Oracle-Self Service Kit : Gimme the details (part 2)
This is the second of two posts getting into more details about the “Oracle Server Self-Service Kit”. It goes through 2 sample uses, to highlight how the solution works and what the outputs are.
Table of content of the full series
- Introduction post
- Overview and scenarios
- Download link
- What you get, and how each deployment type is handled
- Supported versions
- Looking ahead
- Gimme the details (part 1)
- Sample execution #1 : Requesting a new dedicated Oracle database
- Sample execution #2 : Requesting a new schema on a shared environment
- Gimme the details (part 2)– this post
- More details on the Runbooks
- What’s in the VMM Service Template?
- What do I get if I use the Service Manager integration?
- Using the package : Installation and configuration
More details on the Runbooks
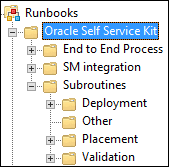
The solution includes 15 Runbooks, classified in different subfolders depending on their roles
- The “SM integration” folder contains Runbooks used to monitor and update Service Manager requests, should you choose to integrate with Service Manager. See more details about these Runbooks in the next section.
- The “End to End Process” contains one Runbook, doing the main routing between Self-Service and the actual placement/deployment/validation/notification. It is either called directly by the “SM integration” Runbooks, or called manually or from another system
- “Placement” subroutines determine where to create databases, schemas or servers. In the solution, these Runbooks return variables, but they have been created as subroutines so you could easily customize them (query a CMDB, lookup a custom table, etc.)
- “Deployment” subroutines handle actual deployment of databases, schemas or servers. They usually copy files, customize response files, execute setup, and delete the response files afterwards
- “Validation” subroutines connect to deployed components and execute Oracle commands like LSNRCTL and SQLPLUS, to gather the output and send them to the requesting user as part of the notification email
- “Other” subroutines include the email notification Runbook (sends email as HTML, see this post from my colleague Jim Britt to customize it further), the logging Runbook (logs in Orchestrator and in a text file controlled by a variable, although you could customize it as needed), and the Desktop Experience Runbook. When deploying new servers, this last Runbook is only executed if the associated variable is set to “True”. It Installs the “Desktop Experience” feature on the operating system, should you wish to access Enterprise Manager locally on that server (EM uses Flash, which requires Desktop Experience on a server). This is not enabled by default, assuming that EM would likely be access remotely.
So, a typical end to end deployment would start with the “SM integration” Runbooks calling the “End to End Proces” Runbook, this one calling the appropriate placement/deployment/validation/notification subroutines.
What’s in the VMM Service Template?
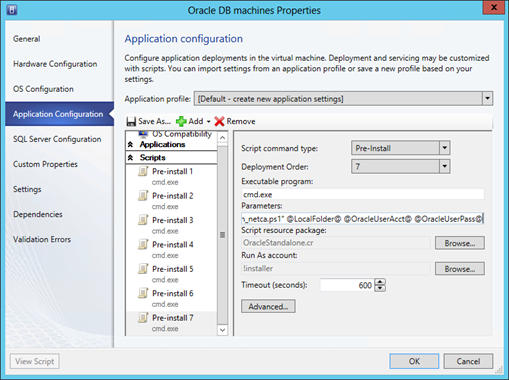
The VMM Service Template deploys a sysprepped Windows Server 2012 machine, and then goes through the different steps to prepare and install Oracle Database 12c (database software only). It has a few Global Settings that are being populated by Orchestrator, either based on user input, or on Orchestrator variables. If you use the Service Template without the Runbooks, you would have to manually enter these parameters at deployment time. As mentioned earlier, note that the Service Template only deploys the database software and runs the Network Configuration Assistant (NETCA). Creation of databases and/or schemas is handled through the Runbooks, providing a flexible approach when deploying a new database or schema on an existing server deployed outside of VMM.
Properties of the single tier in the VMM Service Template
What do I get if I use the Service Manager integration?
When using the Oracle Self-Service Kit, you could just use the Runbooks and template/scripts as the foundation and plumbing for Oracle Database 12c provisioning.
The thinking behind providing the additional management pack for Service Manager was just to showcase the end to end scenarios including a portal, and highlight how you could easily plug another ITSM solution there, depending on the tools and processes in your IT organization. This is why ITSM requests are “monitored” by Orchestrator Runbooks, vs a more classic connector approach from Service Manager to Orchestrator.
Features of the Service Manager Management Pack
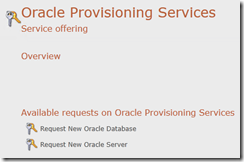
First, the integration adds entries in the Service Manager service catalog, each ITSM process consisting an approval activity and a manual activity. The “manual” activity is the one which will be ultimately automated by Orchestrator.
Then, it also adds a few Runbooks:
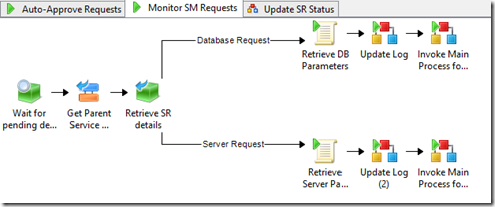
- Auto-approving service requests – requests are only auto-approved if the associated Orchestrator variables are set to “True” (“Service Manager – Auto-approve dedicated requests” and “Service Manager – Auto-approve dedicated requests”)
- Monitoring requests ready to be deployed (after manual or automated approval)
- Updating status in ITSM (if ITSM integration was used)
And the management pack is also able to automatically pass along useful data like the user requesting the new Oracle component, and Runbooks automatically use that information for notifications and logging purposes.
Using the package : Installation and configuration
1. Check prerequisites
- Oracle Database 12c installation files. They should be available on a file share on the network. The path you will configure later in the Orchestrator Global Variables should be the root folder containing SETUP.EXE.
- Windows Server 2012 sysprepped image in the VMM library – which you will be able to map to the virtual hard drive in the VMM service template.
2. Download the ZIP File
In addition to a readme file, the package contains three files and one folder:
3. Virtual Machine Manager (VMM) configuration
- Copy the “Oracle” folder and subfolder (only one subfolder in this version) in your Virtual Machine Manager (VMM) Library, and refresh the library or make sure the library has already refreshed before importing the VMM Service Templates in the next steps
- The scripts and response files located in this custom resource will also be leveraged by Orchestrator Runbooks. As explained later in these configuration steps, it will be important to configure the “Deployment – Network share for scripts” variable in Orchestrator, to point to the share in the VMM library, or another share accessible from the machines where Oracle Database 12c will be deployed.
Note : For initial testing, you should not need to change the content of these scripts, since most of the “dynamic” value would come from Orchestrator variable. Orchestrator sets them as Global Settings when deploying the service template or calling the scripts. If you use the service template without the Runbooks, you can set the VMM global settings manually at deployment time. More details on the VMM Service Template are provided earlier in this post.
That doesn’t mean you will not want to update the Oracle Database 12c response files at some point : The response files provided in this sample solution are still very generic. You will probably want to optimize performance and implement best practices like separating data files and logs, etc. This hasn’t been done in these files, because the actual best option depends on how you will ultimately lay out the virtual hardware for best performance, and also because the first goal was to showcase the automation of deployment.
- Import the VMM Service Template file “Oracle Farm.new.xml” and map the appropriate resources in the wizard, including the RunAs account (need to be a local administrator on the deployed VMs to install Oracle Database 12c), your Windows Server 2012 image, and the custom resource “OracleStandalone.cr” you added to the library in the previous step)
- You will also need to update the VMM Service Template with your network information, the domain name, and the account used to join the domain. Note : If you can change the naming pattern for the VMs, make sure you also update the Orchestrator global variable named “Placement – Dedicated-NoHA-Instance – VM Prefix” as well.
- Finally, after importing the VMM Service Template, you will need to open its properties and update the "OracleUserPass" service setting, to ensure it is configured as "Mandatory" and "Encrypted". If you forget to do so, VMM application scripts will be unable to update the response file with password information, and Oracle Database 12c will fail, resulting in a VM deployment failure.
Note : The Service Template disables the “Smart Screen” feature in Windows Server 2012, to ensure that it can run the installation executables even without any internet connectivity (as will likely be the case on servers in the datacenter). This is achieved as part of the application scripts, by implementing the “disable_ss.reg” file. Should you wish to re-enable the Smart Screen feature as part of the Service Template or afterwards, a similar registry file is provided (“enable_ss.reg”) but not added to the Service Template by default.
4. Orchestrator configuration
- You will need to enable the Orchestrator Runbook Server(s) to act as a “CredSSP” client(s), per this article (look for the part with the cmdlet “Enable-WSManCredSSP”)
Note : You do not need to configure any servers as a “CredSSP” server, since the Runbooks actually do that for you.You could modify the Runbooks to NOT enable the “CredSSP” server option if you prefer to configure or tune it outside of the Oracle Self Service Kit.
- Make sure the Integration Packs for Virtual Machine Manager and Service Manager are installed in Orchestrator
- Import the Runbooks
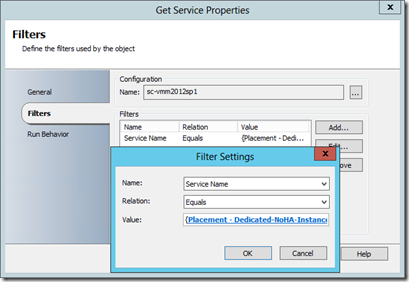
Note : If you need to fill again the properties of the VMM activity used in the “\Subroutines\Deployment\Deploy New Standalone VM with Oracle” Runbook (when changing the connection properties after import), here is how it is setup:
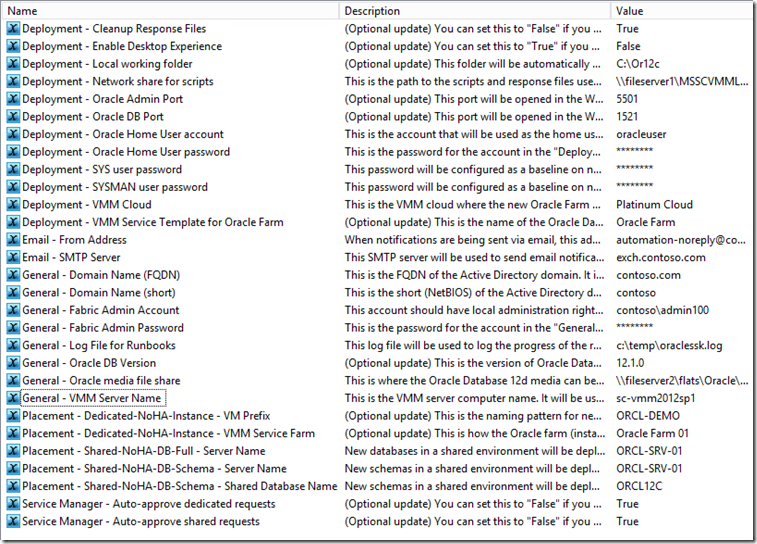
- Update the Global Variables – The description mentions the purpose of the variable, and if updating them is optional or not.
5. (Optional) Service Manager configuration
- Import the management pack
- Customize the approvals, if you plan to use them
- Make sure you start the two monitoring Runbooks in Orchestrator : “Auto-Approve Shared Requests” and “Monitor SM requests”.
