Application Management - Clustering SQL Guest Instances in R2
With the preview release of System Center 2012 R2, there are a few additions to VMM that make clustering with Windows Failover Clustering in guest VMs significantly easier. In this post, I’d like to highlight a few of those improvements as they relate to services.
[October 23, 2013] Update: I’ve put together a sample template and have posted a sequel to this post that covers it, read it here.
Clustering Guests the Old Way
To be clear, Windows Failover Clustering doesn’t really work any differently on a physical host or a VM. As long as your VMs have connectivity to each other and access to shared storage, the process of clustering VMs isn’t any different. The big hurdle with a VM is shared storage.
Previously, it’s been possible to use iSCSI to provide shared storage. The general process required for this is as follows:
- Provision iSCSI target and prepare storage
- Configure target to allow connection from VMs
- Deploy VMs
- On all VMs, configure their initiators for the target
- On one VM, online, partition, and format the drives
- On one VM, create a cluster
- Install any clustered applications
One might imagine that this can be a bit of a headache for repeated deployments of a clustered service. Doing this manually is prone to all sorts of error. It’s perfectly feasible to author a runbook to take care of the first two steps and deploy a service from a template for the remaining steps. Note that the scripts within the service template will need extra logic to discern which commands to run on which VM.
The New, Easier Way
The first new component to discuss is Shared VHDX, which is an easier way to share storage in VMs.
Shared VHDX
Virtual Machine Manager 2012 R2 provides a means to share a single VHDX file across a tier within a service. This means that when the VMs in that tier first boot, all the storage provisioning has been completed and the disk 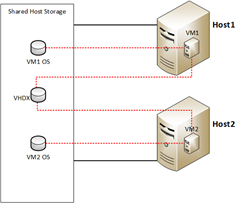 appears to all VMs without any additional configuration. At this point, the first VM can online, partition, and format the disk in preparation for its use as a clustered volume.
Note: The same disk access patterns apply for shared VHDX as for shared storage. That is, simultaneous writes can corrupt data and the disk access must be controlled by some clustering mechanism (for example, Windows Failover Clustering).
There are a few requirements for using shared VHDX within a service template. The service template must be marked as highly-available. The VMs in a highly-available service template can only be deployed to clustered hosts. Also, the disk cannot be an OS disk (sharing OS disks is never supported). It’s also worth mentioning that shared disks can be formatted, and contain data.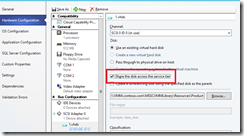
From within service templates in VMM, you’ll find the shared VHDX option within the Hardware Configuration of a machine tier’s properties. A VHDX that is attached to a SCSI adapter can be set to be shared amongst all VMs in that tier. After deployment, the shared disk will appear in all VMs as attached storage just as an additional VHDX should. From here, cluster configuration can begin.
When deploying multiple VHDX images to a machine for clustering (for example a witness disk and a data disk), the same disk image cannot be used within the library. For each VHDX image deployed to the same tier, you’ll need a separate VHDX file in the library. For example, if each VM in a tier had two VHDX disk images that are shared across the tier and an OS image, a total of three disk images will be required in the library (one with the Sysprep’d OS and the other two for cluster).
To simplify some of the logic in cluster configuration, VMM 2012 R2 has provided additional script hooks that can assist with cluster deployment logic. I’ll discuss the four new hooks next.
New Script Hooks
When clustering, there’s usually a need for asymmetric provisioning: treating the first node differently from the remainder of the nodes. Before, this  required complicated script logic. Now, we can simplify efforts by using the new script hooks provided in VMM 2012 R2.
The first new script hook is Creation: First VM. When the first 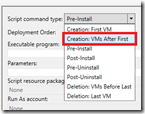 VM in a service tier is created, the specified script will run on this VM and only this VM. All of the operations that are performed once (disk formatting, cluster creation), can be included in this script. Now, subsequent VMs can make simple assumptions about the current state of the environment and simply join the existing cluster.
 For those other VMs, there’s a script hook for those scripts, which is Creation: VMs After First. This script will run on other VMs created and not the first VM.
Now, this fixes the problems with creation and with scaling out, but what about scaling in? Two other hooks were added for this purpose. When scripts are marked Deletion: VMs Before L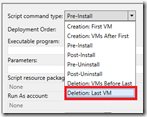 ast, all but the last VM run this script. That is, if you decide to scale-in a tier in a service from two VMs to a single VM, this script will run on the second VM prior to its deletion. Any actions such as removing a node from a cluster can be performed during this operation.
Likewise, a script marked as Deletion: Last VM will run on the last VM when the service is scaled to zero for whatever reason. Using this hook, scripts can perform clean-up operations so that the corresponding Creation: First VM scripts will run as if in a clean environment.
With a combination of shared VHDX and the new script hooks, deploying clustered services is easy.
Obligatory Example
Explanation and conjecture is nice, but nothing speaks for new functionality like a cold, hard demo. As such, I’ve put together a simple example of a clustered service. In this example, we’ll have a two-node guest cluster running SQL installed as a failover cluster instance.
Process
First, we should outline the process of deploying a SQL Failover Cluster Instance on physical machines, and then we can convert it to template logic. The process is as follows
- Configure first server
- Install OS
- Setup roles and features
- Failover Clustering
- Failover Cluster Management Tools
- Failover Clustering Module for Windows PowerShell
- Join server to a domain
- Create a new Windows Failover Cluster
- Partition and format disks in cluster
- Run the SQL installation as a first node in a new failover cluster
- Configure second server (and any subsequent servers)
- Install OS
- Setup roles and features
- Failover Clustering
- Failover Cluster Management Tools
- Failover Clustering Module for Windows PowerShell
- Join server to a domain
- Join existing Windows Failover Cluster
- Run the SQL installation as a new node in an existing failover cluster
One might notice that this fits very well within the confines of the new script hooks. The only steps that differ are italicized and the machines are otherwise identical. To convert this to a service template, we can use a single tier service and take care to specify which scripts run when.
Scripts
Clustering on the First Node
We’ll need two clustering scripts: one to create a cluster and one to join an existing cluster. To create the cluster, we can use the New-Cluster cmdlet. After the cluster has been created, disks may be added to the cluster. This can be done by getting the disks available to the cluster with the Get-ClusterAvailableDisk cmdlet and then piping that into the Add-ClusterDisk cmdlet.
There is one caveat to mention here: cluster disk ordering. Disks don’t necessarily appear to the operating system in the same order as they appear to a Windows Failover Cluster. That is, the PowerShell cmdlet Get-ClusterAvailableDisk may return a disk number 5 as ‘Cluster Disk 1’ and disk number 1 as ‘Cluster Disk 2’. Now, the New-Partition cmdlet expects the drive number as it appears to the operating system (as in the Get-Disk cmdlet). So, if the drives are formatted sequentially, this may correspond to ‘Cluster Disk 1’ being G: and ‘Cluster Disk 2’ being D:, which provides some complication to specifying cluster disk name and drive letter during a SQL installation.
As a possible alternative, consider first bringing online and partitioning the disks without formatting them (this will allow the disks to be detected by the cluster). Next, run the Get-ClusterAvailableDisk cmdlet to get a set of Name/Number pairs. Now, use the Set-Partition cmdlet to assign drive letters. Lastly, you can use the Format-Volume cmdlet, specifying the driver letters. This will provide you with a deterministic ordering to the cluster disk name and driver letter pairs. A script example below should make this clear.
Next, the cluster quorum settings can be set via Set-ClusterQuorum and cluster validation can be run with Test-Cluster. Note that, by default, SQL installation will not proceed on an a cluster that has not been validated. Putting this all together, the cluster script for the first host may look something like this:
| 001 002 003 004 005 006 007 008 009 010 011 012 013 014 015 016 017 018 019 020 021 022 023 024 025 026 027 028 029 030 031 032 033 034 035 036 037 038 039 040 041 042 043 044 045 046 047 048 049 050 051 052 053 054 055 056 | Param($clustername, $clusterIP); function Log($out) { $out = [System.DateTime]::Now.ToString("yyyy.MM.dd hh:mm:ss") + " ---- " + $out; Write-Output "$out"; } if($clusterIP) { Log "Creating cluster $clustername on $env:COMPUTERNAME with IP $clusterIP"; New-Cluster -Name $clustername -Node localhost -StaticAddress $clusterIP | Out-Null; } else { Log "Creating cluster $clustername on $env:COMPUTERNAME using DHCP"; New-Cluster -Name $clustername -Node localhost | Out-Null; } Log "Getting available disks..."; $disks = Get-Disk | ?{$_.FriendlyName -eq "Microsoft Virtual Disk"}; foreach($vol in $disks) { $num = $vol.Number; Log "Starting with drive $num"; Log "Bringing drive online..."; Set-Disk -Number $num -IsOffline $False; Log "Initializing partition table as MBR..."; Initialize-Disk -Number $num -PartitionStyle MBR; Log "Creating single partition..."; New-Partition $num -UseMaximumSize | Out-Null; Log "Done with drive $num"; } $clusterdisks = Get-ClusterAvailableDisk | Select Name,Number; Log "Formatting disks and assigning drive letters..."; $letters = 67..90 | %{[char]$_} | ?{!(Get-PSDrive -Name $_ -ErrorAction SilentlyContinue)}; foreach($disk in $clusterdisks) { $num = [int]($disk.Name -replace 'Cluster Disk ',''); $letter = $letters[$num]; $drivenum = $disk.Number; Log "Formatting Cluster Disk $num (Drive $drivenum) and assigning drive letter $letter..."; Set-Partition $disk.Number -PartitionNumber 1 -NewDriveLetter $letter | Out-Null; Format-Volume -DriveLetter $letter -FileSystem NTFS -Confirm:$False | Out-Null; } Log "Adding disks to cluster..."; Get-ClusterAvailableDisk | Add-ClusterDisk; Log "Assigning witness disk..."; Set-ClusterQuorum -NodeAndDiskMajority 'Cluster Disk 1'; Log "Validating cluster..."; $results = Test-Cluster -WarningAction SilentlyContinue; if(Select-String '<div class=3D"error">' $results) { Log "Cluster Validation errors."; Write-Error "Validation failure. See '$results' for details."; exit -1; } Log "Validation complete." |
The Log function in this script is useful for standardizing log output for troubleshooting template deployment failures. Note that an argument to this script is $clusterIP, which allows for deployment in a static IP environment. VMM is not able to allocate additional IP addresses from a static IP pool for objects like cluster names and SQL cluster names, so these can be supplied as service settings in a service template. At deployment, the static IP can either be manually assigned from the static IP pool in VMM with cmdlets, or pre-allocated and deployed with a runbook. Although it is possible for this script to contain the logic to request an IP address from the VMM server, the script would need the name of the VMM server and there would need to be connectivity to the VMM server from within the VM.
Clustering on the Other Nodes
This is very straightforward. The only thing the other nodes need to do is join an existing cluster. Piping Get-Cluster into Add-ClusterNode is only a single line of code. Very simple, generally. There may be some other considerations, however. For example, DNS propagation delay may cause hiccups to this deployment. You might work around this by adding a block to wait on DNS, and then subsequently wait on the cluster name, for whatever reason. You’ll want to make sure that in doing this, however, you avoid two things: waiting forever or wasting CPU cycles. The solution is to set an appropriate timeout for the script and sleep in between checks. Even adding this, the script is still fairly small:
| 001 002 003 004 005 006 007 008 009 010 011 012 013 014 015 016 017 018 019 020 021 022 | Param($clustername); function Log($out) { $out = [System.DateTime]::Now.ToString("yyyy.MM.dd hh:mm:ss") + " ---- " + $out; Write-Output $out; } while(!$([System.Net.Dns]::GetHostAddresses($clustername))) { Log "Waiting for DNS..."; [System.Threading.Thread]::Sleep(20000); } Log "Adding localhost to $clustername"; Get-Cluster -Name $clustername | Add-ClusterNode -Name localhost; Log "Validating cluster..."; $results = Test-Cluster -WarningAction SilentlyContinue if(Select-String '<div class=3D"error">' $results) { Log "Cluster Validation errors."; Write-Error "Validation failure. See '$results' for details."; exit -1; } Log "Cluster validation complete." |
In some environments, you might consider pre-creating the DNS entries to avoid long delays. Since the drives have already been brought online and formatted, no further action is necessary on the other nodes. Note that the first node has already finished its complete deployment (including the SQL installation) prior to the other nodes running any of their scripts.
SQL Installation Configuration Preparation
Be sure to checkout Bruno Saille’s post for more guidance on provisioning SQL as a service in a System Center stack. I’ll just be covering a simple example as it relates to running SQL in a Windows Failover Cluster. As we will need to be running the SQL installation entirely without user interaction, you might want to read this article about commandline installation of SQL. There are many options and you’ll want to customize your deployment for your environment.
One way to easy the pain of all these options, especially if you’re more familiar with installing SQL with a GUI, is to work your way through the GUI install and then cancel before actually installing. When the SQL installer prepares an installation, it will save a settings file for the configuration and supply its location. I’ll do a quick walkthrough of generating a settings file.
First, start begin th e installation as if creating a new failover cluster, and work through all the steps as usual (you’ll need an existing cluster to pass all the checks to generate the configuration).
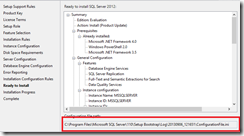
Now, on the final page of the installer before beginning installation, take the given file that is referenced and use that as your configuration. Simple, and painless.
You’ll do the same process for the add node configuration, and everything should be done.
Doing things this way is probably the easiest way to generate a base configuration you can work with.
SQL Installation on the First Node
As the configuration file is already generated, it’s a simple matter of referencing that file when starting the install and providing any additional parameters (user names, passwords, IP addresses). For ease of deployment, you might consider two options for your configuration files.
The first option is to have a partial configuration file INI with all the static components saved within the custom resource. When running the install, this file could be referenced and additional options can be supplied as parameters to the installer.
The second option is to generate the entire configuration from within the script. This may be the most flexible of options, but requires a bit of work to ensure that everything works as expected.
You might come up with other ways to accomplish the task, as well. The key is that all the SQL installation components be on the system during deployment. The easiest way might be to add the SQL installation directory to the OS disk image, and perhaps delete that directory as the last deployment step, if desired. You might also consider pointing to UNC paths for some deployments. The details will, of course, depend on your environment. For this example, I chose to add the SQL installation directory to the OS disk image so I can reference it easily within deployment scripts.
My deployment is using DHCP and a very simple configuration, so I don’t need any special scripts at this point. My INI file looks like this:
[OPTIONS]
ACTION="InstallFailoverCluster"
ENU="True"
QUIET="True"
UpdateEnabled="False"
FEATURES=SQLENGINE,REPLICATION,FULLTEXT,DQ
UpdateSource="MU"
HELP="False"
INDICATEPROGRESS="False"
X86="False"
INSTALLSHAREDDIR="C:\Program Files\Microsoft SQL Server"
INSTALLSHAREDWOWDIR="C:\Program Files (x86)\Microsoft SQL Server"
INSTANCENAME="DEMO"
SQMREPORTING="False"
INSTANCEID="DEMO"
ERRORREPORTING="False"
INSTANCEDIR="C:\Program Files\Microsoft SQL Server"
FAILOVERCLUSTERDISKS="Cluster Disk 2"
FAILOVERCLUSTERGROUP="SQL Server (DEMO)"
FAILOVERCLUSTERIPADDRESSES="IPv4;DHCP;ClusterNetwork1"
FAILOVERCLUSTERNETWORKNAME="SQLCLUSTERDEMO"
COMMFABRICPORT="0"
COMMFABRICNETWORKLEVEL="0"
COMMFABRICENCRYPTION="0"
MATRIXCMBRICKCOMMPORT="0"
FILESTREAMLEVEL="0"
SQLCOLLATION="SQL_Latin1_General_CP1_CI_AS"
INSTALLSQLDATADIR="F:"
SQLUSERDBLOGDIR="F:\MSSQL11.DEMO\MSSQL\Data"
SQLTEMPDBDIR="F:\MSSQL11.DEMO\MSSQL\Data"
SQLTEMPDBLOGDIR="F:\MSSQL11.DEMO\MSSQL\Data"
FTSVCACCOUNT="NT Service\MSSQLFDLauncher$DEMO"
With this, I can simply run
C:\SQL\Setup.exe /ConfigurationFile=first.ini /IAcceptSQLServerLicenseTerms /AGTSVCACCOUNT=@Agent Account@ /AGTSVCPASSWORD=@Agent Password@ /SQLSVCACCOUNT=@SQL Account@ /SQLSVCPASSWORD=@SQL Password@ /SQLSYSADMINACCOUNTS=@SQL Admins@
Now, each of those can be service settings supplied at deployment time. You can see that this is easily customizable for your deployment environment.
SQL Installation on the Other Nodes
The process is similar for other nodes, but the generated configuration INI is a bit different, as the action is different and fewer inputs are needed:
[OPTIONS]
ACTION="AddNode"
ENU="True"
QUIET="True"
UpdateEnabled="False"
UpdateSource="MU"
HELP="False"
INDICATEPROGRESS="False"
X86="False"
INSTANCENAME="DEMO"
SQMREPORTING="False"
FAILOVERCLUSTERGROUP="SQL Server (DEMO)"
CONFIRMIPDEPENDENCYCHANGE="False"
FAILOVERCLUSTERIPADDRESSES="IPv4;DHCP;ClusterNetwork1"
FAILOVERCLUSTERNETWORKNAME="SQLCLUSTERDEMO"
FTSVCACCOUNT="NT Service\MSSQLFDLauncher$DEMO"
We refer to rest.ini instead of first.ini, and the SQL installation is otherwise the same.
Other Considerations
By default, a FCI install of SQL is not allowed on a cluster that has not been validated. Whenever significant cluster configuration changes occur, the cluster validation must run again. As such, cluster validation is run with the addition of each node. However, cluster validation can only be conducted on one node at a time.
More than just this limitation of cluster validation, it’s also important to note that SQL’s AddNode is not supported in parallel. If you write in complicated script logic to handle the cluster validation limitation, you should also handle running the SQL installs in a serial manner.
Because of these two points, and the fact that a tier with three nodes will deploy the second and third nodes in parallel, deployment is almost guaranteed to fail for more than two nodes. As a result, the tier should only be configured to deploy a default of one or two instances. After two instances have been deployed, the tier can be scaled out, one node at a time.
In some environments, a runbook offers great advantages. The runbook can obtain static IP addresses from VMM, pass them as parameters to the template service settings deployment, deploy the first two nodes, and then scale to any number of nodes in the tier in a serial manner.
In other environments, you might consider only using two VMs and scaling in/out as dictated by performance monitoring.
Conclusion
With the new additions in VMM 2012 R2, clustering applications within the guest has been greatly simplified. In this post, I’ve done my best to get you enough information to get started. Note that configuring a SQL cluster as a single tier has implications for simplifying more robust service templates, as well. Templates that include a web application with a SQL backend can now be deployed with a clustered SQL instance that is scalable, independent of the web frontend.