SQL Server Self-Service Kit : Gimme the details (part 2)
This is the second of two posts getting into more details about the “SQL Server Self-Service Kit”.
Table of content of the full series
- Introduction post
- Overview and scenarios
- Download link
- What you get, and how each deployment type is handled
- Supported versions
- Looking ahead
- Gimme the details (part 1)
- Sample execution #1 : Requesting a new dedicated instance without high availability
- Sample execution #2 : Requesting a new highly-available database on a shared environment
- Sample execution #3 : Requesting a “SQL Server-enabled” environment
- Gimme the details (part 2)– this post
- What do I get if I use the Service Manager integration?
- Using the package : Installation and configuration
- Some tips and tricks worth highlighting
What do I get if I use the Service Manager integration?
When using the SQL Server Self-Service Kit, you could just use the Runbooks and template/scripts as the foundation and plumbing for SQL Server provisioning.
The thinking behind providing the additional management pack for Service Manager was just to showcase the end to end scenarios including a portal, and highlight how you could easily plug another ITSM solution there, depending on the tools and processes in your IT organization. This is why ITSM requests are “monitored” by Orchestrator Runbooks, vs a more classic connector approach from Service Manager to Orchestrator.
Features of the Service Manager Management Pack
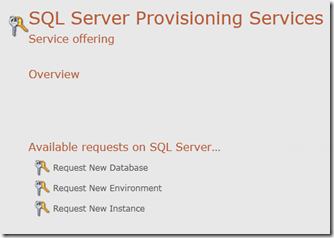
First, the integration adds entries in the Service Manager service catalog, each ITSM process consisting an approval activity and a manual activity. The “manual” activity is the one which will be ultimately automated by Orchestrator.
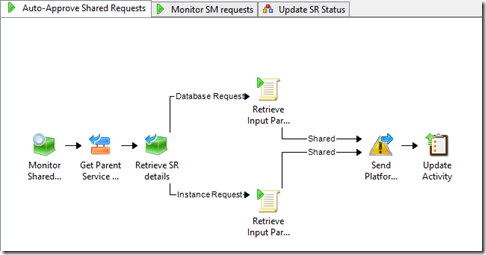
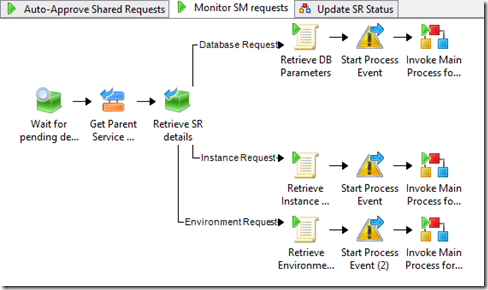
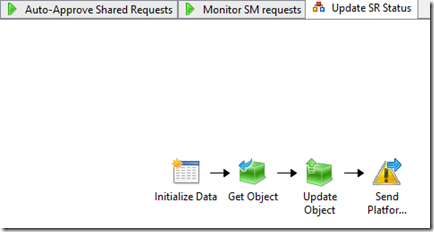
Then, it also adds a few Runbooks:
- Auto-approving “shared” requests
- Monitoring requests ready to be deployed (after manual or automated approval)
- Updating status in ITSM (if ITSM integration was used)
And the management pack is also able to automatically pass along useful data like the user requesting the new SQL Server component, and Runbooks automatically use that information for notifications and DB/instance delegations.
Using the package : Installation and configuration
1. Check prerequisites
- SQL Server 2012 SP1 installation files. They should be available on a shared on the network. The path you will configure later in the Orchestrator Global Variables should be the root folder containing SETUP.EXE.
- Windows Server 2012 sysprepped image in the VMM library – which you will be able to map to the virtual hard drive in the VMM service template. This image should have the .NET Framework 3.5 already installed. If not, you could also edit the VMM Service Template to add the .NET Framework as part of the installation process.
- If you want to leverage the “SQL Server-enabled environment” deployment scenario, you should make sure you download and configure the Service Template Example Kit (STEK) from my colleague Shawn Gibbs.
- When deploying new instances, the Orchestrator Runbook Server service account will need to copy files over the network to the target server. This may require specific firewall exceptions, either in the VM template, or in the way the firewall is being configured through Group Policies when joining the domain.
2. Download the ZIP File
The package contains three files and two folders.
3. Deployment scripts
- Copy the “SQLProvisioning” folder to a share on the network, that can be accessed via the machines acting as the “shared” SQL Server Fabric (standalone servers and/or cluster nodes)
- Update the INI files to suit your account needs (in boldare the only mandatory updates)
- FIRST.INI and REST.INI are used to deploy SQL Server on cluster nodes. In these files, you should look at these properties to ensure they match your needs : AGTSVCACCOUNT, SQLSVCACCOUNT, FTSVCACCOUNT as the accounts used to configure clustered instances ; SQLSYSADMINACCOUNTS as the group which will be assigned SYSADMIN rights on any deployed instance ; INSTALLSHAREDDIR and INSTALLSHAREDWOWDIR if you usually install SQL Server in a different directory. The PID parameter can be set to specify a non-evaluation version. You should not need to touch the instance or disk data as they are passed automatically when running setup, based on the user request
- STANDALONE.INI : you should update these properties as needed : AGTSVCACCOUNT, SQLSVCACCOUNT, FTSVCACCOUNT as the accounts used to configure standalone instances ; SQLSYSADMINACCOUNTS as the group which will be assigned SYSADMIN rights on any deployed instance ; INSTALLSHAREDDIR and INSTALLSHAREDWOWDIR if you usually install SQL Server in a different directory. The PID parameter can be set to specify a non-evaluation version. You should not need to touch the instance data as they are passed automatically when running setup, based on the user request
Note : The SQL Server INI files provided in this sample solution are still very generic. You will probably want to optimize performance and implement best practices like separating data files and logs, etc. This hasn’t been done in these files, because the actual best option depends on how you will ultimately lay out the virtual hardware for best performance, and also because the first goal was to showcase the automation of deployment.
Note : Full reference on the SQL Server unattended files can be found here : https://msdn.microsoft.com/en-us/library/ms144259.aspx
- On any of the machines which will serve as the “Shared” SQL Server Fabric and where you will deploy instances, you should enable CredSSP authentication, using this command in PowerShell : “Enable-WSManCredSSP –Role Server –Force”. This needs to be done on both standalone servers and cluster nodes. This is not needed on “shared” machines where only databases would be created. Note : You will also need to enable the Orchestrator Runbook Servers to act as CredSSP client, per this article : https://blogs.technet.com/b/heyscriptingguy/archive/2012/11/14/enable-powershell-quot-second-hop-quot-functionality-with-credssp.aspx
4. Virtual Machine Manager (VMM) configuration
- Copy the “SQL” folder and subfolder (only one subfolder in this version) in your Virtual Machine Manager (VMM) Library, and refresh the library or make sure the library has already refreshed before importing the VMM Service Templates in the next steps
- Update the files: In “INSTALL.CMD”, you will need to update the path where the SQL Server installation files are located. The “CONFIGURATIONFILE.INI” could be a copy of the “STANDALONE.INI” file from the scripts folder.
- Import the VMM Service Template file “SQL Server Farm.new.xml” and map the appropriate resources in the wizard, including the RunAs account (need to be a local administrator on the deployed VMs to install SQL Server), your Windows Server 2012 image, and the custom resource “SQLStandalone.cr” you added to the library in step 3 as part of the “SQL” folder)
- You may also need to open the designer in the VMM console and update the VMM Service Template with your network information, the domain name, and the account used to join the domain. Note : If you can change the naming pattern for the VMs, make sure you also update the Orchestrator global variable named “Placement – Dedicated-NoHA-Instance – VM Prefix” as well.
5. Orchestrator configuration
- Make sure the Integration Packs for Virtual Machine Manager and Service Manager are installed in Orchestrator
- Import the Runbooks and update the connection information for the Service Manager Runbooks (in the “SQL Server Provisioning\SM integration” folder) and for VMM (in the “SQL Server Provisioning\Subroutines\Deployment\Deploy New Stanalone Server w/SQL” Runbook)
Note : If you need to fill again the properties of the VMM activity used (when changing the connection properties after import), the filter should be set to “Service Name equals {Placement - Dedicated-NoHA-Instance - VMM Service Farm}”, using the corresponding variable. This is the variable set to “SQL Farm 01” by default, as you can see in the next item.
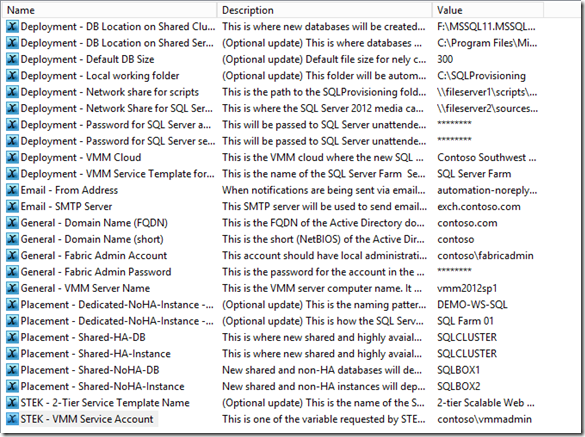
- Update the Global Variables – The description mentions the purpose of the variable, and if updating them is optional or not.
6. (Optional) Service Manager configuration
- Import the management pack
- The review activities are set with dummy test users and this should be changed to something meaningful for you, should you wish to keep approvals. This is done by editing the 3 templates (you can search for "SQL" in the templates view). If you do not change these users, approvals may not work and the request may still remain pending in an approval state.
- Make sure you start the two monitoring Runbooks in Orchestrator : “Auto-Approve Shared Requests” and “Monitor SM requests”.
Known issues
1. The solution has been tested with SQL Server 2012 SP1. Using another version is certainly possible, and you might just have to update the unattended installation switches. This might even apply to SQL Server 2012 (non-SP1).
2. The "Delegate Instance (2)" activity in the bottom branch of the end to end process Runbook has an error : The instance parameter should point to the instance name parameter from the databus (published data from the "Evaluate Deployment" activity), and not to "MSSQLSERVER".
Some tips and tricks worth highlighting
That was already a lot of information! So, instead of going through a boring description of every activity and script from the Runbooks, here are a few highlights of some of the hurdles/tips/tricks maybe worth mentioning, and how they were solved:
- SQL Server unattended vs SQL Server image preparation : Instead of SQL Server imaging capabilities from VMM , unattended files were used in this solution to deploy SQL Server for several reasons:
- The need to potentially deploy a named instance (As of today, sysprepped SQL Server are prepared for a specific instance name that cannot be changed after image preparation)
- Consistency between the different deployments : A similar unattended deployment is used when deploying SQL Server on a new dedicated VM, or on an existing “shared” server
Note : If you only use default instances (MSSQLSERVER), you could simplify the process to use the built-in SQL Server imaging support from VMM, at least for new dedicated VMs
- Handling the side of SQL Server media files : The initial thought was to add these into the VMM library. The drawback in doing back was the time it would take for VMM to create the ISO file when pushing the unattended installation as a script. Having the SQL Server media on the network makes it more flexible in this case.
- Working with cluster disks drive letters : When deploying instances on a shared cluster, the Runbook is trying to find the first available disk in the pool, to use it as shared storage. There was a little trick in finding the attached disk letter, to pass it to SQL Server unattended setup afterwards. Symon’s script was the solution : https://blogs.msdn.com/b/clustering/archive/2009/10/16/9908325.aspx
- Passing instance name data : When deploying the instance on a new dedicated VM, it would have been nice to supply the instance name as a Global Setting in VMM, but unfortunately in our use use, Global Settings are positioned at the tier level and not at the VM/Computer level. So there is logic in the Runbook to pass a file with the instance name, and the VMM script parses the data and passes it to the SQL Server unattended setup
- The PowerShell scripts also show a few interesting scenarios, which could be useful when working with VMM automation in general:
- Use of ”CredSSP” authentication to enable “double hop” to a second machine. For example, this was necessary when launching the new instance installation on a cluster, where some work/checks have to be executed by the first node on the second node.
- Assigning Global Settings values to Service Templates : This was needed when deploying the Service Template Example Kit (STEK), where an IIS website name is asked.
- Deploy or Scale out a Service Template : This is a very classic use case of PowerShell with VMM. There are ways to do it using the activities of the Orchestrator integration pack, but this shows you how to do it in a single PowerShell script.
Also and finally, when testing this multiple times, classic issues you may face could be exhausting your DHCP pools, or hitting the limit on the number of computers your test account or cluster computer account could add to the domain (10 computers by default, unless you give them enough rights in Active Directory, like the “Create Computer Objects” permission).
