MAT (Powered by Project Shift) Part 2 – Networking
Welcome to the next installment of the MAT4Shift blog series. As a reference, the first article is linked up below. In part 2 of this series we are taking a deep dive in to how and why we perform migration of network settings when moving the VMs between platforms.
- MAT (powered by Project Shift) (Part 1)
Introduction, background information, and how to access the project download on TechNet
When we set out to work with the NetApp team on integrating MAT and Shift, the timing was really good. Mark’s experience in working with real world migrations had produced a list of features to be included in a future version of his scripts. The beauty of MAT was that it took a 1-off process and added “command and control” so an admin could manage executing the process many times over in an automated way. The gap, he knew, was that moving from one virtual disk platform to another without permanently effecting the first is only half the battle. He had the process down for discovering each VM configuration and writing it to SQL, and when he took the next step and built out the VM he used that information to make sure memory, number of processors, and other values remained the same. Networking had been out of scope due to the complex (read: very time consuming) nature of the beast.
When we met with Glenn I had in my mind a PowerShell script to collect every networking detail, store it in XML within the VM, and setup a scheduled task that would reconfigure each NIC at next boot. The only concern was that it required some of the newer cmdlets which meant we would introduce a prerequisite inside each VM and that had me worried. I was just about to start up an attempt to reconstruct everything in WMI calls when Glenn had a genius idea. NetSH has a parameter for “dump” that generates a text file with the configurations for every NIC, and another parameter to import configurations from the stored file. Perfect, since that theoretically gave us compatibility back to 1999 (Windows 2000 Server).
I want to party like it’s nineteen ninety… never mind.
That left us with three problems. Happy to say we overcame each.
- NetSH needed the network adapter name to remain the same so it understood how to do the import of settings. We figured out that we could use the MAC Address as an authoritative reference. No problem since both platforms can set that value from the host. Added to script, along with VLAN. Two birds with one stone!
- NetSH doesn’t include DNS client info – an hour on the phone with Glenn looking at MSDN references for WMI and we built that in to the script. Since the script was already doing some heavy lifting, we had at least two unique values per NIC which made it easy to figure out which NIC should be configured with each client config.
- Ghost Adapters - technically we are creating a new device even though the MAC is the same. If you have experience building and rebuilding desktop machines you may have seen the case of “ghost network adapters” as I call it where a NIC is no longer physically present but the OS remembers that it was there and how it was configured. This generates a prompt when you try to give a new adapter the same IP, as the OS is trying to avoid a conflict in the event the missing adapter should someday find its way back in to the machine. We wanted to avoid this. We looked hard at doing a bunch of DLL reflection to try and uninstall the devices before migration. Ultimately, Glenn, again with genius ideas, scripted out switching the NIC to DHCP and renaming it after the configuration dump occurred so we wouldn’t ever see it post-migration.
I believe he was actually on vacation with his family when he first skeleton’ed out that portion of the script. Atta boy!
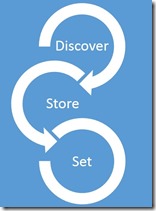
Now that you have a feel for our thought process, let’s look at the three distinct parts of the script and deep dive in to how it works. The process as I describe it is Discover, Store, and Set.
Discover
Digging through the lines of the M4PS (MAT for Project Shift) tech preview, you will notice a couple of things happening in series -
Dump the NIC config to text and eliminate the strange characters at the beginning of the file that prevent a clean import:
001 netsh dump | ?{$_ -notmatch "^\s|#"} | Out-File -FilePath "$env:TEMP\nicConfig.txt" -Encoding ascii Make WMI calls to also write out the DNS information:
001 002 gwmi win32_NetworkAdapter | where { $_.NetConnectionID } | Select-Object -Property Name, MacAddress,NetConnectionID | Export-Clixml -Path "$env:TEMP\nicConfig.xml" gwmi win32_networkadapterconfiguration | ? {$_.IPEnabled -eq "True"} | select MACAddress, DNSDomain, DNSDomainSuffixSearchOrder, DNSServerSearchOrder | Export-Clixml -Path "$ENV:TEMP\nicDNS.xml"
I know there is a bunch of other code there as well. We are working a little bit from the inside out. These above commands need to execute from INSIDE the VM. To make this happen we call a special PowerCLI cmdlet invoke-vmscript that allows the VMware tools to execute code inside the VM from the host as long as you pass administrative creds.
![]() Yeah, let that sit for a minute.
Yeah, let that sit for a minute.
So actually in Discovery, we are also embedding the script needed for Store and Set phases. The code for all three phases is planned out and saved in to a base64 block of characters so everything is passed as cleanly as possible. That is why you see $code where everything that is going to run is saved including a series of commands set to $restorecode, which dives even one step further and encodes the Set phase, on the fly, inside the VM. Network config migration is like an Onion!
Store
So as we start reversing our way out of the spiral, the data has already been stored as the above commands completed. You see the two XML files and the txt file all being written to the TEMP directory.
Once this is complete (remember we are still inside a VMware VM at this point) we need to also Store values that will launch on next reboot that read the data files, and make things happen on the Hyper-V VM. This is preparation for the Set phase. In a normal environment you might use something like PowerShell Remoting to talk to the OS inside the VM but keep in mind, we are actually rebuilding the networking configuration here so trying to look from the outside-in is impossible. There is no way to “talk” until networking is back online.
To accomplish this we harness the power of quantum computing to communicate by storing a message in an alternate dimension. ![]() No actually we use the Registry (yeah compatibility!). If you are familiar with “Run Once” this should look very familiar.
No actually we use the Registry (yeah compatibility!). If you are familiar with “Run Once” this should look very familiar.
001 002 003 004 005 006 007 008 009 010 $WinAccount,$winPassword,$WinDomain = Get-Content "$env:TEMP\nicCreds.txt" Remove-Item "$env:TEMP\nicCreds.txt" $RunOnceKey = "HKLM:\Software\Microsoft\Windows\CurrentVersion\RunOnce" $WinLogonKey ="HKLM:\Software\Microsoft\Windows NT\CurrentVersion\Winlogon" set-itemproperty $RunOnceKey "ConfigureServer" "$env:TEMP\nicRestore.cmd" set-itemproperty $WinLogonKey "DefaultUserName" $WinAccount set-itemproperty $WinLogonKey "DefaultPassword" $WinPassword set-itemproperty $WinLogonKey "AutoAdminLogon" "1" set-itemproperty $WinLogonKey "AutoLogonCount" "2" set-itemproperty $WinLogonKey "DefaultDomainName" $WinDomain
One last thing before we can make the flip! I mentioned Glenn found a way to avoid the IP conflicts across the old and new NICs. See this series of commands where he finds NICs with static IPs, sets them to DHCP, and the then renames all the NICs to their original name plus “_VMware”.
001 002 003 004 005 gwmi win32_NetworkAdapterConfiguration | ? {! $_.DHCPEnabled -and $_.IPAddress } | %{ $_.EnableDHCP() } $NetworkConnections = (New-Object -com shell.application).Namespace(0x31) Foreach ($NIC in (gwmi win32_NetworkAdapter | where { $_.NetConnectionID }|Select-Object -ExpandProperty NetConnectionID)) { $NetworkConnections.Items() |Where-Object {$_.Name -eq $NIC} |ForEach-Object { $_.Name="$($_.Name)_VMware"} }
 Remember, everything up to this point is still happening inside the VMware VM! The script is like a special operations team that has to be able to operate on its own with no outside communication until its mission is complete.
Set
As the Set phase launches we are on our way home. The environment is still inside the VM and operating without being able to talk to the outside, but we are now on Hyper-V. As the VM boots up, the RunOnce reg key is going to cause the OS to auto-logon and restore the configuration. This is the series of commands that was obfuscated on the fly when the RunOnce key was set so that again, everything stays clean.
As we read through the lines below –
There is a period of waiting for things to stabilize (after all the VM just booted up on a different platform).
001 Start-Sleep -Seconds 30;$na = (New-Object -com shell.application).Namespace(0x31) Next the VM names are set and the DNS and NetSH data is imported.
001 002 003 004 Foreach ($n in (Import-Clixml -Path "$env:TEMP\nicConfig.xml")){$na.Items()|?{$_.Name -eq $(gwmi win32_networkadapter -F "MACAddress='$($N.MACAddress)'").NetConnectionID}|%{ $_.Name="$($_.Name)_old" }} Foreach ($n in (Import-Clixml -Path "$env:TEMP\nicConfig.xml")){$na.Items()|?{$_.Name -eq $(gwmi win32_networkadapter -F "MACAddress='$($N.MACAddress)'").NetConnectionID}|%{ $_.Name=$n.NetConnectionID }} Foreach ($n in (Import-Clixml -Path "$env:TEMP\nicDNS.xml")){([wmiclass]'Win32_NetworkAdapterConfiguration').SetDNSSuffixSearchOrder($n.DNSDomainSuffixSearchOrder);gwmi win32_networkadapterconfiguration -F "MACAddress='$($N.MACAddress)'" |%{$_.SetDNSServerSearchOrder($n.DNSServerSearchOrder);$_.SetDNSDomain($n.DNSDomain)}} netsh -f "$env:TEMP\nicConfig.txt" The process finishes with a shutdown so the VM is not left in a logged on state.
001 C:\Windows\system32\shutdown.exe -s -t 5 -f
Summary
Before I’m done I want to quickly say thanks to Mark and Glenn for including me in this work, and thanks to Mark for the incredibly complimentary introduction in post 1. It was a lot of fun to work with these guys. Picture three PowerShell geeks  sitting around a conference table talking out issues and scripting solutions just as fast as the problems could be uncovered, that was us. Even better was to see the fruits of our labor as we kept throwing more and larger VM’s at the process to try and break it. Not only would it never blink, it would keep up with us to the point we needed to optimize our script process else those seconds actually felt like a long time. As it turned out, one of the slowest parts of the process was removing the VMware tools. We came to refer to that process as the “claw hammer” at work.
For more information check out Mark’s post or download MAT4Shift in the TechNet Gallery:
https://gallery.technet.microsoft.com/MAT-powered-by-Shift-343f242d


