Linux operating system deployment and customization with System Center in a VMware environment
If you ever doubted how much heterogeneity you can manage using System Center, this post should help change your mind!
I’m Bruno Saille, Program Manager within the Customer Architecture & Technologies (CAT) team here at Microsoft and this is my first post in the Building Clouds team blog.
This blog post will cover a specific scenario spanning technologies and protocols like VMware, Linux, SFTP, SSH, all automated through System Center 2012 Orchestrator and integrated with System Center 2012 Virtual Machine Manager. It will also highlight a few tips/tricks implemented in the Orchestrator runbooks, and that you may find useful in other situations as well.
The scenario
Let’s say you are running a virtualized environment on VMware today. Regardless if you are also looking at Hyper-V at this stage (and you should, with the latest and upcoming enhancements!), you may be interested in augmenting VMware capabilities through System Center management. We’re talking about features like cloud application-centric management, deep application insight, rich automation, creation and delegation, service templates, etc. To that extent, a great feature from System Center 2012 is the ability for the Virtual Machine Manager (VMM) component to manage your ESX hosts and deploy/customize Windows virtual machines and services. However, while VMM can manage Linux VMs running on ESX, its Linux "OS specialization" capabilities (changing host name, etc,) are only available today for Hyper-V hosts. In this post, we will explain how you can use System Center to deploy Linux virtual machines on VMware, customize the VMs and add applications.
The solution
This sample solution consists of runbooks that achieve the following set of actions:
- Deploy a VM using VMware’s PowerCLI PowerShell cmdlets. The IP used can be DHCP, fixed IP, or can also come from a VMM IP address pool, effectively providing a single pane of glass for IP address management for Windows and Linux through VMM
- Once the machine is up and running and customization has finished, packages are copied over through SFTP using WinSCP, and executed/validated using SSH commands
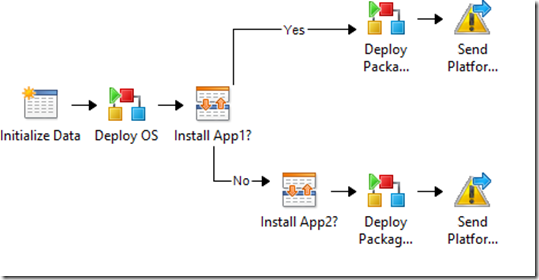
There is a main process runbook handling the end to end execution, and calling subroutines for #1 and #2.
Main process runbook
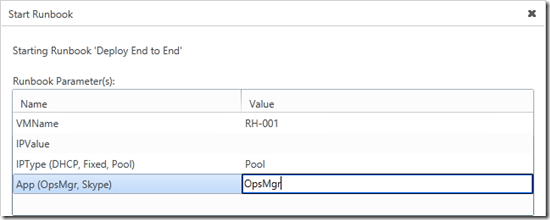
Input parameters for main process runbook
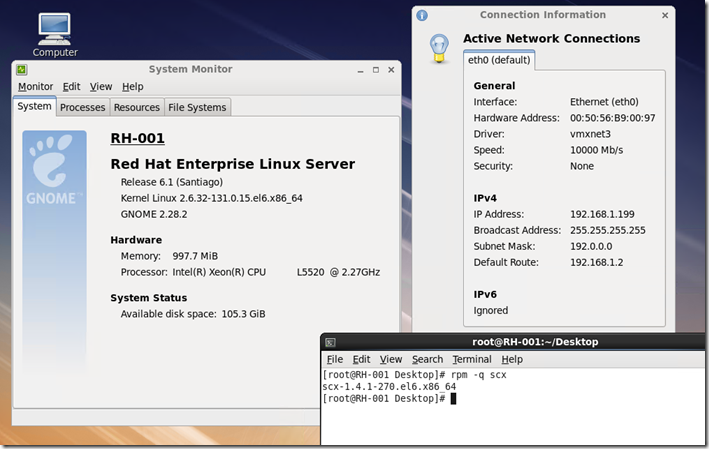
Result in a Red Hat virtual machine
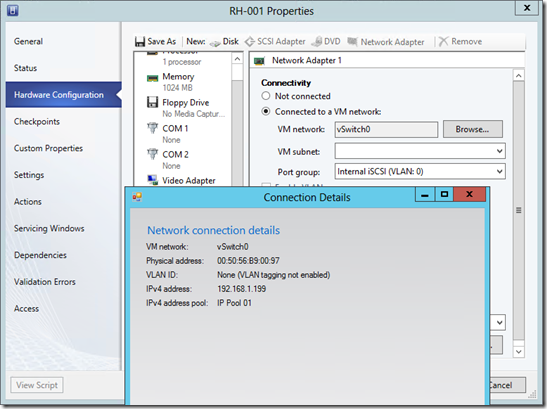
Resulting VM properties in VMM (when using IP addressing using VMM pools)
When it comes to surfacing these runbooks in self-service portals, there are multiple options. One of them being System Center 2012 Service Manager. That way, you can provide a single pane of glass to provision Windows and Linux VMs. The Windows VM provisioning process would be calling the Cloud Services Process Pack (CSPP) runbooks. All these VMs will be managed in System Center 2012 Virtual Machine Manager and in System Center 2012 App Controller.
You could also “just” use these to learn how to work with protocols like SCP and SSH with Orchestrator. This is why the solution is called the Linux Orchestration and Customization Kit (LOCK)
The next section explains in more detail how the sample solution works. How to import/configure the runbooks is explained further down in this post.
Detailed overview and tips/tricks along the way
“Deploy End to end” main process runbook
This runbook takes the following parameters:
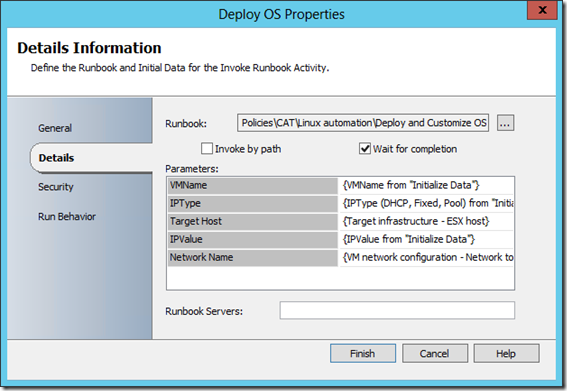
It calls the “Deploy and Customize OS” subroutine with these parameters
Note: The network name for the VM is in a variable in this example – in production this would probably be an input parameter when creating the VM
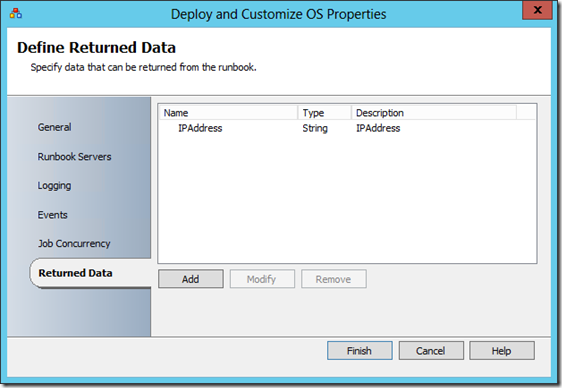
This first subroutine returns the IP address of the VM that was created:
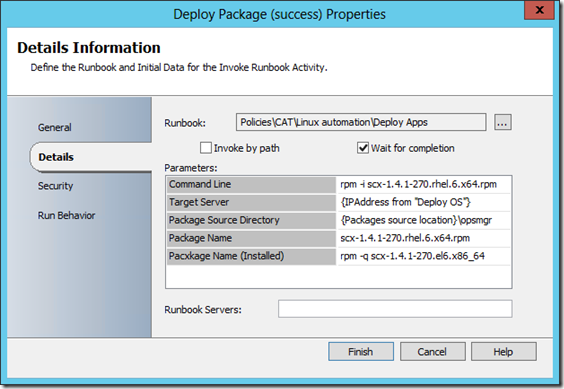
The main process runbook then calls the “Deploy Apps” subroutine with the right parameters based on the application chosen (this example is with the System Center 2012 Operations Manager RPM package – see below for more details on application installations)
“OS Deployment and Customization” subroutine
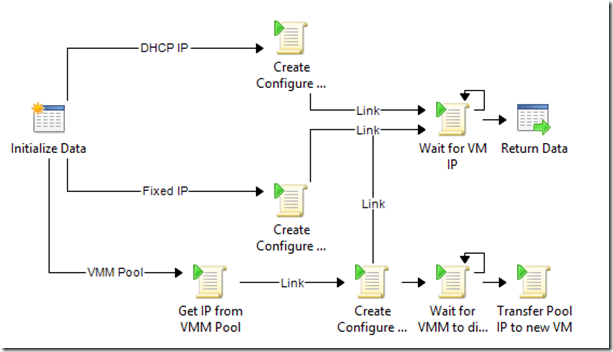
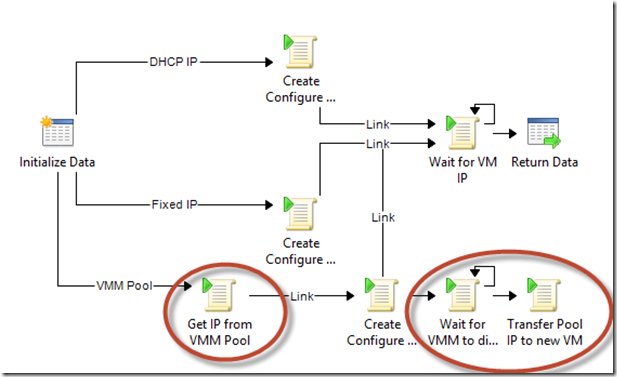
OS deployment and customization subroutine
This runbook creates the VM through PowerCLI. The OS Customization template is created on the fly in all three modes (Static IP, VMM pool).
In all three branches, the runbook then waits for the VM to be up before exiting. This serves two purposes: 1/ Make sure the VM is fully up and running and ready to receive file copies, and SSH commands 2/ Retrieve the IP address through PowerCLI. This is especially useful in the DHCP scenario, where we do not know which IP was assigned…!
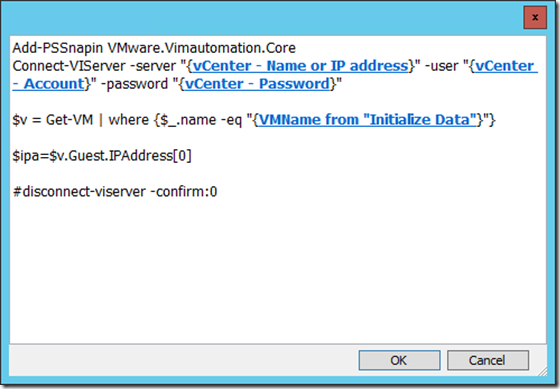
<Tip #1> The “Wait for VM” activity has a few interesting features.
The script within is just querying PowerCLI in a loop, to try to retrieve the IP address:
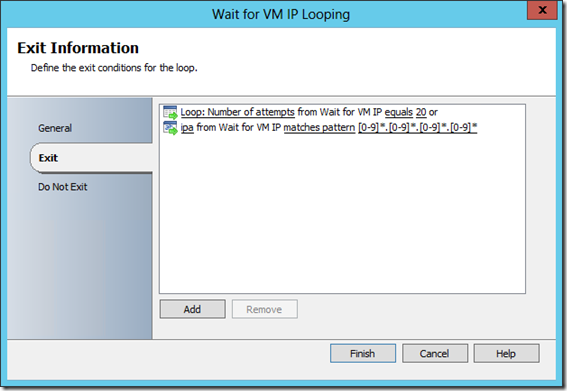
But the exit condition uses a pattern to ensure that not only an IP was returned, but an IPv4 address:
This was added because there seems to be a small time window where a Linux VM could receive the IPv6 first. Adding that pattern in the loop ensure that we wait for an actual IPv4 address before proceeding to applications install. If you use IPv6, you might want to tune this differently.
</Tip #1>
Notice the last branch at the bottom: The runbook enables you to use VMM pools as a single pane of glass for IP addressing (Remember, this is done out of the box with Windows VMs on ESX, and Windows/Linux VMs on Hyper-V). The trick is that IP addresses cannot be “reserved” in the pool, they have to be assigned to an existing object. To work around this, we’re assigning a new IP to a “dummy VM” to mimic IP reservation. And then, after VM creation in PowerCLI, the runbook just waits for VMM to discover the new VM from vCenter, and transfers the IP address assignment from the dummy VM to the actual new VM.
Note : To work with VMM, the scripts use PowerShell remoting. You could update this subroutine to use the “Run VMM script” activity from Powershell if you prefer. Also, if you adapt the scripts to your environment and end up having to work with multiple output from PowerShell, make sure you look at Charles Joy’s post here .
As part of this “OS Deployment and Customization” subroutine, you could also run LVM scripts if needed, since it is just a matter of running SSH scripts. For example, adding a drive in a VM would consist of adding a virtual disk through PowerCLI, and then scanning the disk and configuring them via SSH.
“Deploy Apps” subroutine
At this stage when entering the second subroutine, the VM is up and running, and we want to deploy an application. The sample runbooks described in this post deploy only one application on each VM, using a keyword. One keyword leads to an installation success, and another usually leads to a failure based on missing package dependencies (the goal being to showcase how the runbooks surface both situations)
- Keyword “OpsMgr” means the runbook will try to deploy the Operations Manager agent on the Linux box – and it should install successfully.
- Keyword “Skype” means the runbook will try Skype – and on a RedHat 6.1 x64, this should fail on missing dependencies
Note: It would be easy to change the application installation process to rely on a list of applications or, even better, query a CMDB like System Center 2012 Service Manager to retrieve list of applications and their installation properties (source location, installation command line, etc.). You could also Leverage System Center 2012 Configuration Manager as the technology to push applications after the Linux machine has been deployed and customized. Configuration Manager supports several UNIX and Linux flavors .
Application deployment consists of copying the files to the remote box, executing the installation command line, and validating installation was successful.
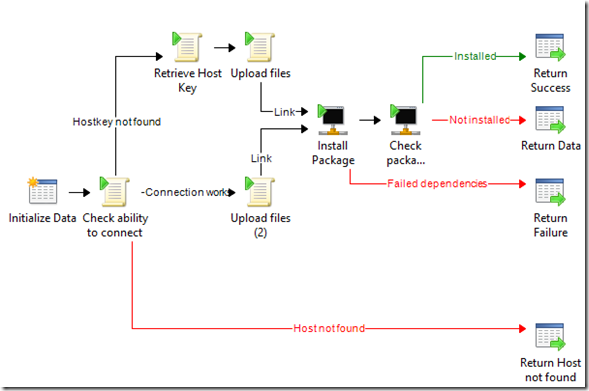
Applications copy and installation subroutine
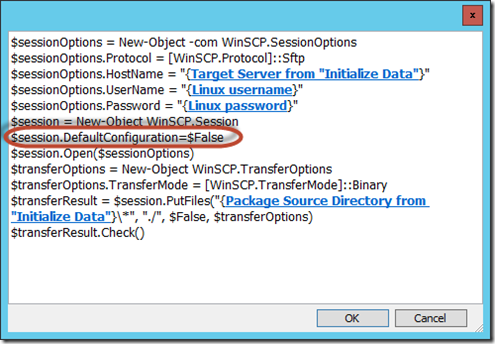
The file copy uses WinSCP and the SFTP protocol, and happens in the “Upload Files” activities in the previous screenshot.
Note: This file copy phase could also be modified to mount a CIFS share, but WinSCP being a familiar tool on Linux, made sense in this example.
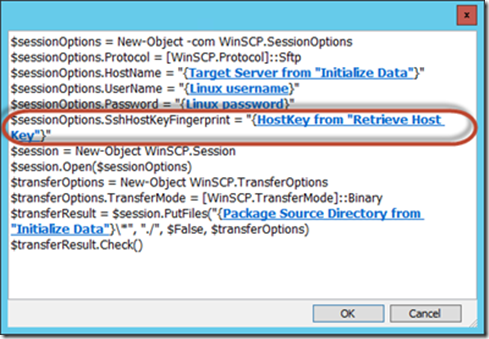
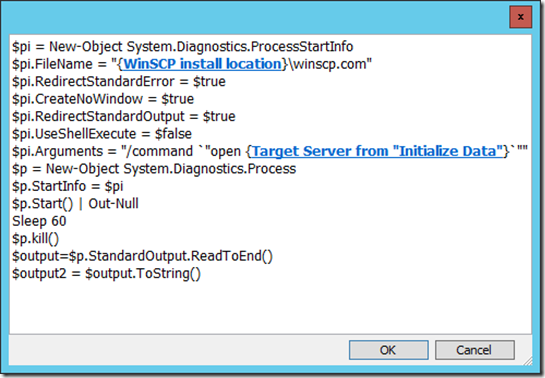
The tricky part is connecting with WinSCP. It requires a “hostkey” specific to the target host, for security purposes. The “Check ability to connect” activity is there to try a WinSCP connection, and the runbook analyzes the standard output to see if the host key is already in the cache or not, or if the host does not reply.
- When the host key is not found in the cache, WinSCP output actually provides the key, so the top branch is actually able to parse the output, retrieve the host key, and use it in the “Upload Files” activity.
- If the host key is found in the cache, we can move forward with the copy. There is just a slight difference in the automation script calling WinSCP, to tell it to use the cached key.
<Tip #2> The “Check ability to connect” activity shows how to automate a command line application and pass the standard output to the databus.
You might wonder why the two options below were not used to achieve this, and here is why:
- Using a “Run Program” activity: When you run WinSCP interactively, you might notice that WinSCP sits on its own prompt after trying to connect to the server. Depending on the situation, it could be waiting to add the key to the cache, or for the username. You *could* add a timeout to a “Run Program” activity and it would work, but then the activity would exit with a “warning” status, and your runbook will also have a “warning” status. So the drawback is either a cosmetic or a management one, depending on how you track runbook success and failure.
- Using PowerShell’s Start-Process method: That option would be a way to avoid the “warning” status issue, but proves more difficult to work with in this case, since WinSCP has its own prompt.
</Tip #2>
The rest of this subroutine uses SSH to actually install and validate installation of the chosen package.
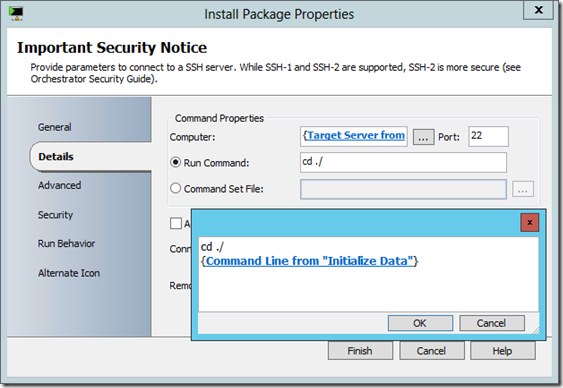
<Tip #3> Even without using a .SH file, the “Run SSH Command” standard activity is able to run multiple commands in a single activity. Like many fields in the Orchestrator runbook designer, you can expand the command window and add multiple lines
</Tip #3>
How to import and configure the runbooks
- Check Prerequisites in your environment:
- Ensure you have a working Linux template in vCenter.
- Download and install WinSCP on the Orchestrator server. You should install the executable, but also automation components (1st and 3rd downloads on this page).
- Have some RPM packages handy for testing. The sample runbooks are configured with two packages, to showcase success and failure on a RedHat 6.1 x64 server.
- The Operations Manager agent should install successfully.
- The Skype package should likely fail, based on missing dependencies
- (If you want to use the same two packages to test the runbooks, names of the files needed for each of them can be found in the main process runbook, when calling the applications subroutine)
- Optional requirement : If you plan to use VMM IP address pools for IP addressing, you need to pre-create this pool in VMM (it can be an existing pool)
- Import the runbooks (download link is : https://gallery.technet.microsoft.com/Linux-Automation-Example-3002ef6e)
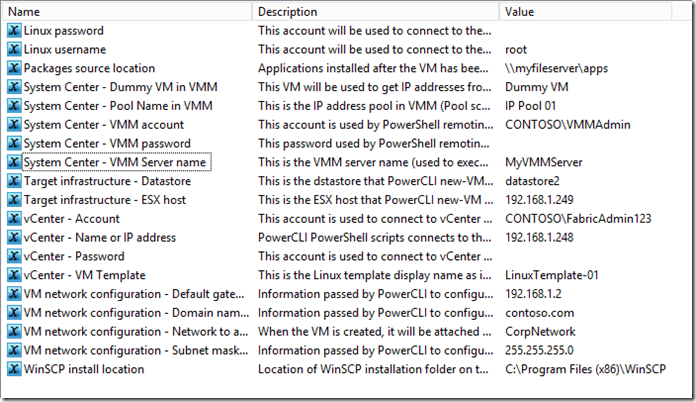
- Configure the Orchestrator variables to match your environment
-
- If the service account for your Orchestrator runbook service has rights into VMM, you may not need to specify the “System Center – VMM account” and “System Center - VMM password” variable, and could edit these three activities in the “Pool” branch of the OS deployment and customization subroutine, to not use these credentials in PowerShell remoting.
You should then be ready to test the runbooks using the System Center 2012 Orchestrator web console, and once you are satisfied with them you could expose them into a portal of your choice, like System Center 2012 Service Manager.
Wrap-up and benefits
In a classic production situation where a self-service portal is being used to request virtual environments, this solution helps provide:
- A single pane of glass for requests (Runbooks instantiated by the portal can call VMM for Windows VM and can call PowerCLI for VMware VMs)
- A single pane of glass for IP management (the Runbooks in the solution can use VMM IP pools to assign IP to the VMware VM deployed through PowerCLI)
- A single pane of glass for service “consumption” (All VM, whether deployed through VMM or through the Runbooks, are surfaced into VMM eventually, and can be viewed and stopped/started/etc. in user portals/interfaces)
Note : As an alternative, you could also rely on the capability to deploy a Linux VMDK through VMM (without OS specialization), and have custom Runbooks to change IP, name, etc. This is probably more of an option if there is only one specific Linux distribution, otherwise the approach from this blog post is more generic (it could apply to multiple distributions, as it offloads the OS specialization to vCenter). Both options are possible depending on your requirements.
As always, this is a sample and there are variations you could make to adapt and optimize it for your own environment. In production, this would also require more error handling, and further componentization as the solution expands.
Thank you for reading this post! Hopefully you learned a few tips and tricks along the way, as well as how to achieve a specific scenario that is not fully covered out of the box with System Center.
