Application Management - Creating the DotNetNuke® Community version Service Template
Today I’ll go through the process I used to create a new service template example for the content management software known as DotNetNuke®. I will show the steps required to create a Service Template using the STEK examples and I will discuss some interesting out of band challenges with some alternatives to work around. To start with I’m using the working deployable example templates, STEK, from my earlier blog post here. These are based around some of the advanced concepts built into System Center Virtual Machine Manager 2012 SP1. For a better understanding of Service Templates in general I would suggest starting with the Technet Library info by clicking here.
Download the scripts and basic template here. Note: This does not include the DotNetNuke® files. You will have to download and convert into a web deploy package following these instructions.
HOW
The process we will follow is fairly simple and similar to what one would do in any process you wish to automate. We will use an existing blank lab service deployed from STEK and manually modify it to run the DotNetNuke® application while creating scripts to automate any changes that we require to run configure the systems and the application so we can recreate those changes in the completed service.
Basic Steps to create:
1. Deploy base template from STEK matching the required architecture of the application to the correct STEK template. In our case 2-Tier Scalable which includes SQL.
2. Install the web application and any required SQL databases
a. Make note of required changes that can be scripted like populating the DB and creating users and file permissions on the application folders.
3. Extract the applications into a WEBDEPLOY package and a DACPAC for SQL
4. Move the scripts created in 2.a and application packages in 3 to the VMM library
5. Create a copy of the 2 Tier STEK template and now use the library of scripts and packages (artifacts) that we created above to complete a fully deployable on demand Service Template.
Step 1 – Deploy base template to work from
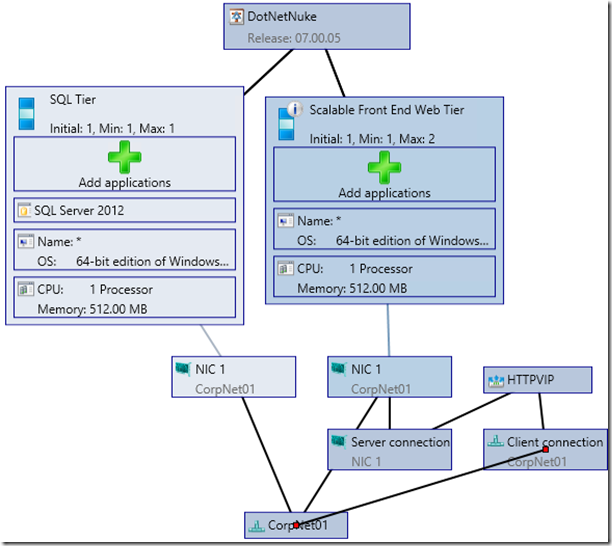
In the first step we need an environment to build and test DotNetNuke® or whatever web application we are choosing to use. Since we do not have all the application artifacts we need, we will deploy it once and capture what we do. I am starting with a copy of the ‘2-tier Scalable with SQL’ template by right clicking on it and selecting ‘Copy’. I then modify the name and version to suit my needs. In this case rename the copy to DotNetNuke® and I am using version 07.00.05 of the community edition of DotNetNuke® CMS.
I need to make a couple of changes before I deploy the blank 2 tier service. I first need to allow a SQL Exception through the firewall of the SQL server and I also want to enable Remote access to the server so I and other users can RDP into the VM’s. For my example here I will simply disable the firewall and enable remote access via a unattend.xml file that I will copy to the VMM library and then using the Service Template configuration I’ll attach the unattend.xml file to each node in the template.
Example of my Unattend.xml file that disables the firewall and enables remote access:
1: <?xml version="1.0" encoding="utf-8"?>
2: <unattend xmlns="urn:schemas-microsoft-com:unattend">
3: <settings pass="specialize">
4: <component name="Networking-MPSSVC-Svc" processorArchitecture="amd64" publicKeyToken="31bf3856ad364e35" language="neutral" versionScope="nonSxS" xmlns:wcm="https://schemas.microsoft.com/WMIConfig/2002/State" xmlns:xsi="https://www.w3.org/2001/XMLSchema-instance">
5: <DomainProfile_EnableFirewall>false</DomainProfile_EnableFirewall>
6: <PrivateProfile_EnableFirewall>false</PrivateProfile_EnableFirewall>
7: <PublicProfile_EnableFirewall>false</PublicProfile_EnableFirewall>
8: </component>
9: <component name="Microsoft-Windows-TerminalServices-LocalSessionManager" processorArchitecture="amd64" publicKeyToken="31bf3856ad364e35" language="neutral" versionScope="nonSxS" xmlns:wcm="https://schemas.microsoft.com/WMIConfig/2002/State" xmlns:xsi="https://www.w3.org/2001/XMLSchema-instance">
10: <fDenyTSConnections>false</fDenyTSConnections>
11: </component>
12: </settings>
13: <settings pass="oobeSystem">
14: <component name="Microsoft-Windows-Shell-Setup" processorArchitecture="amd64" publicKeyToken="31bf3856ad364e35" language="neutral" versionScope="nonSxS" xmlns:wcm="https://schemas.microsoft.com/WMIConfig/2002/State" xmlns:xsi="https://www.w3.org/2001/XMLSchema-instance">
15: <OOBE>
16: <HideEULAPage>true</HideEULAPage>
17: <SkipMachineOOBE>true</SkipMachineOOBE>
18: </OOBE>
19: </component>
20: </settings>
21: </unattend>
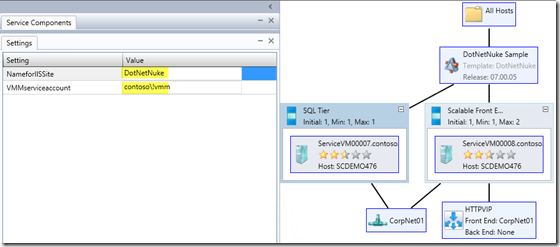
I then deploy the 2-tier blank service. During deployment I change the @NameforIISSite@ and @VMMserviceaccount@ parameters to suit my needs. My VMM service runs under the contoso\!vmm service account and I want the IIS web site and APP Pool to be named DotNetNuke. Remember from the earlier post that a scalable service using NLB needs the VMM Service account to finish setting up NLB. This is the account that the VMM management server runs under, not the agent.
Step 2 – Install DotNetNuke and configuring
Once we have the service up and running with a single Web tier and single SQL tier we can copy the extracted files from the uncompressed DotNetNuke® download folder the new web tier server into the directory created by the service deployment scripts and named after the @NameforIISSite@ parameter. In my case it’s C:\inetpub\wwwroot\DotNetNuke
From here we have some have a choice to make. Most web sites use a database and in most cases there is a connection string that is stored in the config or code that points to the correct databases but also include permissions. For DotNetNuke® purposes do we want to use integrated security using Windows Auth into SQL or SQL security, either way both require some work. For this template we’ll choose integrated which requires adding a service account to AD and making the app pool run under that account as well as adding that account to SQL for access to the DB. To add a user to AD we will use a PowerShell script which we will run now in the web tier and also save as a custom script for the service template. It’s beyond the scope of this blog entry to deep dive into the scripts and/or best practices in scripting. Feel free to comment with your updates and changes you use and any other options you find work better. For this script keep in mind I don’t want to copy AD Modules to each VM in every service I deploy or use remote sessions so this is what I ended up with.
 # Purpose: Add user to AD
# Arguments: [Domain in LDAP Format] [User to add] [Password for user]
# Example: ./AddUserToAD.ps1 "ou=Services,ou=HQ,dc=Contoso,dc=com" "DotNetNuke" "Pass@word1"
#
$ScriptName = $MyInvocation.MyCommand.Name

$OU = $args[0]
$userName = $args[1]
$Password = $args[2]

if (!$args.Count -eq 3)
 {…} # Displays instractions if no arguments added

try{

$TargetOU = [ADSI]"LDAP://$OU"

if(![ADSI]::Exists("LDAP://cn=$userName,$OU")) {

    $obj = $Group.Create("user", "cn=$userName")
    $obj.Put(“sAMAccountname”,$userName)

    $obj.setinfo()

    $User = $Group.psbase.Children.Find("cn=$userName")
    $User.psbase.Invoke("SetPassword", $Password)
    $User.psbase.InvokeSet('Accountdisabled', $false)
    $User.psbase.CommitChanges()

} else {
    $EventLog = New-Object System.Diagnostics.EventLog('Application')
    $EventLog.MachineName = "."
    $EventLog.Source = "AddUserToAD Script"
    $EventLog.WriteEntry("Script did not complete. User already exist.","Warning", "1000")
    }
}catch [Exception]{
    $EventLog = New-Object System.Diagnostics.EventLog('Application')
    $EventLog.MachineName = "."
    $EventLog.Source = "AddUserToAD Script"
    $EventLog.WriteEntry("Script failed. The error message: $_.Exception.Message","Error", "1000")
}
Run : cmd.exe /c %SYSTEMROOT%\system32\windowspowershell\v1.0\powershell.exe -noprofile -file ./AddUserToAD.ps1 "ou=Services,ou=HQ,dc=Contoso,dc=com" "DotNetNuke" "Password1”
Once we run the PowerShell we should end up with a service account under our OU HQ\Services and now we run some command line to modify the AppPool to run under the new service account. We already created a new AppPool named after the @NameforIISSite@ parameter we entered in the deployment via a script in STEK, so that will be the same parameter we will use for this command when converted to a script. We’ll also share service account name and password for the following script when we turn those into parameters as well.
(Note: the following can be found in the Mod_AppPool.cmd file in the download)
%windir%\system32\inetsrv\appcmd set config /section:applicationPools /[name= 'AppPool Name' ].processModel.identityType:SpecificUser /[name= 'AppPool Name' ].processModel.userName:ServiceAccount /[name= 'AppPool Name' ].processModel.password:Password
Let’s also grant the newly created user the proper access to the c:\inetpub\wwwroot\DotNetNuke folder. We do this using a script that is part of the standard set from STEK called Mod_Folder_Permissions.cmd. Note: the folder we want to change permission on was created by STEK’s standard scripts and used the variable we entered during deployment for @NameforIISSite@, where ‘c:\inetpub\wwwroot\’ is hard coded in script. The resulting command is:
(Note: change ‘everyone’ to the app pool identity before deploying a production template)
cacls c:\inetpub\wwwroot\dotnetnuke/t /e /g everyone:f
Before moving on we will use the SQL Enterprise Management Console to create the DB called DotNetNuke and give the new service account created above db_owner access to it. (Note: SQL scripts are already included to create the database but you could also run DotNetNuke for the first time and it has an excellent process to test and then install the database process)
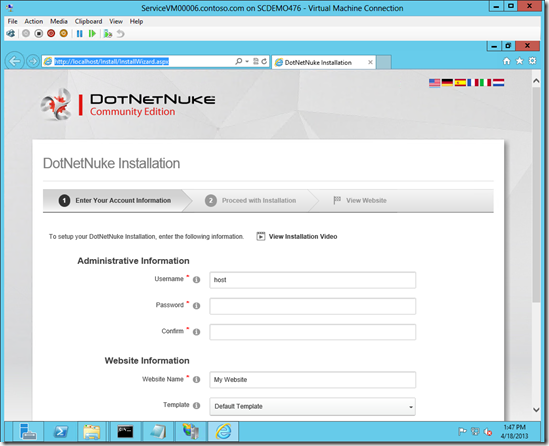
To use DotNetNuke to install its own database, as well as make a few other changes required for the first time use just browse https://localhost/ on the DotNetNuke web UI server.
If installing the database manually using the supplied scripts (in the downloaded files from DotNetNuke®) we need to modify the web.config file of the DotNetNuke® application, located in the root directory of what we copied over to the server. There are 2 locations we need to change connection strings to point to our SQL server and use Integrated Security.
Note: Here we are uncommenting the correct line and commenting out the SQL Express line then changing the server name to trusted connection properties. We also could assign the SQL server a name in advance of deployment or as a parameter in the deployment process and populate it here. We will discuss in a second post related to challenges in Service Template’d web applications.
Step 3 – Creating the WebDeploy package and DacPac
At this point you should have a working version of DotNetNuke®. The install page would have asked for database server name and also a password for DotNetNuke® administrator which is stored in the database. We now need to extract the web application as a web deploy package and the database as a DacPac and store them in the VMM library.
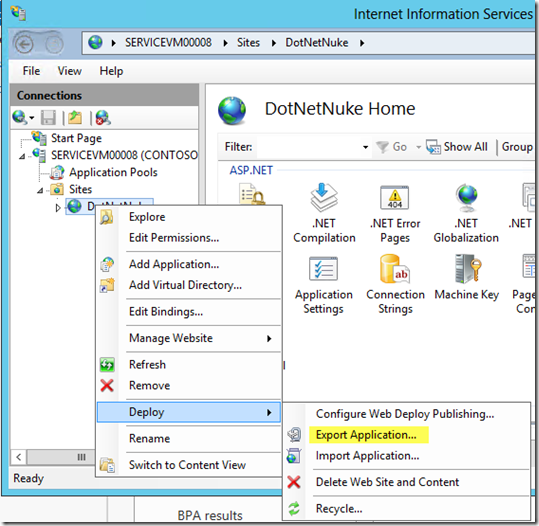
Log into the web server VM of the service template that we created DotNetNuke® on and open the IIS management console. Accept all the defaults and create a webdeploy package.
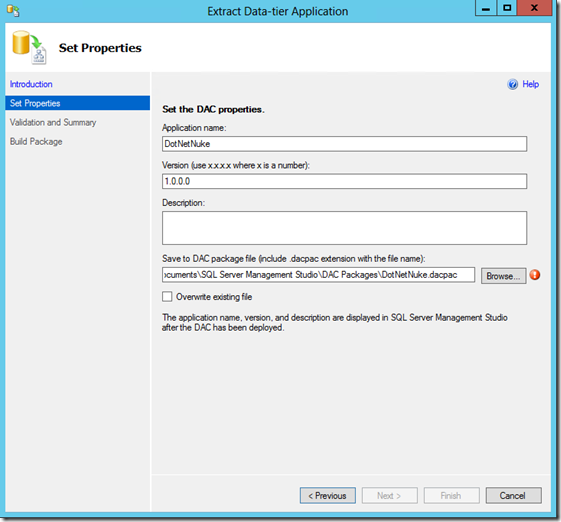
Now let’s open SQL Management console and connect to the SQL server where we deployed the database. We’ll need to do a few things, first select the database, right click on it and extract as a DacPac.
Note: Prior to this ‘extract to DacPac’ stage I typically delete any domain specific users associated with the database so that they aren’t attached to the DacPac and become a point of failure in the importing later.
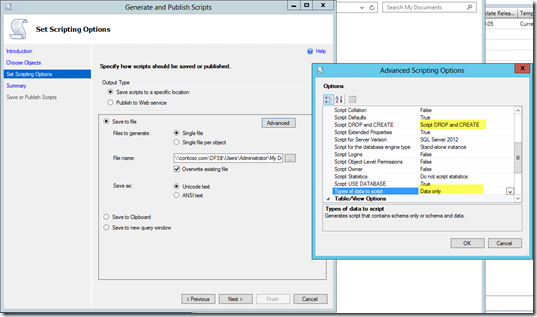
The DacPac is the database Schema along with stored procedures and views so now all we need is the SQL script to import base data into the database that originally comes as part of DotNetNuke® and incorporates any changes you made to the installed version of DotNetNuke® up to this point. Right click on DotNetNuke® again and select ‘Generate Scripts’. Leave selected the ‘Select specific database objects’ option and click next, and then leave ‘Single file’ selected and pick a location to save the script. Select advanced and change ‘Drop and Create’ to true and change ‘Types of data to script’ to ‘Data only’.
We will also need a SQL script that will take the database name and App Pool identity name as parameters and submit them to SQL to create the login and assign it to a role. Following is the create-account.sql file included in the download, where ‘$(DB_USERNAME)’ and ‘$(DATABASENAME) ‘ will equal @NameforIISSite@, which is used for the App Pool identity and database name but you could create your own parameters here for use.
 -- Create user windows Authentication
IF NOT EXISTS (SELECT loginname FROM master.dbo.syslogins
    where name = N'$(DB_USERNAME)' and dbname = '$(DATABASENAME)')
BEGIN
    CREATE LOGIN [$(DB_USERNAME)] FROM WINDOWS
END;
GO
-- Add User to first database
IF NOT EXISTS (SELECT * FROM sys.database_principals WHERE name = N'$(DB_USERNAME)')
BEGIN
    CREATE USER [$(DB_USERNAME)] FOR LOGIN [$(DB_USERNAME)]
              EXEC sp_addrolemember N'db_owner', N'$(DB_USERNAME)'
END;
GO
Step 4 – Customize Service Template for DotNetNuke®
Final step is to save the batch files and PowerShell scripts we created above to a folder named DotNetNuke/custom.cr in the VMM library and copy the artifacts we created above to the DotNetNuke folder in the library. Also copy the SQL scripts to DotNetNuke/SQL.cr.
In this final step we will add the scripts and the applications to the DotNetNuke® Service Template. First delete the working service that you deployed as a working copy, since the copied template we created earlier won’t allow changes when a service is deployed from it.
Now right click the service and open in design view.
SQL Server Tier:
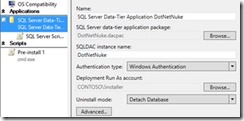
1. Right Click the SQL server tier and open properties, then select Application. Select add and add a SQL Data Tier application. Choose the DacPac we created earlier and imported into the VMM library. (Here I use an installer service account for SQL Run As which uses the STEK Pre-Install script to add to local Admins, not required)
|
|
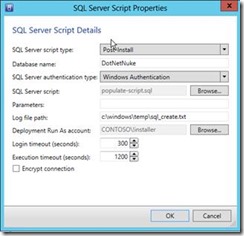
2. Select SQL Scripts and add the Post-Install populate-script.sql we created earlier
|
|
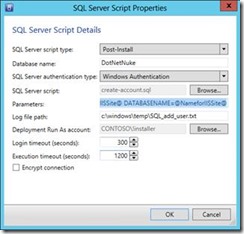
3. Add an additional Post-Install script for the create-account.sql file also created earlier. This script requires mapping of parameters as follows. DB_USERNAME=contoso\@NameforIISSite@ DATABASENAME=@NameforIISSite@
|
|
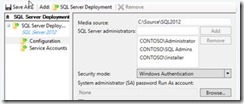
4. I also include the run as service account as a SQL Server administrator.
|
|
Web Server Tier:
For the web tier we need to add the WebDeploy package and run the scripts we created above that add a service account and modifies the app pool to run under that account. First we need to enable PowerShell scripts on the web tier.
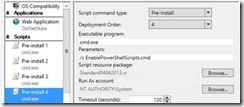
1. Open the Web Tiers properties and select Application configuration. Add a Pre-Install script number 4 and use the STEK batch file in Standard04062013.cr name EnablePowerShellScripts.cmd
|
|
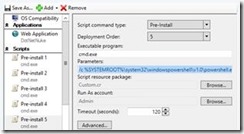
2. Add another Pre-Install script, number 5 that will run the PowerShell script we created earlier for adding a AD user. Under executable program use cmd.exe and use the following parameters: /c %SYSTEMROOT%\system32\windowspowershell\v1.0\powershell.exe -noprofile -file ./AddUserToAD.ps1 @Target_OU@ @NameforIISSite@ @App_Pool_User_Password@ Where we create 2 new @ parameters and use the existing NameForIISSite parameter as part of the command line. This will require a run as account that has permissions to add users to AD.
|
|
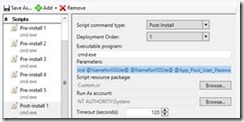
3. Add a Post-Install for modifying the App Pool identity to newly created web site. This is key since this identity is used for SQL permission. /c Mod_AppPool.cmd @NameforIISSite@ @NameforIISSite@ @App_Pool_User_Password@
Again we use NameForIISSite parameter for App Pool identity name and also the Web Site name that was created earlier. The password is the same parameter used in step 2.
|
|
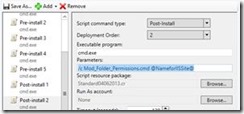
4. And finally we will modify the folder permissions using using another Standard script from STEK: /c Mod_Folder_Permissions.cmd @NameforIISSite@
|
|
You now have a deployable DotNetNuke® community edition which is ready to use, besides a couple of challenges we will discuss in our next blog post here. All that is needed is to change the web.config file, in all web UI tiers, to point to the deployed SQL instance and to add a DNS entry for the NLB IP named DotNetNuke.
