Service Manager 2012 and Service Level Management – Part 3
We have already talked about the reasons behind Service Level Management, as well as how to make Service Manager ready  for Service Level Management (SLM).
In this post, I will focus on Service Level Management in Service Manager and take a deeper look at what needs to be configured to make SLM work. I’ll also explain some of the concepts and capabilities used for Service Level Management.
As noted in the previous posts, there are a few elements that need to be in place before you begin: Notably, confirm that the steps outlined in the previous posts have been followed (see here for the complete overview). 
How Service Level Management works in SCSM
In System Center 2012 - Service Manager, you can create a service level item that consists of queues that correspond to each service level, plus time metrics to measure and warn. Separately, you can also send notifications to users that occur before and after a service level breach. In the Service Manager console, you can manage this process in the Administration workspace using the following nodes:
Calendar:
The Calendar node is used to define work days, work hours, and holidays as a calendar item in the Service Manager console. Each calendar item is a distinct work schedule that represents time available for analysts to resolve incidents and fulfil service requests.
A Calendar item defines work days, work hours and holidays.
Calendar = work schedule for resolving incident & service request.
Calendar items correspond to at least 1 SLO where it is measured by a time metric (i.e. resolution).
Metric:
- Service Level Management metrics area a time metric.
- Measure the start time and times of incidents and service requests.
- First metrics are defined.
- Response time, resolution time
- Response Time: The time it takes for someone to acknowledge an incident (i.e. someone reacted to the incident and someone is aware of the case)
- Resolution time: The time it takes for an incident to be considered solved (not the same as closed) and waiting for closure.
- Then associate it to a Service Level Objective
- Response time, resolution time
Service Level Objectives:
- Creates the relationship between a queue, service level, calendar item, time metric and allows you to enable actions that occur before/after service level breaches.
- Notifications
- Warnings
Note: Be careful about notification, this can get out of control if they are not tested and managed in the right way.
Also note: It is easier to create SLOs if you have defined a calendar item and SLA metric first!
Scenario:
- We want to enable a SLA for all incidents that are assigned to a VIP Queue. Incidents are allocated to a VIP Queue when Priority is less or equal-than 3, and when the subject contains “VIP.”
- We also want to create another queue representing Hardware Incidents which has a different Service Level Objective assigned than the one above.
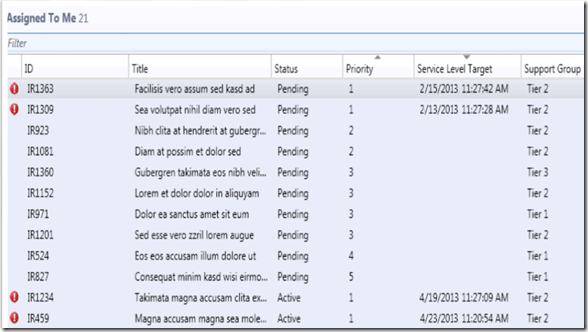
Example of a view assigned to me for breached incidents:
Configuring Service Manager (SCSM) for Service Level Management
Here are the primary steps I’ll cover in this post:
- Creating Calendars
- Creating Queue
- Defining Service Level Metrics
- Creating Service Level Objectives
1. Creating calendars
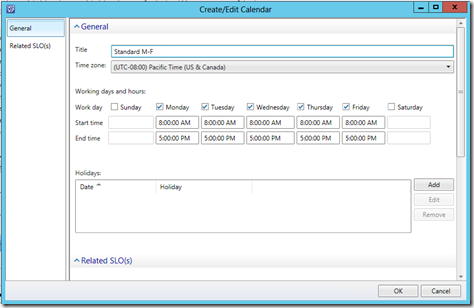
1. In the Service Manager console, open the “Administration” workspace, expand the “Service Level Management” node, and then click “Calendar”
2. In the Tasks pane, click “Create Calendar”
3. Fill in the form as follows:
Title: Monday – Friday
- Timezone: PST (UTC -08:00)
- Work Days – check Mon, Tue, Wed, Thu, Fri
- Start Time: Type 8:00:00 AM for all the work days (Monday – Friday)
- End Time: Type 5:00:00 PM for all the work days (Monday – Friday)
4. Skip the holidays for this.
5. Click “OK” to save the Calendar
We have now created a calendar that works Monday to Friday from 9 am-5 pm.
Now let’s create a calendar that we assign for our VIP Scenario: This will be from 6 am to 8 pm, all weekdays and Saturday, excluding Sundays, 4th of July and 25th of December.
1. In the Service Manager console, open the “Administration” workspace, expand the “Service Level Management” node, and then click “Calendar”
2. In the “Tasks” pane, click “Create Calendar”
3. Fill in the form as follows:
Title: VIP Calendar
- Timezone: PST (UTC -08:00)
- Work Days – check Mon, Tue, Wed, Thu, Fri, Sat
- Start Time: Type 6:00:00 AM for all the work days (Monday – Saturday)
- End Time: Type 8:00:00 PM for all the work days (Monday – Saturday)
4. For Holidays
· Add 4th of July and 25th of December, along with a description.
Click “OK” to save the Calendar
1. In the Service Manager console, open the Administration workspace, expand the Service Level Management node, and then click Calendar.
2. In the Tasks pane, click Create Calendar
3. Fill in the form as follows:
Title: VIP Calendar
- Timezone: PST (UTC -08:00)
- Work Days – check Mon, Tue, Wed, Thu, Fri, Sat
- Start Time: Type 6:00:00 AM for all the work days (Monday – Saturday)
- End Time: Type 8:00:00 PM for all the work days (Monday – Saturday)
4. For Holidays
- Add 4th of July and 25th of December, along with a description.
5. Click OK to save the Calendar
2. Create Queue
Some of you might be thinking to yourselves right now, “Hold on… didn’t we just do this in the last blog post? (here)” The short answer is: Yes. However, I want to create one more queue to better illustrate the relationship between queues and SLO.
This is very similar to last time, but this time I’ll show you how to create an extra queue to show how different SLA’s can be applied to work items.
1. In the “Service Manager” console, open the “Library” workspace, and click “Queues”
2. In the “Tasks” pane, click “Create Queue”
1. Overview Page
- Queue name: Hardware Incidents
- Work item type: Incident
- Management Pack: Leave as is
2. Criteria
- In the filter type: classification category
- Check Title and click ”Add”
- Criteria: Classification Category equals Hardware Problems
3. Click “Next”
4. Review the parameters of the queue and click “Create”
5. Click “Close”
3. Define Service Level Metrics
In the second blog post (here) we defined a couple of metrics (Resolution Time for Incidents and Completion Time for Service Requests) out of the box.
Here’s a basic reminder of the modifications made last time:
1. In the “Service Manager” console, open the “Administration” workspace, and under the “Service Level Management” node, click “Metric”
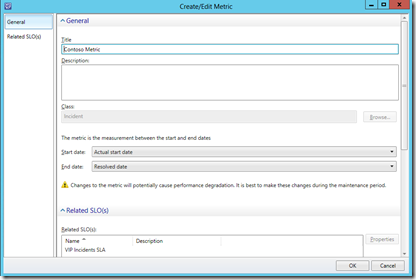
2. You should see two metrics, “Completion Time” and “Resolution Time”
3. Select “Resolution Time,” and click “Properties” in the “Task” pane
4. Examine the values in the form to see how the metric is defined: (i.e Class Incident, Start Time: Created Date, End time: Resolved date)
5. Click “Cancel” to quit the form
4. Create Service Level Objectives
To make the metrics more specific and align it to the business, we will create two Service Level Objectives, one for Hardware and one for VIP users.
Let’s create the first Service Level Objective: Hardware SLO
Hardware SLO:
1. In the Service Manager console, Navigate to > Administration workspace > Service Level Management > Service Level Objectives
2. In the “Tasks” pane, click “Create Service Level Objective”
3. Create “Service Level Objective” wizard appears
4. Fill in the following on the General Page
- Title: Hardware issue
- Class: Incident
- Management Pack: leave as is
- Make sure that “Enabled” checkbox is checked and click “Next”
5. Click “Next “
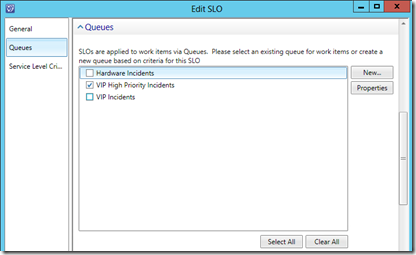
6. On the Queues page
7. Check “Hardware Incidents”
8. Click “Next”
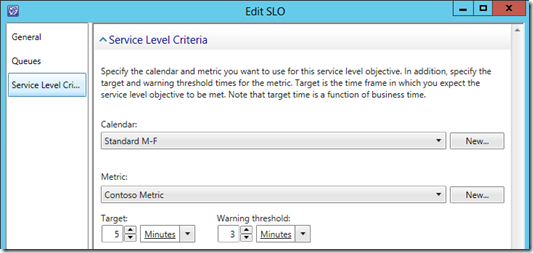
9. On the Service Level Criteria page
- Select the “Business Hours”
- Select Resolution Time metric
- Target Time to 2 hours
- Warning Threshold to 1 hour
10. Click ”Next”
11. Review the SLO’s settings and click “Create”
Click “Close”
VIP SLO:
1. In the Service Manager console, Navigate to > Administration workspace > Service Level Management > Service Level Objectives
2. In the “Tasks” pane, click “Create Service Level Objective”
3. Create “Service Level Objective” wizard appears
4. Fill in the following on the General Page
- Title: VIP Incidents SLA
- Class: Incident
- Management Pack: leave as is
- Make sure that “Enabled” checkbox is checked and click “Next”
5. Click “Next”
6. On the Queues page
- Check ”VIP Incidents”
- Click ”Next”
7. On the Service Level Criteria page
- Select the calendar VIP
- Select Resolution Time metric
- Target Time to 5 minutes
- Warning Threshold to 3 minutes
8. Click ”Next”
9. Review the SLO’s settings and click “Create”
10. Click “Close”
Let’s see if our configuration works as specified
Create an Incident for Hardware
1. Navigate to Work Items > Incident > All Open Incidents
2. Click “Create a New Incident”
3. Input the title of the incident as “Test incident for monitoring Hardware SLA”
4. Set the assigned to the incident to “Administrator”
5. For the Classification category, select “Hardware Problems”
6. Provide other required parameters of the incident and submit it
7. Open the incident.
8. Click the “Service Level” tab
9. Now you should see two the SLAs you created attached to this Incident
- Observe the Target End Time for the SLAs.
- Hardware should be Hardware specified number of minutes of incident created
Create an Incident for VIP
1. Navigate to Work Items > Incident > All Open Incidents
2. Click “Create a New Incident”
3. Input the title of the incident as “Test incident for monitoring VIP SLA”
4. Set the assigned to the incident to “Administrator”
5. For the Classification category, select “Software Problems”
6. Provide other required parameters of the incident and submit it
7. Open the incident.
8. Click on the “Service Level” tab
9. Now you should see two the SLAs you created attached to this Incident
- Observe the Target End Time for the SLAs match the VIP SLO.
- VIP should be the SLA specified number of minutes of incident created
View the Incident breached SLA
1. Navigate to Work Items > Incidents > Incidents with Service Level Breached view
2. The incident you created should appear in the “Incidents with Service Level Breached” view under “Incident Management” node after 10 minutes
- Open the VIP incident and click “Service Level” tab on the incident form
- You should have a warning bar indicating that one or more Service Levels have breached
- Open the incident and then you can click on the Service Level tab; you can now observe the Service Level that was breached.
I hope this introduction to Service Level Management will help you understand how these functions can be leveraged in Service Manager, and I hope this series of posts has provided a helpful overview for how Service Level Management can be implemented in Service Manager.
Please let me know if you have any feedback on this series!
