Bare Metal Deploy through VMM PowerShell (Part 2)
In Part 1 of this blog series I explained the steps to deploy BMC (Bare Metal Deploy) and configure the physical network adapter settings using Logical Networks created in VMM.
In this post, I will explain the steps to deploy BMC and configure the physical network adapter settings using Logical Switches created in VMM through PowerShell.
If you are not familiar with the concepts of networking in VMM, you can read more on TechNet.
The Solution through the PowerShell Approach:
The PowerShell approach is very handy and reusable – especially when many servers need to be provisioned in the offline mode in an automated way. This post features tips on using the bare-metal Cmdlets in VMM, leveraging the new networking features such as Logical Switch, Uplink port profile and Virtual port profile.
Before using the PowerShell, make sure you setup the pre-requisites to run through the Cmdlets:
· Bare Metal machine to deploy OS (BIOS to support virtualization, PXE network boot is configured, and IP address and Logon credentials for BMC are configured).
· Native Boot VHD (VHD/VHDX) file created and stored in VMM Library.
· WDS/PXE server is added to VMM.
· Create Host Profile using native boot VHD in VMM Library.
· Create necessary RunAsAccount (RAA).
- BMC Administrator (BMCAdmin).
· Create one or more Logical Networks to map to the NICs on bare-metal servers.
· Create one or more Logical Switches that encompass the following networking capabilities and properties to be assigned to the NICs on bare-metal servers.
- Extensions (not discussed in this post).
- Uplink (Contains Uplink Mode for NIC Teaming and one or more Uplink Port Profiles for specifying the NIC teaming mode, load balancing algorithm and the network sites it applies to).
- Virtual Port (Contains one or more virtual port classifications for assigning it to various virtual network adapter workloads based on the bandwidth requirement).
For reference, here are screenshots from the lab environment:
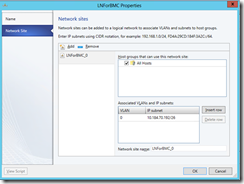
1) Logical Network (LNForBMC) setting: (To create different network sites, assign the subnet/vlan for them and assign it to host group) .
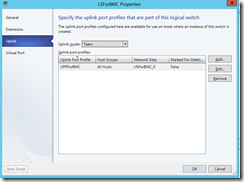
2) Logical Switch (LSForBMC) setting for Uplink: (To define NIC team and set the Native Uplink port profiles applicable for those NIC team or uplink ports)
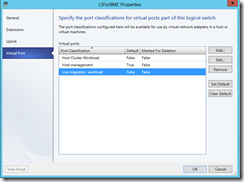
3) Logical Switch (LSForBMC) setting for Virtual Port: (To define the virtual port classification to apply the QoS for each of the individual vNICs to limit the bandwidth)
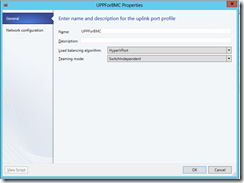
4) Uplink Port Profile setting for NIC Teaming: (To define the NIC teaming mode and algorithm to be used)
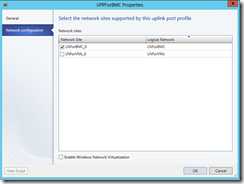
5) Uplink Port Profile setting for Network Sites: (To define the network sites for the Uplink Port Profiles)
Here are the basic steps to follow:
1. Import “Virtual Machine Manager” PowerShell module if not loaded
If (!(Get-Module VirtualMachineManager)) {Import-Module VirtualMachineManager} |
2. Initialize the variables required for the Cmdlet:
$BMCAccount = "BMCAdmin" $BMCAddress = "10.10.0.1" $HGName = "All Hosts" $HPName = "TestHostProfile2" $ComputerName = "MyComputer01" $LSwitch = "LSForBMC" $NativeUPP = "UPPForBMC" |
3. Discover bare metal computers from an IP address “10.10.0.1” (No Deep Discovery).
4. Perform Deep Discovery operation on discovered bare metal computer.
Note: For steps 3 & 4, refer to Part 1 of this series for the sample script snippet.
5. Get VMM Objects for the following items:
- BMC Run As Account
- Host Group to which the BMC has to be added
- Host Profile to use to deploy BMC
- Logical Switch to assign to BMC’s NICs (Physical Adapters)
- Native Uplink Port Profile Set to assign to BMC’s NICs (Physical Adapters)
$BMCRAA = Get-SCRunAsAccount -Name $BMCAccount $HostGroup = Get-SCVMHostGroup -Name $HGName $HostProfile = Get-SCVMHostProfile -Name $HPName $LogicalSwitch = Get-SCLogicalSwitch -Name $LSwitch $NativeUplinkPortProfile = Get-SCNativeUplinkPortProfile -name $NativeUPP $UplinkPortProfileSet = Get-SCUplinkPortProfileSet | where { $_.NativeUplinkPortProfile.Name -eq $NativeUPP } |
6. Get VMM Objects for the following items:
- Port Classification to be used for Host Management virtual network adapter
- Port Classification to be used for Cluster virtual network adapter
- Port Classification to be used for Live Migration virtual network adapter
$PortClassificationHost = Get-SCPortClassification -Name "Host management" $PortClassificationCluster = Get-SCPortClassification -Name "Host Cluster Workload" $PortClassificationLive = Get-SCPortClassification -Name "Live migration workload" |
7. Get VMM Objects for the following items:
- VM Network to be used for Host Management virtual network adapter
- VM Network to be used for Cluster virtual network adapter
- VM Network to be used for Live Migration virtual network adapter
$VMNetworkHost = Get-SCVMNetwork -Name "VMNForHost" $VMNetworkCluster = Get-SCVMNetwork -Name "VMNForCluster" $VMNetworkLive = Get-SCVMNetwork -Name "VMNForLive" |
8. Initialize Array variable to hold all network adapter configuration:
$NetworkAdapterConfig = @() |
9. Perform Physical Network Adapter Configuration using Deep Discovery output.
$MyComputer01.PhysicalMachine.NetworkAdapters | ForEach-Object { if($_.CommonDeviceName -eq "Ethernet 3") { $TransientNetworkAdapterConfig1 = New-SCVMHostNetworkAdapterConfig -SetAsPhysicalNetworkAdapter -LogicalSwitch $LogicalSwitch -UplinkPortProfileSet $UplinkPortProfileSet -MACAddress $_.MacAddress $NetworkAdapterConfig += $TransientNetworkAdapterConfig1 } if(($_.CommonDeviceName -eq "Ethernet 4")) { $TransientNetworkAdapterConfig2 = New-SCVMHostNetworkAdapterConfig -SetAsPhysicalNetworkAdapter -LogicalSwitch $LogicalSwitch -UplinkPortProfileSet $UplinkPortProfileSet -MACAddress $_.MacAddress $NetworkAdapterConfig += $TransientNetworkAdapterConfig2 } } |
10. Perform Virtual Network Adapter Configuration using Deep Discovery output.
$NetworkAdapterConfig += New-SCVMHostNetworkAdapterConfig -SetAsVirtualNetworkAdapter -SetAsManagementNIC -TransientManagementNetworkAdapter $TransientNetworkAdapterConfig1 -UseDhcpForIPConfiguration -LogicalSwitch $LogicalSwitch -PortClassification $PortClassificationHost -VMNetwork $VMNetworkHost $NetworkAdapterConfig += New-SCVMHostNetworkAdapterConfig -SetAsVirtualNetworkAdapter -SetAsGenericNIC -UseDhcpForIPConfiguration -LogicalSwitch $LogicalSwitch -PortClassification $PortClassificationCluster -VMNetwork $VMNetworkCluster $NetworkAdapterConfig += New-SCVMHostNetworkAdapterConfig -SetAsVirtualNetworkAdapter -SetAsGenericNIC -UseDhcpForIPConfiguration -LogicalSwitch $LogicalSwitch -PortClassification $PortClassificationLive -VMNetwork $VMNetworkLive |
11. Set the disk to be used as Boot Volume Disk for OS using Deep Discovery output.
if ($MyComputer01.PhysicalMachine.Disks.DeviceName.Count -gt 1){ $BootVolumeDisk=$MyComputer01.PhysicalMachine.Disks.DeviceName[0]}else { $BootVolumeDisk=$MyComputer01.PhysicalMachine.Disks.DeviceName} |
12. Perform BMC Host Configuration using Deep Discovery output.
$BMCHostConfiguration = New-SCVMHostConfig -BMCAddress $MyComputer01.BMCAddress -SMBiosGuid $MyComputer01.SMBIOSGUID -BMCPort 623 -BMCProtocol "IPMI" -BMCRunAsAccount $BMCRAA -BypassADMachineAccountCheck -ComputerName $ComputerName -Description "" -VMHostGroup $HostGroup -VMHostProfile $HostProfile -VMHostNetworkAdapterConfig $NetworkAdapterConfig -BootDiskVolume $BootVolumeDisk |
13. Deploy OS to Bare Metal using BMC Host Configuration.
| New-SCVMHost -VMHostConfig $BMCHostConfiguration -RunAsynchronously |
14. Check the VMM Job output for the completion of Job and also check the target BMC machine for the installation of OS.
Summary
Use the above Cmdlets as reference and make sure the hard coded values are replaced to match the environment.
In the next post of this series, I will walk through the steps required to create the networking settings using VMM Cmdlets so that it can be re-used across different VMM environments.
