Part 8 - Windows Server 2012 R2 AD FS - Federated Web SSO
This is Part 8 of a multi-part series on how to deploy a complete end-to-end Federated Web SSO solution using Windows Server 2012 R2's AD FS role and the Web Application Proxy. This post is all about TRUST. If you have followed all of the previous sections in this series you now have a lot of secure services and none of them trust each other. You have Certificate Authorities which do not trust the certificates issued by the other organization, you have SharePoint servers which do not even trust their own Certificate Authorities, you have AD FS servers which do not trust the claims issued by the other organization, and you even have the workstation's browsers which do not trust their own domain. For AD FS to work we must now configure all of those components to trust each other.
In case you missed it:
Here is Part 1 - Overview
Here is Part 2 - Installing AD DS, AD CS, and DNS Records
Here is Part 3 - Installing SQL Database Services
Here is Part 4a - Installing CONTOSO's SharePoint Services
Here is Part 4b - Installing FABRIKAM's SharePoint Services
Here is Part 5a - Installing CONTOSO's AD FS Services
Here is Part 5b - Installing FABRIKAM's AD FS Services
Here is Part 6a - Installing CONTOSO's Web Application Proxies
Here is Part 6b - Installing FABRIKAM's Web Application Proxies
Here is Part 7 - Installing External DNS and Workstations
Topology
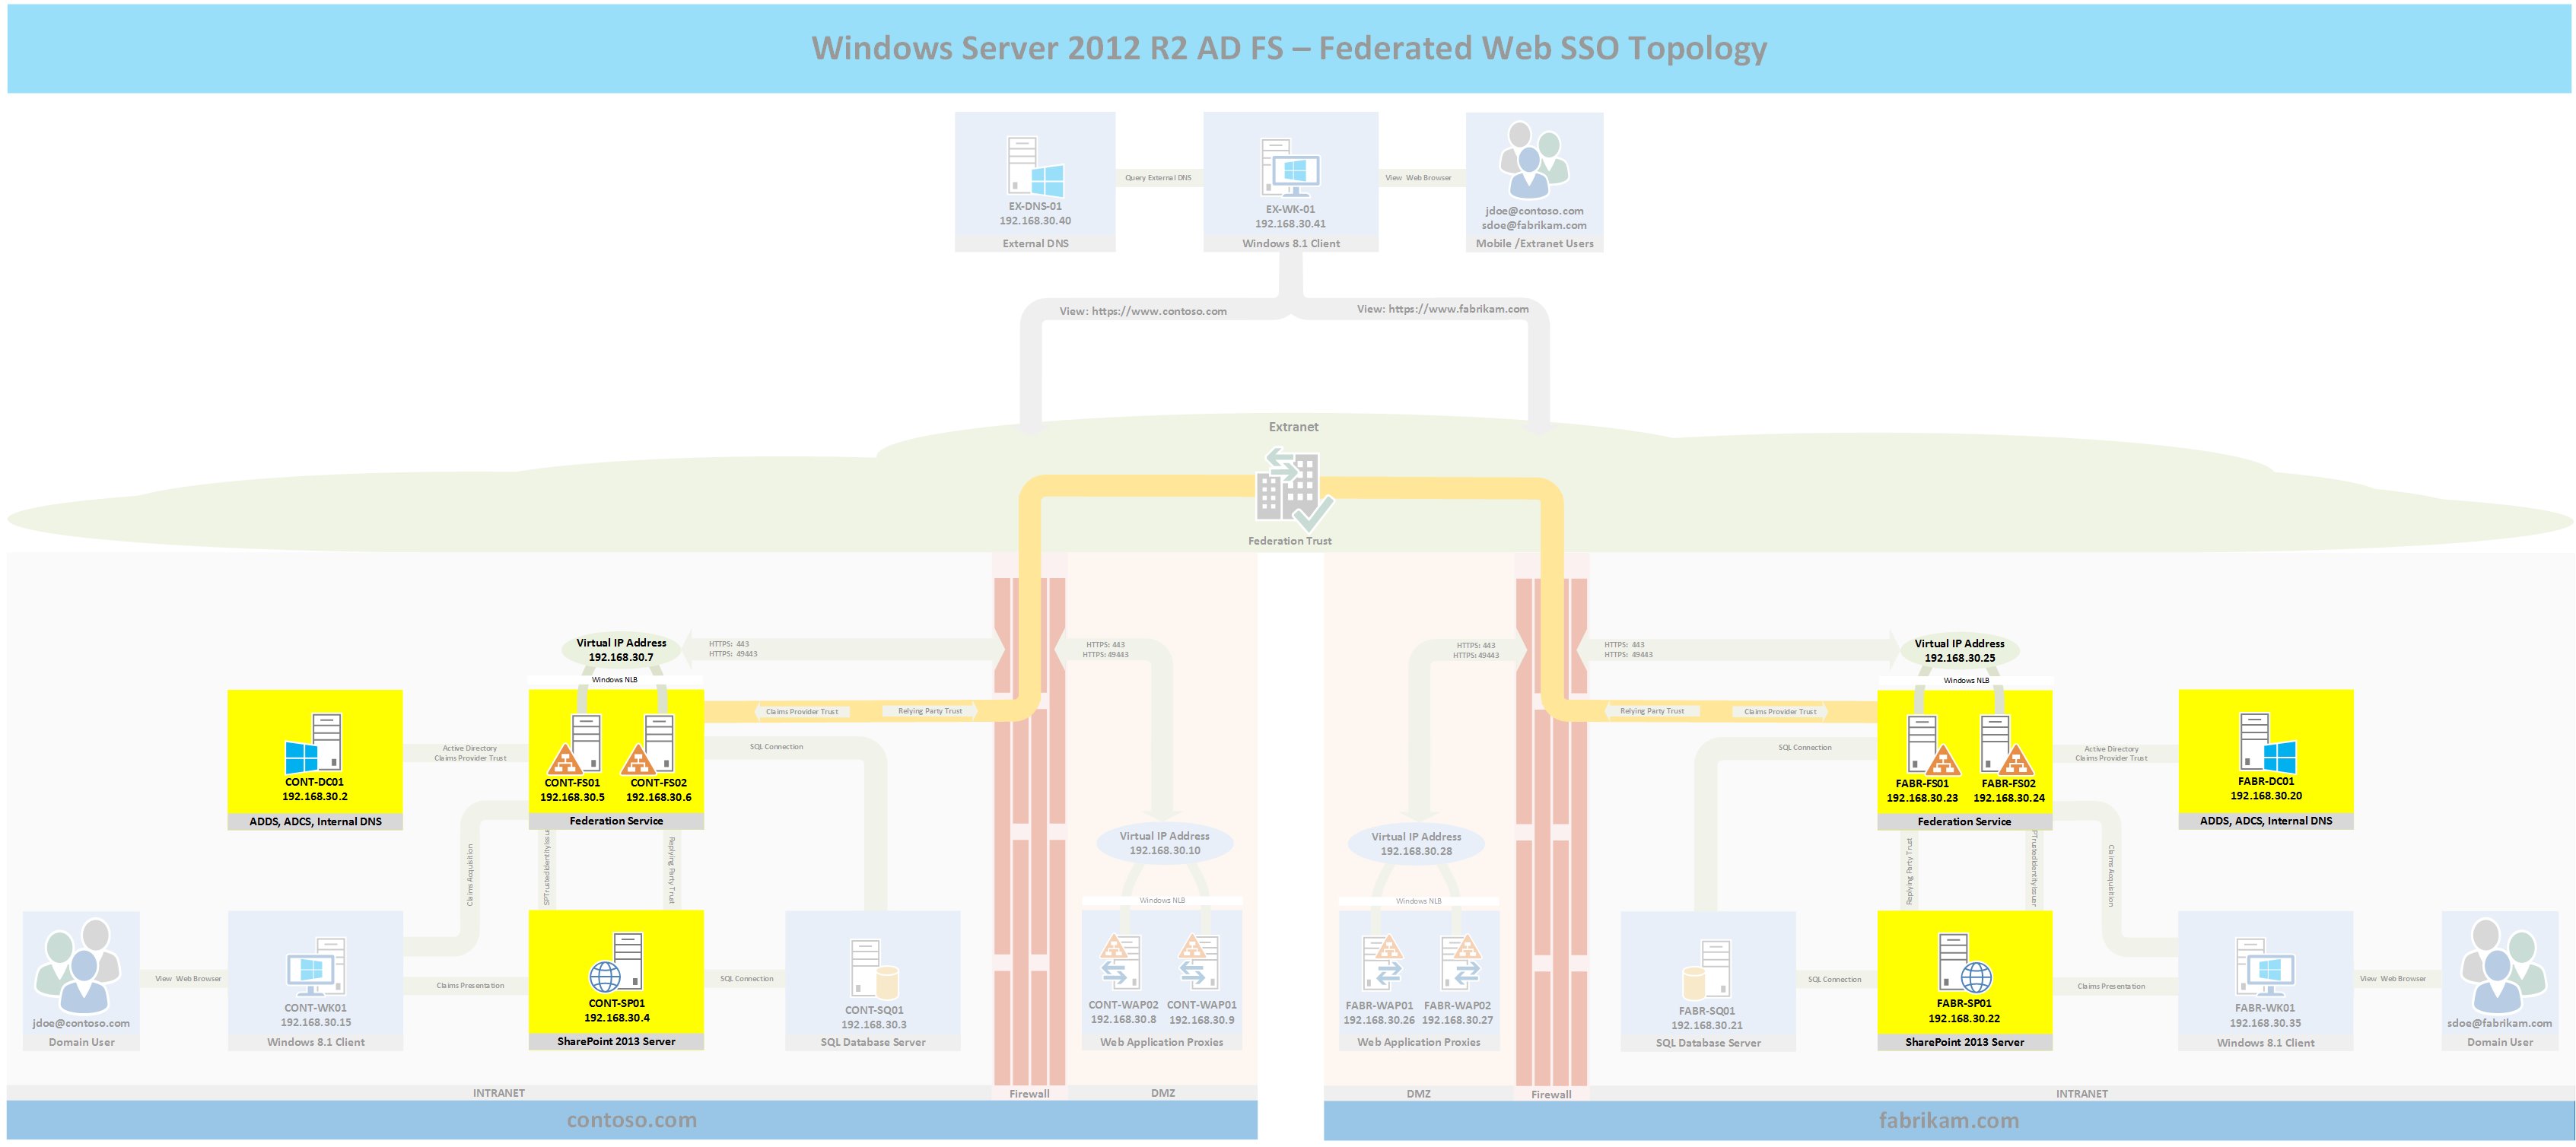
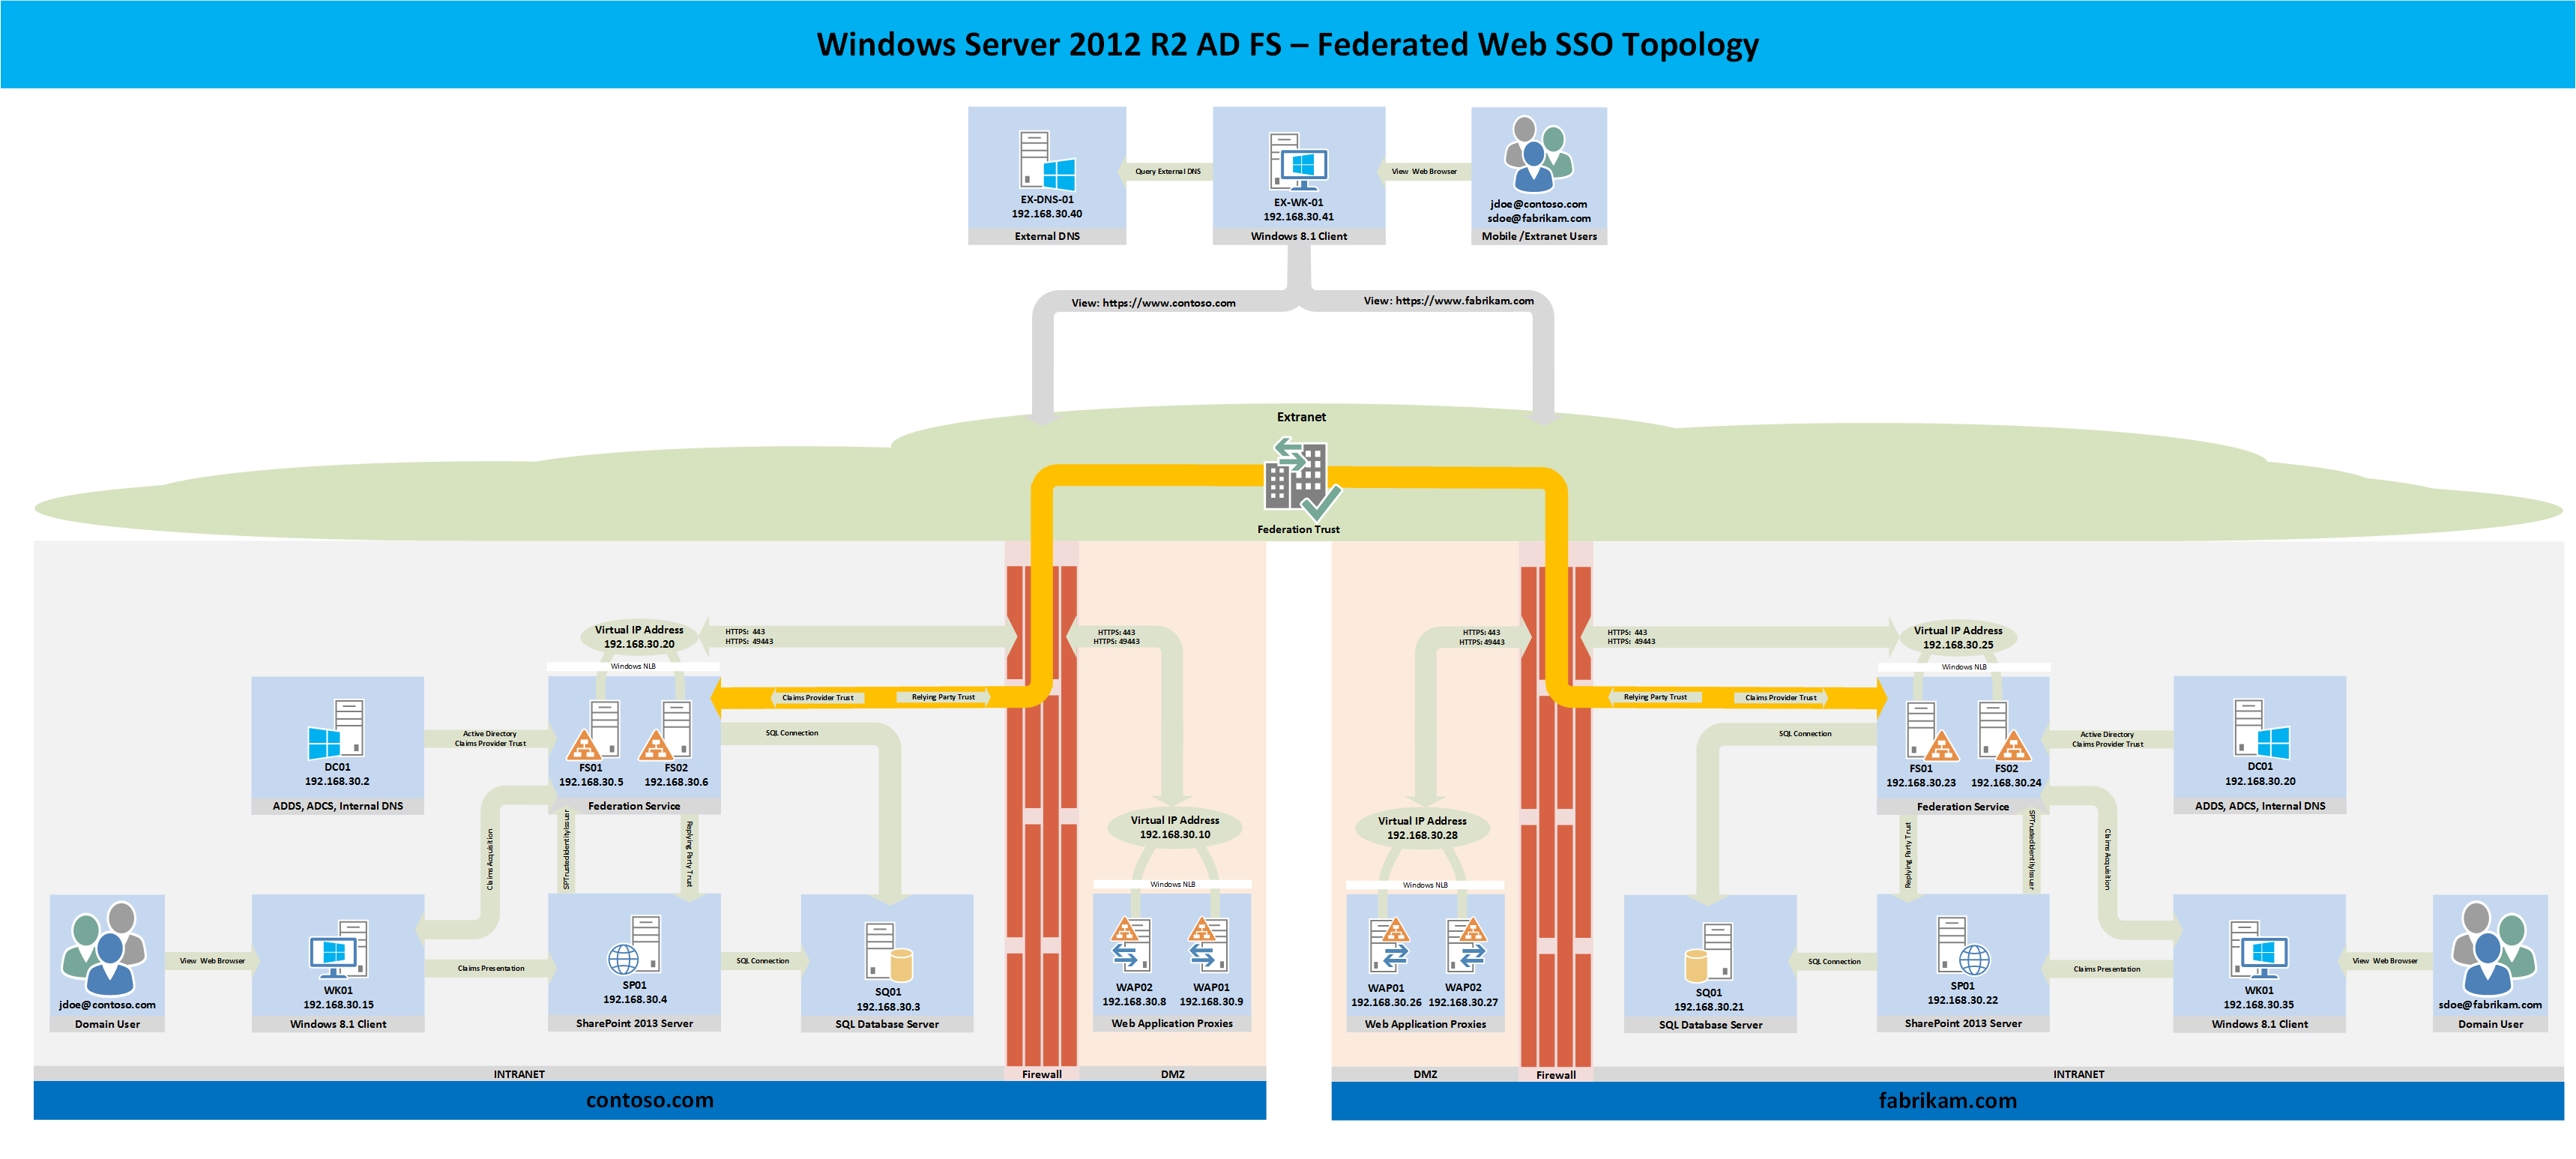
The following topology highlights in yellow the servers that will be configured for part 8 and where they fit into the overall topology. If you wish to see the full topology click here
Internet Explorer
Lets start with the easy stuff then work our way up. By default Internet Explorer does not place any sites in the Intranet Zone, this means that it will not send Windows Integrated credentials when prompted to do so by a site requesting authentication even if the site is hosted on the organization's Intranet. What this means to the end user is that they get a password prompt when attempting to access a site on the local Intranet that is configured to only accept Windows Authentication (i.e. the AD FS servers). In an AD FS environment, the AD FS server is usually configured to request Windows Authentication for Intranet users. Unless the AD FS server's URL is in the browser's local Intranet zone, the end user will get a password prompt that will make it impossible for them to proceed.
The simple fix is to add *.contoso.com to the Intranet Zone within the contoso.com domain and *.fabrikam.com to the Intranet Zone within the fabrikam.com domain. Remember that starting with IE 10, Group Policy Preferences and site to zone maps are used to configure Internet Explorer (not IE Maintenance Mode) you can read more about how to manage IE here.
The following steps will add *.contoso.com to the Intranet Zone within the contoso.com domain
- Log into the CONTOSO domain controller
- Press Windows+R to bring up the Run dialogue box. Type gpmc.msc then hit Enter.
- Right click the Default Domain Policy > Edit
- Expand User Configuration > Administrative Templates > Windows Components > Internet Explorer > Internet Control Panel > Security Page
- Double click Site to Zone Assignment List > Enabled > Show
- For Value Name enter: contoso.com and for Value enter 1 then click OK > OK
Log into the FABRIKAM domain controller and repeat steps 1-6 above but add fabrikam.com for Step 6.
Certificate Authorities
In a production environment, typically the certificates of both organizations will have been signed by a public Certificate Authority that they both trust such as Verisign. However, in this lab environment there is no mutually trusted certificate authority so you will have to manually configure each domain to trust the certificates signed by the CA in the other domain. Even in a production environment, you may have to perform these steps if you are federating with an organization that used a private CA to sign their web and AD FS certificates.
The following steps will export the public key of the Certificate Authority in the CONTOSO domain and import the certificate into the FABRIKAM domain.
- Log into the CONTOSO domain controller
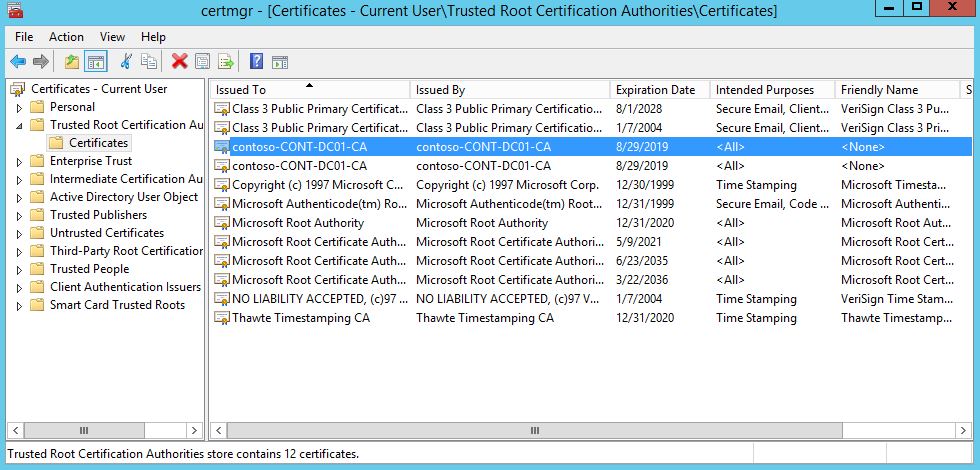
- Press Windows+R to bring up the Run dialogue box. Type certmgr.msc then hit Enter
- Expand Trusted Root Certificate Authorities > Certificates and locate the Certificate Authority's public key. The following figure shows the CA's public key in the lab environment
- Right click the public key > All Tasks > Export > Next > Next
- Give the certificate file a file name then click Next > Finish
- Log into the domain controller for FABRIKAM and copy the CA's public key from the CONTOSO domain controller to the FABRIKAM domain controller
- Press Windows+R to bring up the Run dialogue box. Type gpmc.msc then hit Enter.
- Expand Domains > fabrikam.com > Default Domain Policy > Right Click > Edit
- Expand Computer Configuration > Policies > Windows Settings > Security Settings > Public Key Policies > Trusted Root Certificate Authorities
- Right Click > Import > Next >Browse and locate the exported public key from the CONTOSO CA> Next > Next > Finish
- Click OK.
Repeat these steps to import the FABRIKAM CA's public key into the Trusted Root Certification Authorities folder of the CONTOSO default domain policy.
SharePoint Root Certificate Authorities
SharePoint is the recipient of tokens that have been signed by the local AD FS servers' token signing certificate. SharePoint has it's own trusted certificate authorities list that it uses to verify that it trusts the certificate that signed the claims. Even though from a technical sense, the AD FS server's token signing certificate is not a CA Root certificate, for SharePoint to trust it, it must be added to SharePoint's Root Certificate Authorities list.
The following steps will add the AD FS server's token signing certificate to SharePoint's CA Root Authorities list.
- Log into the AD FS server
- Open an Elevated PowerShell window and run the following commands:
- $SigningCert = (Get-AdfsCertificate -CertificateType Token-Signing).thumbprint
- $SigningCert = gci cert:LocalMachine\My | ?{$_.Thumbprint -eq $SigningCert}
- Export-Certificate -Cert $SigningCert -FilePath C:\SigningCert.cer
- Copy the file that was created (C:\SigningCert.cer) to the root of the local SharePoint server's C:\ drive.
- Open an elevated window of the SharePoint 2013 Management Shell
- Enter the following command: $SigningCert = New-Object System.Security.Cryptography.X509Certificates.X509Certificate2("C:\SigningCert.cer")
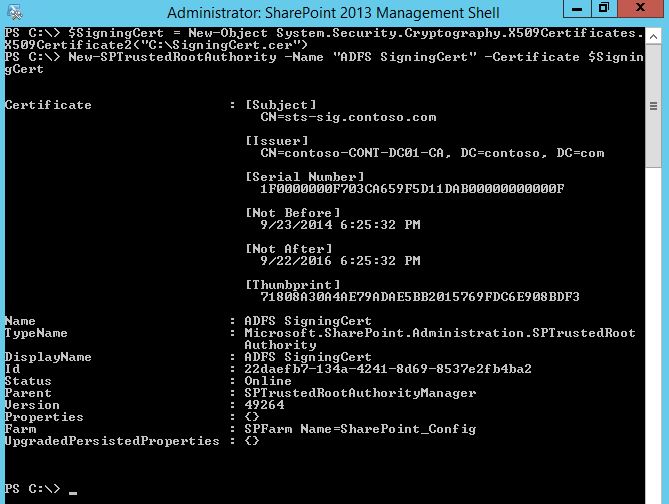
- Enter the following command to import the certificate into SharePoint's CA store: New-SPTrustedRootAuthority -Name "ADFS Signing Cert" -Certificate $SigningCert
- The output should appear similar to the following image:
- Repeat these steps for the AD FS server and SharePoint server in the other forest.
You may wonder why I did not simply open the AD FS console, view the signing certificate, then export the certificate from the certificate store. The reason is because I have encountered situations where admins were troubleshooting for hours why SharePoint was not accepting claims from their AD FS servers, only to find out that they had imported the wrong certificate from the AD FS server. Sometimes the certificates had the same names or looked identical in almost every way, but they were not the actual certificates that the AD FS servers were using to sign the claims. It is better to query the AD FS servers themselves and use that information to get an exact match within the certificate store, vs. assuming the AD FS server is using a particular certificate.
CONTOSO - SharePoint Trusted Token Identity Issuer
We must now configure SharePoint to trust the identity tokens that the AD FS servers will issue, the following script will configure CONTOSO's SharePoint Server to accept claims from CONTOSO's AD FS servers and will configure the user's email address as the identifier claim. Log into CONTOSO's SharePoint server and open an elevated SharePoint Management Shell. Then copy and paste the following script into the window.
$realm = "https://www.contoso.com"
$SignInURL = "https://sts.contoso.com/adfs/ls"
$SigningCert = New-Object System.Security.Cryptography.X509Certificates.X509Certificate2("C:\SigningCert.cer")
$EmailClaimMap = New-SPClaimTypeMapping -IncomingClaimType "https://schemas.xmlsoap.org/ws/2005/05/identity/claims/emailaddress" -IncomingClaimTypeDisplayName "EmailAddress" –SameAsIncoming
New-SPTrustedIdentityTokenIssuer -Name "ADFS" -Description "ADFS Identity" -Realm $realm -ImportTrustCertificate $SigningCert -ClaimsMappings $EmailClaimMap -SignInUrl $SignInURL –IdentifierClaim $EmailClaimMap.InputClaimType
FABRIKAM - SharePoint Trusted Token Identity Issuer
We must now configure SharePoint to trust the identity tokens that the AD FS servers will issue, the following script will configure FABRIKAM's SharePoint Server to accept claims from FABRIKAM's AD FS servers and will configure the user's email address as the identifier claim. Log into FABRIKAM's SharePoint server and open an elevated SharePoint Management Shell. Then copy and paste the following script into the window.
$realm = "https://www.fabrikam.com"
$SignInURL = "https://sts.fabrikam.com/adfs/ls"
$SigningCert = New-Object System.Security.Cryptography.X509Certificates.X509Certificate2("C:\SigningCert.cer")
$EmailClaimMap = New-SPClaimTypeMapping -IncomingClaimType "https://schemas.xmlsoap.org/ws/2005/05/identity/claims/emailaddress" -IncomingClaimTypeDisplayName "EmailAddress" –SameAsIncoming
New-SPTrustedIdentityTokenIssuer -Name "ADFS" -Description "ADFS Identity" -Realm $realm -ImportTrustCertificate $SigningCert -ClaimsMappings $EmailClaimMap -SignInUrl $SignInURL –IdentifierClaim $EmailClaimMap.InputClaimType
AD FS SharePoint Relying Party Trust
The following steps will configure CONTOSO's AD FS servers to send claims to CONTOSO's SharePoint server. Typically here I would show you the PowerShell way to do it, however, due to the limitations of this web page, copying and pasting the sample PowerShell code from the blog directly into PowerShell would cause the script to fail due to formatting problems. However, at the end of this post I have attached the PowerShell versions that will configure CONTOSO's and FABRIKAM's SharePoint relying party trusts for you.
These steps will configure the AD FS servers to send a single claim; the email address. In a production environment you may want to use more claims such as UPN, Role, or a custom attribute.
- Log into CONTOSO's AD FS server.
- Open the AD FS Management Console
- Expand Trust Relationships > Relying Party Trusts
- Right Click > Add Relying Party Trust > Start
- Select "Enter data about the relying party trust manually" then click Next
- For the Display Name enter "SharePoint 2013" > Click Next
- Select AD FS Profile > Next > Next
- Select "Enable Support for the WS-Federation Passive protocol"
- Enter the following URL: https://www.contoso.com/\_trust
- Click Next > Next > Permit all users to access this relying party > Next > Close
- Click Add Rule at the Edit Claim Rules dialogue box.
- Select Send LDAP Attributes as Claims then click Next
- Enter "Active Directory" for the claim rule name then select Active Directory for the Attribute Store
- Select Email Addresses for the LDAP attribute and Email Address for the Outgoing Claim Type then click Finish
- Click Add Rule > Select Pass Through or Filter an Incoming Claim > Click Next
- Enter "Federated Users" as the Claim rule name
- For the Incoming claim Type select Email Address
- Select Pass through all claim values
- Click Finish > OK
Repeat the steps above for FABRIKAM's AD FS server; replace CONTOSO with FABRIKAM in Step 1 and Step 9.
An important concept to grasp here is that you need to issue two complete sets of claim rules when dealing with externally federated users. The first rule creates claims based on the local Active Directory. This rule would not work for federated users because the whole point of AD FS is to eliminate the need to talk to the trusted organization's Active Directory. So instead, a second rule is needed to configure the relying party trust to send claims that have been received from sources other than the local Active Directory database. If your organization is configured to accept multiple claims such as Email,Role, and UPN, make sure that you also configure those same claim rules for federated users as well if needed.
Configure DNS Forwarding
Before we dive into the claims provider trust configuration, we need to take a quick step back and configure DNS in each organization so that CONTOSO can find FABRIKAM's DNS domain and vice versa. In a production environment DNS would already be configured to point to root servers and this step would not be necessary. The following steps will point CONTOSO's and FABRIKAM's internal DNS servers to the lab's EX-DNS-01 root DNS server for resolution.
- Log into the domain controller for each forest
- Press Windows+R to bring up the Run dialogue.
- Type dnsmgmt.msc
- Right click the DNS server > Properties
- Click Forwarders > Edit
- Enter 192.168.30.40 > OK > OK
- Repeat these steps for the other forest
- Verify that you can resolve www.fabrikam.com from the CONTOSO domain controller and www.contoso.com from the FABRIKAM domain controller
You have now configured the DNS servers in both organizations to resolve the DNS records for the other organization. We could have used a conditional forwarder here, or even just set up the other domain controller as the forwarding target, but using an external root DNS server more closely aligns with real world scenarios. Do not proceed if you cannot resolve the DNS records in both organizations. The following sections will fail if cross organizational DNS is not working properly.
AD FS Claims Provider Trust
At this point only two major AD FS tasks remain; getting the two organizations to trust each other and to send each other claims. Sure they trust each other's certificates, and internally SharePoint trusts the AD FS servers, but now it is time to extend that circle of trust to the claims that are issued by the other organization. This is where the Federated part of Federated Web SSO finally comes into play. This is accomplished with the simple addition of a claims provider trust for both organizations. This step tells each organization that the other organization will issue claims that the local organization can trust.
CONTOSO
- Log into CONTOSO's AD FS server.
- Open the AD FS Management console
- Expand Trust Relationships > Claims Provider Trusts
- Right click > Add Claims Provider Trust
- Click Start > Select "Import data about the claims provider published online or on a local network"
- Enter the federation metadata URL for FABRIKAM: https://sts.fabrikam.com/
- Click Next
- You should change the display name to FABRIKAM Users. This display name will be the name that is displayed when users arrive at your Web Application proxy and will be displayed if you have more than one claims provider trust configured.
- Click Next > Close
- Click Add Rule
- Select Pass Through or Filter an Incoming Claim > Next
- Enter "FABRIKAM E-Mail Addresses" for the claim rule name
- For Incoming claim type enter E-Mail Address
- Leave "Pass through all claim values" selected then click Finish.
- You will get a security warning stating you should filter incoming claim values. When first deploying a new claims provider trust I typically leave filtering off until the trust has been verified as working because filtering can greatly complicate the troubleshooting process. However, in a production network you should always filter incoming claims to a specific value such as limiting email claims to just the FABRIKAM mail domain.
- For the purposes of this lab click Yes > OK
FABRIKAM
- Log into FABRIKAM's AD FS server.
- Open the AD FS Management console
- Expand Trust Relationships > Claims Provider Trusts
- Right click > Add Claims Provider Trust
- Click Start > Select "Import data about the claims provider published online or on a local network"
- Enter the federation metadata URL for CONTOSO: https://sts.contoso.com/
- Click Next
- You should change the display name to CONTOSO Users. This display name will be the name that is displayed when users arrive at your Web Application proxy and will be displayed if you have more than one claims provider trust configured.
- Click Next > Close
- Click Add Rule
- Select Pass Through or Filter an Incoming Claim > Next
- Enter "CONTOSO E-Mail Addresses" for the claim rule name
- For Incoming claim type enter E-Mail Address
- Leave "Pass through all claim values" selected then click Finish.
- You will get a security warning stating you should filter incoming claim values. When first deploying a new claims provider trust I typically leave filtering off until the trust has been verified as working because filtering can greatly complicate the troubleshooting process. However, in a production network you should always filter incoming claims to a specific value such as limiting email claims to just the CONTOSO mail domain.
- For the purposes of this lab click Yes > OK
AD FS Relying Party Trust
At this point both organizations are ready to receive and trust claims from the partner organization, so what could possibly be left? There's one major problem; neither organization is configured to send claims to the other organization, so federation would fail if a user attempted to access the resources in the partner organization. For that reason we will need one more trust on both sides; an AD FS relying party trust to tell CONTOSO that FABRIKAM needs (relies on) it to send claims and so that FABRIKAM knows that CONTOSO relies on it to send claims as well. The following steps will configure CONTOSO and FABRIKAM to send claims to the partner organization.
CONTOSO
- Log into CONTOSO's AD FS server.
- Open the AD FS Management Console
- Expand Trust Relationships > Relying Party Trusts
- Right click > Add Relying Party Trust
- Click Start > Select "Import data about the claims provider published online or on a local network"
- Enter https://sts.fabrikam.com/ for the federation metadata address
- Click Next > Next
- You should change the display name to FABRIKAM Users. This display name will be the name that is displayed when users arrive at your Web Application proxy and will be displayed if you have more than one relying party trust configured.
- Click Next > Next > Select "Permit all users to access this relying party" > Next > Next > Close
- Right click the new Relying Party Trust > Edit Claim Rules > Add Rule
- Select "Send LDAP Attributes as Claims" > Next
- Enter "Active Directory" for the Claim rule name
- Select Active Directory for the Attribute Store
- Under the LDAP Attribute select E-Mail-Addresses and under the Outgoing Claim Type select E-Mail Address
- Click Finish > OK
FABRIKAM
- Log into FABRIKAM's AD FS server.
- Open the AD FS Management Console
- Expand Trust Relationships > Relying Party Trusts
- Right click > Add Relying Party Trust
- Click Start > Select "Import data about the claims provider published online or on a local network"
- Enter https://sts.contoso.com/ for the federation metadata address
- Click Next > Next
- You should change the display name to CONTOSO Users. This display name will be the name that is displayed when users arrive at your Web Application proxy and will be displayed if you have more than one relying party trust configured.
- Click Next > Next > Select "Permit all users to access this relying party" > Next > Next > Close
- Right click the new Relying Party Trust > Edit Claim Rules > Add Rule
- Select "Send LDAP Attributes as Claims" > Next
- Enter "Active Directory" for the Claim rule name
- Select Active Directory for the Attribute Store
- Under the LDAP Attribute select E-Mail-Addresses and under the Outgoing Claim Type select E-Mail Address
- Click Finish > OK
The preceding steps configured FABRIKAM and CONTOSO to send email address claims to the other organization when requested to do so by users with a valid local Active Directory account in each organization.
AD FS Certificate Revocation Checking
By default AD FS servers check the revocation status of the certificates presented to them when the federated organization sends cookies encrypted and/or signed with their certificates. This works fine in a production network where certificate revocation checking is as simple as querying the CA's published CRL to verify that the AD FS server's certificate is not in it. However, in this lab environment, setting up CRL's is outside of the scope of the lab. So the quick fix is to disable CRL checking within the AD FS servers. Note; this should only be performed in a lab environment. The following steps will disable CRL checking for the federated claims provider and relying party trusts.
CONTOSO
- Log into CONTOSO's AD FS server
- Open an elevated PowerShell window and enter the following commands:
- Get-AdfsClaimsProviderTrust -Name "FABRIKAM Users" | Set-AdfsClaimsProviderTrust -EncryptionCertificateRevocationCheck None -SigningCertificateRevocationCheck None
- Get-AdfsRelyingPartyTrust -Name "FABRIKAM Users" | Set-AdfsRelyingPartyTrust -EncryptionCertificateRevocationCheck None -SigningCertificateRevocationCheck None
FABRIKAM
Log into FABRIKAM's AD FS server
Open an elevated PowerShell window and enter the following commands:
- Get-AdfsClaimsProviderTrust -Name "CONTOSO Users" | Set-AdfsClaimsProviderTrust -EncryptionCertificateRevocationCheck None -SigningCertificateRevocationCheck None
- Get-AdfsRelyingPartyTrust -Name "CONTOSO Users" | Set-AdfsRelyingPartyTrust -EncryptionCertificateRevocationCheck None -SigningCertificateRevocationCheck None
Wrap-Up
In this blog post I walked you through creating trusts, enabling trust, trusting root certificates, trusted zones, etc. Now you can see why I called this post all about trust. But if you made it this far then you now have two organizations which trust each other's certificate authorities, browsers which trust their local intranet, SharePoint servers that trust their AD FS servers, AD FS servers that trust the claims issued by their federated partner, and AD FS servers that will issue claims to their federated partner. The only task left is to configure SharePoint to use claims to authenticate SharePoint users which is exactly what we will configure in Part 9 of this series.
BONUS
As promised I have attached a sample script that shows you how to create an AD FS Relying Party trust using PowerShell. It will not create all of the Relying Party Trusts that you need or the Claims Provider trusts, but it will show you the proper syntax that you need to work with AD FS claims rules and how to create the trust in PowerShell.
Configure-RelyingPartyTrust.txt