Part 5a: Windows Server 2012 R2 AD FS - Federated Web SSO
This is Part 5a of a multi-part series on how to deploy a complete end-to-end Federated Web SSO solution using Windows Server 2012 R2's AD FS role and the Web Application Proxy. In this part I will deploy CONTOSO's highly available Federation Service. Most organizations and lab environments will already have an existing deployment of Active Directory, SQL, and SharePoint which means that many of you will have skipped to this post as the entry point for your AD FS deployment. Ensure that you do already have a fully functional Active Directory, SQL, DNS, SharePoint, and certificate services infrastructure before proceeding.
If you did skip the previous parts and jumped straight to this one, ensure that you update the IP addresses, DNS names, and SPNs to match your environment. One of the most common problems I encounter when troubleshooting a customer's AD FS deployment is incorrect DNS names or Service Principal Names (SPNs).
In case you missed it:
Here is Part 1 - Overview
Here is Part 2 - Installing AD DS, AD CS, and DNS Records
Here is Part 3 - Installing SQL Database Services
Here is Part 4a - Installing CONTOSO's SharePoint Services
Here is Part 4b - Installing FABRIKAM's SharePoint Services
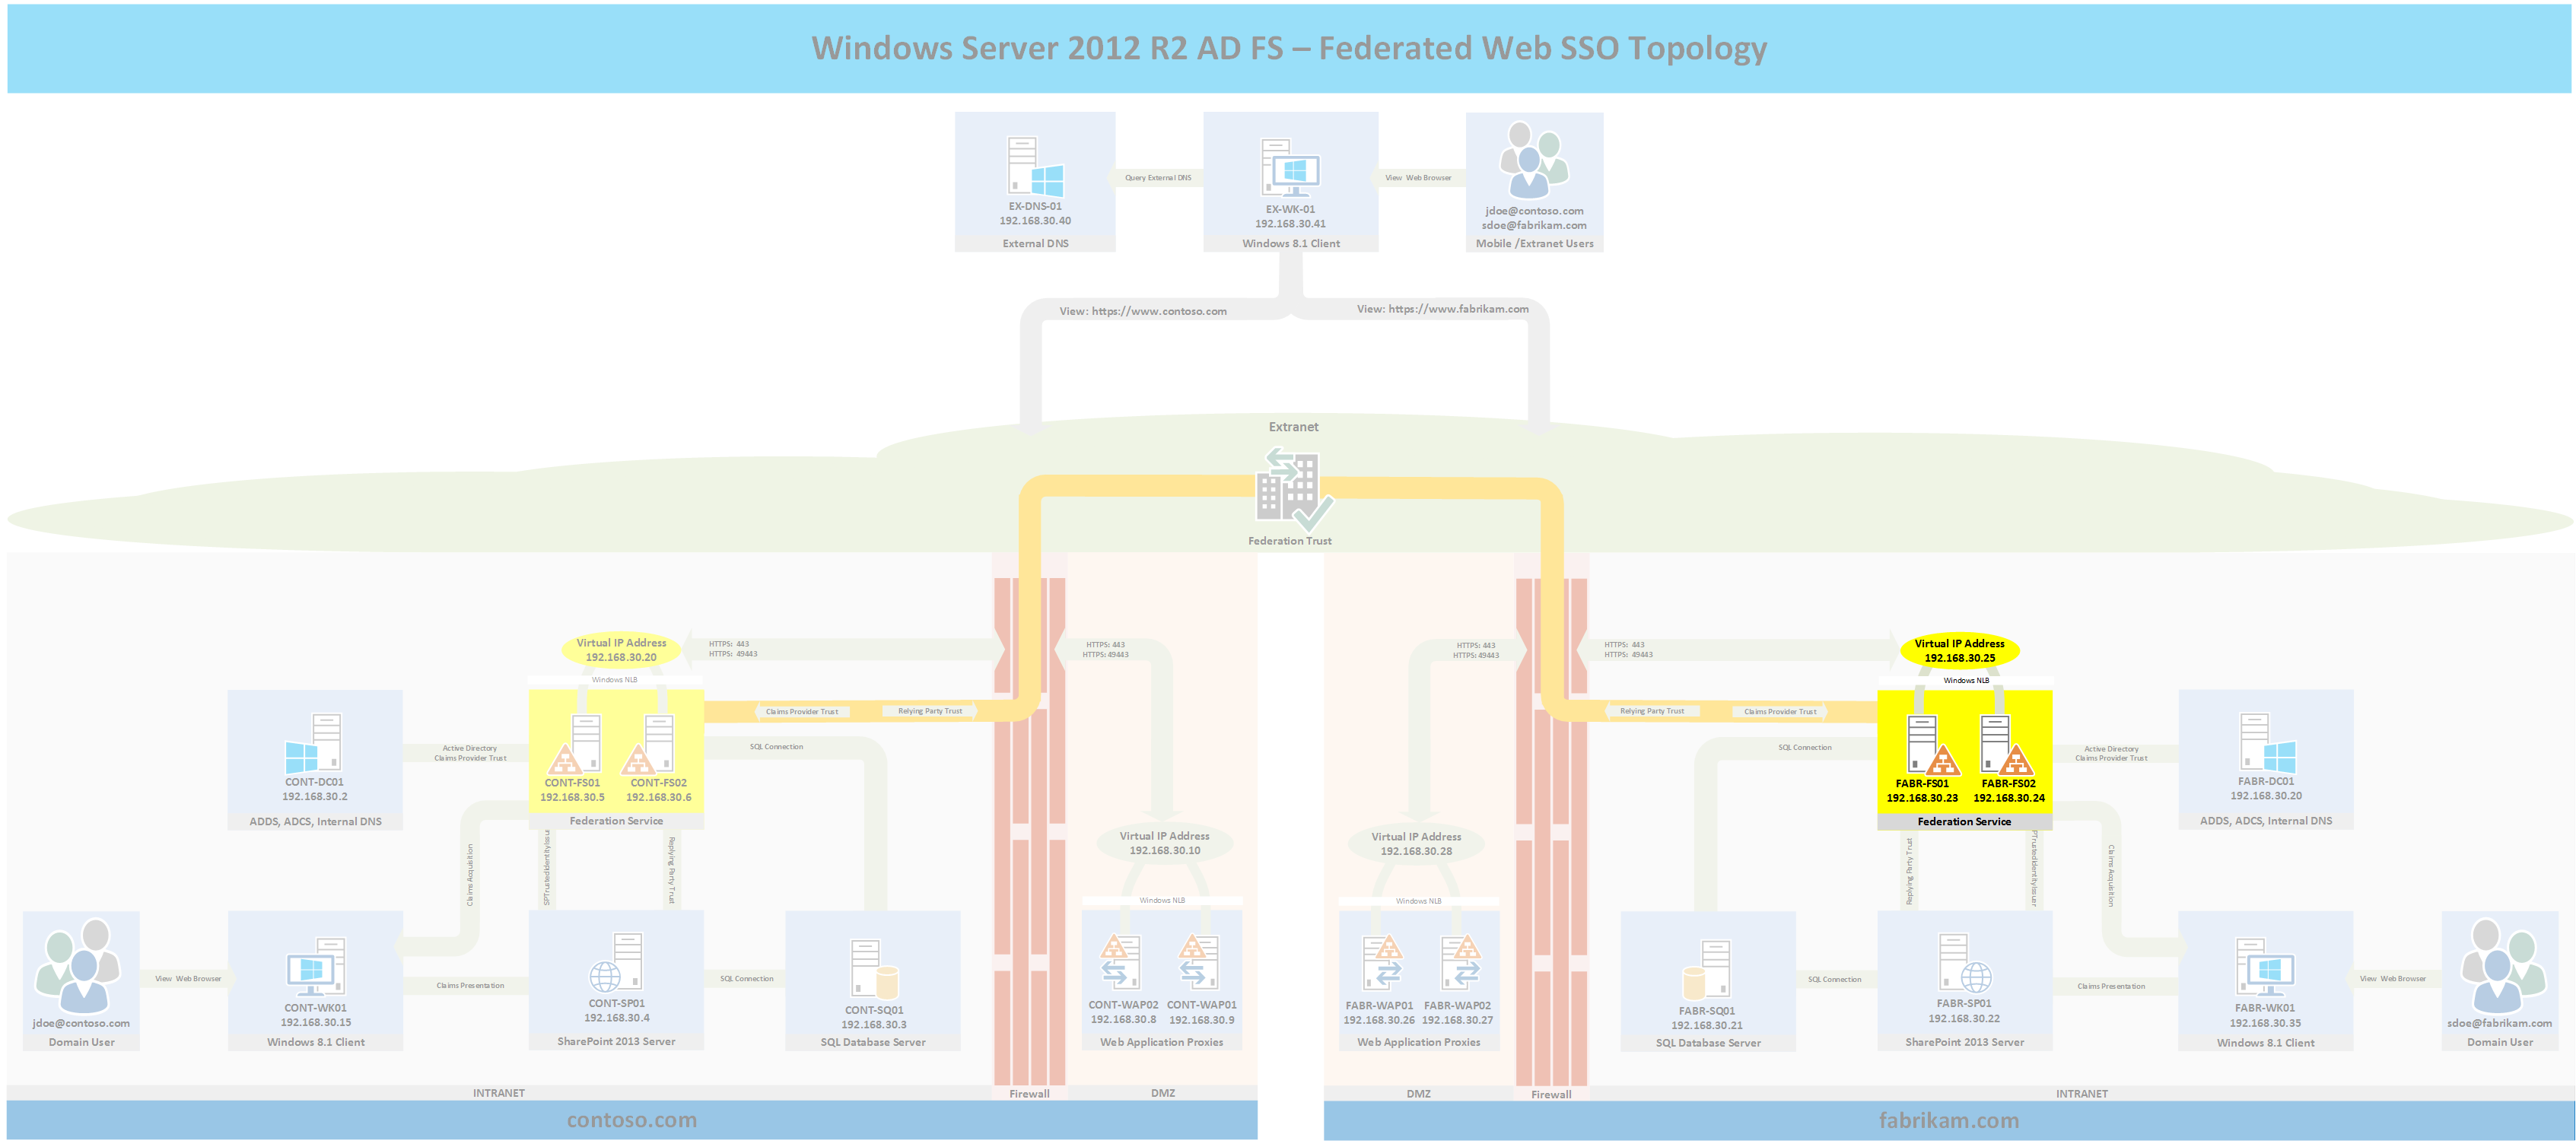
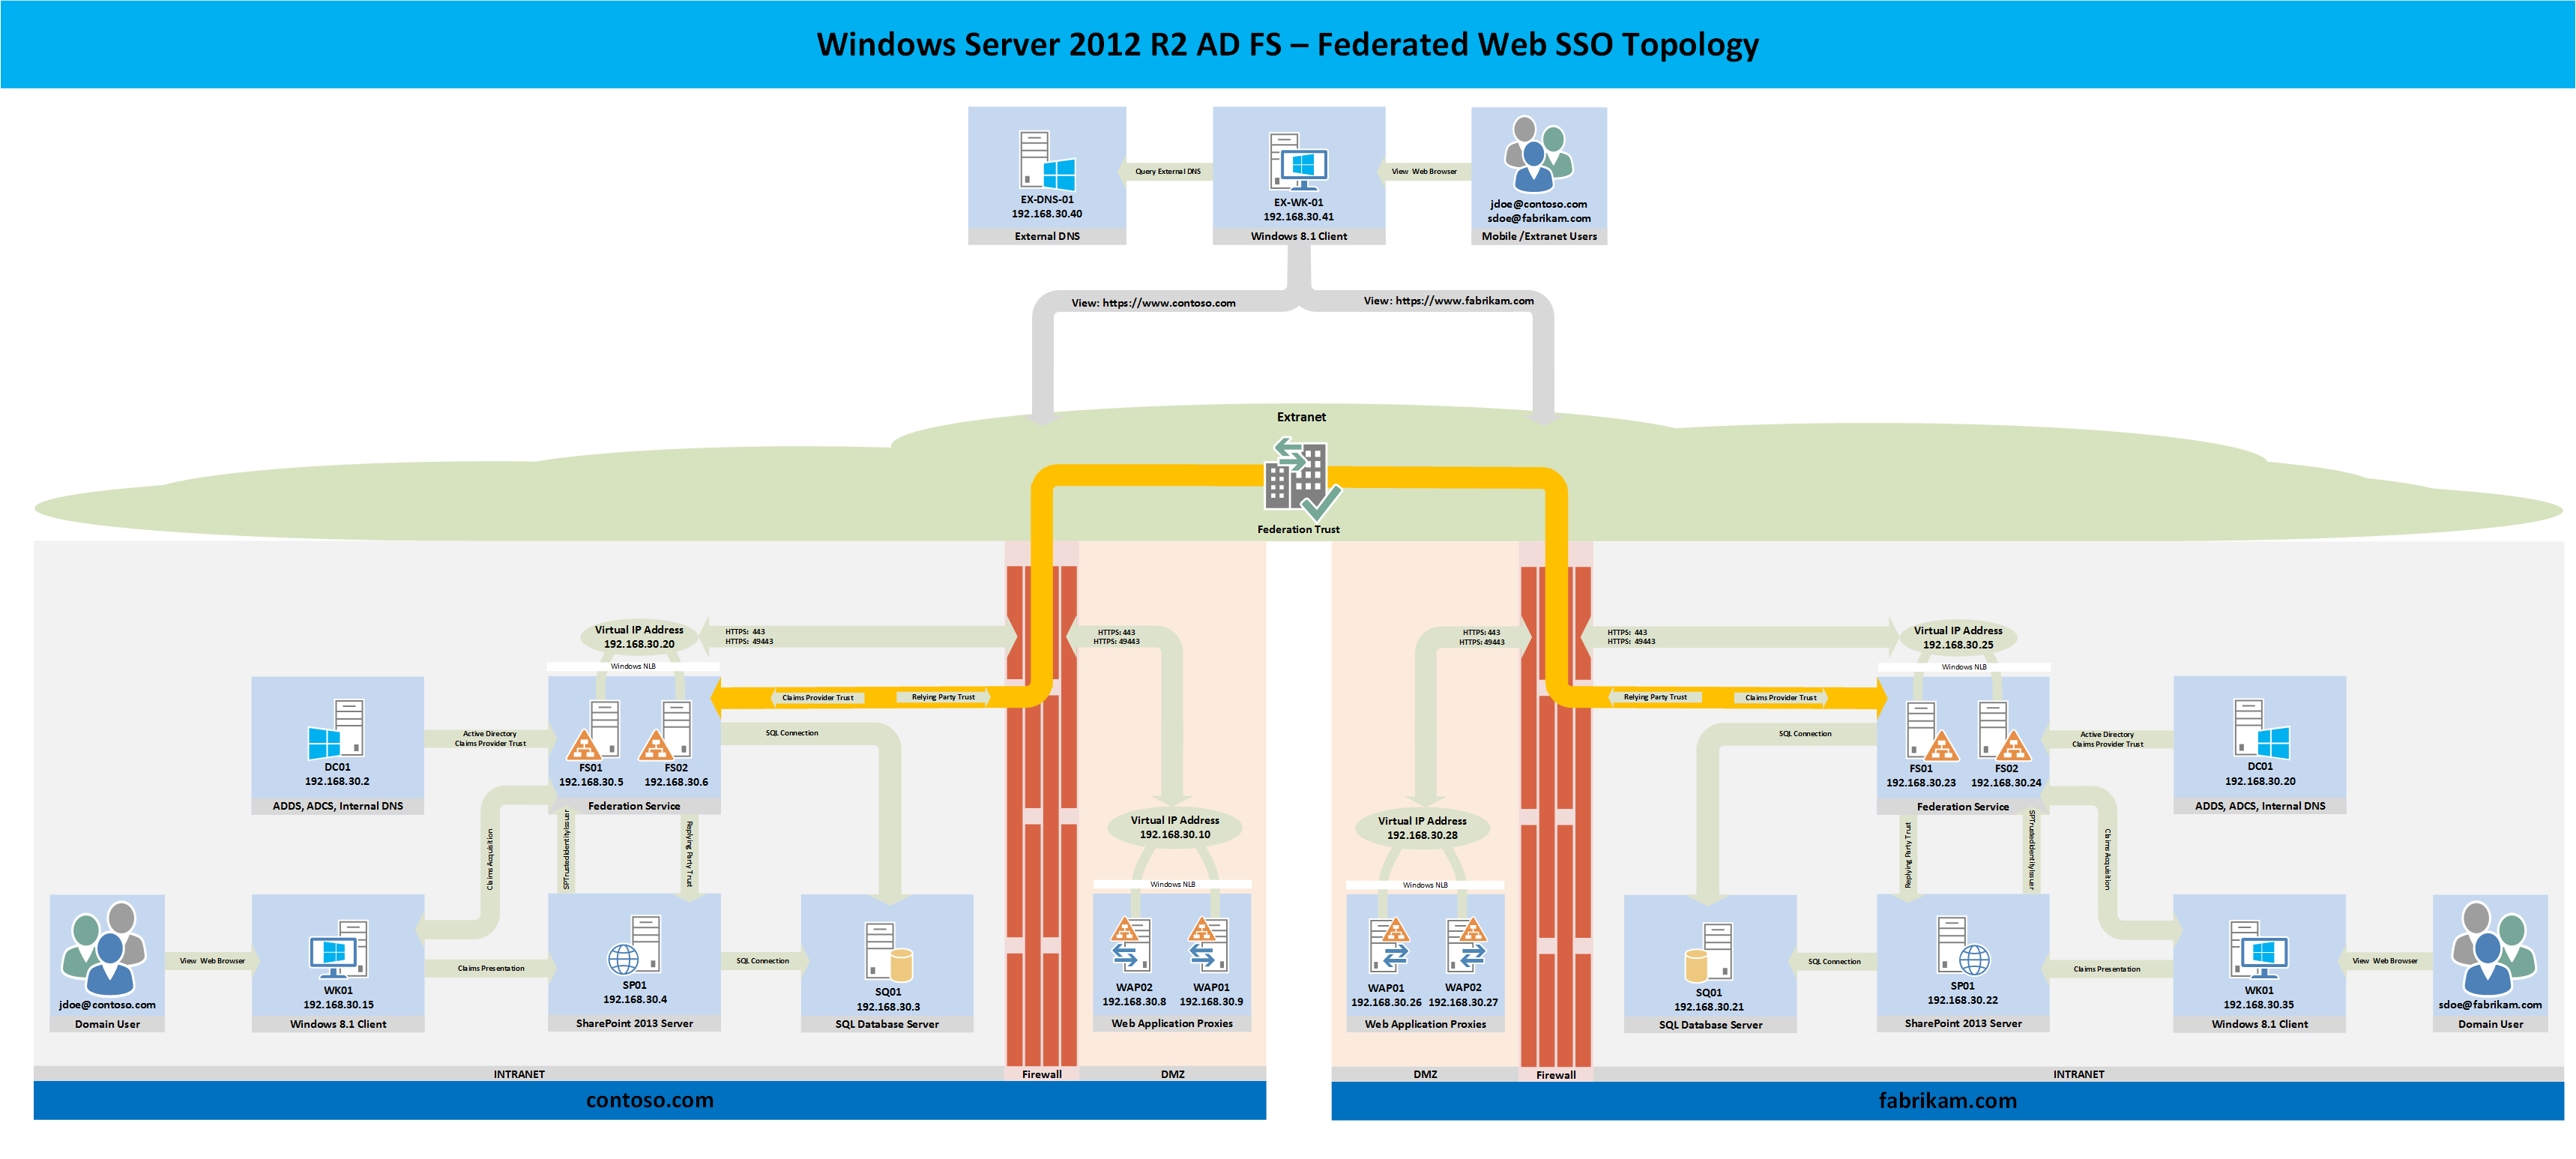
Topology
The following topology highlights in yellow the two servers that will be built for parts 5a and 5b and where they fit into the overall topology. If you wish to see the full topology click here
Deploy CONTOSO's Federation Servers
The following sections will deploy CONTOSO's federation servers in a highly available configuration.
Deploy CONTOSO's First Federation Server
- Log into the CONTOSO domain controller (CONT-DC01) and create a new Domain User called srv_ADFS
- If you have not already done so, create a new DNS A record called sts.contoso.com with an IP address of 192.168.30.7 which is the network loadbalanced virtual IP address for the federation service.
- Log into the CONTOSO SQL server (CONT-SQ01) and give srv_ADFS sysadmin rights.
- Open SQL Server Management studio > Security > Logins > New Login > Search > Locations > Entire Directory > OK
- Enter srv_adfs then press Enter
- Select Server Roles > Check sysadmin > OK
- In a production environment the rights should be modified to give the service account the least permissions necessary after AD FS is deployed.
- Deploy a Windows Server 2012 R2 workgroup server and configure the IP addess, subnet mask, hostname, and DNS servers. For the purposes of this series the information will be as follows:
- Hostname: CONT-FS01
- IP Address: 192.168.30.5
- Subnet Mask: 255.255.255.0
- DNS Servers: 192.168.30.2
- Join the contoso.com domain
- After rebooting, log into the server using CONTOSO domain credentials (i.e. CONTOSO\Administrator)
- Add AD FS to the server by typing the following command from an elevated PowerShell window: Add-WindowsFeature ADFS-Federation -Includemanagementtools
- Request 3 certificates (Service Communications, Decryption, Signing)
- From the Start Menu type MMC > File > Add/Remove Snapin > Certificates > Add > Computer Account
- Click Next > Finish > OK
- Expand Certificates > Right Click Personal > All Tasks > Request New Certificate
- Click Next, ensure Active Directory Enrollment Policy is highlighted > Next
- Select Web Server then click the More Information is required link
- For the subject name select Common Name then type sts.contoso.com and click Add
- Click the General tab and enter sts.contoso.com for the Friendly name and Description
- Click the Private Key tab
- Select Make private key exportable then click OK > Enroll
- Repeat steps 7a-7i to obtain 2 more certs with a subject name of sts-dec.contoso.com and sts-sig.contoso.com
- The service communications certificate should have a subject name of sts.contoso.com, the decryption certificate should have a subject name of sts-dec.contoso.com, and the signing certificate should have a subject name of sts-sig.contoso.com
- Export all of the certificates to a PFX file before continuing.
- Highlight all 3 certificates > Right Click > All Tasks > Export
- Click Next > Yes, export the private key > Next > Personal Information Exchange > Next
- Select Password and enter a password then click Next
- Select a place to save the file > Next > Finish > OK
- Go back to the certificate management console and give the srv_ADFS service account rights to read the private keys
- Highlight a Certificate > Right Click > All Tasks > Manage Private Keys > Add > srv_ADFS > Uncheck Full Control
- Click OK
- Repeat for all 3 certificates
- Open an elevated PowerShell window and type the following command: dir cert:localmachine\my
- Open Notepad and copy and paste the thumbprints from each certificate to the proper locations within the following command after typing the following PowerShell command into the Notepad document:
- $fsCred = Get-Credential
- Install-AdfsFarm -CertificateThumbprint <thumbprint> -DecryptionCertificateThumbprint <thumbprint> -SigningCertificateThumbprint <thumbprint> -FederationServiceName sts.contoso.com -SQLConnectionString "Data Source=CONT-SQ01;Integrated Security=True" -ServiceAccountCredential $fsCred -FederationServiceDisplayName "CONTOSO Users"
- The completed command should look similar to the one shown in the following Figure.

- Copy the completed PowerShell commands from Notepad to an elevated PowerShell window. Enter CONTOSO\srv_ADFS and the password for srv_ADFS when prompted then press Enter to continue
- You should get a message stating that the deployment was successful.
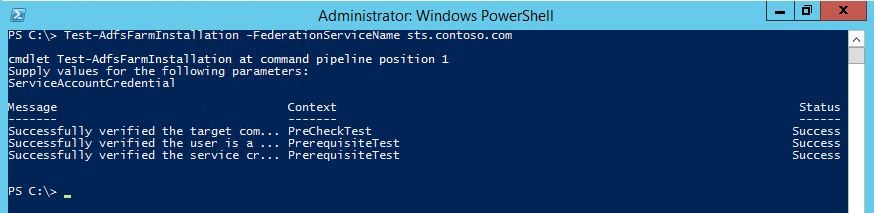
- Type the following PowerShell command to verify that the service successfully installed: Test-AdfsFarmInstallation -FederationServiceName sts.contoso.com then enter the credentials for CONTOSO\srv_ADFS when prompted. Your output should be similar to the one shown in the following Figure.
Deploy CONTOSO's Second Federation Server
- Deploy a Windows Server 2012 R2 workgroup server and configure the IP addess, subnet mask, hostname, and DNS servers. For the purposes of this series the information will be as follows:
- Hostname: CONT-FS02
- IP Address: 192.168.30.6
- Subnet Mask: 255.255.255.0
- DNS Servers: 192.168.30.2
- Join the contoso.com domain
- After rebooting, log into the server using CONTOSO domain credentials (i.e. CONTOSO\Administrator)
- Add AD FS to the server by typing the following command from an elevated PowerShell window: Add-WindowsFeature ADFS-Federation -Includemanagementtools
- Copy the private keys that were exported from CONT-FS01 to CONT-FS02
- Import the private keys to CONT-FS02
- Double click the PFX file and select LocalMachine then click Next > Next
- Enter the password that you entered when you exported the private keys then click Next
- Select Place all certificates in the following store > Browse > Personal > OK > Next > Finish > OK. Note: As a best practice you should delete the PFX file once the certificates have been imported into the certificate store.
- Open the certificate management console and give the srv_ADFS service account rights to read the private keys
- Highlight a Certificate > Right Click > All Tasks > Manage Private Keys > Add > srv_ADFS > Uncheck Full Control
- Click OK
- Repeat for all 3 certificates
- Open an elevated PowerShell window and type the following command: dir cert:localmachine\my
- Open Notepad and copy and paste the service communications thumbprint (subject: sts.contoso.com) to the proper location within the following command after typing the following PowerShell command into the Notepad
- $fsCred = Get-Credential
- Add-AdfsFarmNode -ServiceAccountCredential $fsCred -SQLConnectionString "Data Source=CONT-SQ01;Integrated Security=True" -CertificateThumbprint "<thumbprint>"
- The completed command should look similar to the one shown in the following Figure.
- You should get a message stating that the deployment was successful.
- Type the following PowerShell command to verify that the service successfully installed: Test-AdfsFarmInstallation -FederationServiceName sts.contoso.com then enter the credentials for CONTOSO\srv_ADFS when prompted. Your output should be similar to the one shown in the following Figure.

Install Windows NLB (OPTIONAL)
The following steps will make the AD FS deployment a highly available service. Typically in a production environment, a 3rd party load balancer is used to provide this functionality. If you choose to skip the deployment of Windows NLB or a 3rd party load balancer ensure to change the sts.contoso.com DNS A record IP address to point to either CONT-FS01 or CONT-FS02.
Deploy NLB to CONT-FS01
- Log into CONT-FS01 and open an elevated PowerShell window
- Type the following commands to add NLB to CONT-FS01 and to configure the port rules
- Add-WindowsFeature NLB,RSAT-NLB -IncludeManagementTools
- New-NlbCluster -Hostname CONT-FS01 -Interface "Ethernet" -ClusterName ADFSNLB -ClusterPrimaryIP 192.168.30.7 -SubnetMask 255.255.255.0 -OperationMode Multicast. Note: if you are unsure of the Inteface name or this command fails type Get-NetAdapter | fl name to get the interface name
- Get-NlbClusterPortRule | Remove-NlbClusterPortRule -Force
- Add-NlbClusterPortRule -StartPort 443 -EndPort 443 -IP 192.168.30.7 -Protocol Tcp -Affinity Single -Interface "Ethernet"
- Add-NlbClusterPortRule -StartPort 49443 -EndPort 49443 -IP 192.168.30.7 -Protocol Tcp -Affinity Single -Interface "Ethernet"
- Verify that the cluster is operational by typing the following command: Get-NlbCluster
Deploy NLB to CONT-FS01
- Log into CONT-FS02 and open an elevated PowerShell window
- Type the following commands to add NLB to CONT-FS02
- Add-WindowsFeature NLB,RSAT-NLB -IncludeManagementTools
- Add-NlbClusterNode -NewNodeName CONT-FS02 -NewNodeInterface "Ethernet" -Hostname CONT-FS01 -Interface "Ethernet"
- Verify that the cluster is fully converged by typing the following command: Get-NlbCluster
Verify NLB and AD FS Federation Metadata
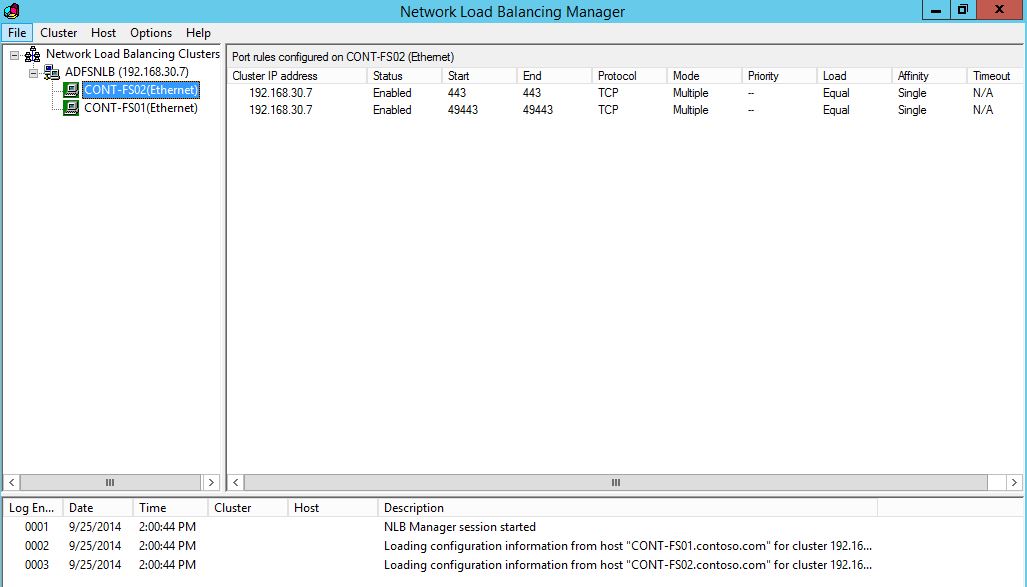
Verify NLB is fully configured by going to the start screen > type network load balancing manager then press enter. NLB should be similar to the one shown in the following Figure.
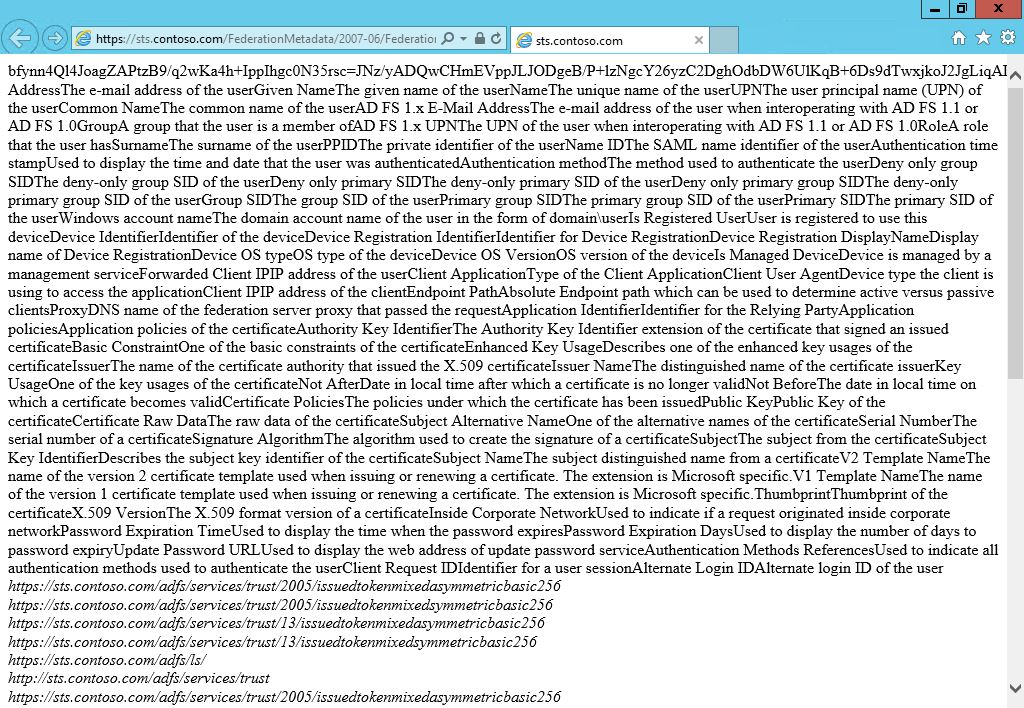
Verify AD FS by typing the following URL into a browser window: https://sts.contoso.com/FederationMetadata/2007-06/FederationMetadata.xml
You should be presented with a federation metadata page similar to one of the ones shown below depending on your browser's trusted sites and compatibility mode configuration.

If you chose to deploy NLB or a 3rd party loadbalancer, ensure both nodes work as intended before proceeding by drainstopping one of the nodes (Powershell: Stop-NlbClusterNode -Drain -Hostname CONT-FS01 or CONT-FS02). A common problem I have seen when dealing with clustering is that only one node works so users get intermittent errors that can be hard to troubleshoot since traffic occasionally hits the non-working node.
If your environment is virtual and your hypervisor host is Hyper-V and the NLB VIP is unreachable outside of the NLB cluster's VLAN or you encounter intermittent connectivity problems to the VIP then try enabling MAC spoofing for the VM as explained here. If your hypervisor is VMware, you may need a static mapped mac address entry to resolve the issue.
Verify Service Principal Name
Although the AD FS service automatically configures the SPN for the AD FS service account, I always like to verify that it is correct before proceeding. This will also ensure that another account does not have the same SPN which will prevent Kerberos from working. The following steps will verify the SPN.
- Log into a CONTOSO member server.
- Open a command prompt and type the following commands
- setspn -X
- setspn -L srv_adfs
- The resulting output should be similar to the output shown in the following Figure. Any duplicates should be resolved before continuing.

Wrap-Up
You now have two forests one named contoso.com and one named fabrikam.com along with the DNS records, certificate services, database services, CONTOSO's and FABRIKAM's SharePoint Foundation 2013 services, and CONTOSO's Windows Server 2012 R2 AD FS services. In the upcoming parts FABRIKAM's AD FS services and both organization's Web Application Proxies will be deployed and configured to support federated web SSO.
Troubleshooting
- If you cannot connect to the SQL server and the Windows Firewall is enabled ensure port TCP 1433 is enabled inbound on the Windows Firewall as per the following instructions.
- If the installation of AD FS fails when connecting to SQL, verify that the service account has at least DB Owner on the SQL server for the target database
- If you get an error when attempting to obtain a certificate ensure that Domain Computers have rights to read the Web Server template
- If you get an error when attempting to obtain a certificate ensure thatthe CRL has not expired
- If you get an error "Install-AdfsFarm: Parameter set cannot be resolved..." verify that the command and all parameters are properly spelled and that all mandatory parameters are present
- If you get an error stating page cannot be found when viewing https://sts.contoso.com/FederationMetadata/2007-06/FederationMetadata.xml verify that the sts.contoso.com record was created and points to either the AD FS server IP address or the NLB Virtual IP address (VIP)