Configuring Exchange 2013 SP1 to Accept AD FS Claims
Overview
In this post I am going to show you how to configure Exchange 2013 SP1 to accept AD FS claims. Not only that, I am going to provide a PowerShell Script that I wrote to make lab testing this functionality much easier. In case you missed it, Exchange 2013 SP1 fully supports AD FS claims-based authentication to connect to Outlook WebApp and EAC. You can read all about it as well as how to configure it here: https://technet.microsoft.com/en-us/library/dn635116%28v=exchg.150%29.aspx.
The TechNet article does a great job of explaining how to configure Exchange 2013 SP1 to accept claims based authentication, so my goal here is to hopefully show you step-by-step how to do the same thing and include automation steps to make the testing and deployment even easier.
In this post I am going to use an existing fictional homelab.net Active Directory lab environment to demonstrate how to integrate Exchange 2013 SP1 and Windows Server 2012 R2 AD FS. The servers in my lab are configured as follows:
dc1.homelab.net - ADDS, ADCS, DNS
dc2.homelab.net - ADDS
adfs1.homelab.net - Windows Server 2012 R2 AD FS Federation Service Server
adfp1.homelab.net - Windows Server 2012 R2 Web Application Proxy
ex01.homelab.net - Exchange 2013 SP1 CAS Server
ex02.homelab.net - Exchange 2013 SP1 HT,MB Server
wksta1.homelab.net - Windows 8.1 workstation
Prerequisite Software
The script shown here as well as the architecture, examples, and screen shots were all created in my lab environment. I did not test the steps or the script on other versions of the software. All of the following servers and services were fully operational prior to integrating AD FS and Exchange 2013. I strongly suggest you thoroughly verify that your environment has fully functional Active Directory, DNS, ADFS, and certificate services prior to performing the steps in this post.
My lab environment consists of:
- Windows Server 2012 R2 AD DS
- Windows Server 2012 R2 AD CS
- Windows Server 2012 R2 AD FS
- Windows Server 2012 R2 Web Application Proxy
- Exchange 2013 SP1 installed on a Windows Server 2012 R2 member server
Prerequisite Information Needed
Based on my lab testing I wrote a PowerShell script that automates much of the integration steps between Windows Server 2012 R2 ADFS and Exchange 2013 SP1. However, some prerequisite information must be obtained and input into the script prior to running it.
OWA URL - This is the URL that users will use to access OWA. For my lab environment I matched my OWA Virtual Directory External URL to my Web Application Proxy's External URL.

ECP URL - This is the URL that users will use to access EAC. For my lab environment I matched my ECP Virtual Directory External URL to my Web Application Proxy's External URL.

Web Application Proxy Certificate Thumbprint - This is the thumbprint of the certificate that will be used by the Web Application Proxy to publish OWA and EAC to external users. To get this I logged into my Web Application Proxy and entered the commands shown in the following screenshot.

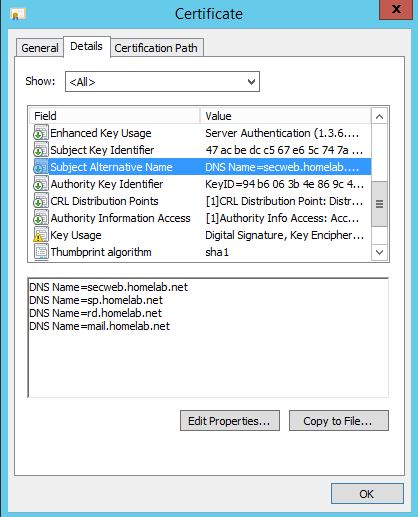
While we are on the subject of the Web Application Proxy's certificate, lets take a closer look at the certificate's properties. As you can see in the following screenshot, I have obtained a cert from my CA that has Subject Alternative Names that include everything I plan on doing in my lab. This includes SharePoint (sp.homelab.net), RD Gateway (rd.homelab.net) and Exchange Web Services (mail.homelab.net). To me this is easier than having to constantly obtain more certs. Also I gave my certificate a generic subject name called secweb.homelab.net (short for secure web).
ADFS Signing Certificate Thumbprint - This is the thumbprint of the certificate that the AD FS server uses to sign tokens. To get this I logged into the Windows Server 2012 R2 AD FS server and typed the following command:

ADFS Issuer URL - This is the URL where relying parties can send end users to be authenticated. To get this I logged into the Windows Server 2012 R2 AD FS server and typed the following command.

Based on the result I created the following url: https://sts.homelab.net/adfs/ls/
I cannot stress enough that if any of these thumbprints are entered incorrectly into the PowerShell commands you may spend hours troubleshooting certificate issues. Also it goes without saying that all certificates must be trusted by all services and that revocation information must be accessible to all servers.
So after collecting all of that information below is what my results looked like:
OWA URL https://mail.homelab.net/owa
ECP URL: https://mail.homelab.net/ecp
Web Application Proxy Certificate Thumbprint: E154575C1B6C77AB5B8FDDB702D25ED08C58F116
ADFS Signing Certificate Thumbprint: BFA9D8A6A763171CE9C9A2DA26A08ABCE65C0E62
ADFS Issuer URL: https://sts.homelab.net/adfs/ls/
Automation Script
I am a big fan of automating complex tasks and deployments and this scenario was no different. So I created the following script which takes the prerequisite information and automates most of the tasks associated with configuring each respective service. The following script should be used strictly in a lab environment only. The way I used it in my lab was I ran it on my AD FS Federation Service Server (2012 R2 ADFS) then I ran it on my Web Application Proxy Server, and finally I ran it on my Exchange 2013 SP1 CAS server. I have also attached the script to this post. The script will ask you what role it is configuring prior to doing anything as shown below:

#
#Edit the following URLs and thumbprints to match your environment before running this script
#
#OWA URL
$owaURL="https://mail.homelab.net/owa"
#ECP URL
$ecpURL="https://mail.homelab.net/ecp"
#WebApplication Proxy Certificate Thumbprint
$WebApplicationProxyCertThumpbrint="E154575C1B6C77AB5B8FDDB702D25ED08C58F116"
#ADFS Signing Certificate Thumbprint
$ADFSSigningCertificateThumbprint="BFA9D8A6A763171CE9C9A2DA26A08ABCE65C0E62"
#ADFS Issuer URL
$ADFSIssuerURL="https://sts.homelab.net/adfs/ls/"
#The following section is only for ADFS Federation Service Servers
function fnADFSServiceServers{
$IssuanceAuthorizationRules=@'
@RuleTemplate = "AllowAllAuthzRule"
=> issue(Type = "https://schemas.microsoft.com/authorization/claims/permit",
Value = "true");
'@
$IssuanceTransformRules=@'
@RuleName = "ActiveDirectoryUserSID"
c:[Type == "https://schemas.microsoft.com/ws/2008/06/identity/claims/windowsaccountname",
Issuer == "AD AUTHORITY"]
=> issue(store = "Active Directory", types =
("https://schemas.microsoft.com/ws/2008/06/identity/claims/primarysid"), query = ";objectSID;
{0}", param = c.Value);
@RuleName = "ActiveDirectoryGroupSID"
c:[Type == "https://schemas.microsoft.com/ws/2008/06/identity/claims/windowsaccountname",
Issuer == "AD AUTHORITY"]
=> issue(store = "Active Directory", types =
("https://schemas.microsoft.com/ws/2008/06/identity/claims/groupsid"), query = ";tokenGroups
(SID);{0}", param = c.Value);
@RuleName = "ActiveDirectoryUPN"
c:[Type == "https://schemas.microsoft.com/ws/2008/06/identity/claims/windowsaccountname",
Issuer == "AD AUTHORITY"]
=> issue(store = "Active Directory", types =
("https://schemas.xmlsoap.org/ws/2005/05/identity/claims/upn"), query = ";userPrincipalName;
{0}", param = c.Value);
'@
Add-ADFSRelyingPartyTrust -Name "Outlook Web App" -Enabled $true -Notes "This is a trust
for $owaURL" -WSFedEndpoint $owaURL -Identifier $owaURL -IssuanceTransformRules
$IssuanceTransformRules -IssuanceAuthorizationRules $IssuanceAuthorizationRules
Add-ADFSRelyingPartyTrust -Name "Exchange Admin Center (EAC)" -Enabled $true -Notes "This
is a trust for $ecpURL" -WSFedEndpoint $ecpURL -Identifier $ecpURL -IssuanceTransformRules
$IssuanceTransformRules -IssuanceAuthorizationRules $IssuanceAuthorizationRules
Write-host "Active Directory Federation Service Server Configuration Complete"
}
#The following function is only for Web Application Proxies
function fnWebApplicationProxies{
Add-WebApplicationProxyApplication -BackendServerUrl "$owaURL/" -
ExternalCertificateThumbprint $WebApplicationProxyCertThumpbrint -ExternalUrl "$owaURL/" -Name
'OWA' -ExternalPreAuthentication ADFS -ADFSRelyingPartyName 'Outlook Web App'
Add-WebApplicationProxyApplication -BackendServerUrl "$ecpURL/" -
ExternalCertificateThumbprint $WebApplicationProxyCertThumpbrint -ExternalUrl "$ecpURL/" -Name
'EAC' -ExternalPreAuthentication ADFS -ADFSRelyingPartyName 'Exchange Admin Center (EAC)'
Write-host "Web Application Proxy Configuration Complete"
}
#The following section is only for Exchange 2013 SP1 Servers
function fnExchangeServers{
$s=New-PSSession -ConfigurationName Microsoft.Exchange -ConnectionURI "https://
$($env:ComputerName)/PowerShell/" -Authentication Kerberos; Import-PSSession $s
$uris = @($owaURL,$ecpURL)
Set-OrganizationConfig -AdfsIssuer $ADFSIssuerURL -AdfsAudienceUris $uris -
AdfsSignCertificateThumbprint $ADFSSigningCertificateThumbprint
Write-host "Exchange Organization Configuration Complete"
Get-EcpVirtualDirectory | Set-EcpVirtualDirectory -AdfsAuthentication $true -
BasicAuthentication $false -DigestAuthentication $false -FormsAuthentication $false -
WindowsAuthentication $false #-LiveIdAuthentication $false
Get-OwaVirtualDirectory | Set-OwaVirtualDirectory -AdfsAuthentication $true -
BasicAuthentication $false -DigestAuthentication $false -FormsAuthentication $false -
WindowsAuthentication $false #-LiveIdAuthentication $falseOAuthAuthentication $false
IISReset /Noforce
Write-host "Exchange Virtual Directory Configuration Complete"
}
#Displays Selection Popup Box
$title="Select Server Role"
$Message="Select the role of the server you are currently configuring.`r`n-This script must be
ran locally on the server you are configuring.`r`n-Ensure you have modified the parameters in
this script to match your environment or click Cancel to do so now."
$ADFS=New-Object System.Management.Automation.Host.ChoiceDescription "&AD Federation
Server","AD FS Federation Service Server."
$ADFP=New-Object System.Management.Automation.Host.ChoiceDescription "AD &Federation
Proxy","AD FS Federation Proxy."
$Exchange=New-Object System.Management.Automation.Host.ChoiceDescription "&Exchange 2013 SP1
CAS Server","Exchange 2013 SP1 CAS Server."
$Cancel=New-Object System.Management.Automation.Host.ChoiceDescription "&Cancel","Cancel."
$options = [System.Management.Automation.Host.ChoiceDescription[]]($ADFS,$ADFP,$Exchange,
$Cancel)
$result = $host.ui.PromptForChoice($title, $message, $options, 0)
switch($result)
{
0{fnADFSServiceServers} #Configures Federation Service Servers
1{fnWebApplicationProxies} #Configures Web Application Proxy Servers
2{fnExchangeServers} #Configures Exchange Servers
3{Exit} #Terminates Script
}
Known Limitations
- The script will not gather the URL's or thumbprints for you. This logic could be easily added but for simplicity purposes I made this a manual step
- When running the script on the Exchange 2013 servers IIS typically took longer to start than the script will wait, so I had to start the World Wide Publishing service by hand after running the script
- The script will currently only set the BackendServerUrl and the ExternalURL values to be the same when configuring the Web Application Proxy. So if your internal url for your OWA is different such as internal.homelab.net while your external URL is something like external.homelab.net then additional modifications will need to be made to have different URLs when configuring the Web Application Proxy
Results
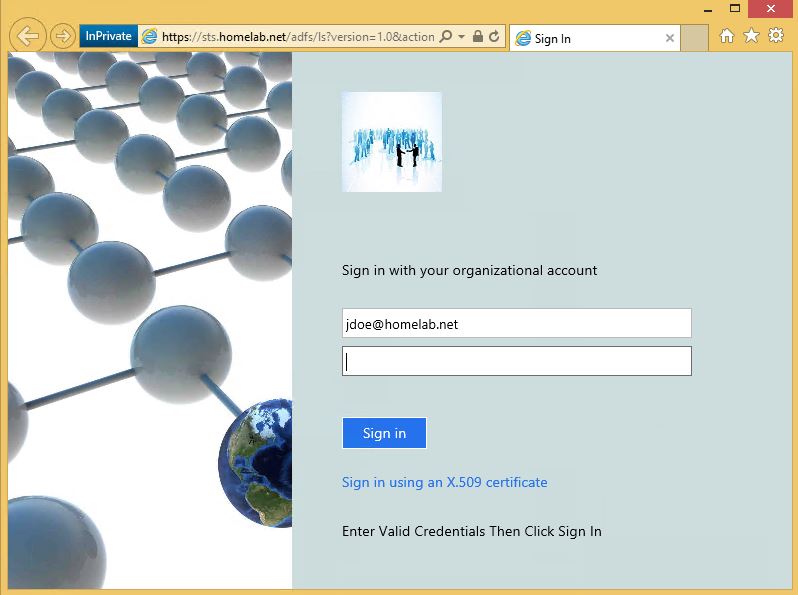
After configuring the Federation Service Server, Web Application Proxy, and Exchange 2013 SP1 I then edited the hosts file of my domain joined workstation to resolve sts.homelab.com to my AD FS Federation Service Server and to resolve mail.homelab.com to my Exchange 2013 SP1 CAS server. As expected, Exchange properly redirected me to my Federation Server to be authenticated as shown in the following screenshot.

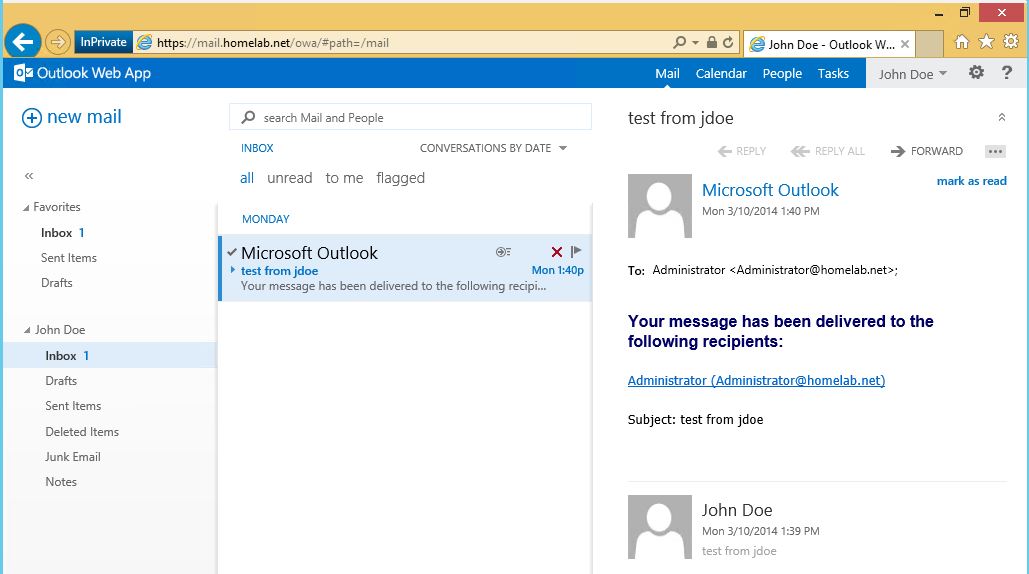
Since the Federation Service server is configured to accept Windows Integrated Credentials from internal users I was then logged into OWA without an additional prompt for credentials. Make sure that your federation service URL (in my case it was sts.homelab.net) is in your browser's trusted sites or this step will fail and you will get a password prompt. As shown below I was able to view my inbox.
To simulate an external user, I edited my hosts file on my workstation to resolve sts.homelab.net and mail.homelab.net to the Web Application Proxy's IP address. Typing https://mail.homelab.new/owa then revealed the following logon page. Admittedly my Web Application Proxy logon page probably does not resemble yours. I have been testing customizing the Web Application Proxy page based on the following TechNet article: https://technet.microsoft.com/en-us/library/dn280950.aspx. If you look closely you will also notice that I can either log in via a user certificate or a username and password. Both methods worked in my test environment. In a future post I will show you how to provision smart card certs that can be used with the Web Application Proxy to authenticate users.
 .
.
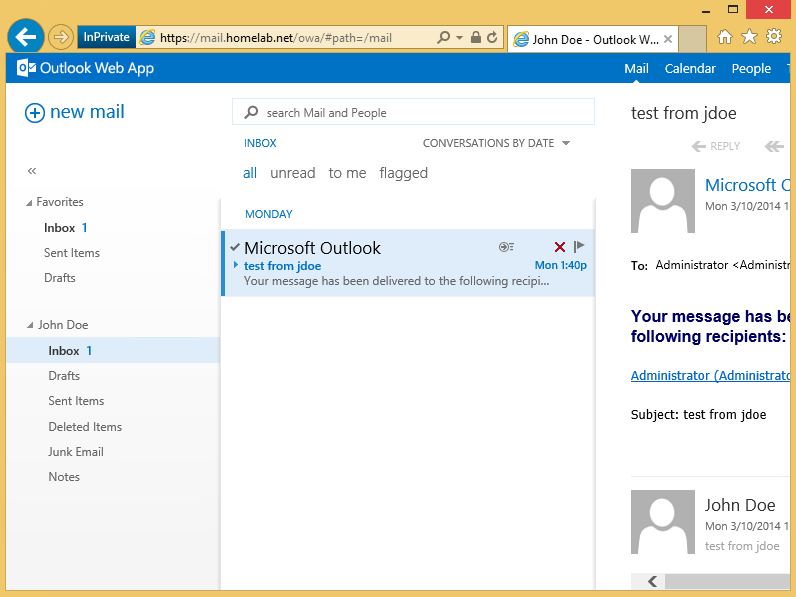
After entering valid credentials or selecting a valid client certificate, I was able to successfully view my test user's inbox as shown below.
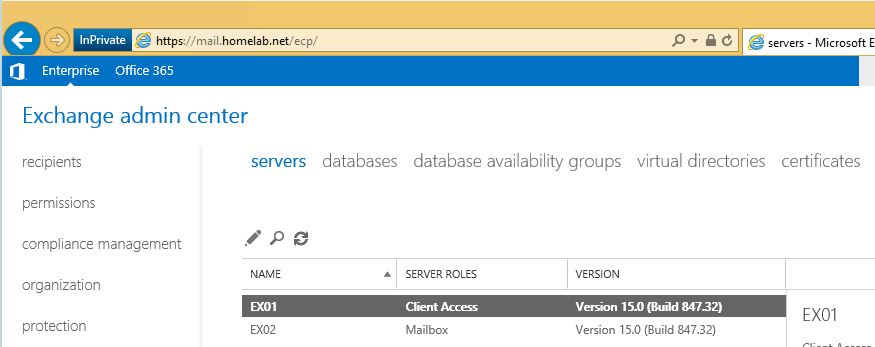
To truly showcase the power of combining ADFS, the Web Application Proxy Role, and Exchange 2013 SP1 I then logged in via the Web Application Proxy to the https://mail.homelab.net/ecp URL and was able to access the Exchange Admin Center as an Organizational Admin as shown below. Securely accessing your Exchange organization using nothing but port 443 from anywhere in the world was unheard of less than 5yrs ago.
Conclusion
In this post I showed you how to use the new Exchange 2013 SP1 AD FS integration features to fully integrate Exchange 2013 SP1 into an existing Windows Server 2012 R2 AD FS deployment. I also provided a sample PowerShell script which can be easily customized to fit different organizational needs.