Move and Store Operations Management Suite (OMS) Log Analytics Data to Azure SQL Data Warehouse using Azure Data Factory – Part 1
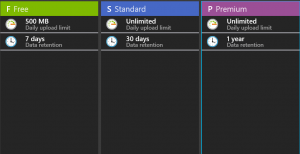
From time to time, having conversations with customers about OMS Log Analytics, some questions come up about long term storage of their data. If you’ve been utilizing OMS Log Analytics for a while you may remember the legacy three service tiers (Free, Standard, Premium) in which our Premium tier allowed for 1 year of data retention.
Those legacy tiers have since been replaced by Free, Standalone, and OMS.
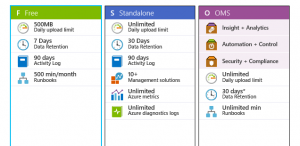
In the new pricing tiers, it now lists 30 days of data retention for the Standalone and OMS tier. So the question is what happens on the 31st day of that data point metric? Well most likely it will stop showing up in your log search results and if you are looking to show operational trends that span more than 30 days, then unfortunately you might be out of luck. Now let me be clear before we move on. At the timing of this post I am not aware of any changes to the service tiers that will extend retention longer than the 30 days stated, so we’re going to proceed forward with the understanding that data points older than 30 days will no longer be available to you. I have not had time to speak with the Product Team, so if I get an update I will come back and update this post.
This post will show you how to capture OMS Log Analytics search data and move that data over to an Azure SQL Data Warehouse. With the following steps you will:
- Create and save a OMS Log Analytics search result
- Create an Azure Storage Blob Container
- Create an Azure SQL Data Warehouse
- Utilize Azure Automation to schedule the OMS Log Analytics search and upload data blob to storage container
- Create and connect resources to Azure Data Factory
- Create a ADF (Azure Data Factory) pipeline to move the OMS Log Analytics search data from Storage Blob to Azure SQL Data Warehouse
I will also mention that beyond using Azure SQL Data Warehouse to solve a data retention issue, you could also possibly utilize this solution as an additional option to filter and capture data to be presented outside of the OMS console. OMS Log Analytics already has native functionality to push data into Microsoft PowerBI, so this can be another tool you have in your toolbox to build a solution.
Before you begin
I would highly recommend that you become familiar with some key posts I utilized to formulate the solution in this post as well as some of the technology we will be talking through. I’ll be honest, if you’re new to some of the technologies listed in the previous bullets, I would highly encourage you to take your time and familiarize yourself with the following links: Using the OMS Search API with native PowerShell cmdlets Using Azure PowerShell with Azure Storage Create an Azure SQL Data Warehouse Introduction to Azure Data Factory Load data from Azure blob storage into Azure SQL Data Warehouse via Azure Data Factory Azure Automation Overview
I’ve tried my best to sequence the activities needed in a logical order. If you find that something is missing or not making sense, please refer to one of the above links concerning the activity and/or technology. Those links are exactly what I used to build this solution.
Step 1: Build and save the search results of OMS Log Analytics query with data you want to move into the Azure SQL Data Warehouse
To start simple, the data I’m looking to archive into the Azure SQL Data Warehouse is all the Windows Security Events with ID 4625 for the past 24 hours. Event ID 4625 is an account failed to log on. This could be useful for forensic activities by the security team. My search query is:
Type=SecurityEvent EventID=4625 TimeGenerated>=NOW-24HOURS 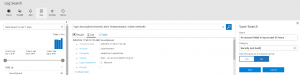
Once you run your search query, hit the save button and name the search and put it under a category. I chose the Security and Audit category for this search. 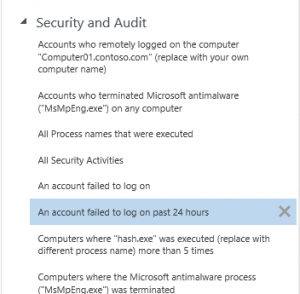
You should now see your custom saved search query when you go back to Log Search and click on the Favorites star.
Step 2: Create an Azure Storage Account and a Blob Storage Container within the Storage Account
Since we will be creating several Azure services to achieve this solution, it will be best to create an Azure Resource Group to house all of the Azure services. If you’re not familiar with the concept of a resource group, please check out this link Create Resource Group. I simply created a Resource Group called OMSLogsToAzureSQLDW to put all my Azure services into. 
Once you have your Resource Group created, create a Storage Account in that resource group. For instruction on creating a Storage Account, please check out this link Create a Storage Account.
Once your storage account is provisioned, add a Blob container to the Blob service. 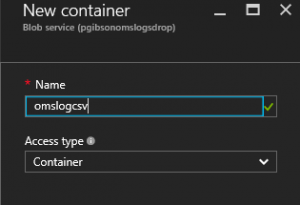
You’ll want to make a note of the URI to your container as you’ll need it later for the automation. 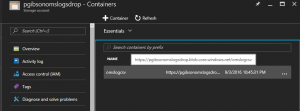
Oh and by the way you can hack it all you want. At the time of this posting I have since removed my Resource Group containing the container :-).
Step 3: Create the Azure SQL Data Warehouse
Now we will need to create the Azure SQL Data Warehouse that will be the long term data store of our OMS Log Search Query data. To create the Azure SQL Data Warehouse, please follow the directions in this link Create an Azure SQL Data Warehouse. You’ll need to choose a server name and a database name. For the database name I chose “omslogs”. A couple of things to remember to configure with Azure SQL data warehouse server, remember to choose a Blank database when creating the database, allow Azure services to access the server, and don’t forget to create the firewall rule to allow your client IP to access the server. The firewall rule is important because if you don’t set your client IP address you will not be able to connect to your server via the SQL Management Studio.
Step 4: Choose a Table Name and Populate the Table Schema
This is an extremely important step. The way the pipeline load process works with Azure Data Factory for this specific use is it will take the structure of the upcoming CSV file we’ll be creating and loading into our storage container, and moving that data right into the Azure SQL Data Warehouse. If the schema data structure of the CSV file is not the same as the table in Azure SQL Data Warehouse database, then the Azure Data Factory pipeline load operation will fail. So we have to do a couple of things here first on the data warehouse database before proceeding.
The first thing we need to come up with is the name of the table that will hold the CSV file data. Since the OMS Log Analytics search query is “An account failed to log on past 24 hours”, I figure I would call the database table “acctfailedlogonpast24hours”.
Secondly, we have to understand the column structure of the CSV file. To do that, return to your OMS portal and run the saved search query “An account failed to log on past 24 hours”. When the search results are finished, click the export to Excel option and save the file to your computer. 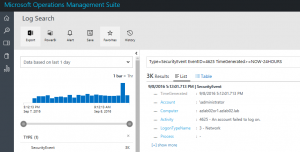
Now you can either open that saved file and record all the column names, or you can run this PowerShell code against the file to enumerate all the columns. I found this code snippet of code on stackoverflow.com.
$inFilePath = "C:\users\philg\downloads\SearchResults.csv"
$csvColumnNames = (Get-Content $inFilePath | Select-Object -First 1).Split(",")
$csvColumnNames
Next we need to use SQL Management Studio and connect to your Azure SQL Data Warehouse server. 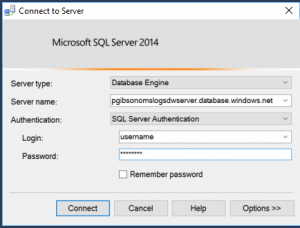
Once you’re connected, open a new query file, choose the “OMSLOGS” database (or whatever database you created during the data warehouse setup) and run the following T-SQL code. The columns should correspond to the columns in the CSV file.
CREATE TABLE acctfailedlogonpast24hours
(
"TimeGenerated" nvarchar(1024),
"SourceSystem" nvarchar(1024),
"Account" nvarchar(1024),
"AccountType" nvarchar(1024),
"Computer" nvarchar(1024),
"EventSourceName" nvarchar(1024),
"Channel" nvarchar(1024),
"Task" nvarchar(1024),
"Level" nvarchar(1024),
"EventData" nvarchar(1024),
"EventID" nvarchar(1024),
"Activity" nvarchar(1024),
"MG" nvarchar(1024),
"TimeCollected" nvarchar(1024),
"ManagementGroupName" nvarchar(1024),
"AuthenticationPackageName" nvarchar(1024),
"FailureReason" nvarchar(1024),
"IpAddress" nvarchar(1024),
"IpPort" nvarchar(1024),
"KeyLength" nvarchar(1024),
"LmPackageName" nvarchar(1024),
"LogonProcessName" nvarchar(1024),
"LogonType" nvarchar(1024),
"LogonTypeName" nvarchar(1024),
"Process" nvarchar(1024),
"ProcessId" nvarchar(1024),
"ProcessName" nvarchar(1024),
"Status" nvarchar(1024),
"SubjectAccount" nvarchar(1024),
"SubjectDomainName" nvarchar(1024),
"SubjectLogonId" nvarchar(1024),
"SubjectUserName" nvarchar(1024),
"SubjectUserSid" nvarchar(1024),
"SubStatus" nvarchar(1024),
"TargetAccount" nvarchar(1024),
"TargetUserName" nvarchar(1024),
"TargetUserSid" nvarchar(1024),
"TransmittedServices" nvarchar(1024),
"WorkstationName" nvarchar(1024),
"id" nvarchar(1024),
"Type" nvarchar(1024),
"TargetDomainName" nvarchar(1024)
);
Once that finishes you should have a completed successfully on the output. You can also run the T-SQL command SELECT * FROM acctfailedlogonpast24hours and verify the table and columns are listed.
Step 5: Use Azure Automation to Invoke OMS Search API to load search results as CVS and copy to Azure Blob Storage
There’s no need for me to recreate the wheel on this one. Tiander Turpijn post Using the OMS Search API with native PowerShell cmdlets , that I referenced earlier, completely documents the process of using AzureRM.OperationalInsights PowerShell module to query the OMS Search API. I do make some slight additions to the code because I need to capture the search results as a CSV and then move that file to the Azure storage for the Azure Data Factory pipeline process to move into the Azure SQL Data Warehouse. My biggest addition is authenticating to the Azure storage to post the CSV file blob to the storage container.
If you are new to Azure Automation, please ensure you have updated your Azure Automation modules to the latest. This is called out in Tiander’s post, but it is buried in a couple of links. Go directly to Jakob Gottlieb Svendsen’s page here and follow his instructions. You’ll thank me later :-).
You can find my Azure Automation script for this posted at my GitHub repository here https://raw.githubusercontent.com/phillipgibson/OMS_Stuff/master/SaveOMSLogSearchCSVToBlobStorage.ps1
Let’s pause right here to end part 1 of this blog series. The key thing you’ll want to have been able to complete is the Azure Automation of running your OMS saved search query, capturing the data in a CSV file, and then loading the CSV to your blob storage. If all of that is complete then you’re in good shape to continue to part 2 below.
Phil Gibson
Cloud Solutions Specialist | MCSD: Azure Solutions Architect