Working with Azure Active Directory Graph Api from Powershell
Hello Everyone,
In this blog post I'm going to show a simple way to work with Azure Active Directory Graph Api directly from Powershell.
Basically in order to access this API we first need to be authenticated with ADAL (Active Directory Authentication Library), this authentication will is done trough a JSON formatted token that is then passed as a parameter in the header for the Invoke-RestMethod cmdlet.
This blog post assumes you already have Azure Powershell 1.0 or greater module installed in your computer, if not, you can install it from https://aka.ms/webpi-azps.
We don’t intend here to build a full featured script but at least provide a function to get the Authentication Token and show a few examples using Graph Api calls. For a similar article but based on REST API, Azure Management and a Sample Script to identify page blob status (like if a VHD is attached or not to a VM), please refer to Working with Azure REST APIs from Powershell – Getting page and block blob information from ARM based storage account sample script blog post.
To get started, open a Powershell command prompt and type (or paste) the following code, this will create a function in your session that will be able to return the Authentication token:
To use this function just type:
$token = GetAuthToken -TenantName "<your Azure AD tenant>.onmicrosoft.com"
For example:
$token = GetAuthToken -TenantName "pmcazureme1.onmicrosoft.com"
Getting back to the example, lets define some variables so we can avoid lots of typing:
 # Defining Azure AD tenant name, this is the name of your Azure Active Directory (do not use the verified domain name)
 $tenant = ”pmcazureme1.onmicrosoft.com”

 # Getting the authorization token
 $token = GetAuthToken -TenantName $tenant

 # Building Rest Api header with authorization token
 $authHeader = @{
    'Content-Type'='application\json'
    'Authorization'=$token.CreateAuthorizationHeader()
 }
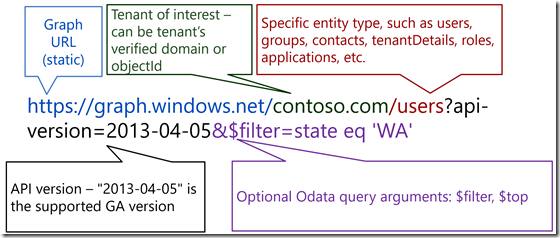
With these variables and results obtained from GetAuthToken function we built the foundation to start executing calls to Graph Api, this Api has the following format:
Each block of code now will perform a different task using Graph Api:
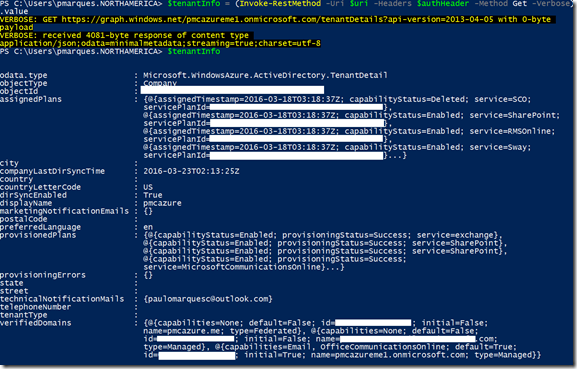
Getting tenant information
 $resource = "tenantDetails"
 $uri = "https://graph.windows.net/$tenant/$($resource)?api-version=1.6"
 $tenantInfo = (Invoke-RestMethod -Uri $uri –Headers $authHeader –Method Get –Verbose).value
Result
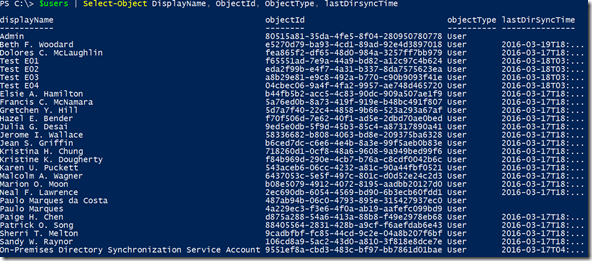
Getting a list of all users
 $resource = "users"
 $uri = "https://graph.windows.net/$tenant/$($resource)?api-version=1.6"
 $users = (Invoke-RestMethod -Uri $uri –Headers $authHeader –Method Get –Verbose).value
Result
Getting a list of users that Display Name starts with letter T by using OData filtering
 $resource = "users"
 $uri = "https://graph.windows.net/$tenant/$($resource)?api-version=1.6`&`$filter=startswith(displayName,'T')"
 $users = (Invoke-RestMethod -Uri $uri –Headers $authHeader –Method Get –Verbose).value
Result
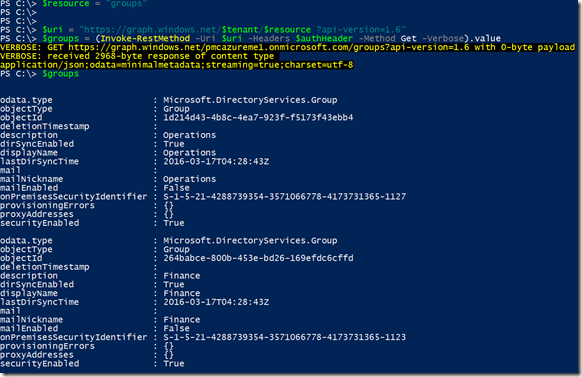
Getting a list of groups
 $resource = "groups"

 $uri = "https://graph.windows.net/$tenant/$($resource)?api-version=1.6"
 $groups = (Invoke-RestMethod -Uri $uri –Headers $authHeader –Method Get –Verbose).value
Result
So far we only did read operations, what about creating a real user on Azure AD by using the graph API?
First, lets define our user properties in a Powershell hash table, in this way we can easily convert it to JSON format and send as the body content of the Graph Api Post method.
 $newuser = @{
                 "accountEnabled"=$true;
                 "userPrincipalName"="pmc@pmcazureme1.onmicrosoft.com";
                 "displayName"="Paulo Marques";
                 "passwordProfile"=@{
                                     "password"="adHDla@#sdj";`
                                    "forceChangePasswordNextLogin"=$true
                                 };
                 "mailNickname"="pmc"
             }
To see your hash table, just type $newuser and press enter:
Last step before jumping in the Invoke-RestMethod is converting this hash table into a JSON structure, type the following line and press enter:
$newuserJsonDef = $newuser | ConvertTo-Json
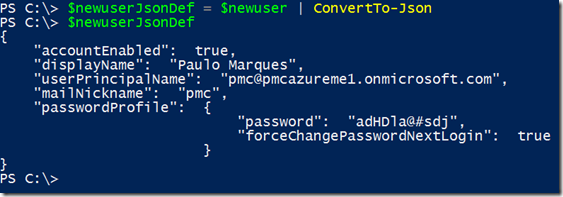
To see the newly converted object, just type $newuserJsonDef and press enter:
Lets build again our $uri variable:
 $resource = "users"
 $uri = "https://graph.windows.net/$tenant/$($resource)?api-version=1.6"
Run the Invoke-RestMethod cmdlet to get your user created on Azure Active Directory, notice the new parameters and values highlighted:
$result = Invoke-RestMethod -Uri $uri -Headers $authHeader -Method Post -Body $newuserJsonDef -ContentType "application/json"
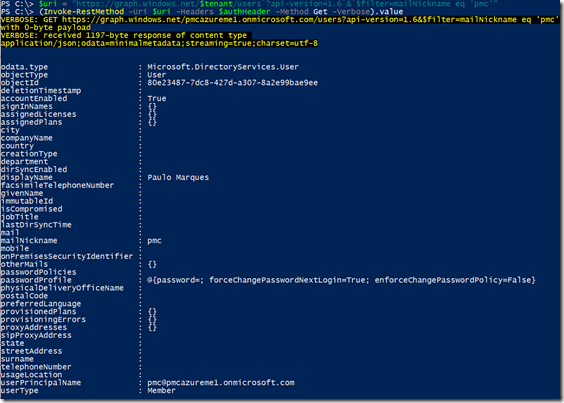
Check the result by querying your new user:
 $uri = "https://graph.windows.net/$tenant/users`?api-version=1.6`&`$filter=mailNickname eq 'pmc'"
 (Invoke-RestMethod -Uri $uri –Headers $authHeader –Method Get –Verbose).value
For more information about Graph Api, please refer to the following articles:
Operations overview | Graph API concepts
https://msdn.microsoft.com/library/azure/ad/graph/howto/azure-ad-graph-api-operations-overview
Azure AD Graph API reference
https://msdn.microsoft.com/library/azure/ad/graph/api/api-catalog
Versioning | Graph API concepts
https://msdn.microsoft.com/library/azure/ad/graph/howto/azure-ad-graph-api-versioning
Supported queries, filters, and paging options | Graph API concepts
https://msdn.microsoft.com/library/azure/ad/graph/howto/azure-ad-graph-api-supported-queries-filters-and-paging-options
That’s it for this blog post, see you later!

