Opalis 6.3: Automating Hyper-V Cluster Patching using the Configuration Manager IP (Part 3)
In Part 1 of this article, I began to talk about the process of maintaining Hyper-V Clusters. The process of "draining" a host (moving guest VM's off to another cluster node) was accomplished using a PowerShell script. The next steps include assigning updates and then monitoring the updates through the process of installation.
In Part 2 of this article, I went into more detail about waiting for VM Hosts to clear, then adding the computer to a collection and doing a refresh of the collection and the client. I then went into a discussion of the "Get Software Update Compliance" activity and even showed how to create your own compliance status query to customize what you're looking for.
Now I'm going to talk about the compliance status information and what to do with the information you get back. Depending on whether you use the Get SU Compliance activity or you create your own query, you will get status information back regarding an update, an update list, a deployment package, or an advertisement. Each type of object has state IDs associated with them, and they may be different from the other types of objects, so you need to understand what type of object you're dealing with before you decide on a branching strategy (how to handle the return values). In a later blog post, I'm going to talk about a multi-branching object I'm working on to make all of this easier, but for now we will tackle this the traditional way.
Now you can use trial and error to determine your branches from the query results, adding new branches as you encounter a new status code, or you can take a shortcut and just look up all the possible status codes from the SQL View "v_StateNames" in the ConfigMgr database. In this view is a list of all possible states with their ID, Name and Description. There's also a "Topic Type" column. This is the ID of the "source" of the status. For instance, update compliance is Topic Type 300. If I query for all status IDs of that topic type, I get this:
| TopicType | StateID | StateName |
| 500 | 0 | Detection state unknown |
| 500 | 1 | Update is not required |
| 500 | 2 | Update is required |
| 500 | 3 | Update is installed |
For enforcement state, which is Topic Type 300, here are the possible states:
| TopicType | StateID | StateName |
| 402 | 0 | Enforcement state unknown |
| 402 | 1 | Enforcement started |
| 402 | 2 | Enforcement waiting for content |
| 402 | 3 | Waiting for another installation to complete |
| 402 | 4 | Waiting for maintenance window before installing |
| 402 | 5 | Restart required before installing |
| 402 | 6 | General failure |
| 402 | 7 | Pending installation |
| 402 | 8 | Installing update |
| 402 | 9 | Pending system restart |
| 402 | 10 | Successfully installed update |
| 402 | 11 | Failed to install update |
| 402 | 12 | Downloading update |
| 402 | 13 | Downloaded update |
| 402 | 14 | Failed to download update |
You see it's still states 0-3, but the ID values mean different things. That's why it's important to know exactly what type of query you are getting results for. Here is a list of relevant topic types. Using this, you can get your own lists of status IDs:
| TopicType | Status Type | Possible Values |
| 300 | Update List Compliance | 0-3 |
| 301 | Update Install State | 0-10 |
| 302 | Deployment Evaluation | 0-3 |
| 400 | DCM Detection State | 0-3 |
| 401 | DCM Compliance State | 0-4 |
| 402 | Update Enforcement State | 0-14 |
| 500 | Update Applicability | 0-3 |
| 501 | Update Scan State | 0-7 |
| 800 | Client Installation State | 100,301-319,400, 500,601-609,700 |
| 1000 | Client Health w/ MP | 1-2 |
| 1101 | Client Certificate State | 1-2 |
| 1100 | Client native Mode Readiness | 1-2 |
For those of you wondering where I got this information, it's from the ConfigMgr reports. The reports can be a wealth of information because they contain the SQL queries used to pull the report data together. Using those SQL queries, you could roll your own queries to create random monitors for scan errors or deployment errors, or anything else that you currently have reports for. You can basically turn reports into an automatable action! I'll talk about all that in a future post.
Going back to our Get SU Compliance activity, it relies on the SMS_UpdateCompliance class in WMI, which returns the following properties:
       UInt32 CI_ID;
      UInt32 EnforcementSource;
      UInt32 LastEnforcementMessageID;
      String LastEnforcementMessageName;
      DateTime LastEnforcementMessageTime;
      UInt32 LastEnforcementStatusMsgID;
      DateTime LastStatusChangeTime;
      DateTime LastStatusCheckTime;
      UInt32 MachineID;
      UInt32 Status;
You'll see there are a few "ID" properties we could use here: "Status", "LastEnforcementStatusMsgID", and "LastEnforcementMessageID". You will actually want to use a combination of these values to determine how to proceed.
"Status" will correspond to TopicType 300 and "LastEnforcementMessageID" corresponds to TopicType 402. Here's a quick run-down of how we'll branch off of this based on status IDs:
| Status | LEM ID | Action to take |
| 0 | 0 | In progress… delay 60 seconds and re-check status |
| 2 | 1 | In progress… delay 60 seconds and re-check status |
| 2 | 2 | In progress… delay 60 seconds and re-check status |
| 2 | 3 | In progress… delay 60 seconds and re-check status |
| 2 | 4 | In progress… delay 60 seconds and re-check status |
| 2 | 5 | Restart the system, wait for it to reboot, then restart compliance status check |
| 2 | 6 | Failure occurred - create a new Service Manager ticket using a template |
| 2 | 7 | In progress… delay 60 seconds and re-check status |
| 2 | 8 | In progress… delay 60 seconds and re-check status |
| 2 | 9 | Restart the system, wait for it to reboot, then restart compliance status check |
| 3 | 10 | Done with this update |
| 2 | 11 | Failure occurred - create a new Service Manager ticket using a template |
| 2 | 12 | In progress… delay 60 seconds and re-check status |
| 2 | 13 | In progress… delay 60 seconds and re-check status |
| 2 | 14 | Failure occurred - create a new Service Manager ticket using a template |
| 1 | n/a | Done with this update |
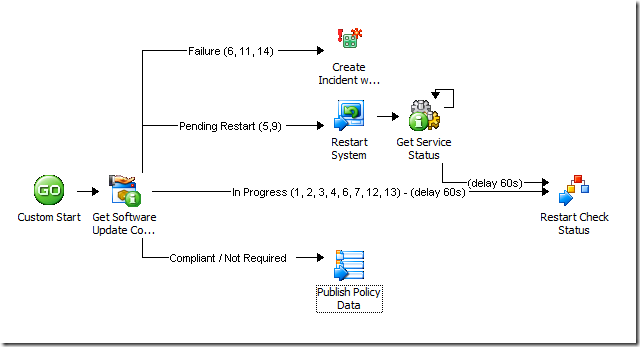
And here is what that workflow would look like:
If you noticed that my Get SU Compliance activity was moved and now appears after a Custom Start, bonus points for you! What I've done is moved the compliance checking part into a separate policy/workflow to take advantage of a couple of things. First, I'm using encapsulation to make compliance checking a self-contained entity that I could use over and over from many different workflows. This is one of those best practices things to help you avoid re-building the same routines over and over.
Second, Opalis allows looping at an activity, but it doesn't allow running an activity, doing a second activity, and then looping back to the first. At least not within a single workflow. To do this, you have to separate off the loop into a new workflow and then use the Trigger Policy activity to do the looping part. So as you can see here, I have a couple of branches that will actually restart the same policy, but if the evaluation returns a failure, or the opposite – that the computer is compliant or the update is not applicable – then the policy won't re-start.
This follows along my earlier post about comparing Opalis to LEGOs… building workflows is a very "fluid" thing. You will find yourself adjusting them as you start adding more robustness or more functionality. It's just something you'll normally do. Now if I look back at the previous workflow, here's what I see:
Notice that instead of the Get SU Compliance activity being directly after the Refresh Client activity, it's now the Trigger Policy activity, which calls my new looping policy. Note also I added a comment to the link (and updated the properties of the link) to add a 2 minute delay before triggering the policy. This is just to allow the client a couple of minutes to complete the scan and deployment evaluation actions. If you find this is not typically enough time, feel free to add more. Of course, in a more robust scenario, we would actually go to the remote client and scan the log file to determine if the process was complete before moving on (we'll do that another time).
When I do the Trigger Policy to start the compliance check, I pass along the computer name. I can also pass along the update List ID if I am going to use that SQL query instead of the Get SU Compliance activity, but for now all we need is the computer name. And in the branches where I re-start the same policy, I just re-supply the computer name.
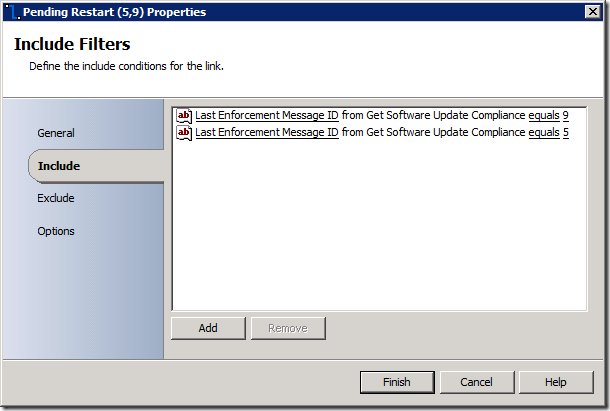
Here's an example of the link conditions I used in order to branch based on status ID's returned:
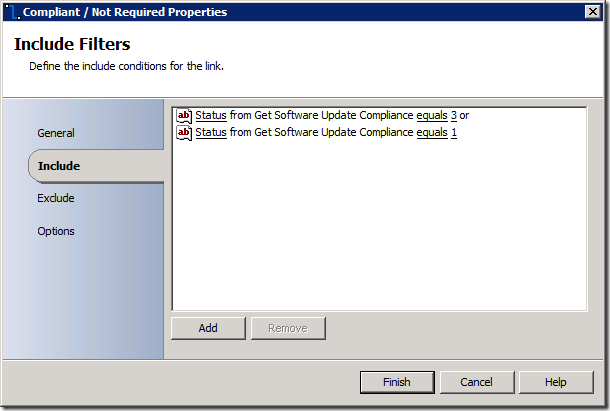
And the Compliant / Not-Applicable branch uses the "Status" property:
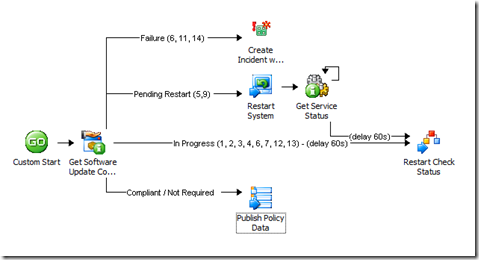
So just to recap so far, we have three policies that have been built:
Next we'll talk about what we can do either after a failure or after the computer is finished installing all the updates and is compliant. I know you're thinking "will this guy get one with it and give me the whole end to end process?"… but I really have to break it up into bite-size chunks. There's lots of information to absorb here and I want to make sure you're not being rushed through it ![]()
See you in part 4!


