Opalis 6.3: Opalis System Center Service Manager Integration Pack: Attachments
The Opalis 6.3 Integration Pack for Microsoft System Center Service Manager provides a mechanism for uploading attachments into Service Manager. The workflow activity “Upload Attachment” has been designed to support uploading different types of content into Service Manager. An attachment could be a File Attachment to an Incident or Change. It could also be a Knowledge Article (end user or analyst content). This activity can be a little tricky to use since. Service Manager treats this content somewhat differently based on the type of content. File Attachments (such as would be associated with Incidents and Changes) is dealt with somewhat differently than for Knowledge Articles. We’ll cover both in this blog post.
…by the way, you can review this content in the help documents installed with the product (click the “Help” button when you are authoring “Upload Attachment”) or by visiting Technet @ https://technet.microsoft.com/en-us/library/gg440728.aspx. I hope to provide some more concrete examples in this post to make working with attachments easier for workflow authors.C
File Attachment
Creation of a file attachment is a two-step process. First, one must create a File Attachment object that is connected to the parent record (the Incident, Change, etc). Then one must upload the content into the File Attachment object. This sample will use a “Change” class object as a sample parent record, however this approach is valid for any class that can accept a File Attachment as a related object (such as an “Incident” or any custom class you create in the SM Authoring tool).
The basic workflow structure is show below:

- Create or otherwise identify a parent record. In this sample I’ll create a Change from a Template, but the process would be identical for incidents. All you need is the object GUID from the parent object. So if this is an existing object you queried via “Get Object” that’s fine as long as you get the Object GUID of the parent record where you want the file attached.
- “Get File Status” is used to get information about the file to attach. We are mostly looking for the file size in KB and the file extension. If you have this information via other means that’s fine, but “Get File Status” is a simple way to get the job done.
- “Create File Attachment” is a renamed “Create Related Object” activity. This creates both a File Attachment object as well as a relationship to the parent object referenced in the first step.
- Upload the attachment with “Upload Attachment”
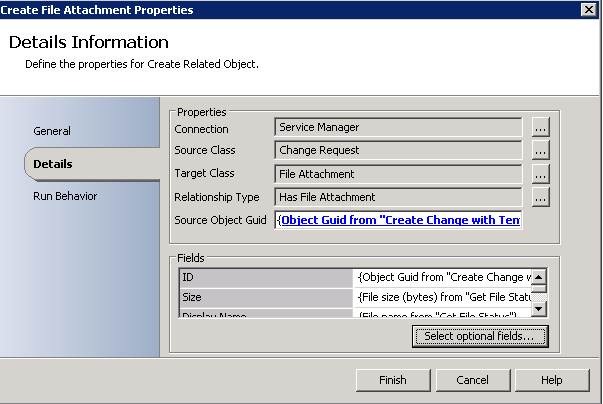
The configuration of “Create File Attachment” needs to be reviewed. This is a “Create Related Object” that I renamed so it’s clear what I am doing. Again, this creates both a File Attachment object as well as a relationship to the parent object… in this example an object from the Change class. So the “Source Object GUID” is going to be the GUID of the parent Change object. Then we select “File Attachment” as the Target Class. Opalis filters out and presents the appropriate Relationship Types, in this case “Has File Attachment”.
A set of properties will need to be populated. The list will initially be blank (since none are mandatory, but in reality most are). Select “Selectio optional fields…” and select all the properties offered. These need to be populated with data needed by Service Manager so it’s client-side business logic can manipulate the attachment (i.e. you can open it up, see the file size, etc.). These will all be the same for a Change, Incident, as well as other classes since they are associated with the “File Attachment” object and not the parent record it’s related to.

- ID: Provide the Object GUID of the parent incident/change record
- Size: The size of the file in bytes from the Get File Status activity (note: the file size is displayed in KB in the SM GUI)
- Display Name: Use the file name from Get File Status (no path)
- Description: Same as “Display Name”
- Added Date: Use the current Date/Time. I just subscribe to “Object start time” from the previous activity.
- Extension: This is important. Use a “.” (see below) and then the string for the extension. So for a txt file use “.txt”. Or you can use the published data from Get File Status but remember that it doesn’t include the “.” So you will need to provide it. See the screen shot below for an example of how I provide the extension using the extension property from Get File Status:

I could use feedback on how well this all works as soon as you can provide it. It’s the last feature in the IP. Note there is no “Get Attachment” planned for this release. It didn’t make the cut. There wasn’t enough time for the testing. So you won’t see a “Get Attachment”, unfortunately.
Knowledge Articles
The process is a little different for Knowledge Articles. The process is a little different because Knowledge Articles are not created with “Create Related Object” as is the case with File Attachments. The basic process for working with Knowledge Articles is similar, however. Again, here is a sample workflow that outlines the process one would use.

- Create or otherwise identify a parent record. In this sample I’ll create a Change from a Template, but the process would be identical for incidents. All you need is the object GUID from the parent object. So if this is an existing object you queried via “Get Object” that’s fine as long as you get the Object GUID of the parent record where you want the file attached.
- “Create Knowledge Article” is a renamed “Create Object” activity. It creates an object from the “Knowledge Article” class. Set the properties for the Knowledge Article as required.
- “Create Relationship” is used to relate the Knowledge Article to the parent record. I’ll provide a screen capture to show how this activity is configured.
- Upload the attachment with “Upload Attachment”. You would provide a file/path for the “End User Content” and/or “Analyst Content” you want uploaded to Service Manager.
The “Create Relationship” configuration is detailed below. Notice in the screen capture how the source class is “Change Request” and the “Target Class” is “Knowledge Article”. Then we select the pre-filtered Relationship type of “Links to Knowledge Article”. The remainder is supplying the Object GUIDS of the parent (source) and child (target) objects… in this case the Change Request and Knowledge Article respectively.
