Opalis 6.3: System Center Service Manager Driven Hyper-V VM Provisioning
Overview
The dynamic provisioning of virtual machines is probably one of the most requested scenario for Opalis. There appear to be many reasons for this. Some are just looking to automate the routine, mundane and error-prone tasks associated with repetitively building requests for new Virtual Machines. That’s the kind of work Opalis does best. Others are looking to begin the journey of adopting private IT resource clouds and see on-demand virtualization of servers as a great place to start. Whatever the reason, orchestration with Opalis easily provides the automation to provision Hyper-V servers on-demand and to-spec.
System Center Service Manager is a great place to start because it provides a natural place to log requests for new resources and track the fulfillment of these requests. So while this blog post COULD just show how one would provision VMs using the Opalis VMM Integration Pack, what I’ll show here is how to build a provisioning process that is driven/managed by standard IT processes.
A Change Request in Service Manager is a great way to start. I won’t go into details on how one authors a Change Request in Service Manager… but I recognize how uninspiring it is for me to say this. So I would ask that you take the time to watch a brief video Travis Wright (from the System Center Service Manager team) and I recorded at TechEd EMEA in November of 2010. Now when you watch this remember that Travis and I had a LONG day, but the point we make here is pretty solid. Watch the first part of the video until Travis passes the demo to me and then hit the PAUSE…
Did you watch it? Well, it’s OK if you didn’t. The key here is that Travis walked through the process of creating a custom Change Request in Service Manager that matched the process we wanted to support for creating VMs. You want a different process? No problem! That’s sort of the point. Service Manager lets you define what you want the process to look like (custom forms) and how you want the work performed (sequenced work item Activities)… and save this all as a Template so it’s easy for users to make requests.
But once you do this work in Service Manager what good is it in Opalis? The answer is… it’s ALL good. Opalis is very focused on providing a workflow authoring experience that is both easy to use and mostly self-contained. That means it’s easy to build and configure workflow activities (translation: zero API-level knowledge required for the Integration Pack) and the configuration information created in Service Manager is “discovered” as you author the workflow. That means we don’t replace one type of “secret knowledge” (how to program in an API) with another kind of “secret knowledge” (how the Service Desk is configured).
OK, now you can watch the second part of the video (if you haven’t already). This is where I build out the Hyper-V provisioning part of the workflow. There are a few key points to look for in watching this video:
Notice how the Opalis workflows are initiated using a “Monitor Object” to watch for updated Service Manager Work Item activities. This is probably the most important concept to grasp when looking at building service-desk driven provisioning workflow. The “Change Request” for is, at a very high level, mostly just qualification data (who is requesting the change, what the change is called, severity, priority, etc). The actual work that needs to be done is defined by Activity Work Items. Work is sequenced (1,2,3,4…) so that it is performed in the correct order. In the demo video Travis and I have a two-step process. The first is an approval, which Service Manager deals with using a “Review Activity” an the second step is the actual provisioning of the Hyper-V VM itself. These two activities run in sequence which means the VM won’t be provisioned until the approval is given for this to happen. Now in most cases a VM provisioning solution won’t have an approval step. For example, it might have a “Check Capacity’ step to find an environment capable of hosting the VM with a given Service Level. A Review step was used to illustrate how one could inject a manual Work Item into a process that included automation in Opalis.
As the workflow to provision the VMs progresses, the Service Manager IP updates the status of the process. This is important because a user in Service Manager shouldn’t have to flip between Opalis and Service Manager to see the progress of their request. The information should be fully contained in the environment they use every day (Service Manager). If you look carefully at the video you will actually notice an harmless error in by build of the workflow. When I start the workflow I select “Update Object” when there is an “Update Activity” available in the Opalis palette. Both workflow activities do the same thing… update an activity. One is just generic and the other “specific” to the Activity Work Item class. The point, however, is that at the start and end of the Opalis workflow one can see how the status of the automation is sent back to Service Manager.
Other data that might be required can also be sent. In the video we capture the VM Name from the VMM IP and send that back up to the parent Change Request. Why do this? Well, if you provision a VM via a dynamic system it might be helpful to return the name of the system. One might also want initial login credentials, etc. The point here is that this information can be updated as needed so the user in Service Manger has all the information about their new VM at their fingertips.
What you will NOT see in the video but we cover here is the registration of the new VM in the Service Manager CMDB. A new VM is an asset that needs to be tracked and managed just like any other IT asset. The Service Manager Integration Pack uses the generic “Get”, “Update”, “Create” and “Monitor” workflow activities to interact with the objects in the CMDB. Relationships are dealt with using “Get Relationship” and “Create Relationship”.
Also, what you will NOT see in the video but we cover here is the expiration of the VM. Full-lifecycle VM management is a common “how to” request and it’s actually simple to accomplish with the VMM and SM IP. Basically, when one creates a VM asset in the CMDB set a few attributes that define when the VM is created and it’s lifespan (or just use a constant lifespan). Then run a de-provisioning job on a regular basis, perhaps daily, that looks for VMs that have passed their lifespan and expire them. The process for expiring the VMs is entirely up to you. Some might opt to send nagging emails (gotta love this approach) until the user either indicates the VM is done or extends the lease. Another approach would be to create a Service Manager Work Item assigned to the user who requested the VM to approve extending the lease (via voting in a Review Activity). Or, as is shown in the sample, one might just want to snapshot the VM and shut it down.
Provisioning Workflow Walk-Through:
Let’s take a look at an actual Provisioning workflow:
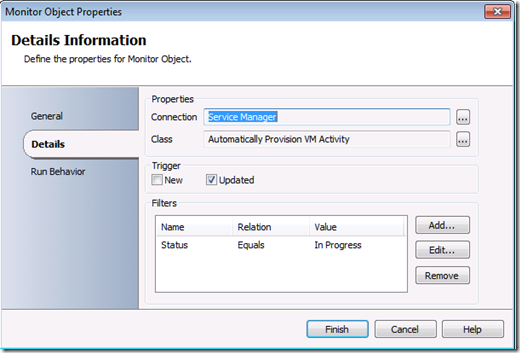
Monitor Object is configured to watch for a custom Service Manager Activity class (see the video to see how Travis creates this class in Service Manager and embeds it in a Change Template).
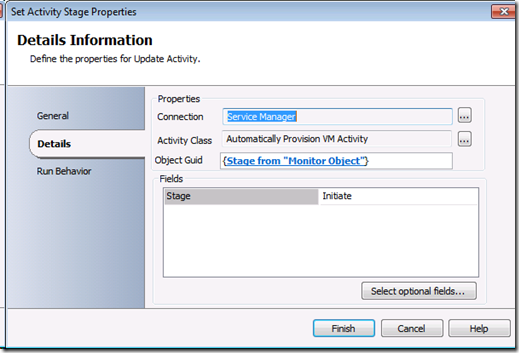
“Set Activity Stage” is an “Update Activity” workflow activity that has been renamed. It sets the “Stage” of the activity to “Initiate”. This is done so that we “tag” the activity to indicate that the request is being processed by Opalis. In the video you will notice how (under pressure!) I accidentally grab “Update Object” and essentially do the same thing. No harm doing it this way, but “Update Activity” was built for this specific purpose and I recommend doing it the way I show in this blog post.
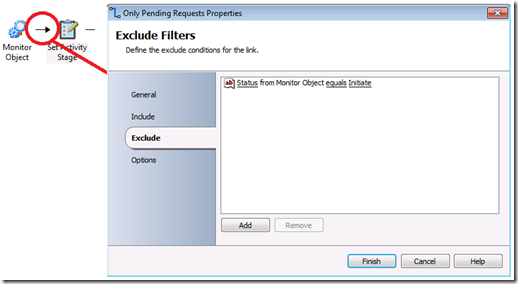
The next “step” isn’t really a step but a link property. Opalis links are active pieces of a workflow providing filtering and branching. In this case we want to filter OUT any Service Manager Activity currently being worked on by Opalis that might have triggered the “Monitor Object” for whatever reason. We do this by double-clicking the link condition between “Monitor Object” and “Set Activity State” and adding an “Exclude” condition as shown.
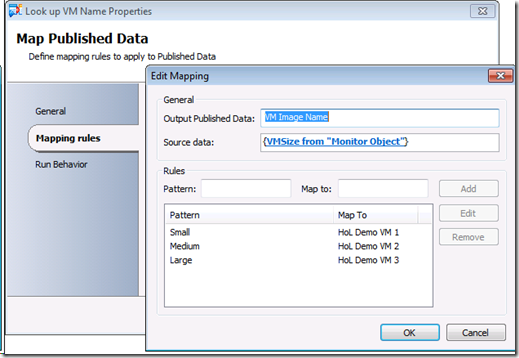
“Look up VM Name” is a renamed “Map Published Data” activity. Look at the activity help for details on how to use this very handy workflow activity. What I am using this for in this example is to take the input VM Size (“Small”, “Medium” or “Large”) and map it to a VM Image that I want to clone. This activity basically builds a look up table that takes on set of information and maps it to another. It’s very handy for things like this but also for mapping pother sorts of data (severity levels etc.) between two systems.
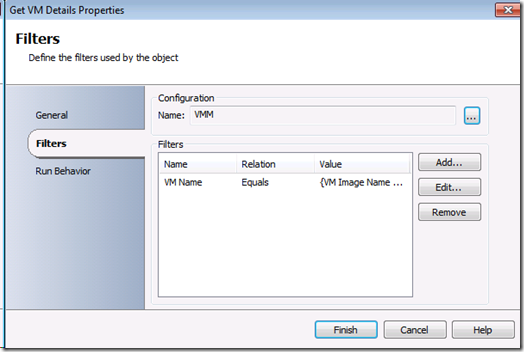
“Get VM Details” is a “Get VM” activity from the VMM Integration Pack. In this sample we clone a VM from an existing image, so we need to get the VM ID of the system we want to clone. This gets the VM statistics for a VM whose name matches what we return from the look up table we just created.
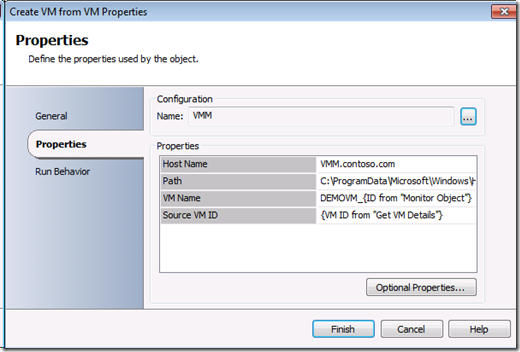
“Create VM from VM” hasn’t been renamed… it’s the same name in the VMM Integration Pack. Basically I have pre-selected a list of options to create a new VM from the image I want to clone. Notice how I dynamically set the VM name to include the Service Manager Activity ID (a unique string) to make the VM name customized. Different organizations will do this differently. Also notice how I provide the VM ID from the “Get VM Details” activity, pointing the cloning at the correct VM image.
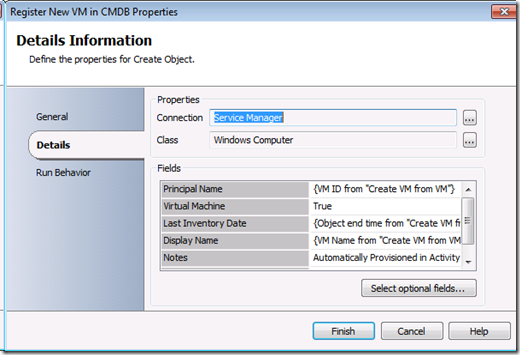
“Register New VM in CMDB” is a renamed “Create Object” activity. It shows how a new asset can be created in the Service Manager CMDB. I won’t show this, but the link between Create VM and the register in the CMDB is only taken if the VM creation is a success (we don’t want to create a VM asset in the CMDB in the clone failed). Also note how I set a “Virtual Machine” flag to “True” and the “Last Inventory Date” to the current date/time. I do this to make it easy to find this VM when it comes time to check the lease in a decommissioning job. Also notice how I “tuck” the VM ID into the “Principle Name” property. I do this so it’s easier to de-commission the VM at a later date.
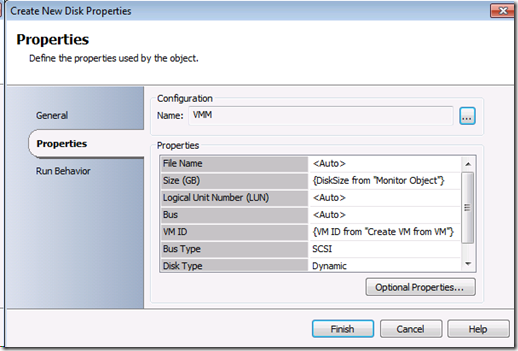
“Create New Disk” is taken right from the VMM Integration Pack. All it does is create a new Dynamic SCSI disk for our newly created VM. Notice it gets the VM ID from the “Create VM from VM” activity and also that it gets the “Disk Size” (in GB) from the Service Manager Work Item Activity.
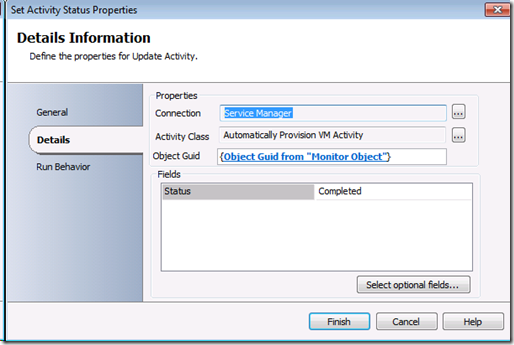
“Set Activity Status” is an “Update Status” activity that has been renamed. All it does is update the Service Manager Work Item Activity to “Completed” so Service Manager knows the work is done.
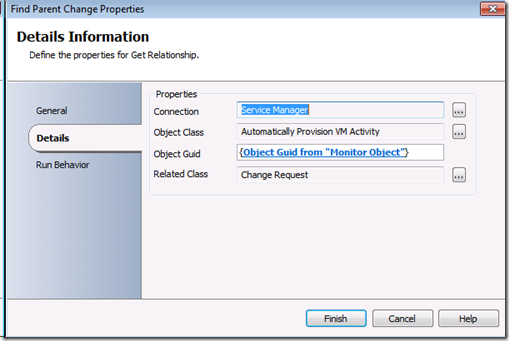
We aren’t done yet! We want to update the parent Change Request to add the name of the VM into it. This is easy to do if you remember one thing: Thus far we have been working with a Service Manager Activity Work Item… the parent Change Request is tied to this Activity via a relationship. So in order to update the parent Change Request we need to find it first. This is very easy to do with the Opalis Service Manager Integration Pack activity “Get Relationship”. Here I look for all Change Requests connected to my custom Work Item Activity class. We know there will only be one… but in your workflows you might need to filter the resulting list using a link condition.
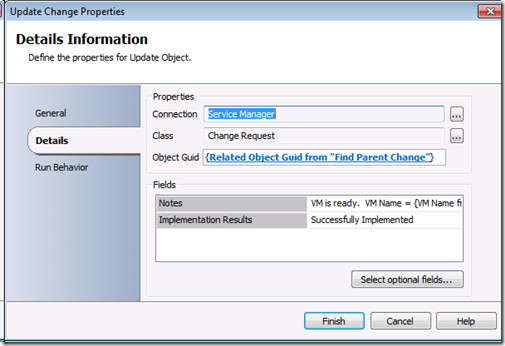
Now that we found the parent Change Request one simply has to update the required information using “Update Object” (in this example renamed to “Update Change Properties”. I set the “Notes” and “Implementation Results” properties but your needs will probably be different.
That’s it! The rest is testing and debugging. This was a simple example but one you hopefully can follow and use as an exercise to build workflows of your own.
De-provisioning Workflow walk-through:
Let’s take a look at an actual de-provisioning workflow:
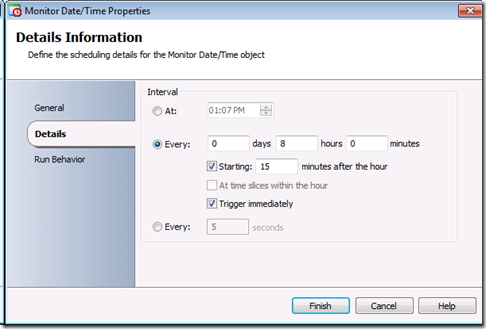
Monitor Date/Time is used to trigger the workflow on a regular basis. I have this set to run every 8 hours at quarter-past the hour but your needs will certainly be different. “Trigger immediately” makes this workflow a LOT easier to debug in the Testing Console!
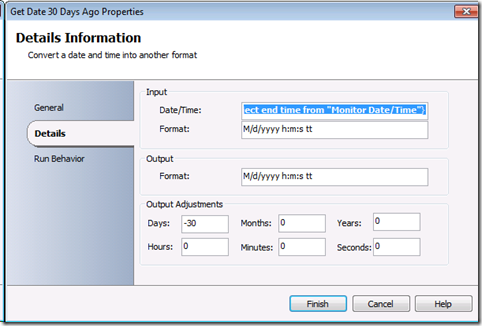
“Get Date 30 Days Ago” is a renamed “Format Date/Time” activity. The use of this activity is documented in the on-line help. In this sample I am basically just taking the current date/time and subtracting 30 days from it… to get a date/time in the past. Any VM after this date/time has expired (i.e. it is 30+ days old).
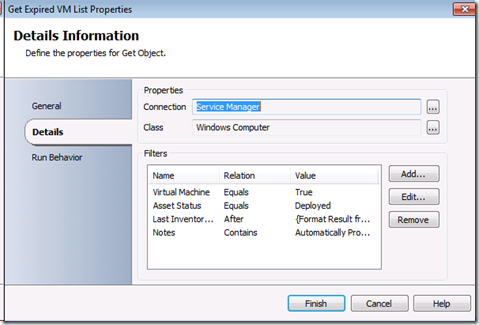
“Get Expired VM List” is a “Get Object” that has been renamed. It queries the CMDB for all VMs whose date stamp (set in the provisioning workflow) places them at over 30 days old. Notice how I make the filtering a bit more precise by adding the “Virtual Machine” is “True” flag and further require that only VMs that are provisioned automatically get de-provisioned automatically. Your process will almost certainly have different rules.
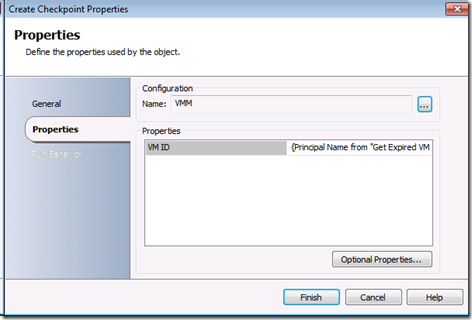
Now I use the VMM Integration Pack to create a checkpoint of the VM. Notice how I pull out the VM ID from the Service Manager CMDB. This makes it easy to target the right VM.
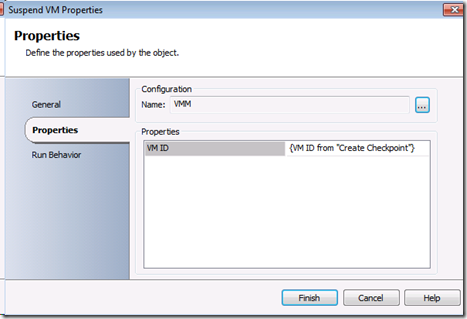
Now, again using the VMM Integration Pack, suspend the VM.
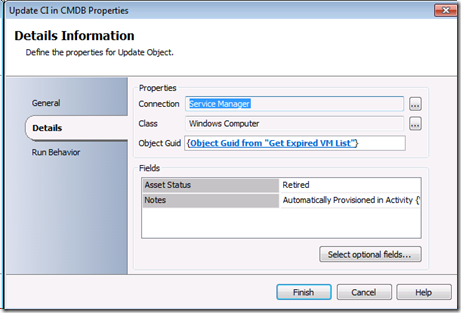
Now update the CMDB using an “Update Object” activity (here renamed to “Update CI in CMDB”). Because the VM has been suspended and potentially could be resumed upon user request, we don’t delete the CI but simply mark it as “Retired”.

