Recreating the Popular Searches Web Part in SharePoint 2013
If you've upgraded from SharePoint 2010 to 2013 and previously made use of the Popular Searches web part, you may or may not have noticed that it no longer exists. In its place, there are now Popular Items and Recommended Items web parts (see: https://technet.microsoft.com/en-us/library/dn794211.aspx). While these web parts are all well and good, if you are looking to recreate the Popular Searches web part in SharePoint 2013 and don't know where to start then look no further. In this blog I'll quickly walk through how you can do this with fairly minimal customization.
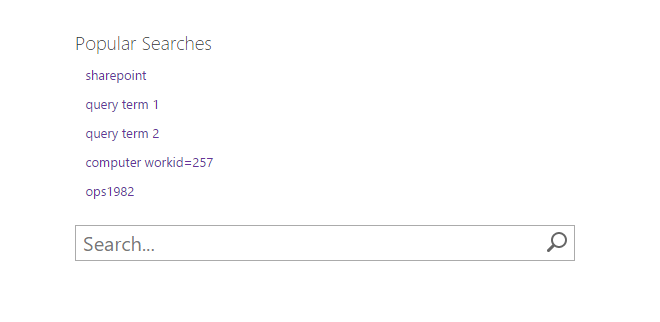
For the uninitiated, the Popular Searches web part simply displayed a number of popular search terms and provided the ability for a user to click on the term and immediately be taken to the search results page for that query. This could be placed anywhere but typically was found on the primary search entry page somewhere near the search box. In order to recreate this we have 2 challenges:
- GET THE DATA
- DISPLAY THE DATA
STEP 1: GET THE DATA
While Web Analytics no longer exists in SharePoint 2013, the SharePoint UI does track almost all search interactions (queries, clicks, etc). We won't get into much detail about it here (see this for more detail: https://blogs.msdn.com/b/nathan_brackett/archive/2014/07/03/search-reporting-and-sharepoint-2013-introduction.aspx), but we will be leveraging some custom PowerShell scripts found here: https://www.microsoft.com/en-us/download/details.aspx?id=43394
Once downloaded and imported, let's grab a bit of data just to make sure there are no connectivity problems. On our lab environment we can pull down 30 days of data relatively quickly. This will vary based on how much traffic your search center receives:

So far so good. Now, since we're looking to get popular searches, let's focus only on searches that are coming directly to our Search Center Site. This will immediately prune out queries that are coming in from other sites and will reduce the complexity of queries that we're running a popular analysis on:

At this point, you can either use the popular aggregation functions that exist in the script or roll your own. For the purposes of simplicity and example, we rolled our own. You can of course add any additional logic you'd like to whether it's filtering, parsing the query a bit, etc.:
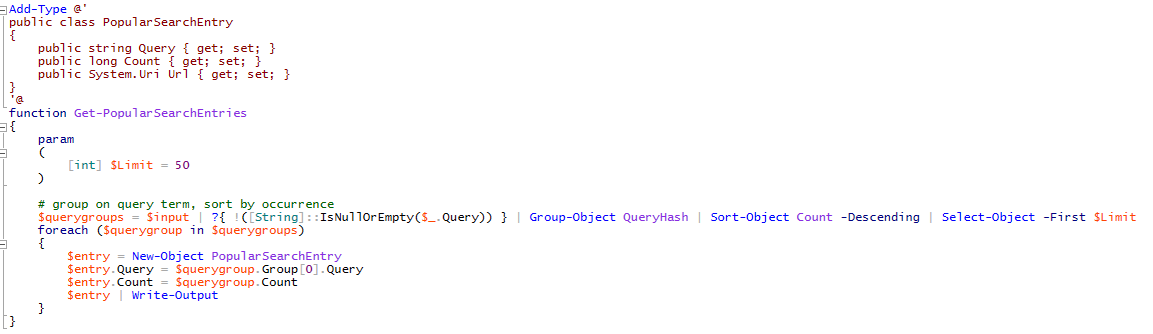
A little utility function like this will group up your raw search entries on QueryHash, which is a numeric representation of the actual query term. It will then sort them out by occurrence and choose the top X searches by term. PopularSearchEntry in this case is a convenience class to store our data. The Query and Count members are relatively obvious. We'll get into why we need the Url member very soon. Let's take a look at some popular searches based on what we have so far:

Great, this is looking close to the data structure we need to put this together. Now for the Url. The Url in this case is going to be a link that lets the user go directly to a search results page. In our lab, we want that link structure to look something like this: https://nmsp01/sites/ootbsearch/Pages/results.aspx?k=sharepoint

Now that we have the data prepared, let's move on to the next step.
STEP 2: DISPLAY THE DATA
The data we are looking to display is relatively straightforward. We have a Query Term, optionally a Count, and we want to use our Url field as the link for each item. In the interest of keeping things very simple, we can use an out of the box Content by Query web part. That requires that we push our popular search data into a SharePoint list. In our lab, we created a list with a few custom fields directly on the Search Center site. Also, don't forget to disable crawling of this list as we don't really need this data being surfaced in search results.
Populating this data can be automated using whatever mechanism you prefer. PowerShell can be used either on server side or using CSOM. We just need to get the data into a list in order to display it to end users. Eventually, you'll want a list that looks a bit like this:
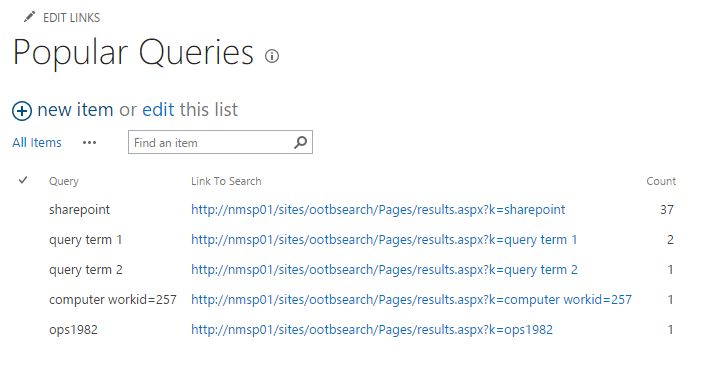
And finally for the end user display. Add in a Content Query web part from the Content Rollups section. You'll want to reference the list you created (in our case, "Popular Queries") and use the Query field as the title and the Link To Search field as the link. You can add this web part to any page you like. In our lab, we added it to the front page of the search center. Clicking on any of the links will take a user directly to the results page using each of the query terms presented: