Developing SharePoint 2013 apps with GulpJS
The SharePoint 2013 app model is a great way to bridge the functionality of SharePoint with the extensibility and standards of HTML5. Since apps are largely driven by client-side JavaScript, it makes sense to borrow some of the core concepts from the modern web development toolkit. Namely, NodeJS and Gulp.
Prerequisites
- Visual Studio 2013 or 2015 (2015 is currently in preview)
- Task Runner Explorer (extension for VS 2013 or baked right into VS 2015)
- NodeJS: Run the installer, or if you have chocolatey: choco install nodejs.install
- GulpJS installed as a global Node module: npm install --global gulp
Learn more about Visual Studio's integration with front end build tools from Scott Hanselman.
What is Gulp?
Gulp is a JavaScript-based build automation framework, similar to MSBuild, Ant, or make. Grunt is another JavaScript automation framework, and most of what is written here also applies to Grunt. Plenty of big name projects use Grunt (jQuery, Bootstrap, AngularJS), but I prefer Gulp due its simplified pipeline API. Both frameworks have over 1000 plugins to extend functionality for specific tasks.
Why build automation?
There are a whole host of tasks involved in releasing client-side applications: JavaScript concatenation & minification, CSS transformation from LESS or SASS, version increments, and code syntax validation (linting).
Those last two tasks are of particular importance to SharePoint app developers. When a SharePoint app is updated and pushed into the App Catalog, it must first increment its semantic version or it will not be recognized as an update. Updating the app version in Visual Studio is a simple, yet manual task: open AppManifest.xml, then update the appropriate version field, then build, and deploy. Easy, but boring. But if you forget to update the version before deploying, you may end up with several minutes of wasted time during the deploy before you realize the mistake.
A much better solution would update the version every time you initiate a build.
Preparing your Visual Studio solution for Node and Gulp
You should already have installed Node and the global Gulp module from the prerequisites. Now enter your VS Solution directory and create package.json. The package.json file is used to identify information about your local project, such as its name and dependencies. Either create an empty file (echo "{}" > package.json) or use the Node initialization wizard:
npm init
Technically this file is not required to run and install Node modules, but it is useful if you are building from a fresh source checkout and need to reinstall dependencies. Finally, even though Gulp is installed as a global module, it must also be installed in your local working directory:
npm install --save-dev gulp
--save-dev means that Gulp will be flagged as a development dependency in package.json. Development dependencies are anything required to build a project, but are not required to actually run the packaged application.
Automatic semantic versioning with Gulp
Because AppManifest is an xml file, we first need to find a Gulp plugin that supports reading and writing XML document objects.
Enter gulp-xml-editor, a Gulp plugin wrapped around the libxml implementation for NodeJS.
And now a quick detour to talk about native code and NodeJS. Because the underlying libxmljs module is a wrapper for the C libxml library, we must prepare our environment for native NodeJS addon modules. Most Node modules are cross-platform by nature, meaning they are written entirely in JavaScript. However, to take advantage of native code, NodeJS ships an additional tool, node-gyp, which has a few extra prerequisites. Namely Python 2.7.x (not 3.x), and Visual Studio 2010/12/13. Once your development environment meets these requirements, you can install native modules without thinking about any of the lower-level build processes.
Now we can install the module:
npm install --save-dev gulp-xml-editor --msvs_version=2013
The --msvs_version flag tells node-gyp which Visual Studio environment to use. You can omit this if VS 2010 is installed.
Finally, some code. The following script should be saved as gulpfile.js—the standard Gulp task definition file.
 // Load plugin modules
var gulp = require('gulp')
  , xedit = require('gulp-xml-editor');

// The semantic versioning format
var V = { MAJOR: 0, MINOR: 1, BUILD: 2, REV: 3 };

// MAJOR and MINOR version values are largely static.
// update them here manually when making major changes
var version = [1, 1];

// The manifest xml uses a namespace, so our xpath must be namespace-aware
var appNS = 'https://schemas.microsoft.com/sharepoint/2012/app/manifest';

// The default Gulp task -- it runs every time and has no task dependencies
gulp.task('default', function () {

  // This task ingests a single file, the manifest
  return gulp.src('AppManifest.xml')

    // parse the manifest into a document object
    .pipe(xedit(function (xml) {

      // obtain reference to manifest's root element
      var app = xml.get('/App:App', { App: appNS });

      // parse current version as integer values
      var current = app.attr('Version').value().split('.')
        .map(function (x) { return parseInt(x); });

      // reset build to 0 if changing MAJOR or MINOR version values
      if (current[V.MAJOR] != version[V.MAJOR] || current[V.MINOR] != version[V.MINOR]) {
        current[V.BUILD] = 0;
      }

      // otherwise increment the last build value
      else {
        current[V.BUILD]++;
      }

      // set the new version and return the updated xml
      current[V.MAJOR] = version[V.MAJOR];
      current[V.MINOR] = version[V.MINOR];
      current[V.REV] = 0;
      app.attr('Version').value(current.join('.'));
      return xml;
    }))

    // write the updated xml file to the current directory
    .pipe(gulp.dest('.'));
});
Now, from the command line, run gulp. You should see the default task execute after which your AppManifest will contain an updated version.
Admittedly, this is a lot of upfront work for an apparently trivial task. It could probably even be replaced with some MSBuild customization. However, the breadth of the Gulp plugin library means we have a large set of existing tools already familiar to client side web developers.
Integrating Gulp tasks with Visual Studio build events
This solution would be a lot less interesting if we had to run gulp from the command line every time VS generates a new build. Instead, we can launch the Task Runner Explorer window from Visual Studio (View -> Other Windows -> Task Runner Explorer).
This tool is still early in development, but its current state lets us bind Gulp tasks to specific IDE events: Before Build, After Build, Clean, and Project Open. In this case, we will bind the default task to the Before Build event, ensuring that the AppManifest version is automatically bumped before the package is created.
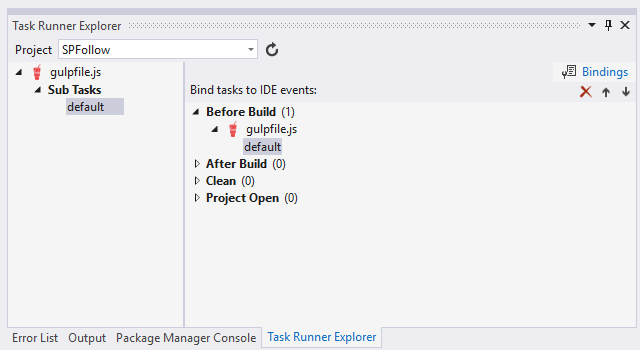
Make sure that the correct VS Project is selected in the Project dropdown. Hit the refresh button if your gulpfile is not visible in the left pane. Then identify the default task, right click it, and select Bindings -> Before Build.
The next time you build or package your app, you will see output from the task in the Task Runner window. You can run a task at any time by right clicking it in the left pane selecting Run.
Next Steps
A future post will demonstrate automated JavaScript syntax validation using JSHint. No need to waste time deploying a build only to find out you forgot to close a curly bracket!