Windows Azure Pack Configuration
This is the fifth article in a series of blog posts that will guide you through a simple implementation of a self-service private cloud interface using Windows Azure Pack. There are many layers of the application, and the underlying infrastructure, when implementing this solution. As we progress through the series we will lay out a scenario, a set of requirements, and provide guidance on how to implement each of the numerous prerequisites, with the ultimate goal of a self-service portal that your team can use to create and manage their own virtual machines.
This article goes over the setting up the Windows Azure Pack user experience, including plans, services, add-ons, and other administrative tasks using the administrator interface.
- Requirements, Architecture, and Prerequisites
- Configuring the VMM Fabric
- Configuring Service Provider Foundation
- Windows Azure Pack Installation
- Windows Azure Pack Configuration (This Article)
- Windows Azure Pack Customization
- Windows Azure Pack Usage
Configuring WAP for our users
This entry in the series will go over customizing the services and plans that users of the private cloud have access to. In this post we will go over adding the basic services, and setup a basic plan that we can build on if additional services are added.
Useful Links
Now that we have installed Windows Azure Pack, there are three main interfaces that we will use to interact with our private cloud. Below are the links to those three interfaces
- https://localhost:30101/ - Configuration site
- https://localhost:30091/ - admin
- https://localhost:30081/ - tenant site
The first two sites should already be familiar, the first being the configuration site that is used to connect the WAP sites to the WAP configuration database, and the second is the admin interface. The tenant site is the site that will be used by the tenants of the private cloud. In a later blogpost, we will go over how to configure these sites with a friendly name, as well as creating a signed SSL certificate to use, removing the self-signed certificate warning when visiting these sites.
Services
Within Windows Azure Pack, there are a number of services that can be added and provided to users. In this section, we will look at adding VM Clouds, SQL Server services so that we can provide access for our users.
VM Clouds
The VM Cloud from our VMM should have been added from our previous blog post in the series.
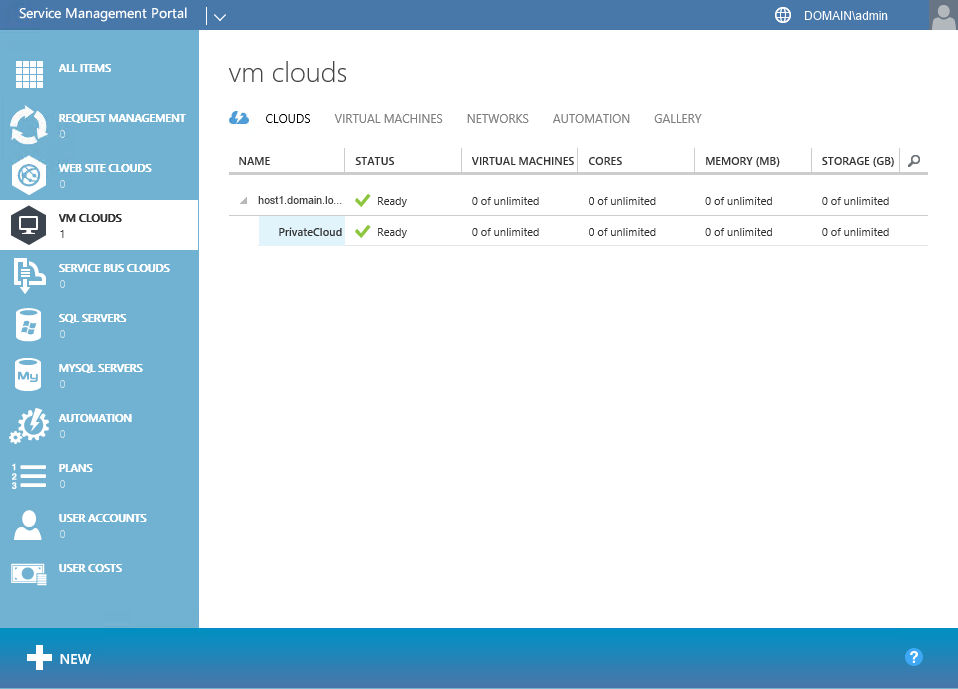
To view the PrivateCloud that we created, click on VM Clouds, select CLOUDS. Expand the VMM server, and click the -> button on PrivateCloud.
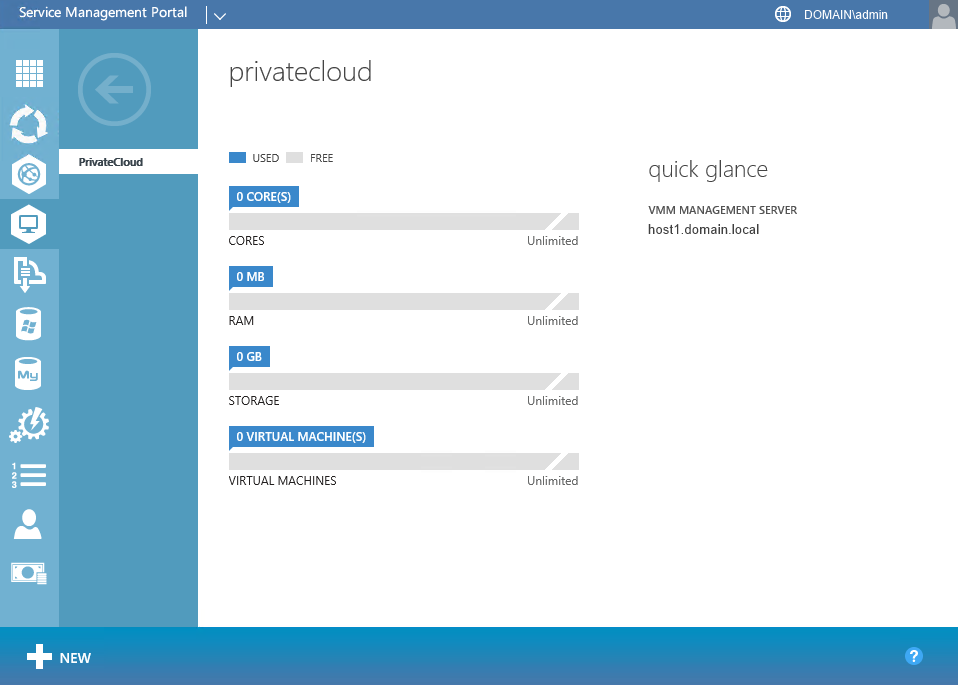
The PrivateCloud current utilization will be shown on the Quick Glance screen. Without any utilization on the cloud, the Quick Glance won’t have much information to provide, but as utilization is increased on the cluster, the utilization table is updated to reflect the levels reported by VMM.

Even though the cloud was setup as unlimited in this case, the graph scales reflect the physical limitation of the hardware setup for the cloud.
SQL Servers
Another service that can be provided to a user is a SQL Server. A SQL Server can be added to WAP for this purpose, but only specific versions will work, including the following:
- SQL Server 2008 SP3
- SQL Server 2008 R2 SP2
- SQL Server 2012 SP1
- SQL Server 2014
When planning for the SQL Server that will be added to the cluster two points should be considered. First, care should be taken to ensure that the physical hardware, and other SQL instances are not impacted by the SQL instance used for our users. Second, when configuring external access to a new SQL server, it is important to carefully implement the firewall rules in order to avoid unintended access to the SQL instances used for administrative and configuration services in the VMM cluster.
A good option for both of these points, is to create a separate VM in the Admin Host Group on our VMM cluster. Directions for creating a VM can be found in the previous entry in this series, as well as installing a separate SQL instance and updating the firewall rules.
For our example, we are using the sqlvm1.domain.local as the hostname for our SQL Server VM.
For this instance, it is advisable to also attach a separate data disk to the VM, as the SQL Server instance can grow larger once users start creating additional databases. It is also advisable to change firewall settings to allow database access from the new VM, as well as use mixed-mode authentication. Once a SQL Server instance is created for our users from the admin portal, click SQL SERVERS -> Add an existing server.
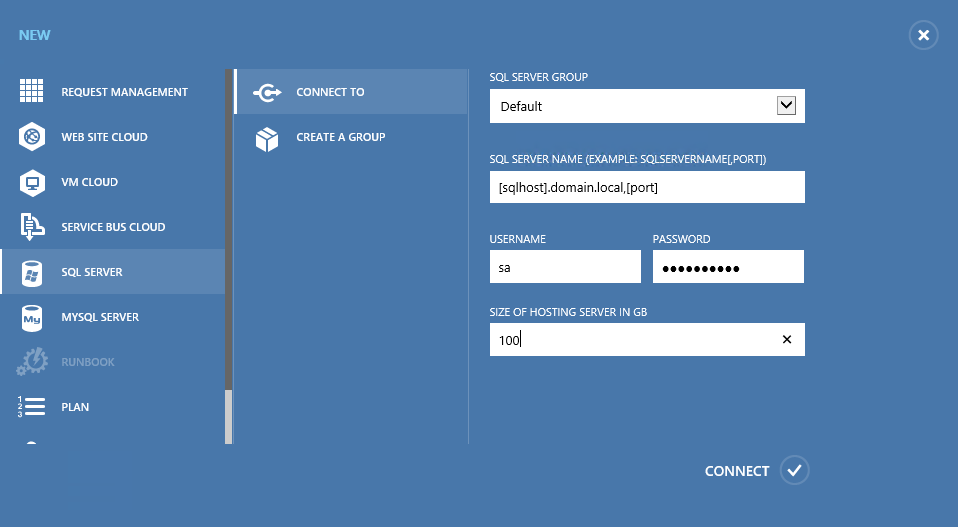
Enter the SQL Server name, as well as the port, and enter credentials with database creation permissions on the server, and select an appropriate database size limitation. Once the SQL Server has been added, select -> to view the dashboard.
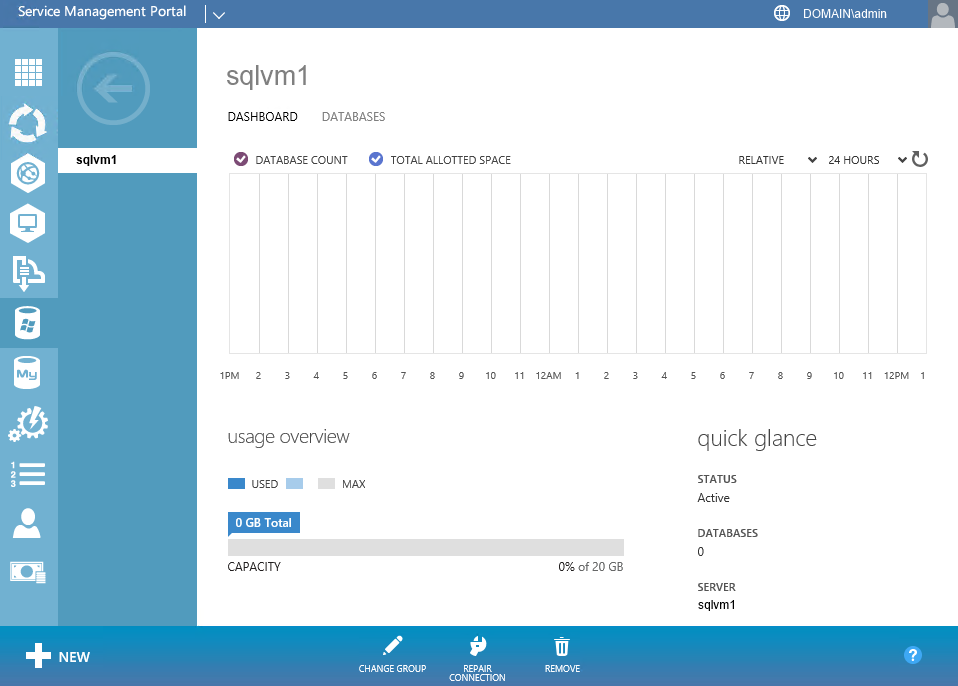
From the dashboard, you can see current utilization, as well as the active databases.
Other Available Services
Other services are also available for WAP, including Web Site Clouds, Service Bus Clouds, and MYSQL Servers. For our scenario these are not needed, but information about these services can be found at the following locations.
- Deploy Windows Azure Pack: Web Sites
- Service Bus for Windows Server
- Using MYSQL with Windows Azure Pack
Plans and User Accounts
Our Windows Azure Pack portal will be self-service, and users will be able to register and add themselves in order to create VMs and services. In order to prevent a disorganized (or chaotic) grab for resources, the administrator can create standard user Plans, a type of profile that sets limits on resources, and makes services available or not. So that some flexibility is available in setting limits, a mechanism is available to define add-ons, or standardized resource limit increases.
Plans
To start the plan wizard, click on New, click Plan, and click Create Plan
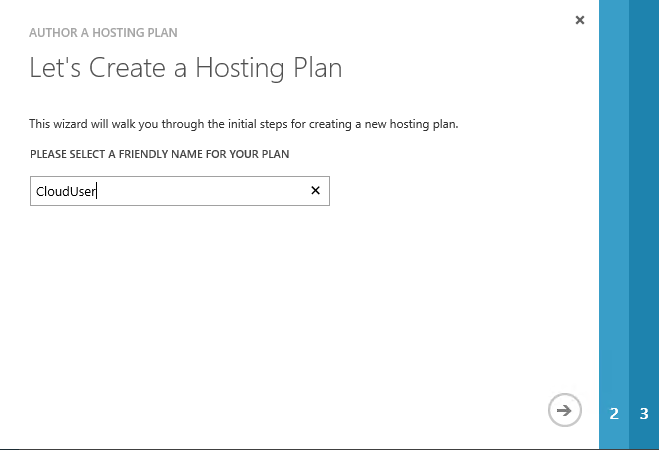
The new plan wizard is shown, and prompts you for a name for the new plan. Enter a descriptive name, and click ->
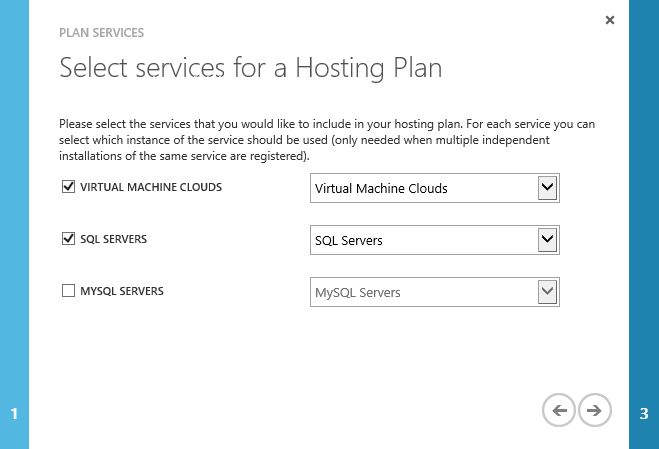
Ensure that both Virtual Machine Clouds, and SQL Servers are checkmarked, and Click ->. Click the Checkmark to complete the wizard, and it will take you to the plan dashboard.
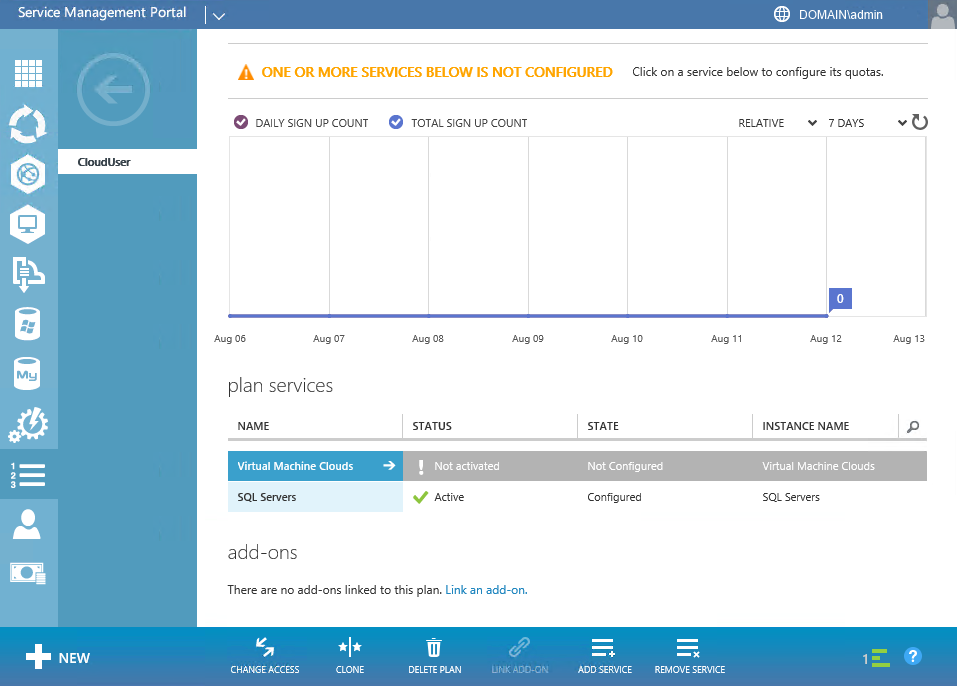
Before the plan is able to use the Virtual Machine Cloud, it needs to be configured. Beside Virtual Machine Clouds, Click ->

Select our VMM server, and the Cloud that we created and scroll down to the usage limit section,
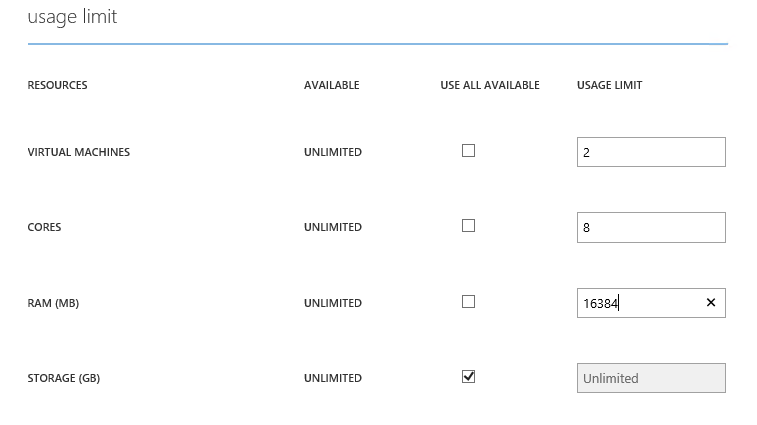
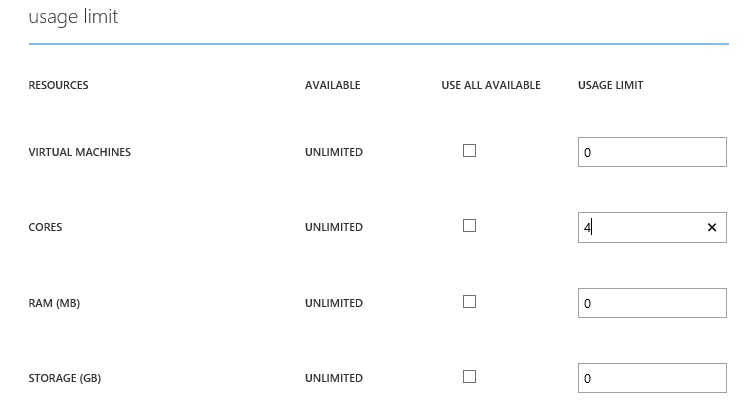
Here, we can setup limitations on the resources each user is allowed to use. In this case, each user is allowed to create 2 virtual machines, with a shared 8 cores, and 16GB of memory. Scroll down to the Networks section, and click add networks
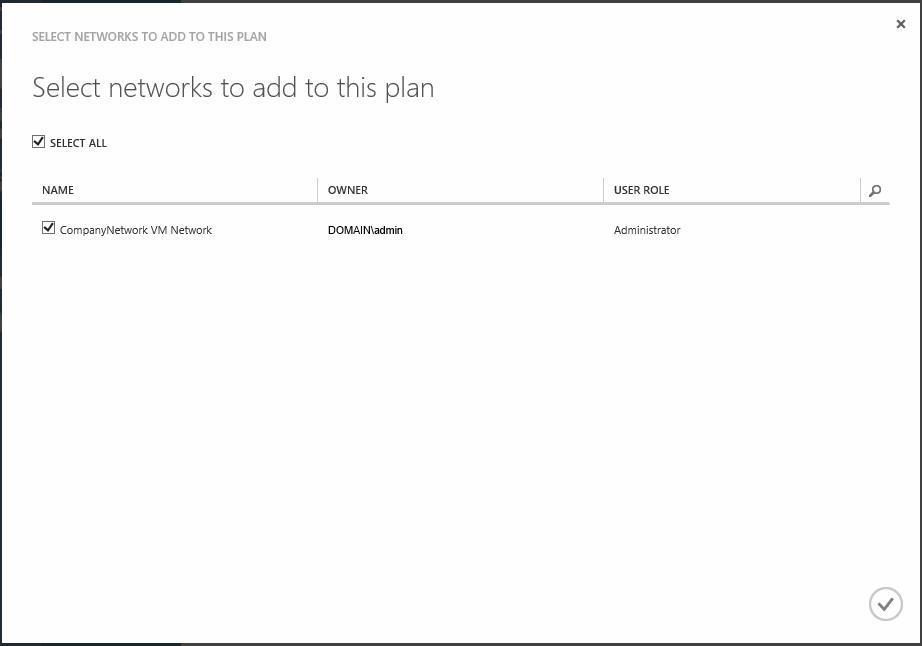
Select our VM network, and click the checkmark to return. We don’t currently have any templates, or gallery items configured for the private cloud. We will go over creating these in a following entry in the series.
Click save to activate the VM Cloud for the plan. Any user with access to the tenant portal is able to create an account, but they need to add a subscription to their account to be able to use it. Since our requirements indicate a need for a self-service interface, we have multiple options on how to add a subscription to a user’s account. We can protect our subscription with an invitation code, or allow any user to add the default subscription to their account. To add an invitation code setting, click on SETTINGS, enter an invitation code, and click Save.
To publish our new plan, and make the plan public, click Change Access, and click Public. A user with an account will then be able to see the new plan, and add it to their account assuming they have the correct invitation code, if that was configured.
Add-ons
Add-ons allow you to add additional resources to the limits of a subscription for a user if the plans are not unlimited. To create an add-on, enter the dashboard for the plan, CloudUser, and click ADD-ONS. Click create a new add-on to start the wizard
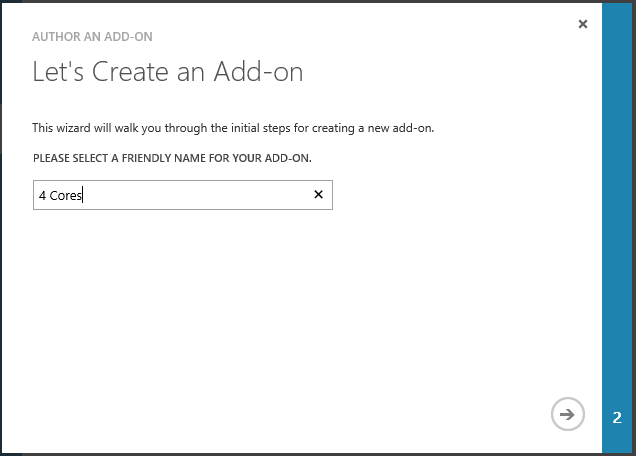
Enter a name for our new addon, and click ->
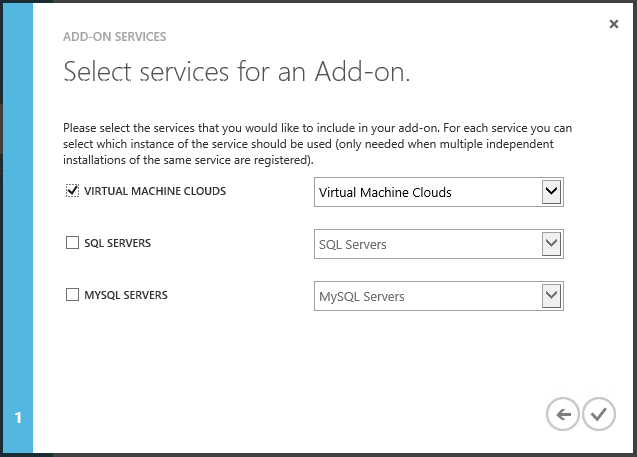
Select the services that the add-on with be modifying, and click checkmark
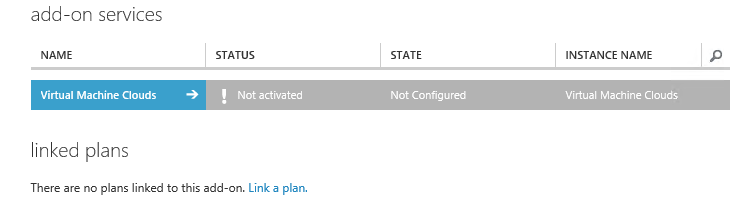
Click the -> beside the service to configure the settings for the add-on.
Enter the additional limits for the add-on, and click Save. Once the add-on is saved, click the <- button to go back to the add-on overview page. Click on Link a plan to add the add-on to our plan.
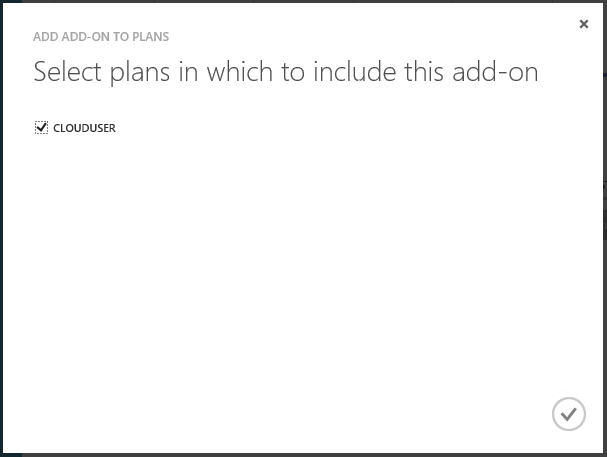
Select the plan we created earlier, and click the checkmark button. The add-on should now be functioning, and can be added to a user manually.
Administration
When you initially setup WAP, it will use the current user as the one and only administrator able to access the adminsite. Luckily, we can easily add additional users to help with the administration, unluckily, you aren’t able to do it from the adminsite UI, you need to configure this through the Windows Azure Pack Configuration PowerShell interface.
Adding additional administrators
To add an additional administrator, open the Windows Azure Pack Configuration PowerShell interface as Administrator. We will need a couple pieces of information to add the new user to the WAP configuration database:
- Sql server: host01.domain.local,<port>
- Db username: sa
- Db password: **********
- New user: DOMAIN\newuser
Once we have this information from our earlier steps, we run Add-MgmgtSvcAdminUser to add the user
 $dbserver = ‘host1.domain.local,58920’
$dbuser = ‘sa’
$dbpassword = ‘********’
$newadmin = ‘DOMAIN\newuser’
$connectionstring = [string]::Format(‘Data Source={0};Initial Catalog=Microsoft.MgmtSvc.Store;User ID={1};Password={2}’, $dbserver, $dbuser, $dbpassword)
Add-MgmtSvcAdminUser -Principal $newadmin –ConnectionString $connectionstring
The cmdlet should then return the new user that was added and return you to the prompt. The user should then be able to log into the admin site using their own credentials.
Finishing Up and Next Steps
At this point, we should have a self-service private cloud. Users should be able to log into the tenant portal site, create accounts, add subscriptions, and create their own VMs. Before we can easily have users do that however, there are some customizations that we can perform that will make the usage of the Tenant portal easier, by creating templates, implementing roles, and modifying the way that users access the tenant portal itself. All of these customizations will be covered in the next post in the series.
- Requirements, Architecture, and Prerequisites
- Configuring the VMM Fabric
- Configuring Service Provider Foundation
- Windows Azure Pack Installation
- Windows Azure Pack Configuration
- Windows Azure Pack Customization (the next installment)
- Windows Azure Pack Usage