Configuring Service Provider Foundation
This is the third article in a series of blog posts that will guide you through a simple implementation of a self-service private cloud interface using Windows Azure Pack. There are many layers of the application, and the underlying infrastructure, when implementing this solution. As we progress through the series we will lay out a scenario, a set of requirements, and provide guidance on how to implement each of the numerous prerequisites, with the ultimate goal of a self-service portal that your team can use to create and manage their own virtual machines.
This article goes over the configuration of the Service Provider Foundation, a component in the System Center Orchestrator suite, which enables Windows Azure Pack to work with VMM to provision, and manage the private cloud. The roadmap for this and subsequent articles is:
- Requirements, Architecture, and Prerequisites
- Configuring the VMM Fabric for Windows Azure Pack
- Configuring Service Provider Foundation (This Article)
- Windows Azure Pack Installation
- Windows Azure Pack Configuration
- Windows Azure Pack Customization
- Windows Azure Pack Usage
Service Provider Foundation
A critical component in the Windows Azure Pack private cloud implementation is the Service Provider Foundation (SPF). SPF provides WAP an interface in which it can interact with the VMM cluster, including provisioning, managing, and reporting on the clouds utilization. With the use of SPF, WAP is able to create an infrastructure allowing for heavily customized, and multi-tenant solutions by utilizing the underlying VMM fabric. In our scenario, a user will be able to create an account, provision virtual resources, and manage those resources directly with WAP, without needing to interact with VMM directly, because WAP utilizes SPF.
SPF is a component of System Center Orchestrator and is available from Orchestrator’s install media. Further details on the service can be found in the following article:
For our scenario, we are installing SPF and the SPF SQL instance on the VMM server (host01.domain.local). This is done for simplicity, as we will not have to open additional ports on the windows firewall.
SPF Prerequisites
The Service Provider Foundation comes with its own extensive set of prerequisites. In this section, service accounts, server roles and features, and other downloads will need to be installed or configured in order for SPF to operate. We will also need to setup a new SQL instance to host the SPF database.
Service Accounts
SPF runs under its own service account. To start, a new service account will need to be created in AD for the service to operate.
- _wapspf_sa – account for running SPF and SPF SQL Instances
This service account also needs to be added to the VMM Administrators role. From the VMM Console perform the following
Click Settings -> Security -> User Roles -> double click Administrators
Click on Members and click Add, and enter the new service account. This will ensure that the SPF service is able to access information, and provision resources on the VMM cluster.
Windows Management Framework 4.0
This install comes with 2012 R2, but if you’re using 2012, it is a required install. Requires a restart once complete. The installer can be found at the following location:
https://www.microsoft.com/en-us/download/details.aspx?id=40855&WT.mc_id=rss_alldownloads_all
and selecting the following download:
Windows Server 2012 - x64: Windows8-RT-KB2799888-x64.msu
The install is a simple install, proceed with the wizard until completed
WCF Data Services 5.0 for OData V3
This prerequisite can be found at the following location:
https://www.microsoft.com/en-gb/download/details.aspx?id=29306
The install is a simple install, proceed with the wizard until completed
ASP.NET MVC 4
This prerequisite can be found at the following location:
https://www.microsoft.com/en-gb/download/details.aspx?id=30683
This install is a simple install, proceed with the wizard until completed. Once the MVC installation completes, exit the web platform installer, as the other components are not required.
SQL Server Instance
SPF will also require its own SQL Server Instance. Follow the directions from the first entry in this series to install a new instance using the following options:
Instance features: database engine services
- Named instance: SCSPF
- Sql Server Agent Account Name: DOMAIN\_wapspf_sa
- Sql Server Database Engine Account Name: DOMAIN\_wapspf_sa
And provide access to the service account, and any applicable security groups. Proceed to install, and close once complete.
When an instance is created, a dynamic IP port is also selected for that instance. We are going to need to know this port in the next step so we will need to record it from the SQL Server Configuration Manager.
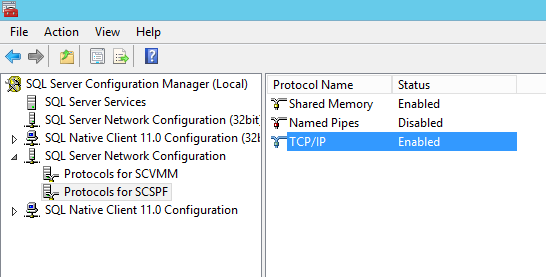
From the configuration Manager, expand SQL Server Network Configuration, and select Protocols for SCSPF, and double-click TCP/IP.
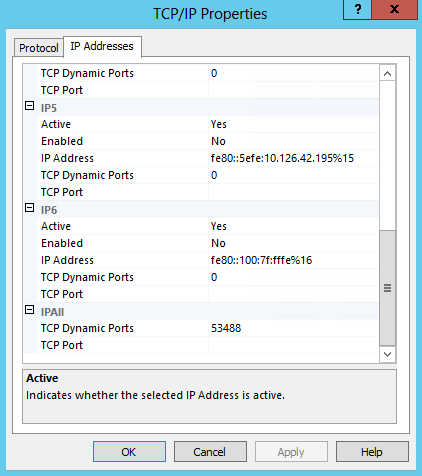
Click the IP Addresses tab, and scroll to IPAll, and take note of the dynamic port selected for the SCSPF instance.
Roles and Features
The Last steps for installing the SPF prerequisites involve enabling roles and features on the server. The following article shows how to install roles and features on windows server 2012.
Install or Uninstall Roles, Role Service, or Features
The following Roles, Features, and Services need to be installed.
Roles:
- Web Server (IIS)
- Click OK to add additional features
Features:
- Management ODATA IIS Extension
- Click OK to add additional features
Web Server Role (IIS) – Role Services - Verify or add the following services:
- Web Server -> Security -> Basic Authentication
- Web Server -> Security -> Windows Authentication
- Web Server -> Application Development -> ASP.NET 4.5
- Management Tools -> IIS Management Scripts and Tools
Click Install to begin the process, and once it is complete, close out of the wizard.
Installing SPF
After all of the prerequisites are installed, we are able to start the installation. From the System Center Orchestrator installation media, run SetupOrchestrator.exe and select Service Provider Foundation from the Standalone installations section under Service Management. Click Install on the next window to start the installation wizard.
The wizard will start with a license agreement, and checking the prerequisites. The check should succeed, if it does not, check the installation status of the identified components. Click Next to move to the database configuration.

Enter the Port from the SPF SQL Instance from earlier, and click Next.
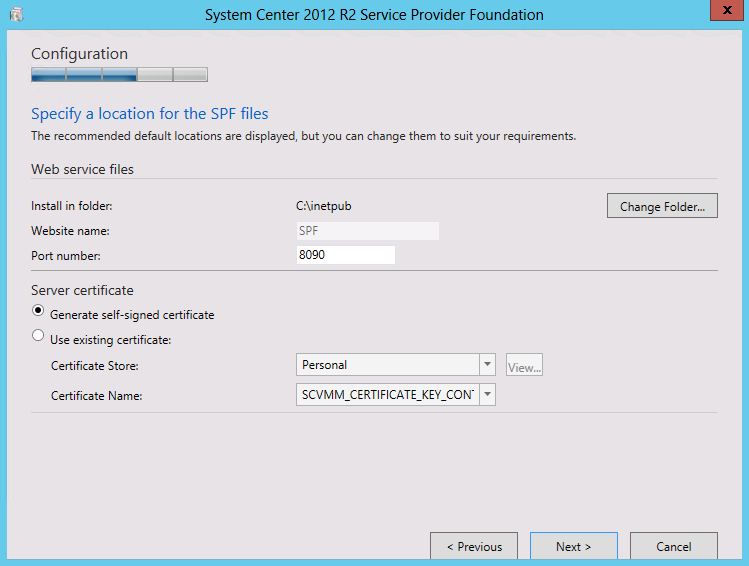
Leave the default website options, and click Next.
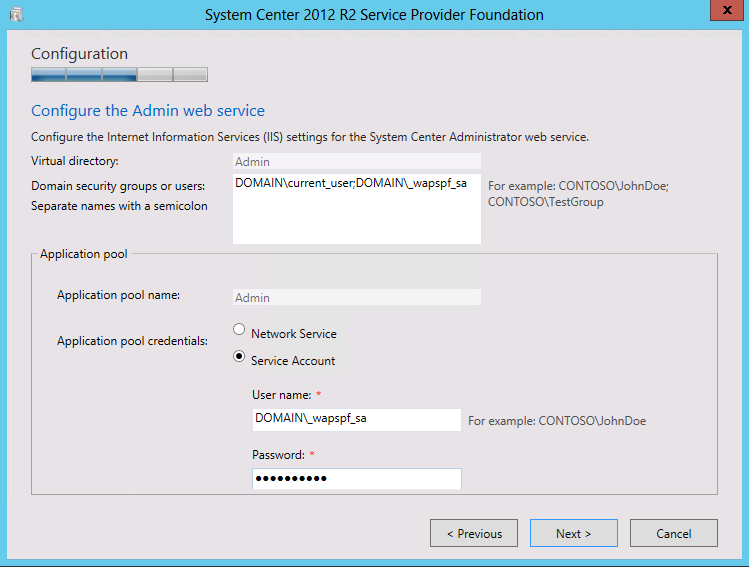
For the Admin Web Service, add the current user, _wapspf_sa, and any other applicable security groups for the web service administrators, and specify the _wapspf_sa service account for the app pool credentials and click Next. Repeat for provider web service, vmm web service, and Usage web service.
Select the desired responses for customer experience, and windows updates, and click Next. Proceed to Install. Click close once complete.
To verify that the SPF was setup correctly, open a browser, and go to the following site:
https://localhost:8090/SC2012R2/VMM/Microsoft.Management.Odata.svc/
The site will prompt you for credentials, enter the _wapspf_sa credentials and hit Ok. If prompted about the website's security certificate, click Continue to this website.
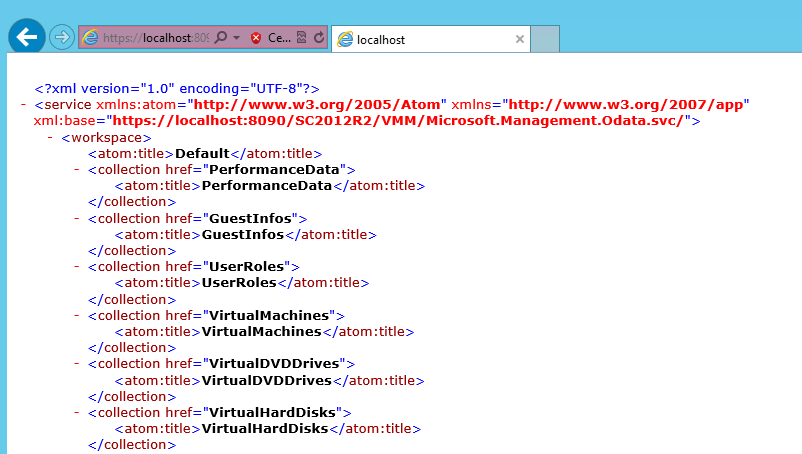
The page will provide the OData interface for SPF. Close the browser once you’ve verified the access.
Finishing Up and Next Steps
This concludes the configuration of the Service Provider Foundation, the interface that Windows Azure Pack will use to manage resources on our private cloud. Now that the underlying infrastructure for our solution is installed, and configured, our next steps will be to create a virtual machine to host the Windows Azure Pack components, install the WAP prerequisites on the VM, and then finally install WAP and connect it to our newly installed SPF.
- Requirements, Architecture, and Prerequisites
- Configuring the VMM fabric
- Configuring Service Provider Foundation
- Windows Azure Pack installation (the next installment)
- Windows Azure Pack configuration
- Windows Azure Pack customization
- Windows Azure Pack Usage