SharePoint 2013 Documentum Indexing Connector - Configuration
Note: This information is intended to compliment and not replace the official documentation on TechNet: Configure and use the Documentum connector in SharePoint Server 2013
This post continues a series on the SharePoint 2013 Documentum Connector. The previous post covered the prerequisites and installation of the connector. This post focuses on the configuration of the connector and Documentum content sources in SharePoint.
Registering the Documentum Connector
After setting up the prerequisites and installing the connector, you need to register the connector with SharePoint so it will appear in the Content Sources as an option for Custom Repository.
Multiple Crawl Components: If you have more than one SharePoint Crawl Component server, you only need to register the connector once.
Steps: Register the Indexing Connector for Documentum to the Search service application
Make sure you are using a PowerShell windows opened AFTER you installed the Documentum connector, or else the cmdlets added by the connector will missing.
If you prefer, you can pass an actual SSA object instead of specifying it by name (String):
$ssa = Get-SPEnterpriseSearchServiceApplication "Search Service Application"
New-SPEnterpriseSearchCrawlCustomConnector -SearchApplication $ssa …etc
Example:
PS C:\>New-SPEnterpriseSearchCrawlCustomConnector -SearchApplication $ssa -Protocol "dctm" -ModelFilePath "C:\Program Files\Common Files\Microsoft shared\Web Server Extensions\15\CONFIG\SearchConnectors\Documentum\MODEL.XML" -Name "Microsoft SharePoint 2013 Indexing Connector for Documentum"
Output:
Protocol DisplayName ModelFileLocation
-------- ----------- -----------------
dctm Microsoft SharePoint 2013 Indexing C... C:\Program Files\Com...
Configuring the Documentation Connector
At this point, the connector is installed and registered with SharePoint. The next step is to configure it for your environment. The location for the Documentum config file is:
%CommonProgramFiles%\Microsoft Shared\Web Server Extensions\15\CONFIG\SearchConnectors\Documentum\DCTMConfig.XML
The DCTMConfig.xml file can be generated using the cmdlet Set-SPEnterpriseSearchDCTMConnectorConfig. A sample config is also available at:
%CommonProgramFiles%\Microsoft shared\Web Server Extensions\15\CONFIG\SearchConnectors\Documentum\DCTMConfigSample.XML
Multiple Crawl Components: If you have more than one SharePoint application server running crawl components, you only need to generate the DCTMConfig.xml once. Then you can copy it to the same location on the other servers. Do this before configuring a content source in central administration.
Before you configure the connector, you should decide which of the four security modes to use. They are listed in the table at this link: https://technet.microsoft.com/en-us/library/ff721975(v=office.15).aspx#DCTM_Overview
Your decision will determine which option to choose for the ACLTranslation parameter of the configuration cmdlet, which determines how the connector handles user permissions for documentum objects. If you are not interesting in maintaining Documentum security for testing, you can choose the NoSecurity option:
-ACLTranslation NoSecurity
Using the DisplayURL options isn't required, but you should think about what happens when a user clicks a documentum result link (display URL). The actual crawling uses DFS URIs which won’t work in a browser. The connector allows you to substitute a webtop URL or other link for Documentum cabinets, folders and documents.
Example: Setting Shared Parameters
PS C:\> Set-SPEnterpriseSearchDCTMConnectorConfig -Shared -ACLTranslation NoSecurity -DisplayURLPatternForDocument "https://mywebtopserver:8080/webtop/component/drl?objectId={ObjectId}&RepositoryName={RepositoryName}" -DisplayURLPatternForContainer "https://mywebtopserver:8080/webtop/component/drl?objectId={ObjectId}&format={Format}&RepositoryName={RepositoryName}"
Configuration information is saved suceessfully into C:\Program Files\Common Files\Microsoft Shared\Web Server Extensions\15\Config\SearchConnectors\Documentum\DCTMConfig.xml.
Once the Shared connector settings are configured, you can configure the DFS Web Service location for each of your Documentum Repositories. The Documentum Connector uses the DFS client libraries to connect to a DFS Web Service, which gives access to objects on the content server. You can confirm that this service is running by accessing the host and port with this URL, and it should return a list of the available services:
https://myDFSserver:9080/services/core/ObjectService
Example: Adding Repositories
Set-SPEnterpriseSearchDCTMConnectorConfig -Repository -RepositoryName "dmRepo1" -DFSWebServiceURL "https://myDFSserver:9080/services"
Set-SPEnterpriseSearchDCTMConnectorConfig -Repository -RepositoryName "dmRepo2" -DFSWebServiceURL "https://myDFSserver:9080/services"
Create a new Crawl Rule
Before creating Content Sources, you should create Crawl Rules for your Documentum Start Addresses. This allows you to specify which Documentum credentials the crawler should use for each source. At least one "Include" crawl rule is required to allow authentication for the content access account in the Documentum repository you are crawling. Additional exclude rules are optional.
First, you should determine which Documentum user to use as the SharePoint Content Access Account. This should be a Documentum user that has read permission for all containers and objects that you wish to crawl. Then, follow these steps to set up your Include rule:
- In SharePoint Central Admin, open the Search Service Application where the Documentum connector is registered
- Navigate to the Crawl Rules section
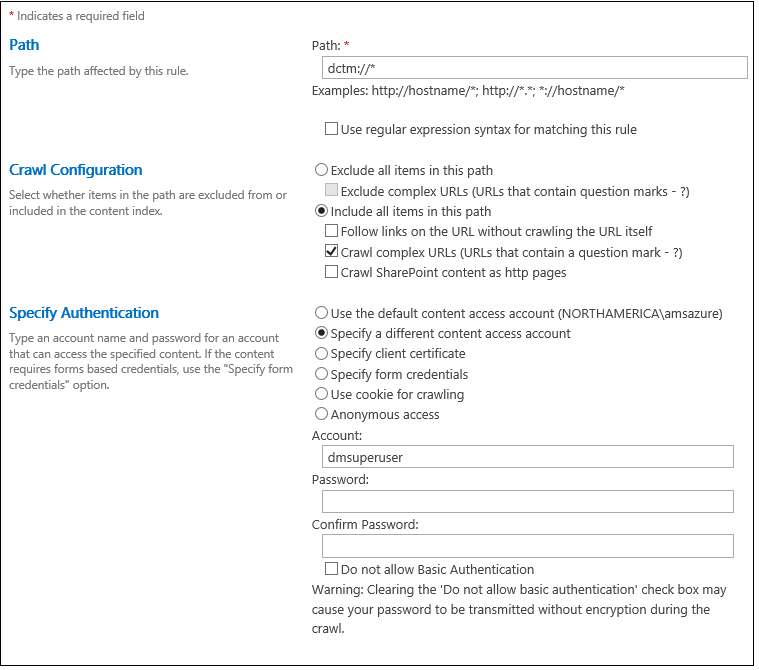
- Input a Path using wildcards that match the Documentum URIs that you plan to crawl with one Documentum user.
- To set the Path for all DCTM URIs, use "dctm://*"
- For Crawl Configuration, choose "Include all items in this path", and select only the "Crawl Complex URLs" checkbox
- Under Specify Authentication, choose "Specify a different content access account". Input the username and password for your Documentum content access account. The Documentum connector only supports basic authentication.
- Make sure "Do not allow Basic Authentication" option is unchecked.
Creating a Crawl Rule for the Documentum Source
Configure a Content Source
In your SSA administration page, create a new Content Source. Give it a name that is descriptive. For Content Source Type choose Custom Repository, and then select "Microsoft SharePoint 2013 Indexing Connector for Documentum". If that option is not available, then your Documentum Connector has not been properly registered.
For the Start Addresses, you will need to provide DCTM URIs that target the Documentum containers and objects you want to crawl. By default it will crawl the root repository. This should be the actual Documentum URI that will be passed as a request to the DFS web service. Do not include a port number in the Documentum URIs, as the port is determined by the connector configuration.
To determine the Documentum path to crawl, see Syntax to refer to a Documentum object
Once the Content Source is created, start a full crawl and watch the crawl log to monitor the status.
Final Word
At this stage you should now have Documentum content in your SharePoint Index. If not, there could be something wrong with your installation, configuration or your environment. In my next post I plan to cover troubleshooting for the SharePoint 2013 Documentum Connector.
Please share your feedback in a comment.