Windows 8 Store Apps + new Office 365 Enterprise Preview (SharePoint Online)
So this is my very first blog post here on MSDN blogs. Personally, I’m excited to write it as it involves 2 great Microsoft technologies I’m very passionate about: Windows 8 and the new Office 365. In this post I will cover the communication fundamentals of how to talk to the new Office 365, specifically SharePoint, from a Windows Store App. As part of the Office Division I’m particularly hyped about the new Office 365 offering and all the great value it brings to our customers. If you haven’t done so, I encourage you to sign up and check out the new Office 365 Technical Preview here.
Last week I decided to develop my first Windows Store App and the one thing I wanted to do was to leverage SharePoint Online as my backend service. SharePoint offers a lot of collaboration and document management capabilities as a service through its CSOM (Client-Side Object Model) APIs and the new REST services. Since I’m a bit more proficient with C# than with Javascript the CSOM managed API seemed like the right choice. I thought it was going to be as straight forward as looking for an article on the web on how to develop a Windows Store App in C# that uses the managed CSOM API to talk to SharePoint Online. Surprisingly I was wrong. Wictor Wilen’s article (great article by the way) is the closest I could find. However, there were a few challenges to make the code work for a Windows Store App:
1) 1) The .NET assembly for Windows Store Apps is a subset of the .NET framework so it doesn’t have all the goodies such as the WS Trust classes to communicate to the Microsoft Online Services STS.
2) 2) Most importantly, the compiler complained that System.Web.Services.dll cannot be resolved when I referenced the CSOM dlls (Microsoft.SharePoint.Client and Microsoft.SharePoint.Client.Runtime).
At this point I’m starting to realize this is not exactly going to be a walk in the park. Since I can’t use the managed CSOM my only alternative is to use the new SharePoint REST services. And for the authentication part … well, this is pretty much what this blog post is about.
SharePoint Online (SPO) implements a brokered authentication model where it relies on a different service to authenticate the user. This service is the Microsoft Online Services Secure Token Service (MSO STS). When a user navigates to a page in SPO they need to authenticate first. SPO will redirect the request to the MSO STS so the user can enter her credentials. After the STS validates the user’s identity it sends back a security token to the browser. The browser then presents the security token to SPO and after SPO validates the token it issues a cookie that allows the user to finally access the SharePoint page. All this is opaque to the user when done from the browser. The goal here is to allow the user to access SPO resources without leaving our Win 8 App (user experience is key) so our app needs to perform all these steps as well. Next, I will explain the code to make authenticated requests to SPO REST services but first I will tell you the code is written for illustration purposes only so I encourage you to make it more robust, elegant, etc. if you are planning to use it in your apps. Also, I must say I was learning Windows 8 App development on the go so, again, please refer to the Windows Store App samples for best patterns and practices. BTW, you can download the sample code at the end of the post if you want to give it a shot right away. Ok, now that you have been warned let’s dive into it.
The diagram below shows the communication flow to make an authenticated REST call to an SPO site from a Windows Store App.
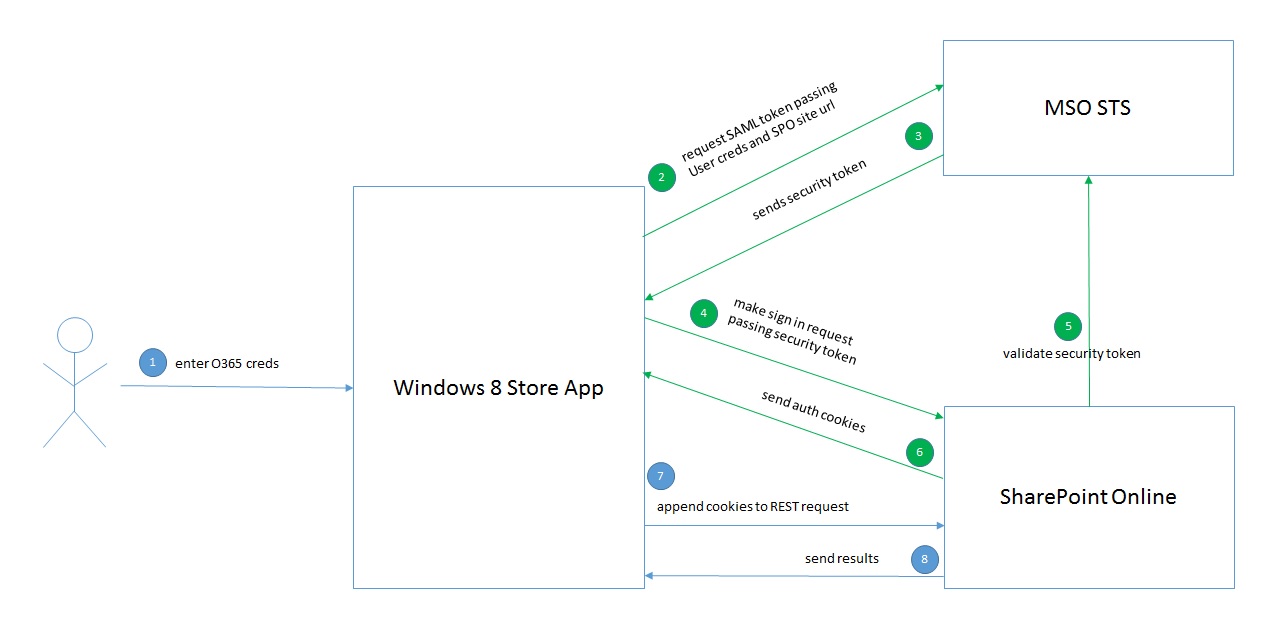
Step 1: Prompt user for credentials and get SAML security token from MSO STS (1, 2 and 3 in the diagram above)
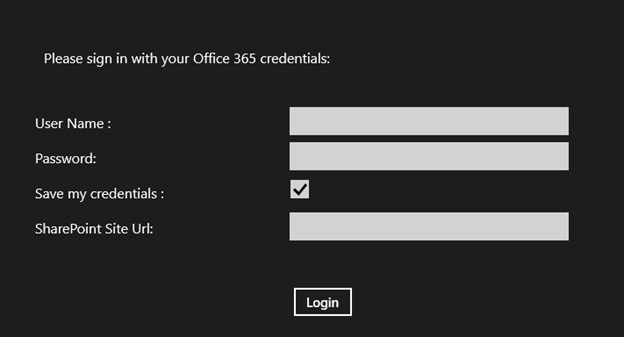
Since the WS Trust WCF classes are not included in the .NET for Windows Store Apps assembly I chose to use plain old vanilla http requests. The first thing is to ask the user for credentials and the SPO site she wants to connect to. I created a very simple page to collect such info.
The “Click” event handler for the “Login” button is where we are going to try to sign in the user to SPO. The authentication code is in a helper class called “SpoAuthUtility”. Let’s take a look:
private asyncvoid loginButton_Click(object sender, RoutedEventArgs e)
{
try
{
// Take the user's Office 365 credentials and
// attempt to sign into SharePoint Online
awaitSpoAuthUtility.Create(
newUri(this.siteUrlInput.Text),
this.usernameInput.Text,
this.passwordInput.Password);
The create method instantiates the helper class and calls GetCookieContainer which gets the auth cookies from SPO. But first it needs to authenticate with MSO STS. This logic is encapsulated in the GetMsoStsSamlToken method which does 2 things:
1) Constructs an issue request SOAP message that conforms to the WS-Trust standard specifying a SAML security token type, the user’s credentials, and the SPO site url. This is what the request security token soap message looks like:
<s:Envelopexmlns:s="https://www.w3.org/2003/05/soap-envelope"xmlns:a="https://www.w3.org/2005/08/addressing"xmlns:u="https://docs.oasis-open.org/wss/2004/01/oasis-200401-wss-wssecurity-utility-1.0.xsd">
<s:Header>
<a:Actions:mustUnderstand="1">https://schemas.xmlsoap.org/ws/2005/02/trust/RST/Issue</a:Action>
<a:ReplyTo>
<a:Address>https://www.w3.org/2005/08/addressing/anonymous</a:Address>
</a:ReplyTo>
<a:Tos:mustUnderstand="1">https://login.microsoftonline.com/extSTS.srf</a:To>
<o:Securitys:mustUnderstand="1"xmlns:o="https://docs.oasis-open.org/wss/2004/01/oasis-200401-wss-wssecurity-secext-1.0.xsd">
<o:UsernameToken>
<o:Username>[username]</o:Username>
<o:Password>[password]</o:Password>
</o:UsernameToken>
</o:Security>
</s:Header>
<s:Body>
<t:RequestSecurityTokenxmlns:t="https://schemas.xmlsoap.org/ws/2005/02/trust">
<wsp:AppliesToxmlns:wsp="https://schemas.xmlsoap.org/ws/2004/09/policy">
<a:EndpointReference>
<a:Address>[url]</a:Address>
</a:EndpointReference>
</wsp:AppliesTo> <t:KeyType>https://schemas.xmlsoap.org/ws/2005/05/identity/NoProofKey</t:KeyType> <t:RequestType>https://schemas.xmlsoap.org/ws/2005/02/trust/Issue</t:RequestType>
<t:TokenType>urn:oasis:names:tc:SAML:1.0:assertion</t:TokenType>
</t:RequestSecurityToken>
</s:Body>
</s:Envelope>
2) Makes the request to the MSO STS and extracts the security token from the body of the response
privateasyncTask<SamlSecurityToken> GetMsoStsSAMLToken()
{
// Makes a request that conforms with the WS-Trust standard to
// Microsoft Online Services Security Token Service to get a SAML
// security token back so we can then use it to sign the user to SPO
// generate the WS-Trust security token request SOAP message passing
// in the user's credentials and the site we want access to
byte[] saml11RTBytes = Encoding.UTF8.GetBytes(ParameterizeamlRTString(
this.spSiteUrl.ToString(),
this.username,
this.password));
// make the post request to MSO STS with the WS-Trust payload
byte[] response = awaitHttpUtility.SendHttpRequest(
newUri(msoStsUrl),
HttpMethod.Post,
newMemoryStream(saml11RTBytes),
"application/soap+xml; charset=utf-8",
null);
StreamReader sr = newStreamReader(newMemoryStream(response));
// the SAML security token is in the BinarySecurityToken element of the message body
XDocument xDoc = XDocument.Parse(sr.ReadToEnd());
var binaryST = from e in xDoc.Descendants()
where e.Name == XName.Get("BinarySecurityToken", wsse)
select e;
// get the security token expiration date from the message body
var expires = from e in xDoc.Descendants()
where e.Name == XName.Get("Expires", wsu)
select e;
SamlSecurityToken samlST = newSamlSecurityToken();
samlST.BinarySecurityToken = Encoding.UTF8.GetBytes(binaryST.FirstOrDefault().Value);
samlST.Expires = DateTime.Parse(expires.FirstOrDefault().Value);
return samlST;
}
Step 2: Sign in the user into SPO by presenting the security token we got from the MSO STS and get the authentication cookies (4, 5 and 6 in the diagram above)
The GetSPOAuthCookies method will make a post request to SPO and get the authentication cookies which come in the response headers. There are 2 encrypted cookies that we get back from SPO: 1) the FedAuth cookie which is basically the cookie we need to pass along with any subsequent requests to the service and 2) the rtFA cookie which is necessary if we want to sign the user out.
privateasyncTask<SPOAuthCookies> GetSPOAuthCookies(SamlSecurityToken stsToken)
{
Uri siteUri = this.spSiteUrl;
Uri wsSigninUrl = newUri(String.Format("{0}://{1}/{2}", siteUri.Scheme, siteUri.Authority, spowssigninUri));
var clientHandler = newHttpClientHandler();
awaitHttpUtility.SendHttpRequest(
wsSigninUrl,
HttpMethod.Post,
newMemoryStream(stsToken.BinarySecurityToken),
"application/x-www-form-urlencoded",
clientHandler);
SPOAuthCookies spoAuthCookies = newSPOAuthCookies();
spoAuthCookies.FedAuth = clientHandler.CookieContainer.GetCookies(wsSigninUrl)["FedAuth"].Value;
spoAuthCookies.RtFA = clientHandler.CookieContainer.GetCookies(wsSigninUrl)["rtFA"].Value;
spoAuthCookies.Expires = stsToken.Expires;
spoAuthCookies.Host = wsSigninUrl;
return spoAuthCookies;
}
Step 3: Make the actual OData request to SPO REST services, get back some goodness and render it using the Windows 8 UI (7 and 8 in the diagram above)
In this case I’m making a request to get all the SP lists from the site that are visible to the user from the SPO web interface. In this case I’m using a GET request. For write operations you need to use POST, PUT, and DELETE methods. I will cover a simple example on how to perform a write operation below. You can find more about the SPO REST services notation based on the OData protocol here.
// Send a json odata request to SPO rest services to fetch all lists in the site that are visible to the end user.
var response = awaitHttpUtility.SendODataJsonRequest(
newUri(String.Format("{0}/_api/web/lists?$filter=Hidden eq false", SpoAuthUtility.Current.SiteUrl)),
HttpMethod.Get, // reading data from SP through the rest api usually uses the GET verb
null,
newHttpClientHandler(),
SpoAuthUtility.Current// pass in the helper object that allows us to make authenticated calls to SPO rest services
);
The method below simply appends the SPO authentication cookies we got earlier to the http request and specifies we want to get JSON back (OData will return ATOM payloads by default). JSON has become extremely popular and the .NET framework for Windows Store Apps provides some really helpful methods to parse JSON strings or implement you own custom serializer.
publicstaticasyncTask<byte[]> SendODataJsonRequest(Uri uri, HttpMethod method, Stream requestContent, HttpClientHandler clientHandler, SpoAuthUtility authUtility, Dictionary<string, string> headers = null)
{
if (clientHandler.CookieContainer == null)
clientHandler.CookieContainer = newCookieContainer();
CookieContainer cookieContainer = await authUtility.GetCookieContainer(); // get the auth cookies from SPO after authenticating with Microsoft Online Services STS
foreach (Cookie c in cookieContainer.GetCookies(uri))
{
clientHandler.CookieContainer.Add(uri, c); // apppend SPO auth cookies to the request
}
returnawait SendHttpRequest(
uri,
method,
requestContent,
"application/json;odata=verbose;charset=utf-8", // the http content type for the JSON flavor of SP REST services
clientHandler,
headers);
}
Finally, manipulate the JSON we got back from SPO and feed it to our app UI. The screenshots below show the lists and list items in my SkyDrive Pro (aka SharePoint MySite).


That’s about it. Before I wrap this up 2 things:
1) If you want to write to SPO you need to append an additional piece of information to your REST call. It is call a dynamic canary and it is used to prevent cross site scripting attacks. You can learn more about it here. For all practical purposes, if you do not append the canary to your REST request SharePoint will not let the write go through even if the user has all the right permissions. So here’s you do it.
publicstaticasyncTask<byte[]> SendODataJsonRequestWithCanary(Uri uri, HttpMethod method, Stream requestContent, HttpClientHandler clientHandler, SpoAuthUtility authUtility)
{
// Make a post request to {siteUri}/_api/contextinfo to get the canary
var response = awaitHttpUtility.SendODataJsonRequest(
newUri(String.Format("{0}/_api/contextinfo", SpoAuthUtility.Current.SiteUrl)),
HttpMethod.Post,
null,
clientHandler,
SpoAuthUtility.Current);
Dictionary<String, IJsonValue> dict = newDictionary<string, IJsonValue>();
HttpUtility.ParseJson(JsonObject.Parse(Encoding.UTF8.GetString(response, 0, response.Length)), dict); // parse the JSON response containing the canary
string canary = dict["FormDigestValue"].GetString(); // the canary is contained in the FormDigestValue of the response body
// Make the OData request passing the canary in the request headers
returnawaitHttpUtility.SendODataJsonRequest(
uri,
method,
requestContent,
clientHandler,
SpoAuthUtility.Current,
newDictionary<string, string> {
{ "X-RequestDigest", canary }
});
}
To get the dynamic canary you have to make a POST request to {siteUrl}/_api/contextinfo with an empty body. Note you still have to append the auth cookies to the canary request. The canary will be in the body of the response under the FormDigestValue element. Now that you have the canary all you need to do is to append it to the “X-RequestDigest” headers of your write REST request (don’t forget the auth cookies) and voila! You are now able to write to your SPO site. The code has an example that adds a new list to the site.
// Make a POST request to create the new SP list
// This is a write call so it requires the canary to be appended to the request headers
var response = awaitHttpUtility.SendODataJsonRequestWithCanary(
newUri(String.Format("{0}/_api/web/lists/", SpoAuthUtility.Current.SiteUrl)),
HttpMethod.Post,
newMemoryStream(Encoding.UTF8.GetBytes(addItemJsonString)),
newHttpClientHandler(),
SpoAuthUtility.Current);
And this is what the body of the request looks like in JSON notation for adding a new document library
{
'__metadata': { 'type': 'SP.List' },
'AllowContentTypes': true,
'BaseTemplate': 101,
'ContentTypesEnabled': true,
'Description': 'My list description',
'Title': '[title]'
}
2) Finally, you can download the sample code here. Enjoy!
And with that we have come to the end of this post. I hope you found it helpful. I will finish by saying I’m super enthused about Windows 8 and the new Office 365 and what they bring to end users and developers alike. I also think the combination of both is a fantastic foundation for developers to create the next generation of collaboration and productivity applications (business, education, finance, etc.) that take advantage of the new Windows 8 gorgeous touch interface plus the best collaboration platform there is with Office 365.
Part 2: Windows Store Apps for SharePoint Online with SSO.
Legal Disclaimer:
Everything written in this blog represents my own views only and not those of my employer. Also, any code is provided “AS IS” without warranty of any kind either expressed or implied, including but not limited to the implied warranties of merchantability and/or fitness for a particular purpose.