Sequencing Office 2010 for App-V, Part 3 – The Actual Sequencing Part
Continuing on from Sequencing Office 2010 for App-V, Part 1 and Part 2, Matt and Jason from 43Tc to share their real world experiences with Office 2010 and App-V and provide guidance on sequencing Office for App-V. In part 3 we look at Sequencing Office 2010.
Installation Phase
Click Start | All Programs | Microsoft Application Virtualization| Microsoft Application Virtualization Sequencer
Click Create a new Virtual Application Package
Select Create Package, and click Next
At the Prepare Computer screen, click Next
At the Type of Application screen, select Standard Application and click Next
At the Select Installer screen, browse to and select the Setup.exe file from your installation location and click Next
At the Package Name screen, enter Office2010_x86 as the package name and click Next
Note: for future reference, you can leverage Office customizations you maintain with tools like Office Customization Tool, however in this example we will explicitly customize the installation.
Click the Check Box to accept the license terms and click Continue
Select Customize from the Choose the installation you want page
On the Installation Options tab click Microsoft Office and select Run all from My Computer
Note: Items cannot be set to "Install on First Use". The user will be unable to add any such marked items once the application is virtualized.
Click the File Location tab and select Browse
In the Browse for Folder dialogue select Q:\Office2010_x86
Click OK to confirm the destination folder, and then click Install Now
The installation will take time to install as it is performing normal installation tasks on the sequencer station
When the setup is complete, click Close to exit the Setup Wizard
Back in the Sequencer, check the box next to I am finished installing and click Next
At the Configure Software screen, select Microsoft Word 2010 and click Run Selected
On the Welcome to Microsoft Office 2010 screen select Don't make changes and select OK
Note: It is a best practice to disable any automatic updates for virtual applications. When virtualizing applications, updates will be managed centrally and performed on the sequencer. This avoids application updates being placed in the User Package Volume file and unnecessarily growing the user profile.
Close Microsoft Word
Launch and close Excel, Access and PowerPoint as well.
Note: DO NOT Launch Outlook or One Note or access a SharePoint site due to user specific customizations that take place on first run/hit that we do not want to capture
Once you have launched and closed the applications, click Next
At the Installation Report screen, click Next
At the Customize screen, select Customize. Further configure the virtual application package and click Next
On the Edit Shortcuts screen, delete any of the automatically generated application entries that you do not wish to present to end users by right-clicking those applications in the left-hand pane and selecting Remove. By the way, ctrl-click for multi-select works here. Do not click Next yet!
Add applications for Feature Proxies
In this section we will create individual virtual application entries for the Feature Proxies provided by the Office 2010 Deployment Kit for App-V. We are still on the Edit Shortcuts screen from the last step.
Click the Add button once for each of the below new application entries, and add the following application info below.
IMPORTANT: entries are cAsE SeNsItIvE . To make each entry easier we recommend copy/pasting the Application Path lines if you are able. Once the Application Path line is entered, the other fields will auto propagate. Add each bullet item below separately. See the below screen shot for an example.
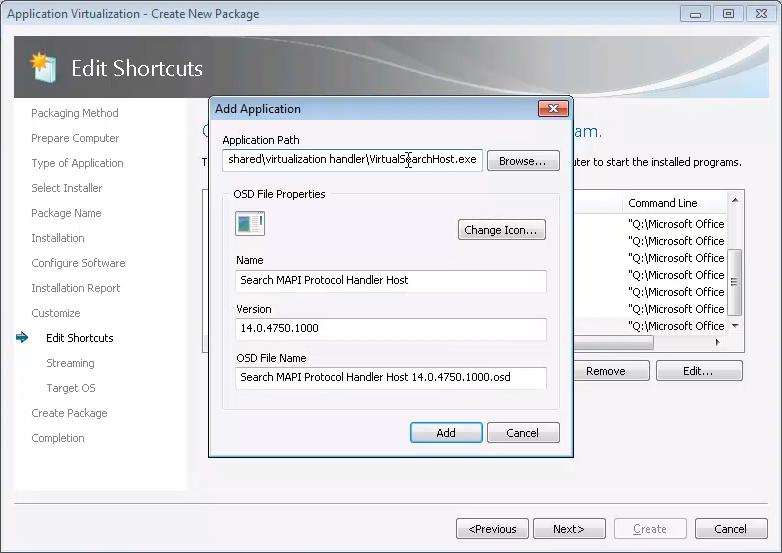
Description: Instant Search (Virtual Search Host) using Windows Desktop Search (WDS)
Application Path: %commonprogramfiles%\microsoft shared\virtualization handler\VirtualSearchHost.exe.
Name: Search MAPI Protocol Handler Host
Description: Virtual SharePoint Proxy
Application Path: %commonprogramfiles%\microsoft shared\virtualization handler\VirtualOWSSuppManager.exe
Name: Microsoft SharePoint Client Support Manager
Description: Simple MAPI
Application Path: %commonprogramfiles%\microsoft shared\virtualization handler\MapiServer.exe.
Name: Microsoft Virtual Office Simple Mapi Proxy Server
Description: Virtual Mail Control Panel Applet
Application Path: %windir%\system32\Control.exe %SFT_MNT%\Office2010_x86\Office14\mlcfg32.cpl
Name: Windows Control Panel
Description: Office Document Cache
Application Path: Q:\Office2010_x86\Office14\MSOSync.exe
Name: Microsoft Office Document Cache
Expand the Office Document Cache element in the Applications tree
Select Shortcuts and click the Edit Locations button (see screenshot below for example)
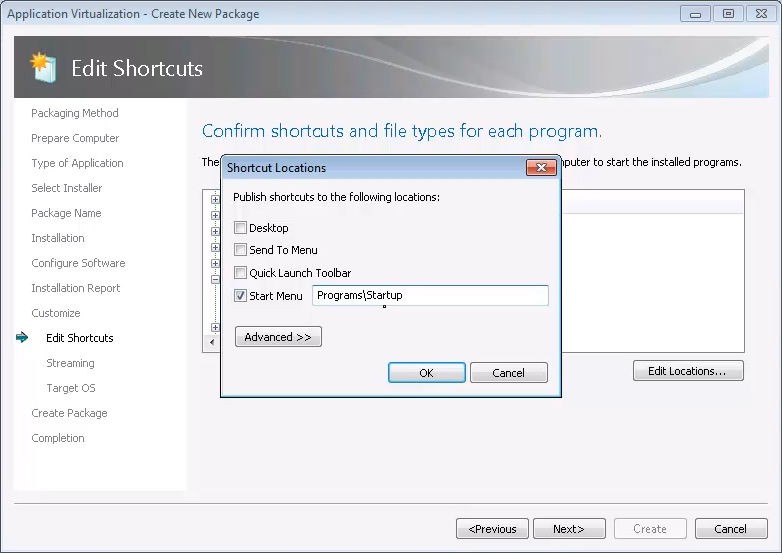
Edit the shortcut location to be Start Menu\Programs\Startup
Expand the Microsoft SharePoint Client Support Manager element in the Applications tree
Select Shortcuts and click the Edit Locations button
Edit the shortcut location as Start Menu\Programs\Startup
Click the Applications node at the top of the left-hand pane.
In the right-hand pane, click the Edit button for each application and change each application's version to 14 (see screenshot below for an example)
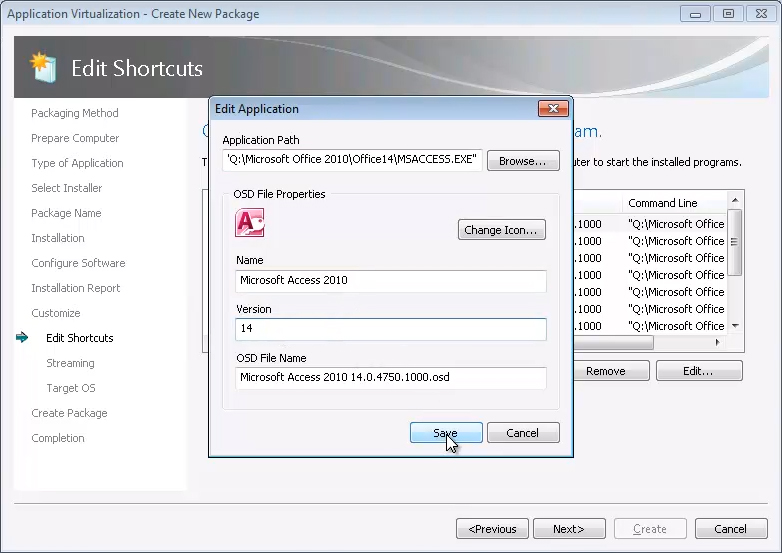
Once you have changed the version for every listed application, Click Next.
Building Feature Blocks and configuration
Office 2010 will be a very large package (in the area of 2 gigabytes). As such the next steps will walk you through splitting the package in to Feature Blocks. Feature blocks separate the specific bits of the package that are most commonly used and needed to launch the application from lesser used bits. The result is that on first launch, rather than the user getting the entire package, they will only receive the most commonly used bits (in the area of only a few hundred Megs). The remaining bits will remain on the server until they are used by the user.
IMPORTANT: DO NOT launch OneNote, Outlook, or SharePoint due to their automatic user specific customization settings.
At the Prepare for Streaming screen, select Microsoft Word 2010 and click Launch.
Once launched, close Word 2010 to establish the minimum Primary Feature Block.
This step should be repeated for the other office applications that your users most commonly use such as Excel, and PowerPoint so they are also placed in the Primary Feature Block.
REMEMBER: DO NOT launch OneNote, Outlook, or SharePoint due to their automatic user specific customization settings .
Click Next
At the Target OS screen, Windows 7 32-bit will already be selected, if you wish to use this package with other platforms, you may select them as well.
Click Next
At the Create Package screen, select Continue to modify package without saving using the package editor and click Next
At the Package Completed screen, click Close
In the Sequencer, click the Deployment tab.
Under Server URL, make the following changes:
Hostname: example.server.name (Name of your App-V Management Server goes here. If you are using SCCM for deployment: leave it as is, SCCM ignores this setting)
Path: Office2010_x86 (Only if using an App-V Management Server. If you are using SCCM for deployment: leave it as is, SCCM ignores this setting)
Under Operating Systems, notice that Windows 7 32-bit is already selected.
Generate .MSI: Checked (useful for testing packages on stand-alone clients)
Compress Package: Checked
Note: To further reduce the amount of network traffic during streaming, you can elect to compress the package. This can sometimes impact first-launch performance by a couple of seconds as the client must decompress each block it receives.
Virtual Registry and Open Software Description (OSD) file changes
Click the Virtual Registry tab.
Expand the registry by double-clicking on Registry and continue to the paths listed below. Right-click and select Key and New to create a new Key under each of the following keys (example screen shot provided below):
- MACHINE\Software\Classes\CLSID\{9203C2CB-1DC1-482D-967E-597AFF270F0D}
- MACHINE\Software\Classes\CLSID\{BDEADEF5-C265-11D0-BCED-00A0C90AB50F}
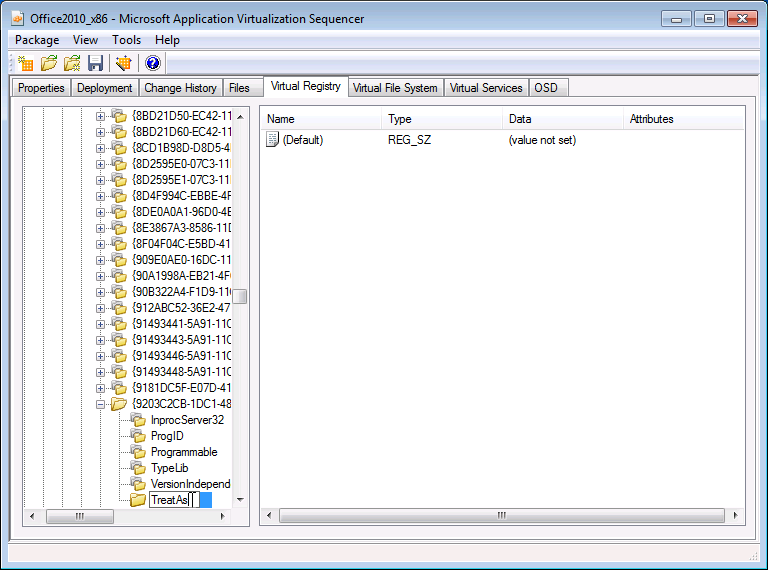
Right-Click each new key and select Key and Rename.
Type TreatAs and select the parent key.
Right-click each TreatAs key, select Key, select the checkmark next to Override Local Key (example screenshot provided below).

Change the following virtual registry key property to Merge with Local by Right-clicking the key, select Key, select Merge with Local Key (example screenshot provided below).
- MACHINE\Software\Microsoft\Office\14.0

Click on the OSD tab
Repeat the following steps for each application in the pull-down list under Select Application (example screenshot provided below).
- Expand IMPLMENTATION under SOFTPKG.
- Expand VIRTUALENV
- Expand POLICIES and select LOCAL_INTERACTION_ALLOWED.
- In the Element Text: field replace the word FALSE with the word TRUE
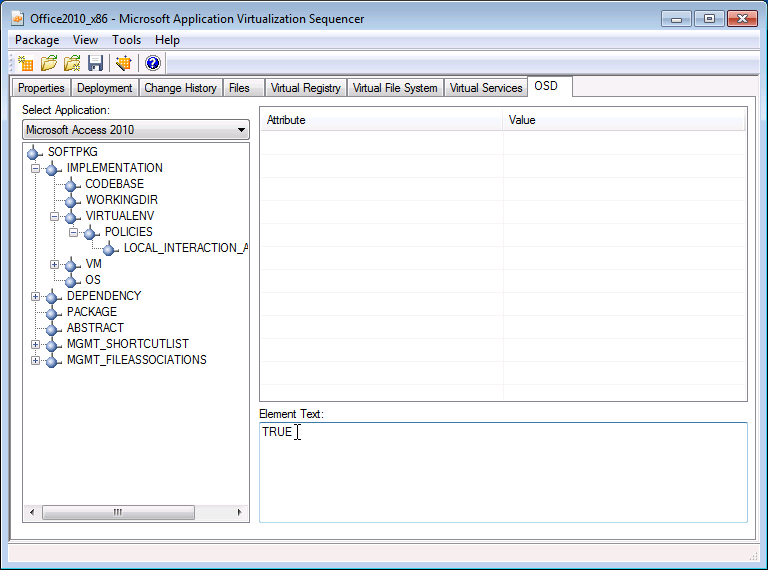
- IMPORTANT: Repeat for every application listed in the pull-down list under Select Application. When completed, continue to the next step.
Click on the Properties tab
Copy the Package GUID and paste it into a notepad document. You will need to use this GUID later.
Saving the sequence
- Click File | Save.
- Browse to the Desktop and create a folder named Office2010_x86.
- Open the Office2010_x86 folder.
- Confirm that the File name: is Office2010_x86.sprj and click Save.
- Once the package is saved open the new Office2010_x86 folder on your desktop and examine the files that were created. Your package files should look pretty much like they do in the below screenshot.
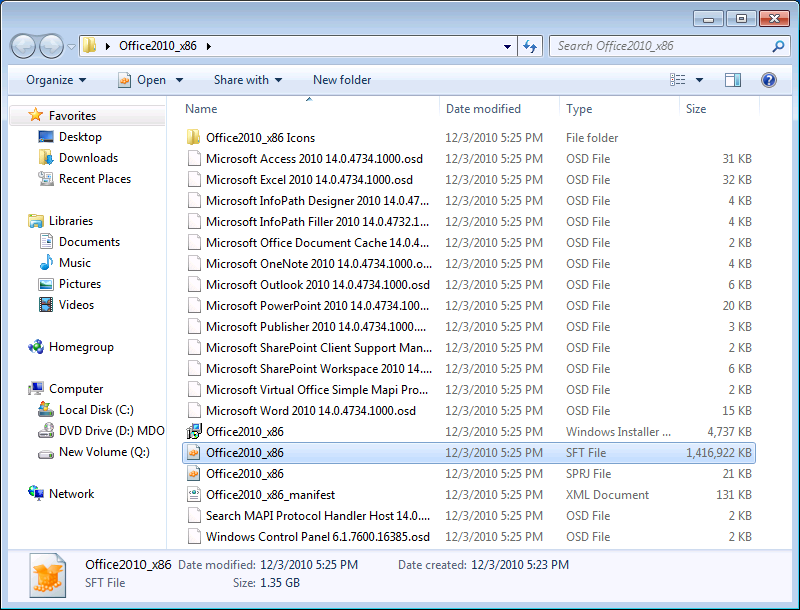
You should now have:
- The Icons folder (self explanitary)
- An .OSD file for each application to which you will be providing shortcuts (as well as the shortcuts provided for the feature proxies)
- The .MSI file (useful for testing on a stand-alone client)
- The .SFT file which is the application package itself (notice it's a little less than 1.5GB in size)
- The .SPRJ file (the package's sequencer project file)
- The manifest.xml file (used for SCCM deployment)
Stay tuned for Part 4, in which we prepare the clients to receive the Office 2010 package.