Phonetic Guides, Yomi, Furigana, or “Ruby” Text
Hello, this is Gwyneth Marshall again. Today we will continue from the East Asian Page Layout Features in Office 2010 article to describe another East Asian feature in Office 2010 called Phonetic Guides. The terms Phonetic Guide, Yomi, Furigana, or "Ruby" Text are used somewhat interchangeably to refer to an annotative gloss placed above or to the right of characters to aid the user in pronunciation. This is particularly important for logographic languages where the reader may not be familiar with the character or the character has more than one pronunciation.
|
NOTE: These features require at least one East Asian language to be enabled as described in My Language Preferences: Office Editing Languages. If additional settings need to be changed, these are noted with the feature. |
Office provides methods to annotate text in
- Access
- Excel
- Outlook
- Publisher, Word, and Outlook WordMail
Access
- Set your Region to Japanese. You will also need to set your default editing language to Japanese.
- Create a new empty database.
- In the table view that appears, create a new field by typing "LastName" in the Add New Field edit box.
- Create a second field called "LastNameFurigana"
- On the ribbon, click the down arrow on the View button and change to the Design view.
- You will be prompted to save the table, name the table, and click OK.
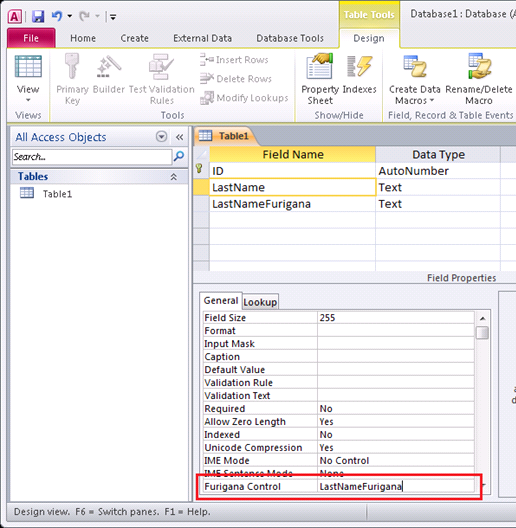
- Click on the text field you just created. In the Field Properties view at the bottom of the window, you should see the Furigana text property.
- In the Furigana text property, type the name of the Furigana field you created above, "LastNameFurigana."
- Change the view to the Datasheet view.
- Change your current keyboard to the Japanese IME and ensure the input mode is set to Hiragana.
- Type "ta-na-ka" in the LastName field and hit the Enter key until the IME candidate is accepted. You should now see the Furigana version of that last name in the LastNameFurigana field. See the image below for an example.

Excel
- You must first ensure one East Asian Language set as your default editing language, as defined in My Language Preferences: Office Editing Languages.
- Type some text and select the cell.
- Go to the Home tab of the Ribbon.
- In the Font chunk, click the down arrow on the Phonetic Guide button.
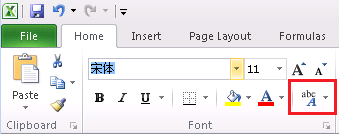
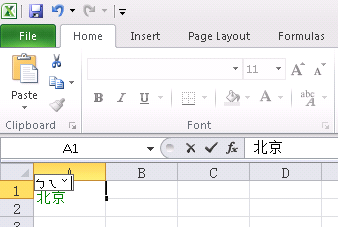
- Select Edit Phonetic
- Type the desired gloss text in the cell.
Outlook
- Set your Region to Japanese.
- Switch to the Contacts view.
- Create a new contact.
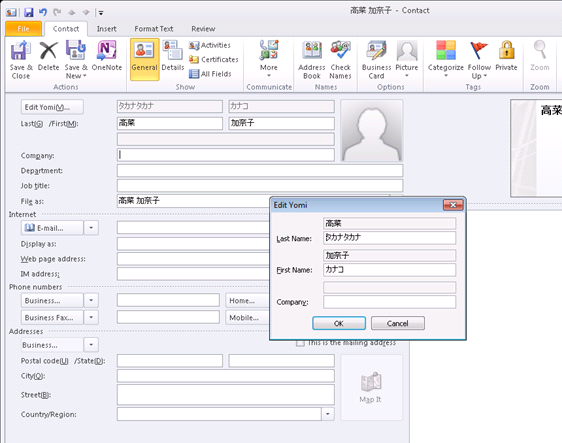
- You should now see some grey fields above the name and company fields. When you type in a Japanese name in these fields, the Furigana text is automatically filled in. The text in the image below was entered with the Japanese IME (set the input type to Hiragana) and type "Tanaka" and "Kanako" for the last and first names. NOTE: Copying and pasting text into the Last Name field will not create the Yomi text. You must change your current keyboard to the Japanese IME and then type in the text.
- To change the values of the Furigana text, click the Edit Yomi... button.
- If your Exchange Administrator has turned on the Yomi feature and your Region is set to Japanese, you can see this field in the Outlook Address book.
Publisher, Word and Outlook WordMail
The following images are for Word, but the instructions are the same for Publisher and Outlook WordMail.
- You must first ensure one East Language enabled, as defined in My Language Preferences: Office Editing Languages.
- Type and then select some text.
- Go to the Home tab of the Ribbon.
- In the Font chunk, click on the Phonetic Guide button. (NOTE: If this button is clicked in with Japanese set as the default editing language, this feature will automatically provide the phonetic guide for the Kanji characters. Other East Asian languages only provide the space where users manually input the phonetic guide, that is, if the button is clicked.)
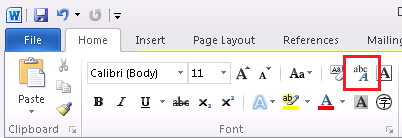
- You will then be presented with a dialog box to enter in desired gloss text.
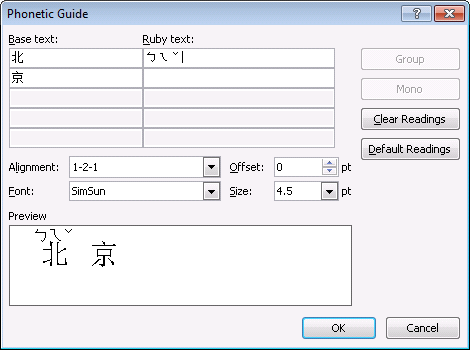
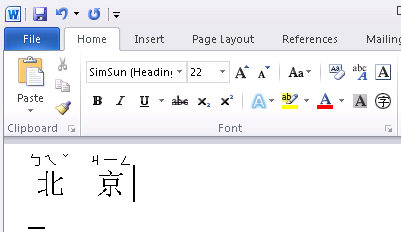
The end result will look similar to this:
Big thanks to Grace Sturman, Peter Liang, Vyom Munshi, Seiichi Kato, and Paul Suurs for helping me with this article.
