PowerShell: Enable/Enforce Multifactor Authentication for All (Bulk) Users in Office 365
Initial Setup
MFA helps secure user sign-ins for cloud services beyond just a single password. With MFA for Office 365, users are required to acknowledge a phone call, text message, or app notification on their smart phones after correctly entering their passwords. They can sign in only after this second authentication factor has been satisfied.
A form of multi-factor authentication is included with Office 365, but you can also purchase Azure Multi-Factor authentication that includes extended functionality. For more information see feature comparison of Azure Multi-Factor Authentication versions.
To set up multi-factor authentication for Office 365
- Sign in to the Office 365 admin center.
- In the admin center, choose users and groups > Active Users.
- Next to Set Multi-factor authentication requirements, choose Set up.

-
- Find the user or users that you want to enable for MFA. In order to see all the users, you might need to change the view at the top.
The views have the following values based on the MFA state of the users:
Disabled
This is the default state for a new user not enrolled in multi-factor authentication.
Enabled
The user has been enrolled in multi-factor authentication, but has not completed the registration process. They will be prompted to complete the process the next time they sign in.
Enforced
The user may or may not have completed registration. If they have completed the registration process then they are using multi-factor authentication. Otherwise, the user will be prompted to completer the process at next sign-in
In non-browser apps (such as …Outlook etc.) will not work until app passwords are created and entered into the non-browser apps.
- Check the check box next to the names you chose.
- This will reveal two options on the right: Enable and Manage user settings. Choose Enable.
- In the dialog box that opens, choose enable multi-factor auth.
To allow MFA users to create App Passwords for Office client applications
Multi-factor authentication is enabled per user. This means that if a user has been enabled for multi-factor authentication and they are attempting to use non-browser clients, such as Outlook 2013 with Office 365, they will be unable to do so. An app password allows this to occur. An app password, is a password that is created within the Azure portal that allows the user to by-pass the multi-factor authentication and continue to use their application.
Important All the Office 2013 client applications support Multi-Factor Authentication through the use of the Active Directory Authentication Library (ADAL). This means that o app passwords are not required for Office 2013 clients.
In the admin center, choose users and groups > Active Users.
Next to Set Multi-factor authentication requirements, choose Set up.
On the multi-factor authentication page, choose service settings.
Under app passwords, choose Allow users to create app passwords to sign into non-browser applications.
This allows users to use client Office applications, but they will have to enter a password of their choosing first.
- Click Save, and then Close.
To manage user settings
- Find the user or users you want to manage and select the checkbox next to their names.
- This will bring up two options on the right, Enable and Manage user settings. Choose Manage User settings. In the dialog select one or more of Require selected users to provide contact methods again, Delete all existing app passwords generated by the selected users, or Restore Multi-Factor Authentication on all suspended devices. Make your selections and choose Save.
Bulk Update Options
GUI
- Sign in to the Office 365 admin center.
- In the admin center, choose users and groups > Active Users.
- Next to Set Multi-factor authentication requirements, choose Set up.
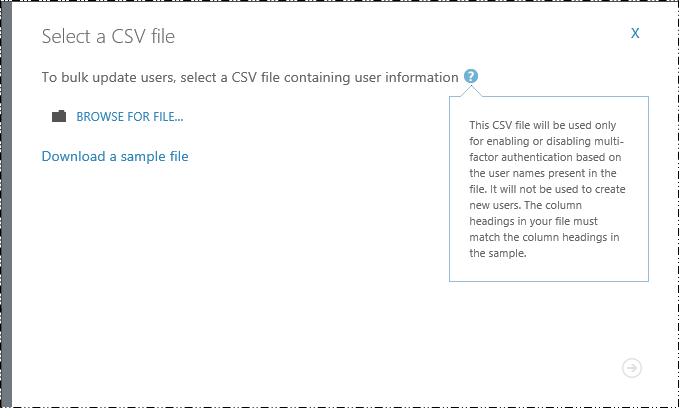
- On the multi-factor authentication page, you will find a "Bulk Update" button.
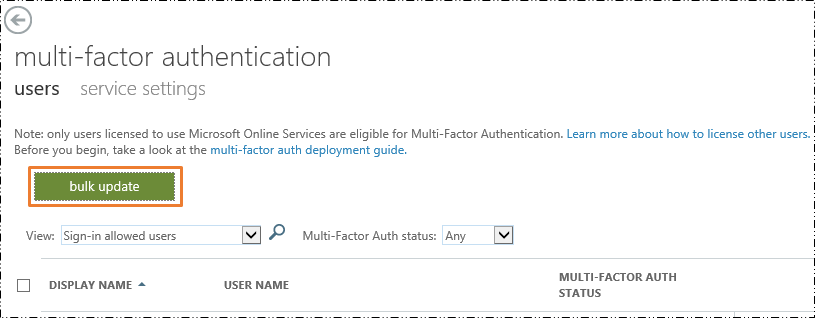
Clicking the button allows you to upload a CSV file with the list of users for whom multi-factor authentication is to be enabled.
PowerShell
Prerequisites: Download and Install the following modules.
The Azure AD Module is supported on the following Windows operating systems with the default version of Microsoft .NET Framework and Windows PowerShell: Windows 8.1, Windows 8, Windows 7, Windows Server 2012 R2, Windows Server 2012, or Windows Server 2008 R2.
First install the Microsoft Online Services Sign-In Assistant for IT Professionals RTW from the Microsoft Download Center.
Then install the Azure Active Directory Module for Windows PowerShell (64-bit version), and click Run to run the installer package.
Open Windows PowerShell
Run the following command.
Get-ExecutionPolicy
If the output is anything other than
"unrestricted" , run the following command.Set-ExecutionPolicy Unrestricted –Scope CurrentUser
Confirm the change of settings.
NOTE: As of when I am writing this blog, it is a good idea NOT to enable multifactor authentication for an administrator who extensively uses PowerShell to administer Office 365. I have come across issues with authentication via PowerShell thereof.
Step 1: Connect to MsolService via PowerShell
Running the command below will bring up a popup would require you to enter your Office 365 Administrator Credentials.
$UserCredential = Get-Credential
Import-Module MSOnline
Connect-MsolService –Credential $UserCredential
Step 2: Run the following commands.
$auth = New-Object -TypeName Microsoft.Online.Administration.StrongAuthenticationRequirement
$auth.RelyingParty = "*"
Step 3: Choose the MFA State. (As documented above)
You can choose between "Enabled" and "Enforced"
$auth.State = "Enabled"
Step 4: Choose the date – Any devices issued for a user before this date would require MFA setup. Normally, we would select the date of running the command.
$auth.RememberDevicesNotIssuedBefore = (Get-Date)
Command to Enable MFA for a single user.
Set-MsolUser -UserPrincipalName <UserPrincipalName> -StrongAuthenticationRequirements $auth
Command to Enable MFA for all users.
Get-MsolUser –All | Foreach{ Set-MsolUser -UserPrincipalName $_.UserPrincipalName -StrongAuthenticationRequirements $auth}
Wrap up tasks
Please read the deployment guide if you haven't already.
If your users do not regularly sign in through the browser, you can send them to this link to register for multi-factor auth: https://aka.ms/MFASetup
Have a nice day!
Anshuman Mansingh(Microsoft) MCPS, MCSE, MCSA – O365 |