Case of the Hit or Miss Windows 10 Servicing Fail
Hello All,
I hope this finds everyone well and gearing up for summer! As Windows 10 deployments accelerate and you successfully tackle bare metal and legacy to uefi conversion/refresh scenarios, we also find ourselves in a third scenario: Servicing Windows 10. Servicing is a new approach to updating Windows and has been introduced and discussed at length in a number of different forums, TechNet, Ignite, blogs, msdn, etc. As we approach Windows 10 version 1803 by now most of you should have your servicing setup, tested, and likely have been through one or two rounds of servicing. I wanted to take a moment to share with you something we found when servicing Windows 10 to version 1709, how we analyzed the problem, and what we did to work around it. The scenario is a mix of Windows 10 machines running versions 1511 and 1607, that are failing to service to 1709 via SCCM. We set out to service the 1511 machines initially where we saw some level of success, and interestingly some level of failures; enough failures that raised many eyebrows. Lets say it was a 60/40 ratio, or 40% failure rate; so it was pretty high which usually indicates a systemic problem that is common among the failures. But alas we are not in the business of speculation! We had these failures bubble up and it was time to rollup the sleeves, dig in, and do some post mortem to understand why. Well as we all know, what we need in our life at this point are logs, logs, logs, and more logs! But where are the logs for servicing? Although the information is out there, it is surprisingly not so easy to find. If you haven't already seen this page, you'll want to head over, check it out, and bookmark it. Tons of great information in here with different levels of content for the beginner to the seasoned IT Pro. Understanding how servicing works is going to help give you a good foundation on which to troubleshoot these types of failures. There is quite a bit to take in on the aforementioned page, suffice it to say I will provide some cliffs notes here (which are not a replacement for reading that content ; )).
The Process
Windows 10 servicing is broken down into 4 phases, or 5 if you're unlucky enough to experience an uninstall/rollback. It's a good idea to read through and understand what each phase is doing, where it takes place, and where the logs for each of these phases are located. Also a key here in finding out what logs were generated and where, is to understand how many reboots have taken place. Depending on what logs are generated (and the content of them), you can deduce which phase the servicing operation failed in. The servicing process reboots once between each phase. This will make more sense later.
Phase 1. DownLevel - This phase is ran in the source OS, this is where all of the install files that are needed are downloaded and prepared for installation. During this phase we mount the SafeOS WIM file AKA the WinPE environment for use after the upcoming (READ 1st) reboot. After the SafeOS WIM is mounted and updated for use on the system, we dismount it, apply BCD settings making it the default boot entry, suspend Bit Locker, and reboot the machine.
Reboot.
Phase 2. SafeOS - After we come back from the first reboot we are now booting into the SafeOS WIM (WinPE) that was prepared in phase 1. Once the machine enters WinPE this is where the bulk of the work to service the operating system is done, AKA where the magic happens. There are many, many operations being done in this phase. Some of the key operations are: Creating an OS rollback, creating a recovery partition, copying/moving the source WIM (target OS) to the recovery partition, applying the OS WIM, applying drivers, adding the new OS boot entry into BCD, and setting the SafeOS WIM as the default boot entry in BCD. Once this phase completes successfully we have applied the new OS, and setup the machine to reboot back into the SafeOS.
Reboot.
Phase 3. First Boot - We are now coming back from the second reboot of the servicing process. During the First Boot phase we boot back into SafeOS, new BCD entries are created for the New OS, settings are applied, sysprep is run, and data is migrated. There is quite a bit going on here during this phase as well.
Reboot.
Phase 4. Second Boot - During the final phase more settings are applied and more data is migrated, system services are started, and the out of box experience (OOBE) phase executes. The culmination of the process is reaching the start screen and eventually the desktop.
Phase 5. Rollback. If you've reached this phase, something has gone wrong and your machine is rolled back to the previously existing operating system version. This implies that somewhere along the line the machine experienced a fatal error and could not continue. Two logs are of immediate interest if you experience a rollback:
C:\Windows.~BT\Sources\Rollback\setupact.log
C:\Windows.~BT\Sources\Rollback\setuperr.log
These four main phases are documented on the Windows 10 Troubleshoot-Upgrade-Errors page, and a nice graphic is included at the bottom of the page. For the first three phases you can actually follow along with each item listed in the graphic on the upgrade errors page by looking at the C:\Windows.~BT\Sources\Panther\setupact.log to see which of the first three phases completed successfully. The page also gives you an idea of where errors are typically seen and what kinds of things can cause them.
The Problem
Fairly widespread reports of machines taking the upgrade, and eventually rolling back began to trickle in. Results may vary but on average the servicing process can take between 1-3 hours to complete. The time it takes to complete is dependent on a number of factors, network uplink speed, processor spec, amount of RAM, type of HDD, etc. In any event, the time that the servicing upgrade took was also compounded by the time the rollback actually took in order to revert the machine to the previous OS. You can get an accurate count of overall servicing time and rollback time by looking at the setupact.log files. In some instances the rollback of machines was still cooking a few hours into the servicing process.
Why?
First let me state that there are tons of logs generated during the servicing process; xml, etl, log, evtx, text files, etc. All of them contain information about what happened during the servicing process, some of them are easy to consume and crack open, some of them aren't as friendly. Review all of the logs, mount the .evtx logs in the event viewer, review the flat text and xml files, and to get into those pesky ETL files you can try converting them to CSV or XML with tracerpt:
tracecrpt.exe setup.etl -of csv -o setup.etl.csv
So we have "all the logs." Let me start by saying that setupact.log and setuperr.log are your friends. They are your go-to. They likely have the information you are looking for or can give you enough information to point you in the right direction or to another log.
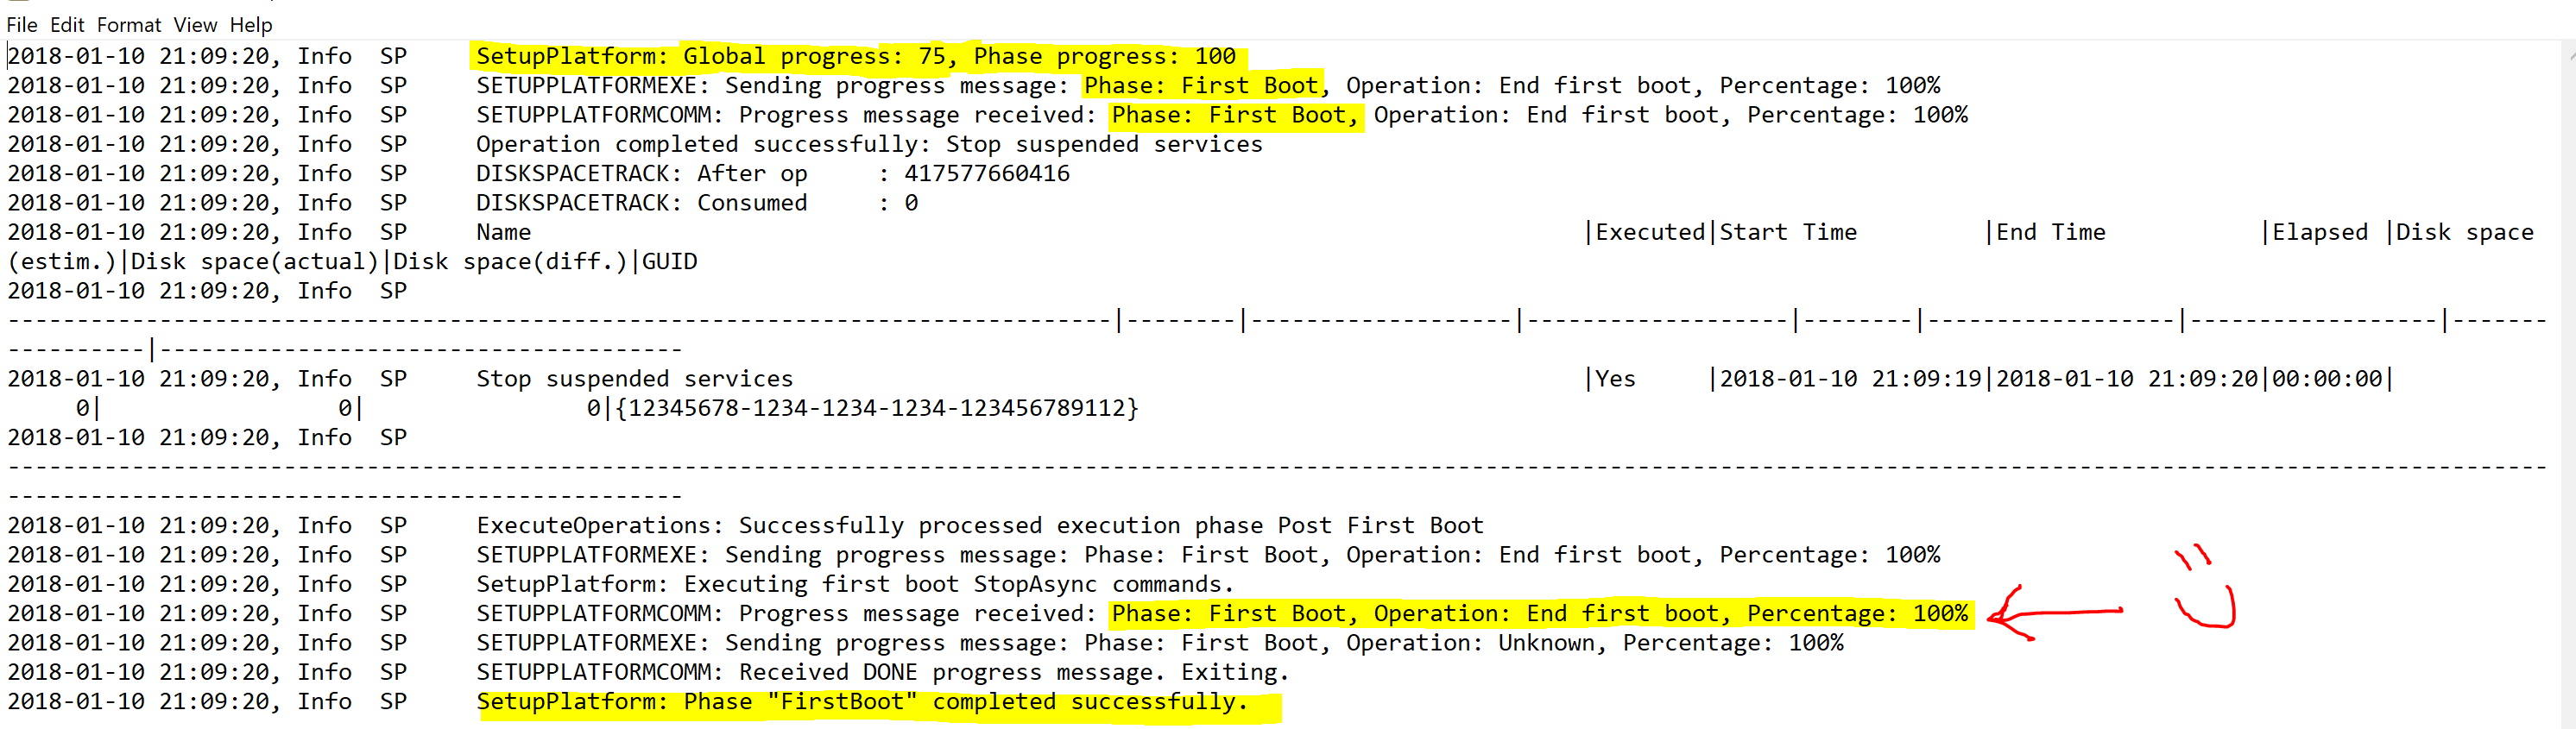
After the dust settled we began to look at a sampling of the machines, effectively scraping the C:\Windows.~BT\Sources\ and C:\Windows\Panther directories to a file share for analysis. Since the following log (C:\Windows.~BT\Sources\Panther\setupact.log) details the first three phases of the servicing process, that's where we want to start. We reviewed the log and low and behold all of the first three phases completed successfully! One thing to note and key in on in the log is that SETUPPLATFORMEXE reports Global servicing progress as well as Phase progress. You'll see entries similar to the following:
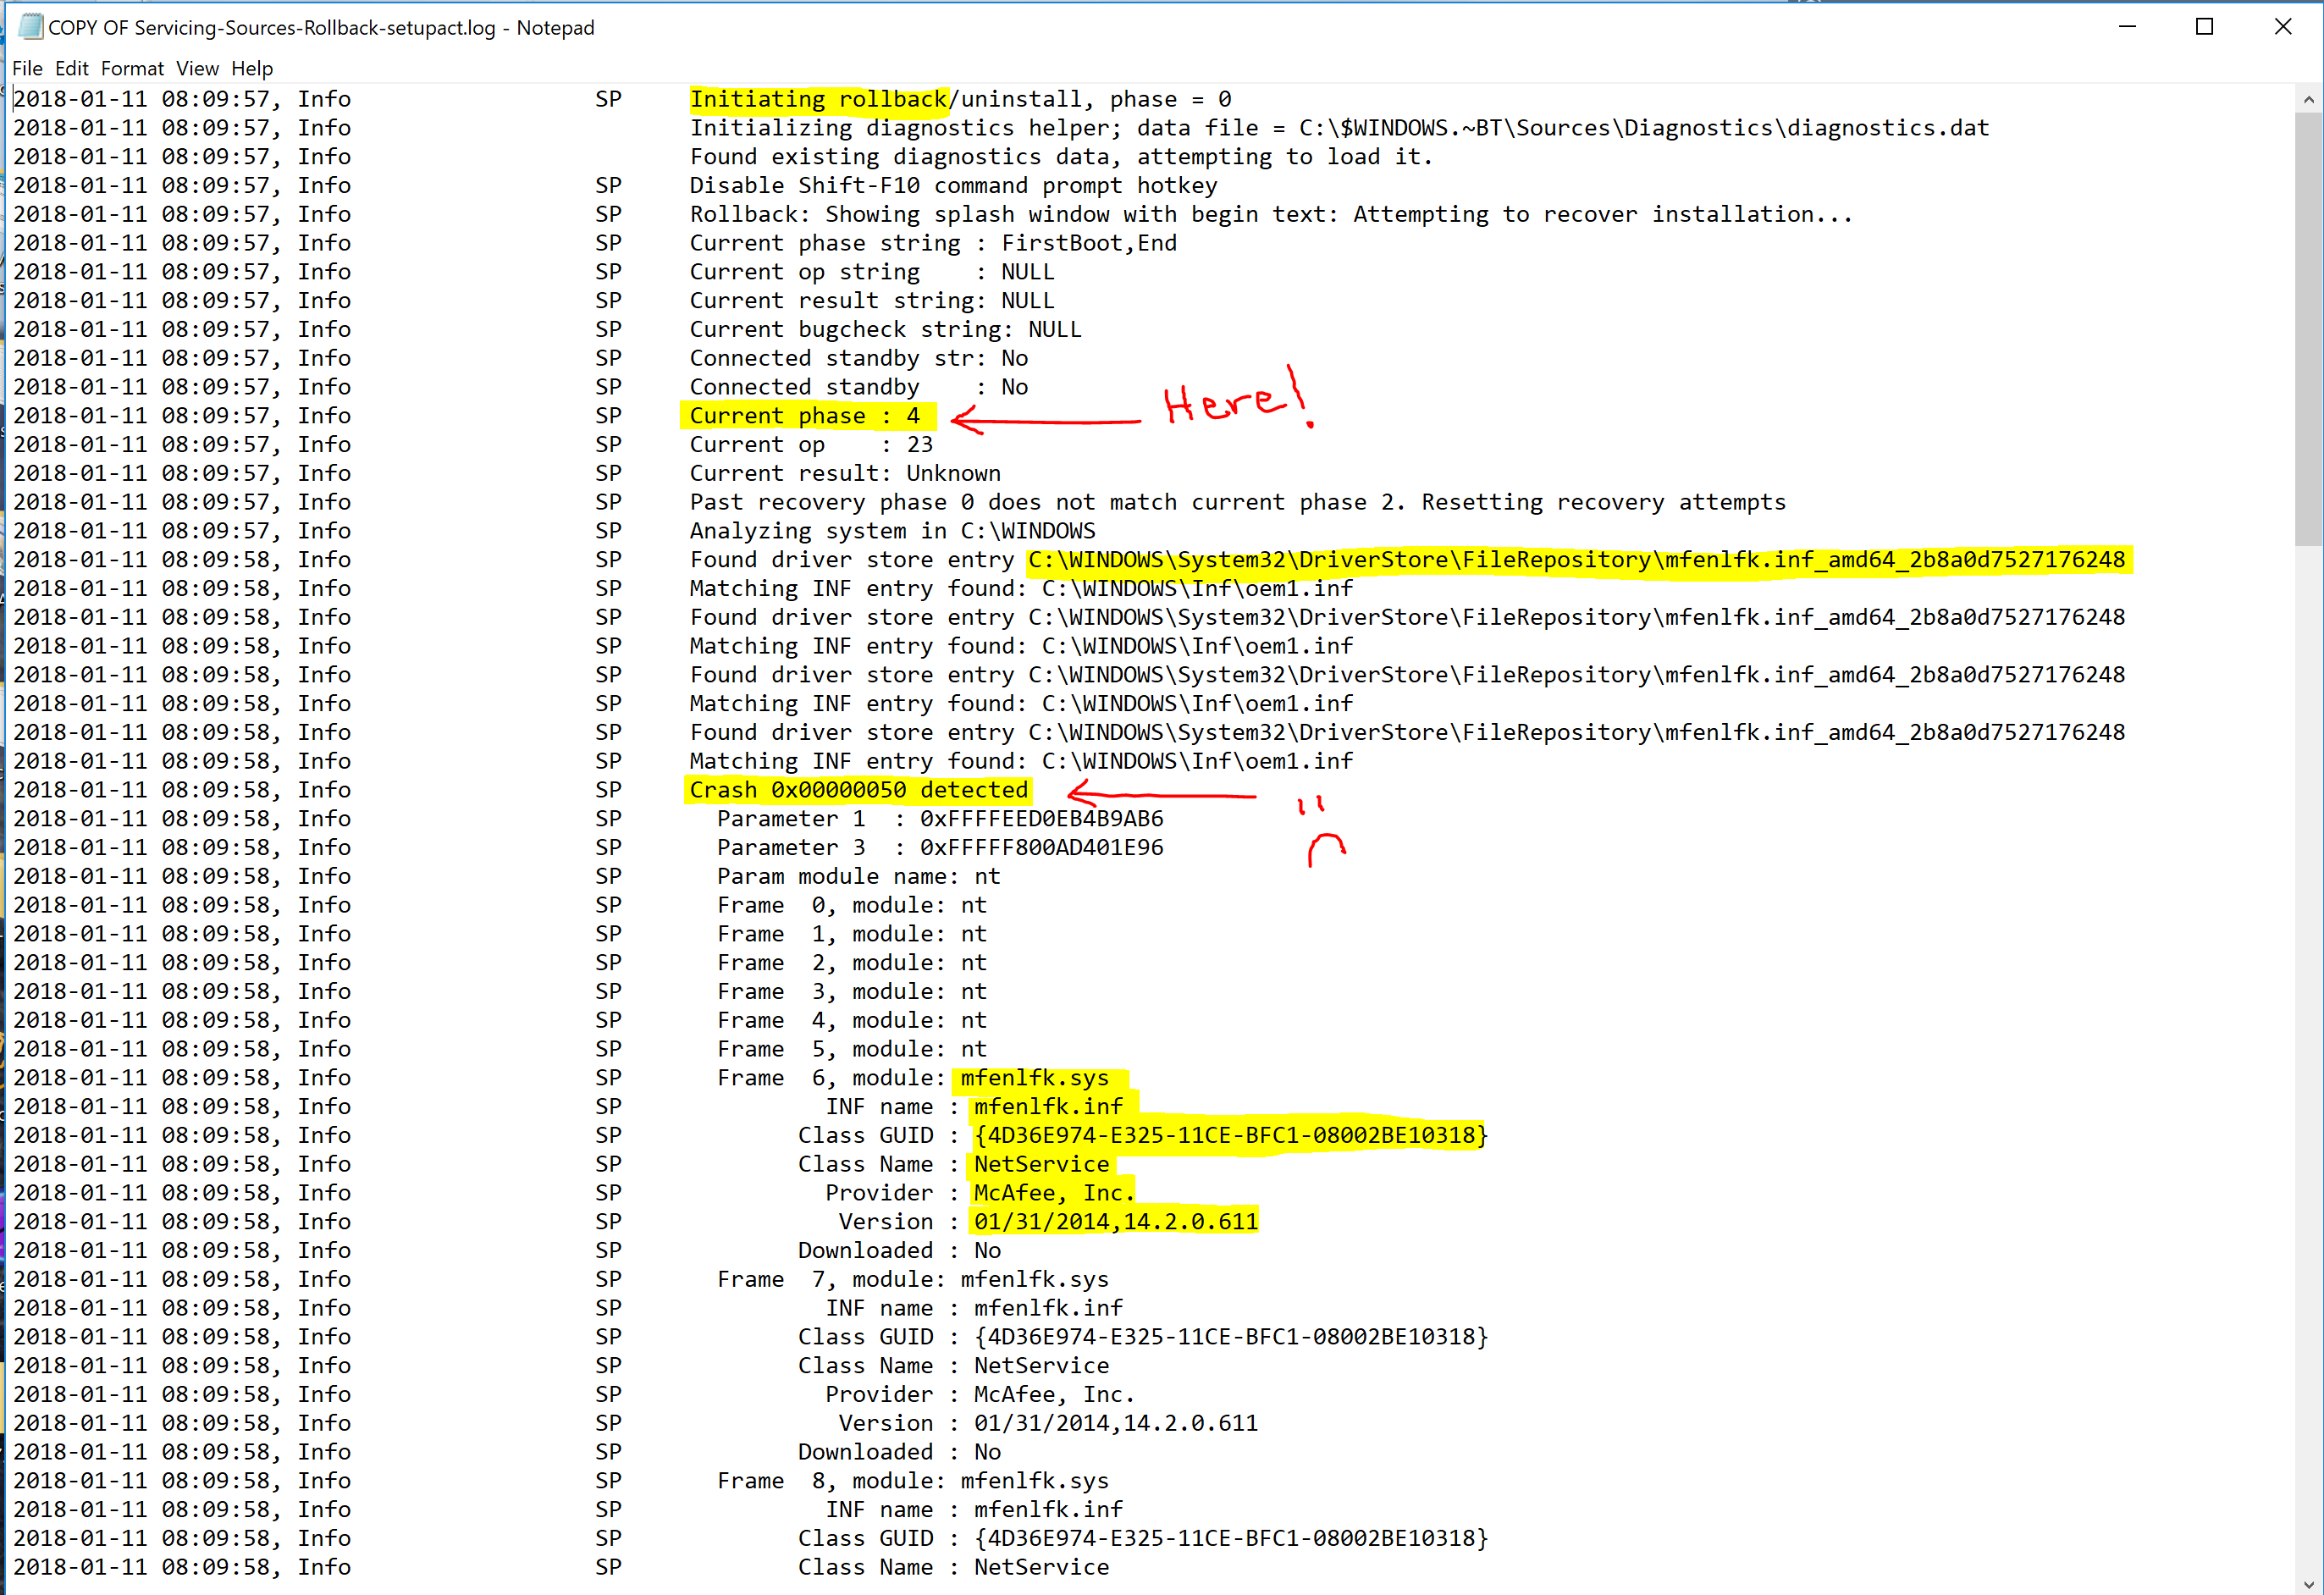
So we were able to quickly narrow down the scope of the failure to one specific phase. Phase 4. Remember Phase 4 occurs in the new target operating system, with all drivers and services starting up and running for the first time, and buttoning up things like settings and data migration tasks, reaching the OOBE phase, and finally (hopefully) the desktop. Only we never reached the desktop. Since we failed in Phase 4 which takes place in the new target OS, a rollback occurred and logs were created in the following directory: C:\Windows.~BT\Sources\Rollback\ Cracking open our go-to log we see the following. A rollback has occurred in phase 4 because of a STOP 0x50 bugcheck, which is PAGE_FAULT_IN_NONPAGED_AREA. This stop code typically indicates that a driver attempted to read or write to an invalid location in memory, in this particular case it was a read operation. In the event of a bugcheck a kernel mini-dump is also generated in C:\Windows.~BT\Sources\Rollback\ The dump only contains stack data. In this case we were not able to have the dump analyzed. Don't fret we are still hot on the trail. Notice about halfway down where it shows "Crash 0x00000050 detected", the next few lines show information extracted from the dump - we can actually see a representation of the stack and the frames in the log. Frames 6-9 are in the mfenlfk.sys driver.
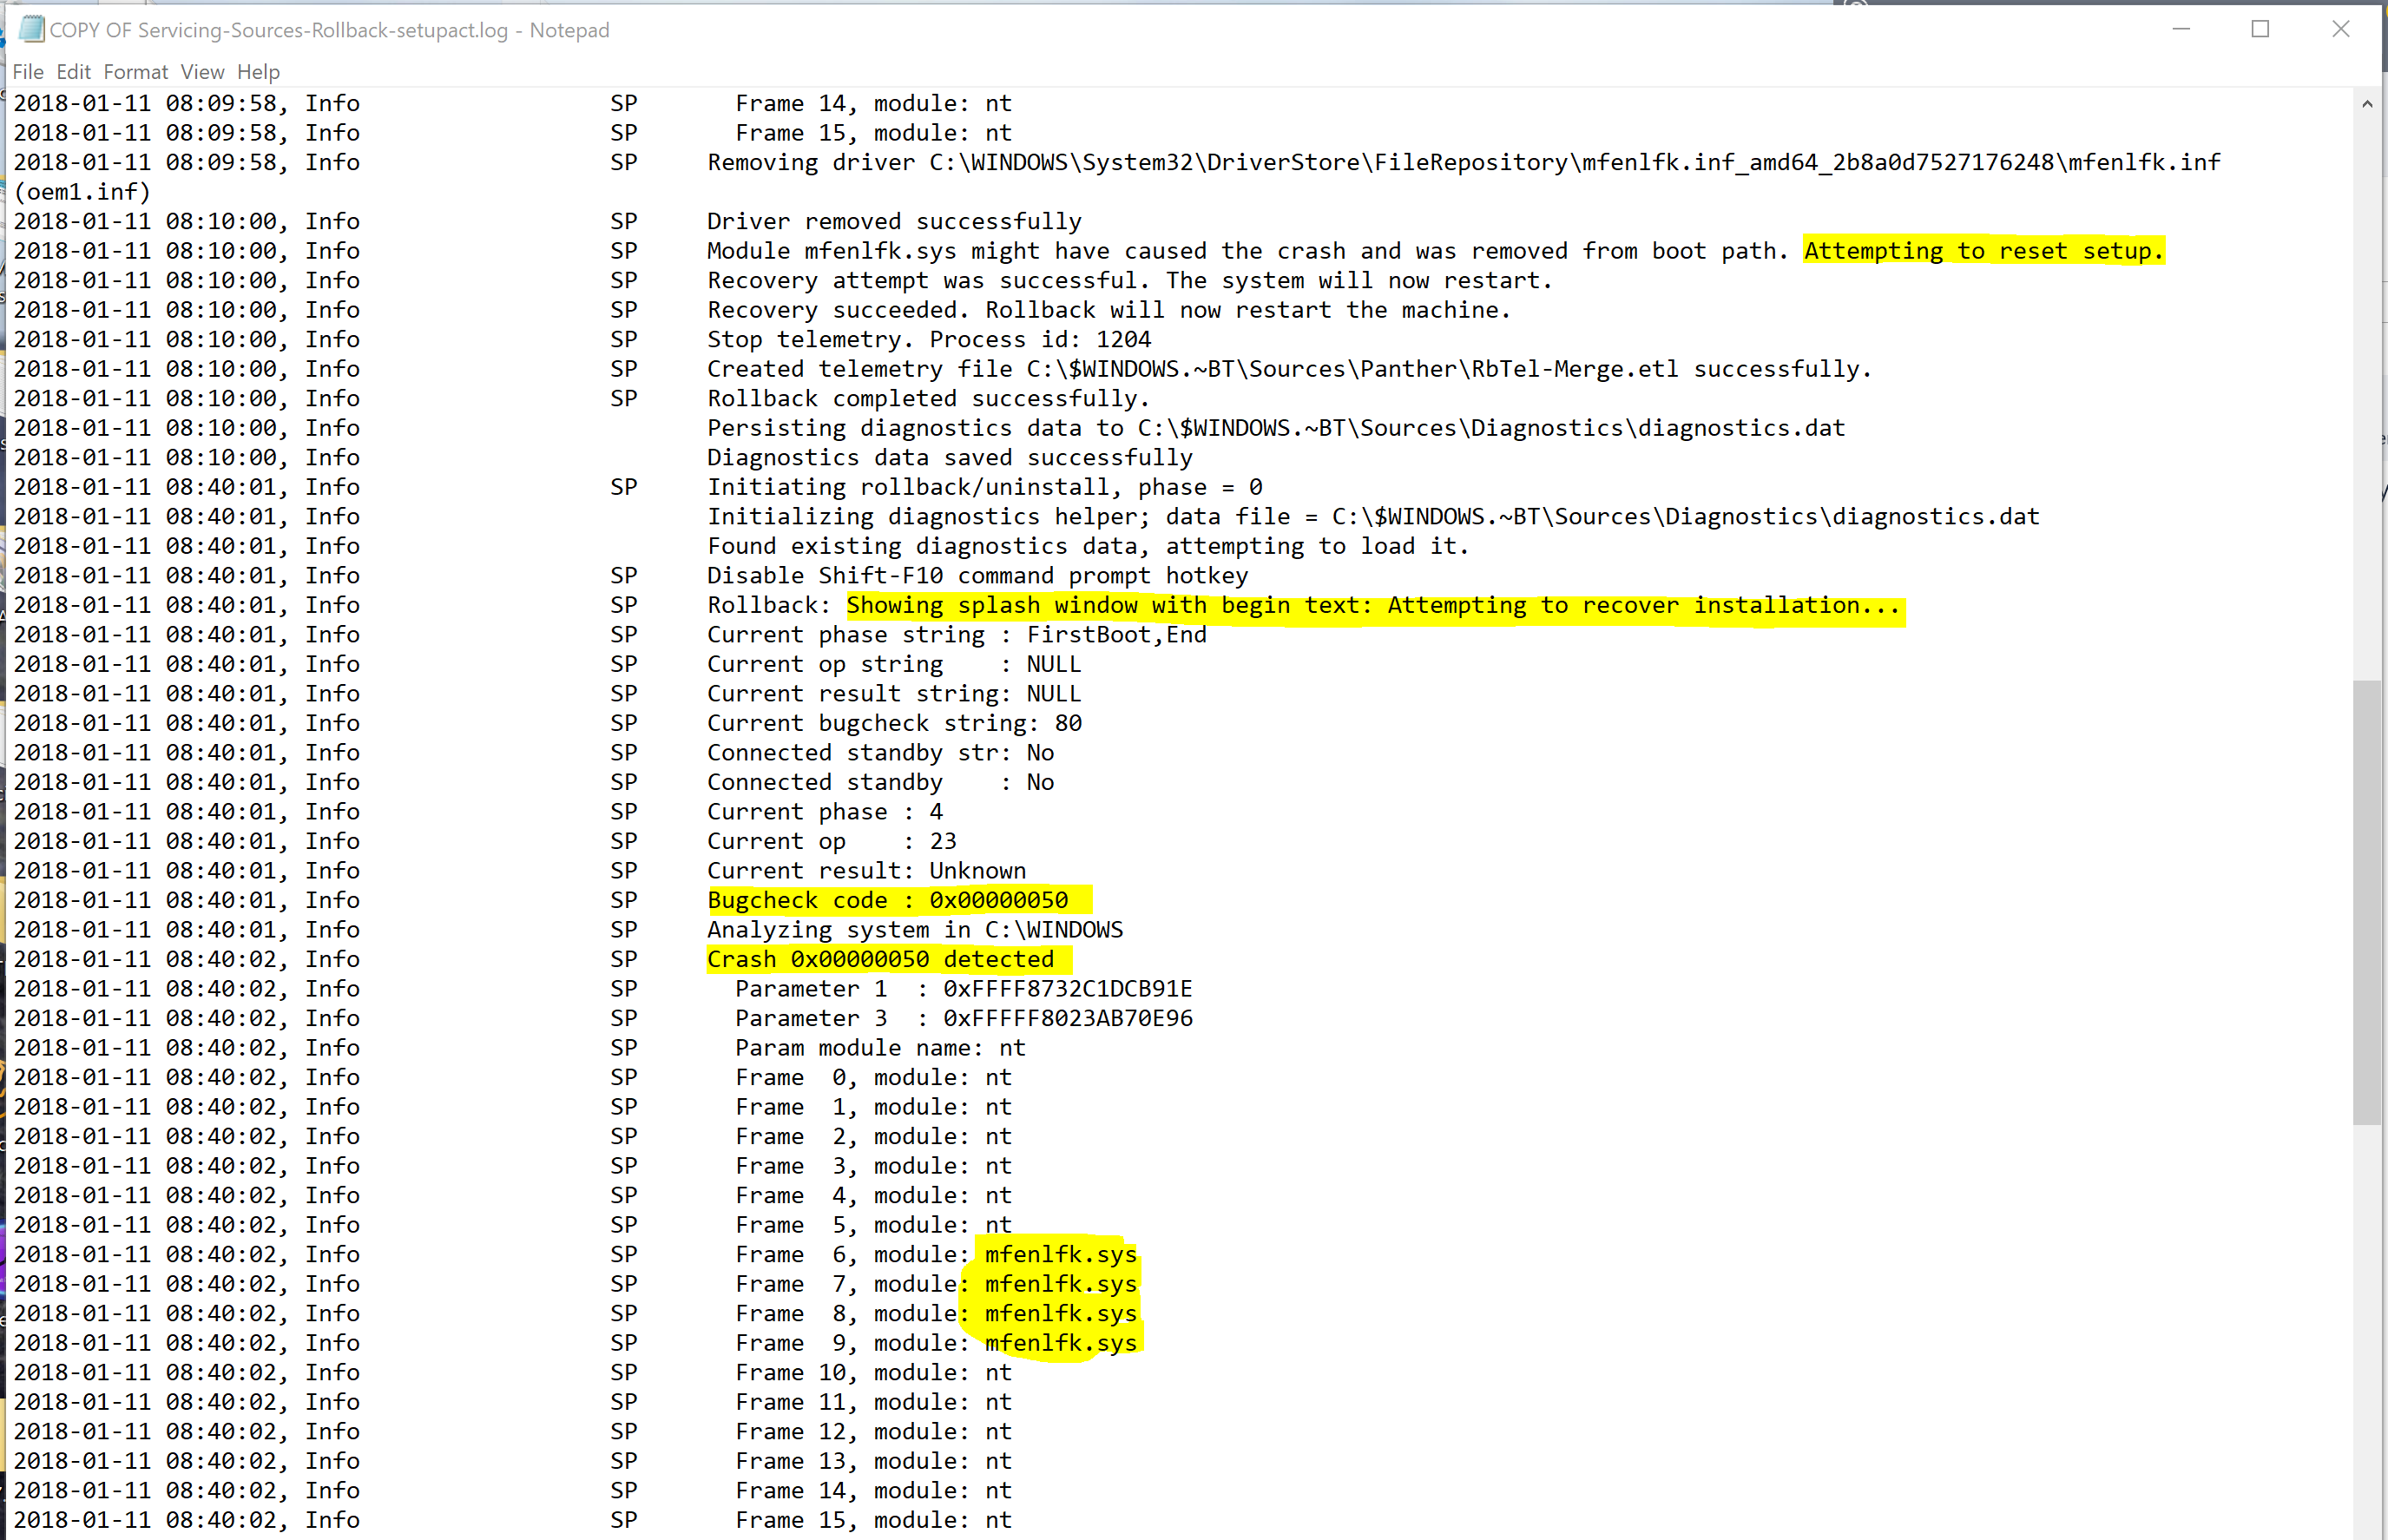
Continuing down the log we see that Windows tried to recover the installation 3 times but bug checked each time with the same stop code, with the same driver in the middle of the stack.
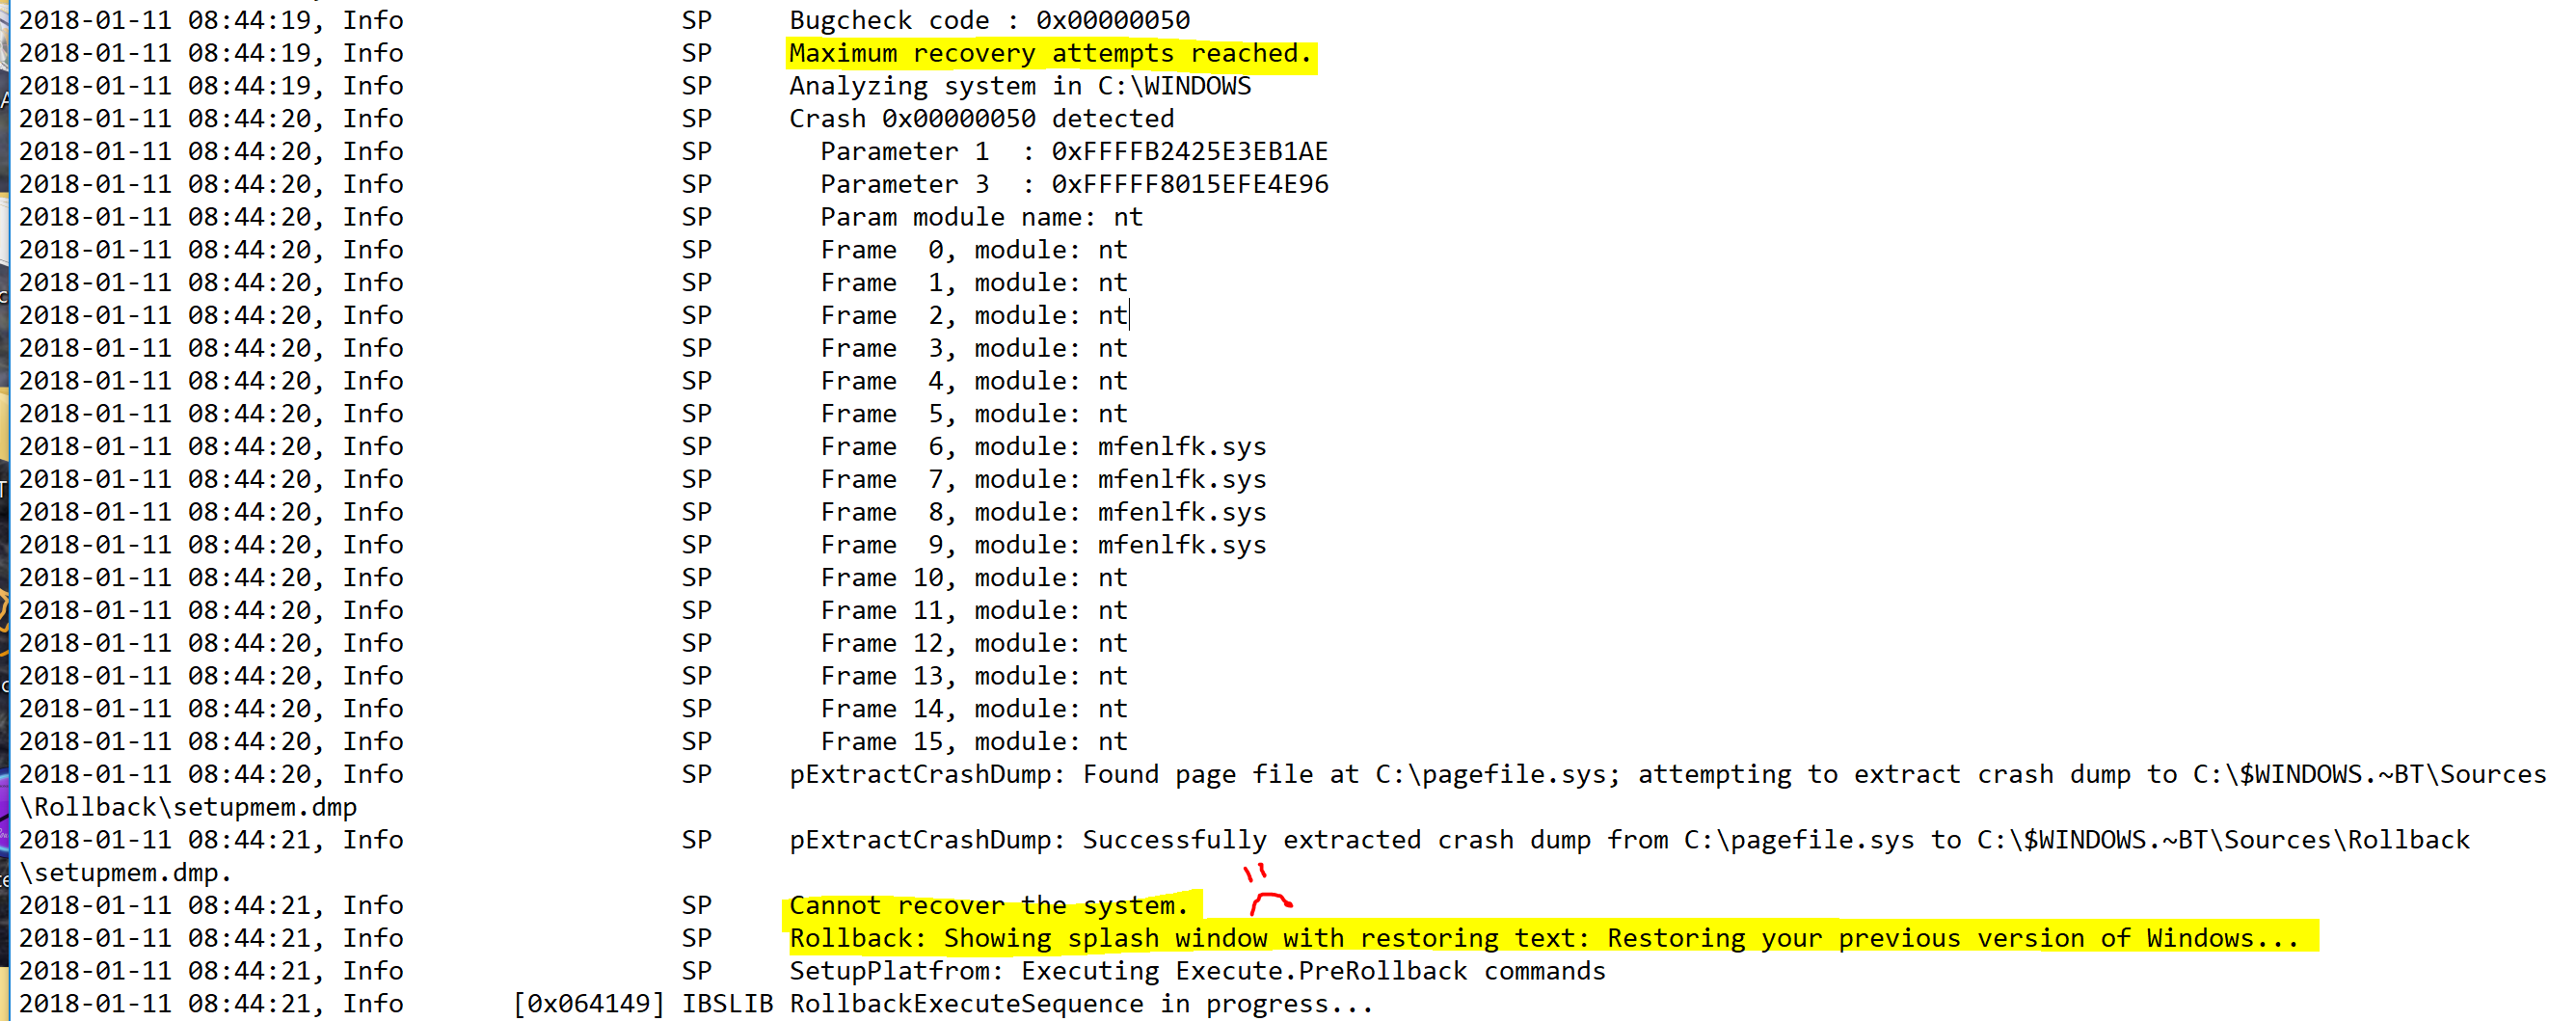
Eventually after hitting the max recovery attempts, Windows begins the process to rollback the OS:
Now we've zeroed' in on the driver in question, which after reviewing it is a network security driver used by McAfee software; with a time/date stamp that is pretty old. We engaged McAfee and started an inquiry on the driver, which was out of date (unsupported) for the version of Windows we were trying to service to (1709). What we found and re-prod' was that even though the system had the latest versions of all the McAfee software(s) installed, this old driver seemed to hang around on the system. Turns out this isn't so good for servicing.
Moving Past
With all eyes on this old driver, we discussed options in order to rid the system of it. How can we get rid of this driver without impacting the system negatively? What if the wrong driver is removed? As you can see the impacts of making a mistake here could be potentially catastrophic on a given box. After much deliberation and reviewing our documentation on the driver store, we arrived at the conclusion that the operating system fundamentally supports removing the driver from the store. Here is a snip of powershell (add your logging, and customize, etc.) we used to interrogate the driver store, search for the very specific driver in question, and remove it:
To expand on this a little, when you query the driver store all drivers are returned. When you find the one you want to remove, you have to remove it by the value of the "Driver" property as seen below. Use caution, just because you find the value on one machine as oem1.inf does NOT mean it will be the same value on another machine, the driver property value is different on each machine, even though the OriginalFileName value is the same. For this reason we have to use logic to identify the driver, grab the "driver" property and feed that to our command to remove the correct driver. Tricky (1st edition). Also note lines 1-3, if your Get-WindowsDriver cmdlet returns an error you may need to use this if McAfee Access Protection is enabled and is blocking access to the temp folder. Tricky (2nd edition).

For the sake of time we used pnputil to remove the driver from the store, of note is that the command line switches for pnputil vary if you are on 1511 (build 10586), they use the legacy switches, and the newer builds of Windows 10 use the newer switches. Tricky (3rd edition). We placed this as the first item in the servicing task sequence, then called a reboot before the servicing step began. We tested this on a number of failed machines and they all took the servicing upgrade successfully. This was quite the long road from the initial discovery, to troubleshooting, to root cause, and eventually to finding a work-around. I hope sharing this with you allows you to better understand the servicing process and how to troubleshoot failures. I would like to re-iterate that the following links provide good information on the topic:
Resolve Windows 10 Upgrade Errors:
/en-us/windows/deployment/upgrade/resolve-windows-10-upgrade-errors
Windows 10 Log Files
Windows 10 SetupDiag is a new tool that was recently released that can also be used to troubleshoot servicing failures. This tool was not released at the time we were working this failure so we didn't get to use it! Check it out!
/en-us/windows/deployment/upgrade/setupdiag
**UPDATE** On 05/07/2018, McAfee published the following KB regarding this issue:
Windows upgrade fails due to old mfenlfk.sys driver in DriverStore\FileRepository
Have a great weekend!
Jesse