Suite B Public Key Infrastructure Part II
Hello all, hopefully it was a good week in IT! Lots going on this week in the field; most notably the Surface Pro 3 UEFI update that Ty posted about earlier! This is certainly a welcome addition, especially for those who don’t seem to have good luck pxe-booting the SP3 or who are doing lots of automation with SCCM!
As promised I’m here to dive back into Suite B PKI. Today we’ll talk about issuing two types of certificates (Key Agreement, and Digital Signature) from the Suite B offline Root CA that we built in the last post, and we’ll issue them in accordance with the requirements for Suite B End Entity Signature and Key Establishment certificates in RFC 5759. I’ve got a Server 2012 R2 box that I’ll be creating both of these certificate signing requests on.
Suite B Key Agreement Certificate
First up we’ll start with the Key Agreement certificate. For more info on Suite B Key Agreement schemes they’re documented in NIST special publication 800-56A.
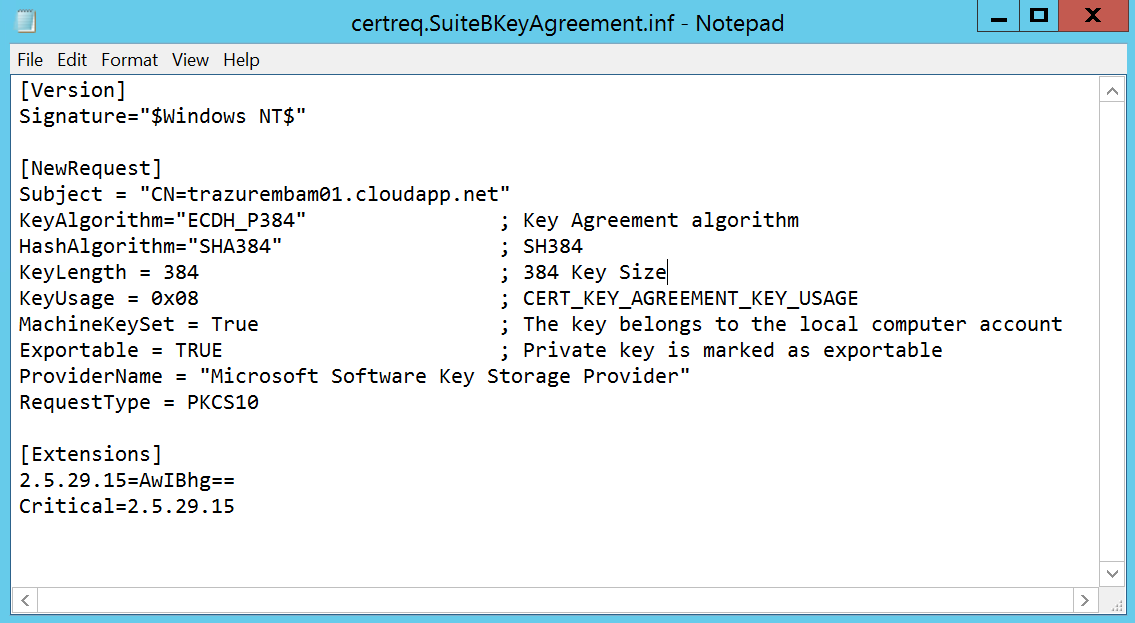
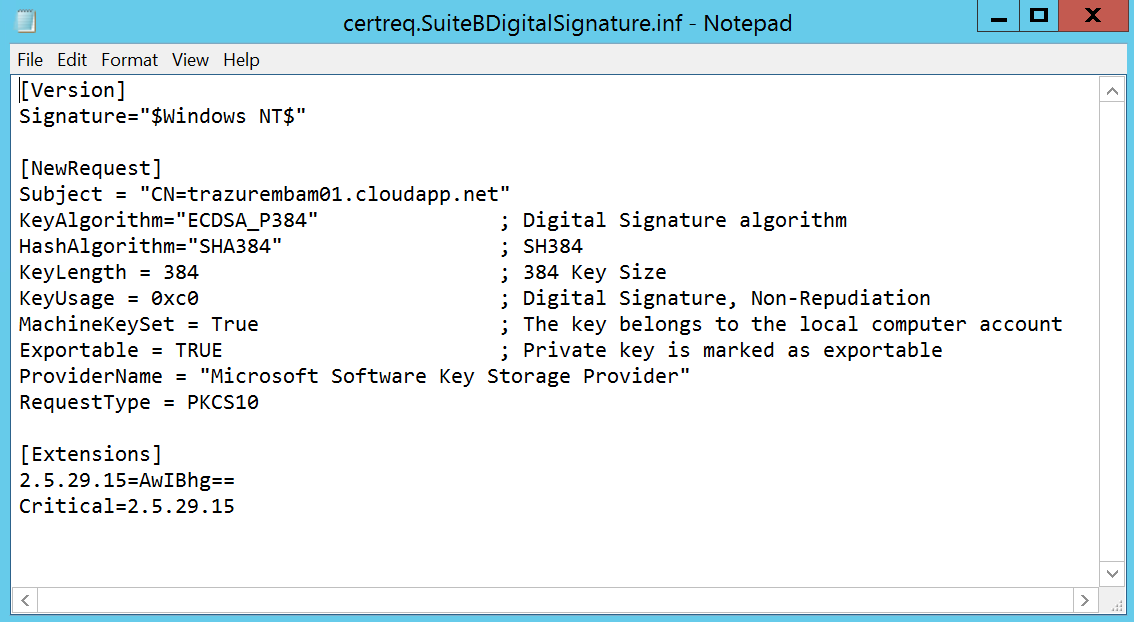
First thing we want to do is to create a certificate request inf file (commonly referred to as certreq.inf). Below is an inf file that I’ve written for submission against our offline Root CA. Make note of the key algorithm, hash algorithm, key length, and the extensions section which marks the key usage extension as critical.
The key usage values are documented here, and are a hexadecimal value that can be added to achieve the required values. For this request we want Key Agreement.
CERT_KEY_AGREEMENT_KEY_USAGE: 0x08
The [Extensions] section was covered in Part I, essentially we’re using the same syntax to mark the key usage extension as critical on this leaf (end-entity) certificate.
Now that we have our certreq.inf file ready, we’ll need to create a base64 certificate signing request (CSR). We can use the handy certreq command to do that:
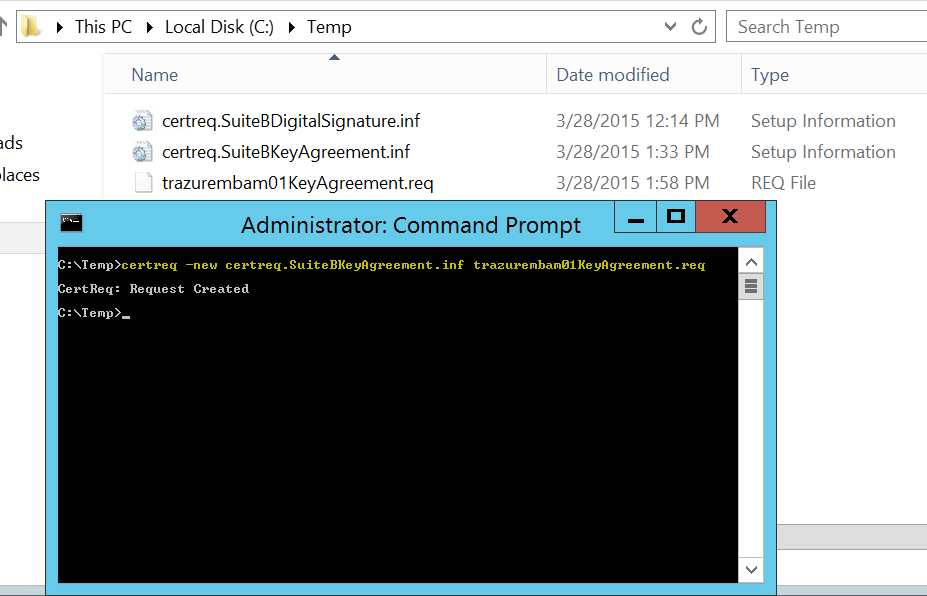
The command output will show that the request was created and there should be a corresponding output file, in this case trazurembam01KeyAgreement.req So, now that we have a CSR we need to get it over to the offline root CA, so we’ll need to “sneaker-net” it over there ;) Once we have the CSR on the Offline Root CA we can cut the certificate.
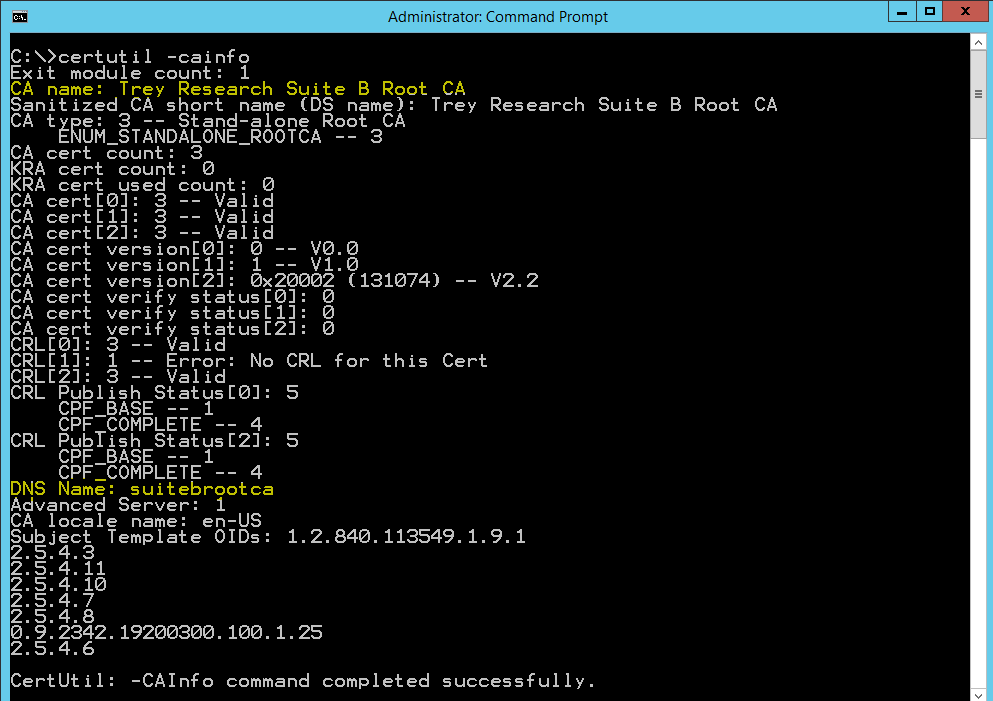
Switching gears to the Offline Root CA, now that we have the CSR copied to the root CA, let’s grab the ca config information "<DNSName\CAName>" An easy way to get those values is to issue the certutil –cainfo command and grab the CA Name and DNS Name values.
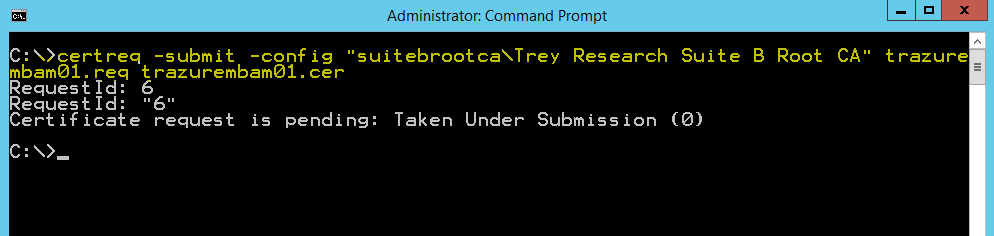
Now we can submit the request where the –config value is in the following format "<DNSName\CAName>:"
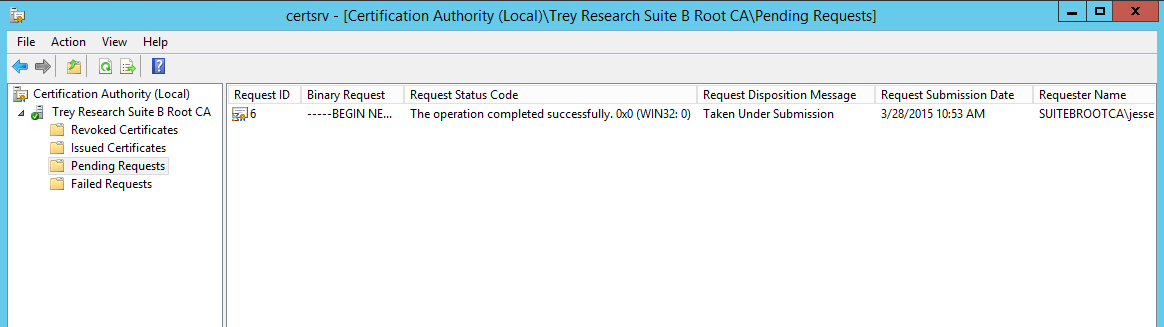
You can also use the CA snap-in to submit the request by right clicking on the CA name | all tasks | submit new request. Note that the request has been taken under submission, so you’ll need to fire up certsrv.msc and issue the certificate. Open the CA snap-in and click on Pending Requests, you’ll see the request in the right pane with a disposition message of “Taken Under Submission:”
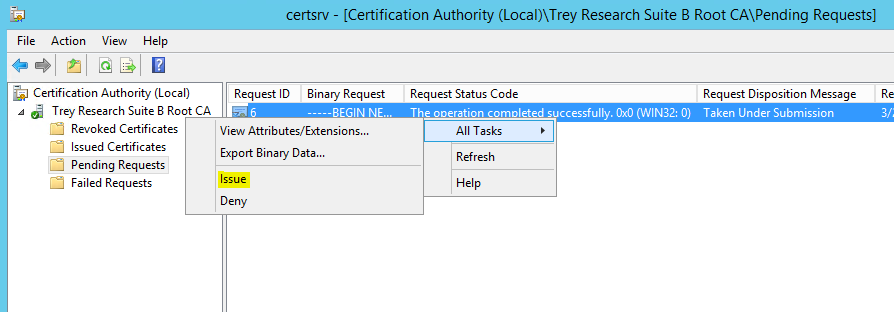
So now we can right click on the pending request and click Issue!
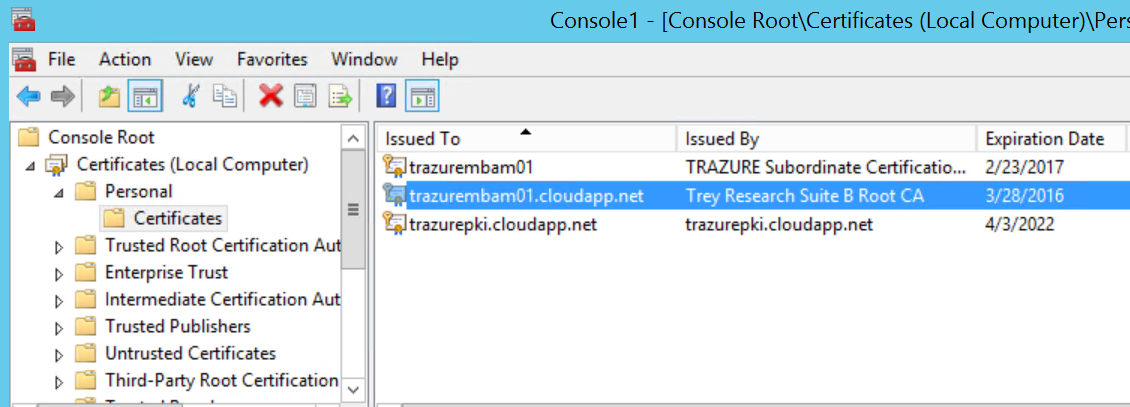
Now if you click on the Issued Certificates folder in the left pane you should see the certificate:

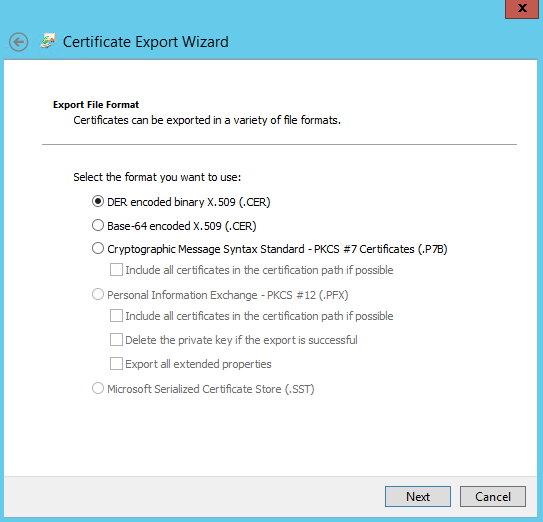
We can double click it and review it, then click the details tab and click Copy to File to export it. Follow the wizard to export it as a DER encoded binary .cer file or a Base-64 encoded .cer file.
Copy the .cer certificate file back to the requesting server. Let me take a minute just to recap what we’ve done so far, as installing the certificate on the requesting sever can sometimes confuse people. So far we’ve completed the following items:
- Created a certreq.inf file for creating the CSR on the requesting server
- Generated the CSR on the requesting server
- Copied the CSR to the Root CA
- Submitted the CSR to the Root CA
- Issued the Certificate on the Root CA
- Retrieved (exported) the issued certificate from the Root CA
- Copied the (exported) .cer certificate file back to the requesting server
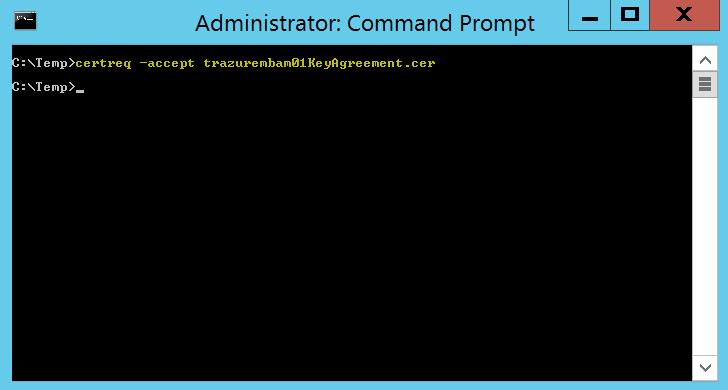
So we’re ready to install the certificate on the requesting server, and sometimes this may get confusing; or you may just be human and forget. ;) Remember that when you create a CSR on a machine, the private key for that certificate is generated and stored on thatserver and only that server. We send the CSR to a CA to digitally sign and create the public key portion of the certificate. Once we retrieve the public key portion of the certificate we need to “marry” it up to the private key portion. We can use the certreq command to do that:
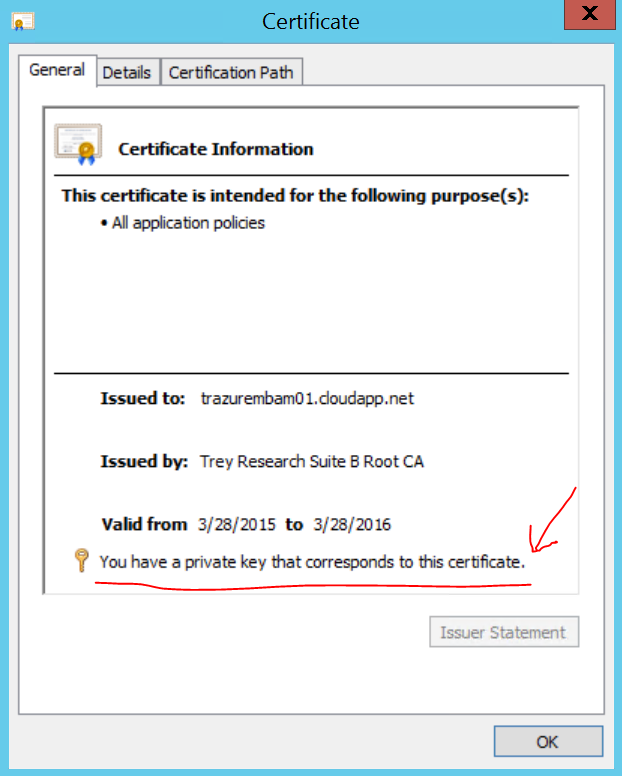
Now on the server, open up the certificates snap-in for the machines personal certificate store and you should see the certificate:
Double-click the certificate and ensure it says the following, if it doesn’t something went south somewhere…
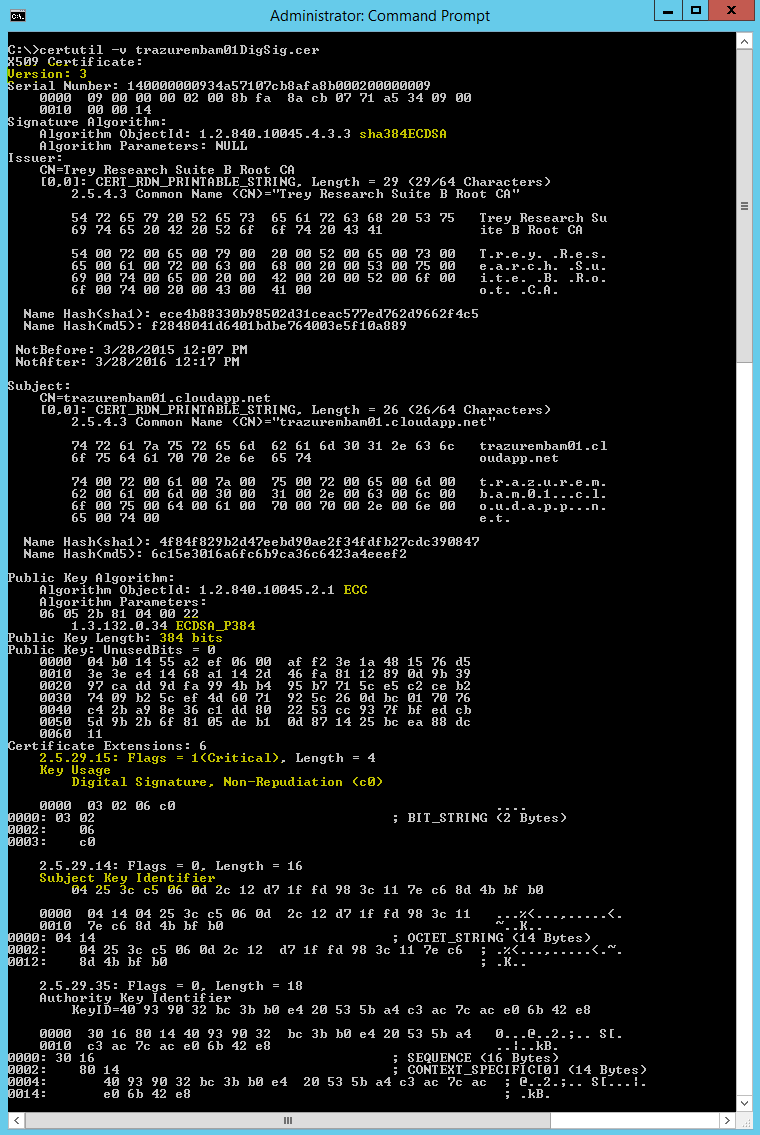
Now let’s use certutil to examine the certificate to check and make sure we have all of the desired extension flags and configurations.
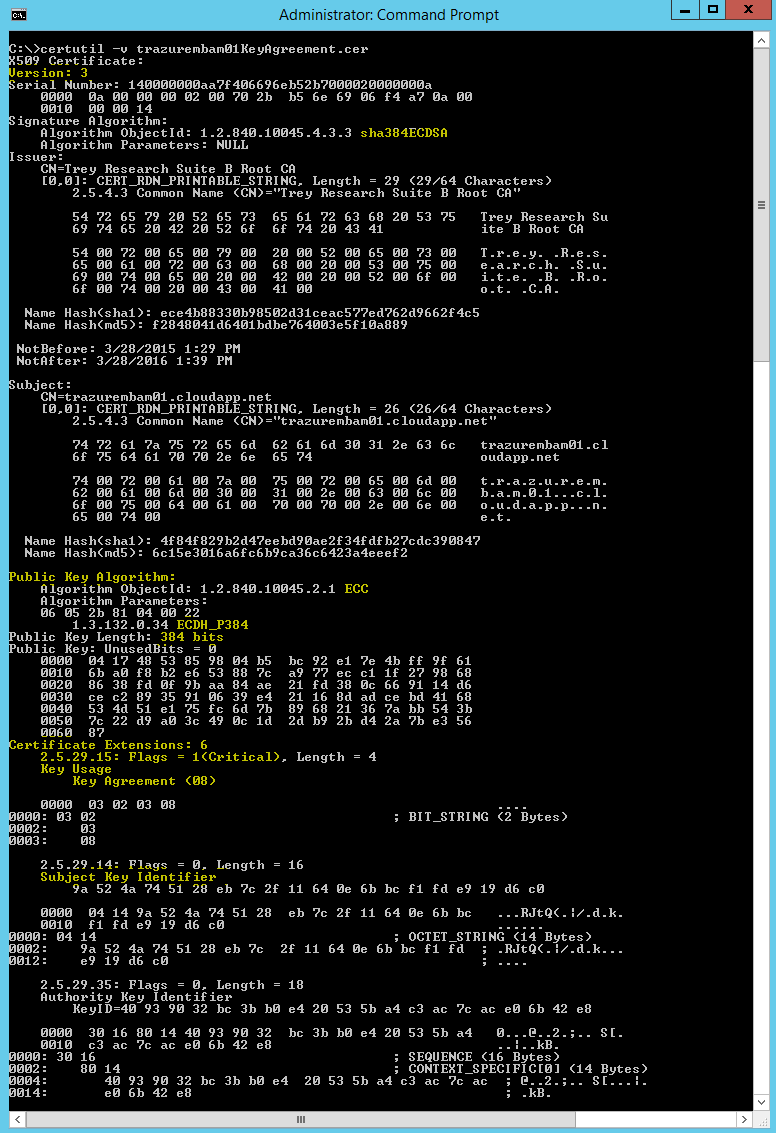
As you can see it's a version 3 certificate, it’s signed with a SHA384 ECDSA key, its public key algorithm is ECDH_P384, the key usage extension is marked as critical, it contains the subject key identifier, and the key usage has only the Key Agreement bit set.
Suite B Digital Signature certificate
For more info on the Suite B ECC Digital Signature Algorithm check out FIPS Pub 186-4. For this exercise you’re going to rinse and repeat the above steps but instead use a different certreq.inf file. Below is an example of the one I used. As with the last certificate we’ll also use the Extensions section to mark the key usage extension as critical. Key algorithm and Key Usage will differ here, for Key usage we want the following two hex values (which gives us 0xc0):
CERT_DIGITAL_SIGNATURE_KEY_USAGE: 0x80
CERT_NON_REPUDIATION_KEY_USAGE: 0x40
You’ll generate the CSR and submit it to the CA in the same fashion as with the last certificate.
- Create a certreq.inf file for creating the CSR on the requesting server
- Generate the CSR on the requesting server
- Copy the CSR to the Root CA
- Submit the CSR to the Root CA
- Issue the Certificate on the Root CA
- Retrieve (export) the issued certificate from the Root CA
- Copy (export) the .cer certificate file back to the requesting server
- Run certreq –accept to install the certificate
Ok now that all of that is taken care of let’s take a look at the digital signature certificate; we’ll use the same certutil command to examine it:
This certutil dump also reports this as a version 3 certificate, it’s signed with a SHA384 ECDSA key, its public key algorithm is ECDSA_P384, the key usage extension is marked as critical, it contains the subject key identifier extension, the key usage extension has the Digital Signature bit set, and has the optional (according to the RFC) Non-Repudiation bit set.
That’s gonna do it for today folks, Hopefully this helps satisfy your “suite-tooth” :) For Suite B Part III we’ll look at subordinating a CA under the offline root CA in accordance with the RFC, all alongside an existing two tier RSA based PKI…have a great weekend!
Jesse Esquivel