Parser Profiles in Network Monitor 3.4
Parser Profiles are a new feature available in our 3.4 Beta. Rich parsers provide detailed information about every part of packet. However this detail comes with a price as it takes longer to parse and filter frames. Parser Profiles are designed to help in this regard by allowing you to quickly switch between profiles based on your need for speed vs. detail.
Filter with Default, Switch to Windows
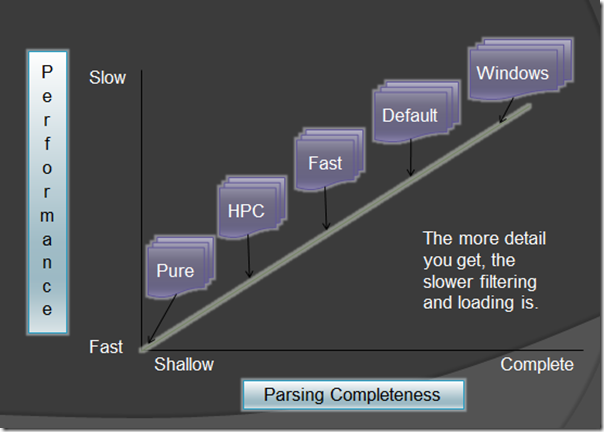
This simple graph below shows that the more complex the parser profile, the more detail you get, and the slower parsing is.
The advantage of using multiple Parser Profiles is that you can use a faster profile to narrow down your search first. Then if you need to, you can switch to a more detailed parser set to explore with the higher fidelity. Which profile you start with depends on what you need to filter or see at a high level, but here are some general descriptions of each parser profile to help you decide. Each profile described below is includes all the options of the profiles mentioned before it.
Pure – The pure profile does essentially no parsing. Its main purpose is to provide some kind of parser if for some reason one doesn’t exist. You can filter on frame numbers and time, and some other things. To find the complete lest, you can type “FrameVariable.” in the filter window and look at the Intellisense for all filterable fields. You can also use the ContainsBin plugin, though its performance is not affected by the parser set.
HPC – This is our High Performance Capture Profile and its main purpose is to provide an optimized profile for the High Performance Capturing feature. However, you can also use it when filtering speed needs to be fast. But its filtering capability is limited to TCP and UDP protocols and below.
Faster Parsing – This profile adds some more protocols into the mix like ARP, HTTP, and some of the name resolution protocols for instance DNS and NBTNS. But it leaves out some heavier protocols like SMB and SMB2.
Default – This profile includes SMB , SMB2 as well as RPC. It’s fairly well rounded and will probably be enough parsing for most general cases. However it does not parse into the application layer so RPC and Soap based protocols display as stubs only.
Windows – This parser profile contains every windows based protocol plus the SQL TDS protocol. The parsing is incredibly complete and will show most application layer protocols. But it is also the heavyweight in terms of cost of parsing.
There are even more parser sets available from our Codeplex Parser site as well as directly from the Office team. But as you might have guessed, using these parser profiles will slow down parsing and filtering even above that of the Windows set as they have dependencies on the Windows parser profile.
Parser Customizations
In some cases you might want to modify a parser or add a new parser. This procedure has changed a bit from NM3.3. To make a parser change, you have to create a new parser set. The easiest way to do this is to create a new parser set in Parser Profile Options window and use a current parser profile as the starting point.
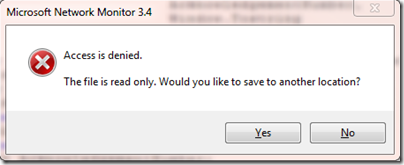
As an example, let’s pretend we’ve made a modification to TCP.NPL. If you are making the change using the Network Monitor parser window, you’ll get an error message when you try to save your change. This message is stating that you cannot save the parser in the default location because it is protected. This is intentional because we want you to have a copy of the original. But you can hit Yes in the dialog to save to a different location.
You are now prompted to save the file to your local parser directory. While you can choose another location, the “%HOMPATH%\documents\Network Monitor 3\Parsers” folder works well as this is automatically added for you when you create a new parser profile.
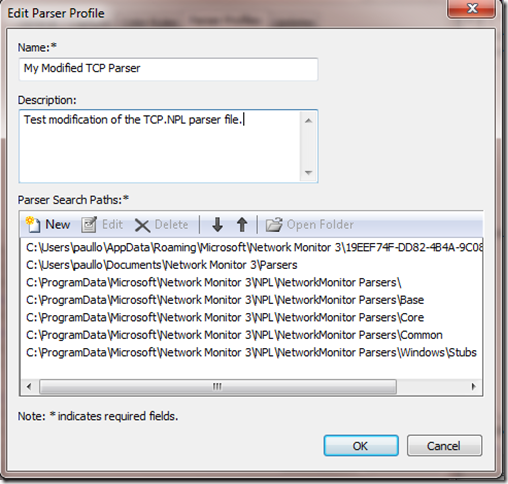
Now that the file is saved, open the Parser Profile option dialog by pressing the Parser Profile button dropdown and select “Parser Profile Options…”. Next select a profile you wish to use as a base. Normally this would be Default or Windows, but it depends on the scenario and depth of parsing you’d like to have as we discussed previously.
You can override the name and description to make it more meaningful to you. If you did select the default location for the parser file, you can add that new directory and move it to the top of the list. But as you can see, your “Network Monitor 3\Parsers” directory has been added by default.
Once you hit OK and exit the Options dialog, you can select your new profile from the Parser Profile drop down button under the User Defined Profiles.
The first time you select the profile, it will need to build the parser profile set, but afterwards, the prebuilt binary will be loaded quickly.
Pick the Parser Profile Right for the Job
With Network Monitor 3.4 you now have even greater flexibility to choose the parser profile that provides you the best performance with regards to the task at hand. And as each of the built in profiles are built during the install, they are all quickly available with a few simple clicks.


