The NLB Deployment Reference – All you need to know to implement and deploy Microsoft Network Load Balancing
Hello everyone! Dante again, this time with some good stuff related to NLB. Based in our experience, we could identify that the most common issue with NLB is that people is not informed enough about the technology, therefore the deployments and implementations usually lack some mandatory settings, or don’t get into consideration the most important factor in every network: the bandwidth consumption.
In this blog note I will try to summarize every important aspect to be considered at the deployment time, and also will share with you some third-party documentation that will help you troubleshoot the most common NLB-related problem scenarios in our support life.
If you would like to know how NLB works, I would recommend to use the following blog note which covers almost all the basics. I will not touch those topics (well, maybe some of them), so please ensure you get them ready in your head to better understand what I’ll talk about 😊
What is the best configuration method for NLB?
As you all may know, NLB has 3 modes to be configured: Unicast, Multicast and Multicast with IGMP. The real answer for that question is: it depends. All three modes work very well if they are properly configured, but they can cause you a real headache if they are not.
From a NLB standpoint, the configuration is straightforward: install the role, open the console, create a new cluster, select the nodes, the NLB method, the ports and affinity and that’s all.
You have also some tools to prepare yourself for each method, basically on the MAC Addressing of each of them. The most important tool for this is NLB IP2MAC. This tool is available on any machine with NLB installed, and is very easy to be used. Just type the command with the desired IP Address to be used as Virtual IP address and you will get the list of possible MAC Addresses for each method. The command is as follows:
NLB IP2MAC <VIP of NLB>
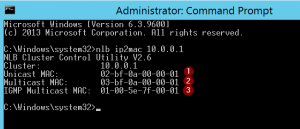
As noted in the screenshot, we can get the MAC Address for each mode easily with this command. You can do your math also, considering the following:
1- Unicast MAC will always start with 02-BF identifying the Unicast MAC of NLB, and then the IP address converted, by octet, to Hexadecimal.
2- Multicast MAC will always start with 03-BF as the Multicast MAC of NLB, and then, again, the IP address converted, by octet, to Hexadecimal.
3- IGMP Multicast MAC is different than the other ones. It will always have 01-00-5E-7F as MAC identifier for NLB IGMP Multicast, and the last 2 parts are the last 2 octets of the IP address.
Now the problem comes when you choose a NLB method but your network infrastructures is not prepared for that. Let’s explain each method.
Unicast
Unicast is the easier way to configure the NLB. Why? Because you don’t need to do anything else in your network infrastructure… In theory. As Unicast mode replaces the original hardware MAC address for a NLB Unicast MAC in each node of the cluster, physical Switches will get crazy and start sending the NLB traffic to all its switch ports, to ensure the traffic is sent to the correct nodes.
In some cases, you would like to have 2 NICs on your server. If you are running Windows 2008 or higher you should consider this other blog note to ensure the traffic gets routed properly with this configuration.
Each NLB Heartbeat packet contains about 1500 bytes of data (only the heartbeats!). By default, the nodes send heartbeat packets each second and wait for 5 of those packets to be received until it considers the node as converged. And that’s per node. You need to increase that number by the number of nodes you have in place. Pretty much data huh?
Now imagine what would happen if you have a 24 or 48 ports Switch in which you have only 2 NLB nodes connected. Since the Unicast mode replaces the MAC of both nodes, for the switch both servers will have the same MAC, and it will not be able to update the MAC Address table properly, causing what is called a Unicast Flood. So, you have now the traffic coming to the NLB from the clients AND the NLB heartbeat traffic being sent to all the switch ports. What a mess, right?
To avoid this, you have 2 options: First is to get a HUB. Yes, a HUB, I’m not kidding. I know it may be hard to get one nowadays, but this is the best way to isolate the traffic. Connecting the HUB to the switch, the Switch will learn the NLB Unicast MAC (which is 02-BF-XX-XX-XX-XX) only in the port the HUB is connected, and the HUB will replicate the traffic to the nodes (because that’s what a HUB is intended for, right?). So, the flooding is being made by the HUB and the other servers on the switch get NLB-Traffic-Free. The second option is to create a separate VLAN for the NLB Servers, but ensuring this VLAN is reachable from other subnets. This way you will keep the traffic isolated only to the Switch ports assigned to that VLAN, and not bothering the rest of the servers on it, reducing congestion.
Ok, but what happens if we have a virtual environment? Usually the virtual switches in Virtual Environments prevent the Unicast Flooding by default (which makes totally sense), so you will need to do some extra settings on your Virtual Environment to get it compliant with Unicast.
If you’re using the best virtual environment ever (Hyper-V, of course) you have it easy: Go to the Hyper-V console, machine settings, select the NIC settings and enable the checkbox for “Enable Spoofing Of MAC Addresses”. Click OK and you’re done.
Now, for VMWare, it’s a little bit more complex, but luckily we have the following VMWare note which explains how to resolve that from their side. Remember to contact them if you have questions with their documentation.
In case you have other virtual environments (like XenServer, VirtualBox, or any other) and are experiencing similar issues, go ahead and contact them for guidance, they should be able to help you. Of course, you can contact us also, we will help you identify where to go next for sure.
Multicast
This mode is my preferred one. It’s kind of tricky, but when you get to understand it you’ll realize it’s the best way. Be warned that your networking team will hate you because you will make them work and will try to convince you to not configure this mode, but stay strong, it worth it.
Multicast mode is different than Unicast but similar at the same time. The main difference is that the Switch may drop the packets or flooding them if it doesn’t know where to send them. But with
Multicast we have more efficient ways to avoid this. Let’s see how.
When you configure the Multicast mode on NLB, you will not get the Hardware MAC address changed on servers, so you will be able to access them through the same NIC all the time, but it configures the NLB VIP to a NLB Multicast MAC Address instead. This MAC has the format of 03-BF-XX-XX-XX-XX. If you do an IPCONFIG /all you will not find it in the network adapters. Since the MAC is not directly attached to the NICs, the switch cannot learn this MAC, but all the traffic going to the NLB Virtual IP address (VIP) will have this MAC as destination. Because the Switch cannot learn this NLB Multicast MAC directly, it will drop the packets (or flood all ports in the same way as Unicast), and the clients will have issues to reach the NLB nodes, as well you will experience Convergence issues. I’ve seen a mix of both things happening several times.
This behavior usually cause confusion, because at the beginning of the configuration it almost always starts working “without issues”, but after some time configured, you will notice the nodes go down in the console, or start experiencing application issues while going through the VIP of the NLB. All of these are symptoms of packet drops due to the lack of network compliance for NLB Multicast.
To avoid this, Microsoft has a mandatory requirement (yes, I used the mandatory word) to have this mode in place. That requirement is the addition of a Static ARP entry and a Static MAC address table entry on your network infrastructure. And that’s where your network team will complain.
Again, from NLB side it’s very straightforward: Install the role, open the NLB console, create a new cluster, select the nodes, the NLB method, the ports and affinity and that’s all. That’s all you need to do from Windows side, nothing else is required to have NLB in place in each NLB cluster. But in the case of Multicast and Multicast with IGMP, you need to manually “teach” the switches (and routers) where the NLB nodes are.
The following notes explain clearly what you need to do to get this properly configured based on your network infrastructure vendor. Bear in mind that we don’t maintain these notes so they may have inaccurate information, please contact each vendor in case of any doubts, our intention is to help you get the most complete list of notes for your information in a single place, but we are not accountable of what’s included on them.
VMWare:
Cisco:
Catalyst Switches for Microsoft Network Load Balancing Configuration Example
Note: If using VSS on Cisco Catalyst, you may experience issues with traffic on one of the stack's nodes. For further information contact Cisco mentioning this bug.
Microsoft Network Load Balancing on Nexus 7000 Configuration Example
Configuring Microsoft Network Load Balancing (NLB) on Nexus 9000 Series
Juniper:
EX Series Switches and Microsoft Network Load Balancing (NLB) in multicast mode
HPE:
Dell:
Dell Configuration Guide for the S4048–ON System 9.9(0.0)
Dell Networking Force10 switches and Microsoft Network Load Balancing
Huawei:
Example for Connecting a Device to an NLB Cluster (Using Multi-Interface ARP)
D-Link:
D-Link Layer 3 Switch Microsoft NLB in Multicast Mode Configuration Example Howto
Avaya:
Technical Configuration Guide for Microsoft Network Load Balancing
H3C:
05-Layer 3 - IP Services Configuration Guide
If you find out that your vendor is not listed here please let us know by a comment so we can try to add it. We are not going to take much care about different models, since usually same vendor share same logic for configuration, but we want you to have at least an idea of how it should look like. If you need assistance for any specific model, please contact your manufacturer.
Again, we need to put the disclaimer since we don’t own any of those notes. In case you have any doubts on the content of the above-mentioned notes please contact the respective manufacturer for support or assistance.
Finally, to cover the Virtualization part, you may be wondering how would you configure the static MAC Address table for a Virtual Machine. Well, we need to understand first how the Virtual Infrastructure is composed. Usually, in enterprises, you have a cluster of a bunch of servers acting as hypervisors (Hyper-V, VMWare, etc.) which share the same VMs and have High Availability features to move the VMs between them to avoid service disruption. How can we ensure the NLB VMs will receive the correct traffic? Here comes another complain from the Networking team. To ensure the VMs will receive the traffic no matter in which virtual host they are, you need to ensure that all the switch ports connected to all the virtual hosts are assigned to the NLB Multicast MAC on the Static entry for the MAC Address table. So, if you have 8 hosts with 2 NICs each connected to the network, you should have 16 interfaces assigned to the NLB Multicast MAC address in the MAC Address Table of the switches. This way you can do Live Migration (or vMotion in case of VMWare) without worrying to which host the virtual machine will get into.
Multicast with IGMP
Finally, we have the last mode for NLB: IGMP Multicast (or Multicast with IGMP). This mode is completely dependent on your network infrastructure, since you need to have IGMP capable switches to get it to work. This mode is basically the same than Multicast, but with an automatic method for NLB Traffic detection, based on IGMP Multicast traffic.
When you enable this method, the NLB nodes will start sending IGMP Join messages to the Multicast Address 239.255.XX.XX where the X correspond to the last 2 octets of the Virtual IP of NLB. In our example of the screenshot, for the IP 10.0.0.1, the Multicast Address used for the cluster nodes to send the IGMP traffic would be 239.255.0.1.
Did I say you need IGMP capable hardware on your network for this method to work? Yes, because your switch should be capable of snoop the traffic to find the ports which are sending the IGMP traffic to auto configure their MAC Address table accurately and send the traffic to the corresponding ports.
Some of the notes listed above in the Multicast section have the correct configuration parameters for their devices, but in case you need confirmation your equipment is capable of this mode, please contact your Hardware vendor for confirmation.
As summary:
- Unicast mode is the easiest way to configure NLB in simple environments. You don’t need to do much to maintain the cluster, but be aware that this configuration may cause you network performance issues on other systems due to the traffic flooding.
- Multicast is the best method (in my opinion) because you specifically direct the traffic to the nodes you need and don’t impact nearby servers. The bandwidth is efficiently used and you have a low risk of performance issues as collateral damage for other systems. As a counterpart, needs a lot more of network equipment knowledge and involvement, but good things are not usually free, right?
- Multicast with IGMP is a good choice also if you have capable networking equipment. It has the benefits of the Multicast with the improvement of the auto configuration of the switches if they are IGMP Snooping enabled. The disadvantage part is, again, a potential limitation on the network equipment. Your network infrastructure may not be capable of this IGMP Snooping feature.
So far, we have reached the end of the blog today, so I hope you enjoyed the explanation and, of course, hope this helps you get your NLB back on track!
I would like to say a big THANKS to Daniel Mauser, who helped me get this piece of knowledge here for you. We'll miss you in the team Daniel!!
See you next entry!