Creating a Site-to-Site VPN (IPSec IKEv2) with Azure and MikroTik (RouterOS)
Authors: Daniel Pires and Daniel Mauser
Introduction
In this article, we are going to show you how to setup a IPSec Site-to-Site VPN between Azure and On-premises location by using MikroTik Router. Another blog post has been published few years ago about the same subject Creating a site-to-site VPN with Windows Azure and MikroTik ( RouterOS ). However, we have some major updates in this article. First, we are going to setup Site-to-Site VPN using Azure Resource Manager Portal (https://portal.azure.com), while original article uses Classic Azure Portal. Second, VPN Gateway in this blog post is Route-Based which will leverage IKE version 2 (IKEv2) compared with the Policy-Based Gateway on first article leveraging IKE version 1(IKEv1). If you are not familiar with the terminology of IPSec Parameters, in particular IKEv2, please take a look on the following documentation About VPN devices and IPsec/IKE parameters for Site-to-Site VPN Gateway connections.
Scenario
Below we have a diagram of the scenario covered in this step-by-step.
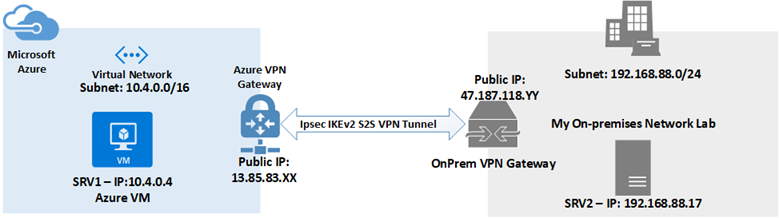
Relevant information on the diagram above necessary to configure the Site-to-Site VPN.
Azure Side:
- VNET Subnet: 10.4.0.0/16
- Public IP of the Azure VPN Gateway: 13.85.83.XX
On-Premises Side:
- Subnet: 192.168.88.0/24
- Public IP of On-Prem Gateway: 47.187.118.YY
Azure: Configuring Route-Based IPSec Site-to-Site VPN
This section we will go over step-by-step on configuring Site-to-Site VPN on the Azure side. The steps demonstrated here are the same in the official documentation: Create a Site-to-Site connection in the Azure portal. So, we are not going to cover specific step by step on how to get to the screens, you can use the official documentation as reference. Also, If you are already familiar with those steps feel free to jump right the way on the session below: MikroTik (On-Premises) Configuring IPSec (IKEv2) Site-to-Site VPN.
1. Create a virtual network

2. Specify a DNS server (Optional for this and not necessary for this demonstration to work)
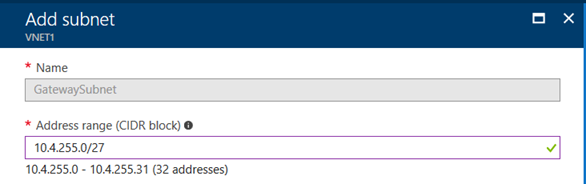
3. Create the gateway subnet:
a. Select Gateway Subnet

b. Add Gateway subnet. In this case I will use the final 255 network inside 10.4.0.0/16 to create 32 addresses allocated to VPN Gateways and subnet is: 10.4.255.0.27
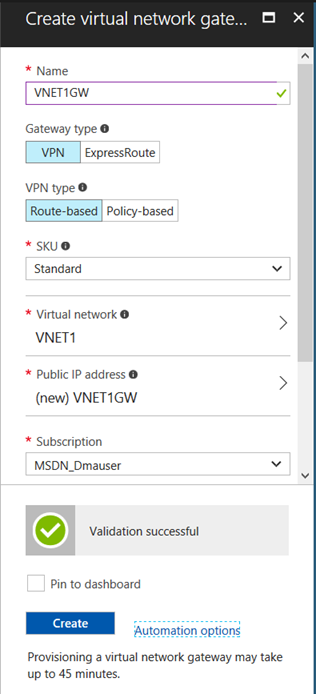
4. Create the Virtual Network Gateway. It is important here to highlight we are going to use VPN Type: Route-Based Also for your lab purposes you can use SKU Basic, for production workloads it is recommend at least Standard SKU. More information about VPN Gateway sizes consult: Gateway SKUs.
a) Creating the Virtual Network Gateway named VNET1GW
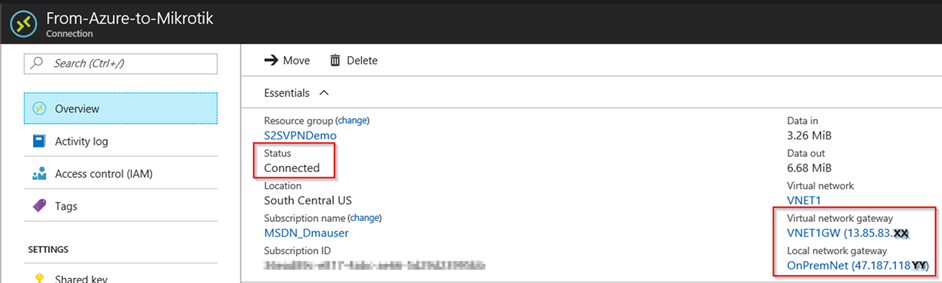
b) After you create Virtual Network Gateway you can see the status as well as the Public IP that is going to be used:

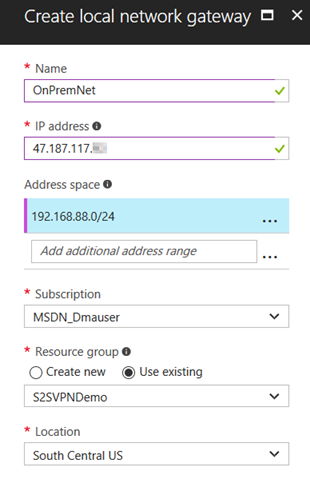
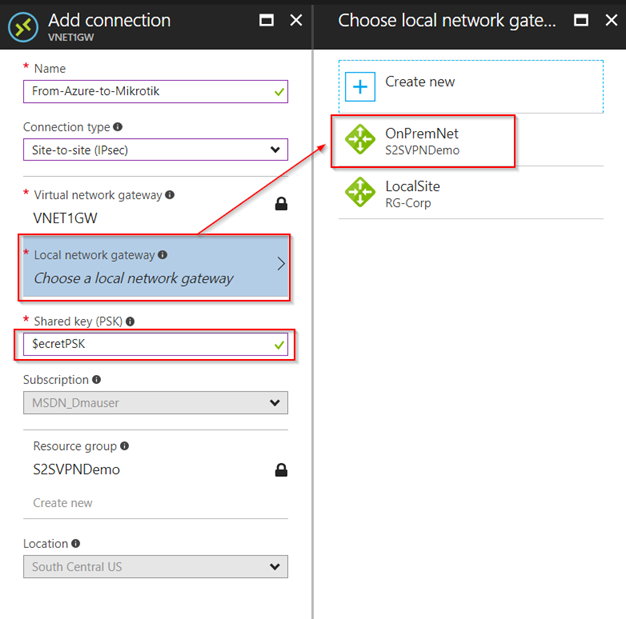
5. Create the local network gateway which requires you specify Public IP of your VPN Device (47.187.117.YY) as well as the On-premises Subnet(s) (192.168.88.0/24).
6. Configure your VPN device – See section: MikroTik (On-Premises) Configuring IPSec (IKEv2) Site-to-Site VPN.
7. Create the VPN connection
8. Verify the VPN connection
MikroTik (On-Premises) Configuring IPSec (IKEv2) Site-to-Site VPN
MikroTik RouterOS has several models and there are very affordable devices models that you can use also to play and learn how to configure Site-to-Site VPN with Azure.
DISCLAIMER: Although we demonstrate Mikrotik in this article, it is important to mention Microsoft does not support the device configuration directly. In case you have issue, please contact device manufacturer for additional support and configuration instructions.
One important point to highlight is IKEv2 has been introduced on release 6.38. Therefore, make sure you have a compatible version to be able to proceed with the configuration demonstrated in this article which we used: RouterBOARD 750 and software version: RouterOS 6.39.
In this tutorial Winbox management utility has been used to perform MikroTik configuration and here are the necessary steps to configure MikroTik correctly:
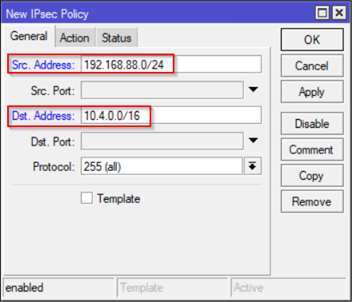
Add IPSec Policy by Selecting on Menu IP and IPSec – On Policies tab click + (plus) sign to add a New Policy. On General tab add both subnets (Source: On-Prem and Destination: Azure) as shown:
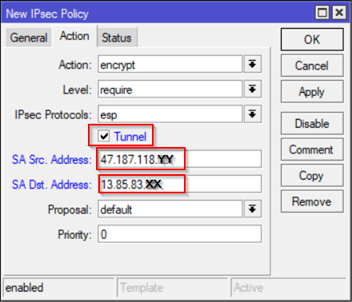
On the same screen but Action Tab – Select Tunnel and specify On-Prem Source Public IP and Destination Azure Gateway Public IP which can be obtained after you Create Virtual Network Gateway (See: Azure S2S VPN section – Step 4b)
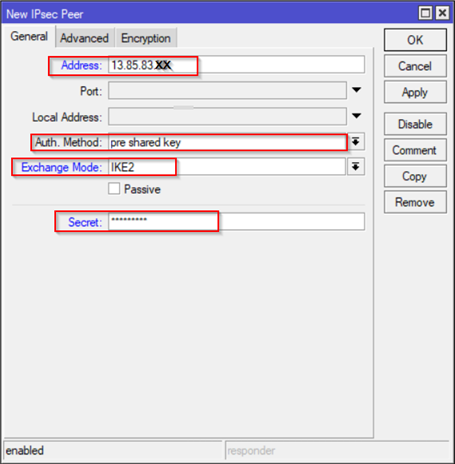
On Peers Tab – Click + (Plus) and add a new IPSec Peer. In IPSec terminology we are working on IKE Phase 1 (Main Mode) on this configuration tab. Here we need Azure Gateway Public IP, specify Pre-Shared Key which can be specified on Part I – Step 7 (Create the VPN connection).
Note: If you MikroTik does not show IKEv2 make sure you have at least RouteOS release: 6.38. Before that release only IKEv1 is available.
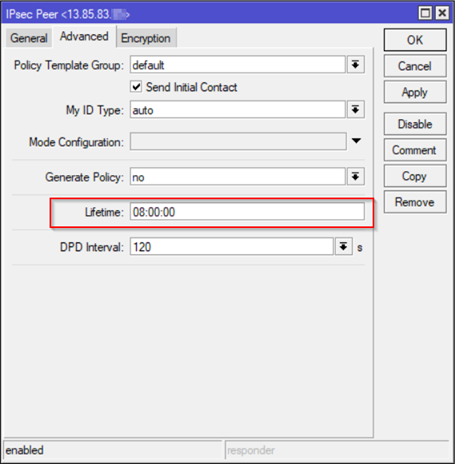
On the same screen, go to Advance Tab and make adjustment on Lifetime to 8h = 28,800 seconds based on Azure official documentation IPSec/IKE parameters - SA (security association) for IKE Phase 1 (Main Mode).
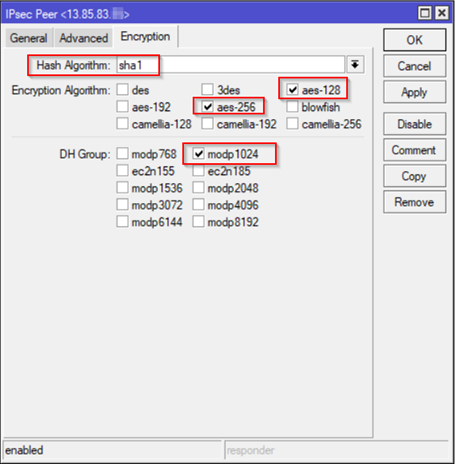
On Encryption Tab, you can use the default which are supported by Azure or make adjustment for a stronger Hash and Encryption (See details here: IPSec/IKE parameters) . For this article the following have been selected:
Now, let's move on to IKE Phase 2 (Quick Mode) which is represented in MikroTik by Proposals. For this one you can either create a new one (+ sign) or change the default one. In case you create a new, make sure to change the Step 2 (IP Sec Policy) and Action Tab and select the appropriate Proposal. For this article, we will change the default IPSec Proposal which the following have been selected based on official Azure information for IKE Phase 2 in IPSec/IKE parameters:

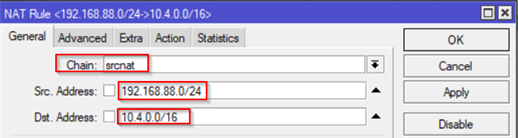
The last step to make sure VPN will route correctly between On-Prem and Azure is to configure a NAT Rule. This is done by going IP and select Firewall – Select NAT tab
- Add Chain as srcnat and both subnets (On-Prem and Azure Subnet).
- On Action tab select accept
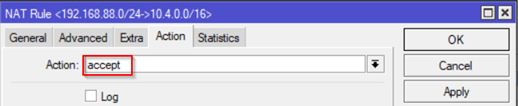
- Add Chain as srcnat and both subnets (On-Prem and Azure Subnet).
Validating the IPSec Tunnel
Ping between two computers in each side. In the right side On-Prem computer (192.168.88.17) correctly pinging Azure VM (10.4.0.4) and the other way around works fine too.
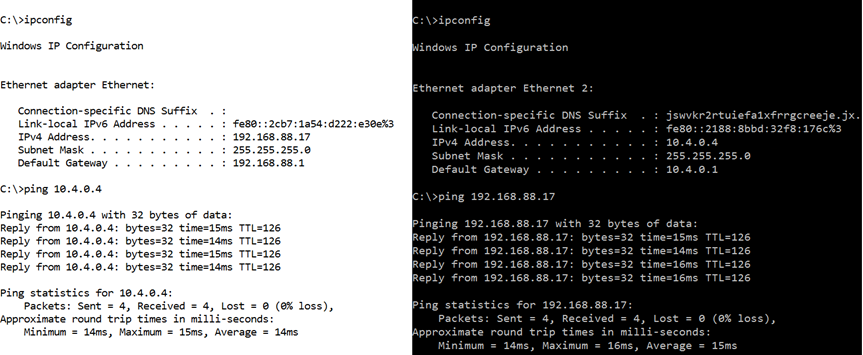
In both sides we see TTL of 126 which corresponds to two hops (both Gateways) getting decremented. Default TTL of Windows machines is 128.
Note: By default ICMP is disabled. Make sure you allow ICMP by running the following PowerShell command:
Set-NetfirewallRule -Name FPS-ICMP4-ERQ-In -Enable True
On Azure Side
On Azure Portal you can validate brand new tunnel created as showed on item 8. Verify the VPN connection above. That can be also validated by PowerShell by using command: Get-AzureRmVirtualNetworkGatewayConnection -Name From-Azure-to-Mikrotik -ResourceGroupName S2SVPNDemo 
On MikroTik Side
There are multiple ways to validate the IPSec VPN connection to Azure on MikroTik. Here are some ways:
1. IPSec – Policies tab. It shows if the IKE Phase 2 is working correctly.

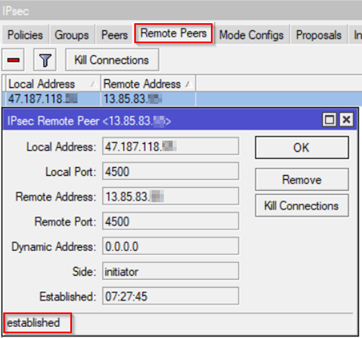
2. Remote Peers tab. This shows if IKE Phase 1 (Main mode) is working correctly.
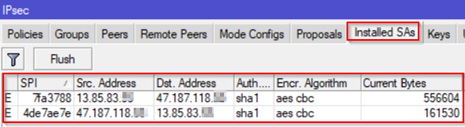
3. Installed SAs tab shows current Security Associations:
IPSec Troubleshooting
If something does not work for some reason during your configuration, you can do a troubleshooting to determine what is going on. MikroTik provides a good interface for logging and troubleshooting IPSec in case you want to get more detailed information on what is going on. Events can be visualized in Log Menu but to ensure you can get IPSec events exposed you need to make a simple change in Logging configuration (System – Logging) and add the IPSec as a Topic:
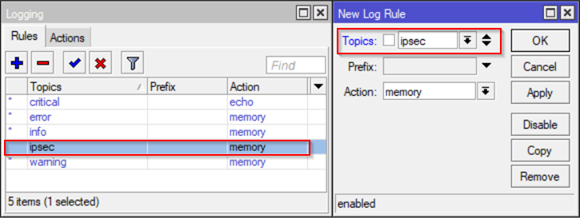
After you add this new Logging rule you have will see the following detailed IPSec events:

Extra Tip: See comments about TCP MSS Clamp configuration shared by a reader.
Conclusion
In this article we demonstrated how to setup a IPSec Site-to-Site VPN using IKEv2 (Route-Based) between Azure and MikroTik RouterBoard. These instructions also may help you to setup any IPSec device which is compatible with Azure VPN Gateway settings. I hope you liked the information shared here and please let us know below in the comments if you have additional questions. I would like to make a special thanks to Azure Support Escalation Engineer Daniel Pires who co-author this article with me. Thanks!