Runbook Commander 2.0 – Deployment and Administration Guide
Welcome to the Deployment and Administration Guide for Runbook Commander 2.0. The intent of this blog post is to walk you through the installation, deployment, and some technical back end information pertaining to Runbook Commander 2.0. If you are not yet using Runbook Commander 2.0, I recommend checking out the overview found here - Runbook Commander 2.0 Overview. If you have not yet downloaded Runbook Commander you can find it her - Runbook Commander 2.0 Download.
There is quite a bit of information in this blog and it reads much more like a technical manual than an article. I recommend using the Table of Contents to navigate around when needed.
As always feedback and suggestions are encouraged and appreciated.
Table of Contents (click section to jump ahead) -
- Prerequisites for Runbook Commander 2.0:
- Installing Runbook Commander 2.0:
- Configuring Configuration Manager Console Extensions:
- Using the Runbook Commander Console Extensions:
- Uninstalling the Console Extensions:
- Pre-Creating console extension XML for use in RBC deployment:
- Deploying RBC with console extensions pre-created console extension XML:
- Updating Console extension XML when RBC is already installed:
- Runbook Commander 2.0 From Design and Drop Down Lists:
- Technical Details: Inside the console extension XML:
- Troubleshooting / Gotchas:
Prerequisites for Runbook Commander 2.0 –
Configuration Manager Console System -
- Configuration Manager 2007 or 2012 console must be installed. Please do not install console extensions on your site server; these should only be applied to a machine hosting the Configuration Manager console and not the site serve itself.
- .NET 2.0 must be installed.
- Administrative Rights when creating configuration files (create file, read registry).
Orchestrator –
- The user executing the console extension must have Publish rights on the Runbook being executed.
- Because RBC limits the execution of Runbooks against Computer Objects, Collections, and Programs from within the Configuration Manager Console, it is configured to only execute against Runbooks which contain a parameter with one of the following names. *NOTE include the : after the Parameter Name value.
- Computer Name:
- Collection ID:
- Program Name:
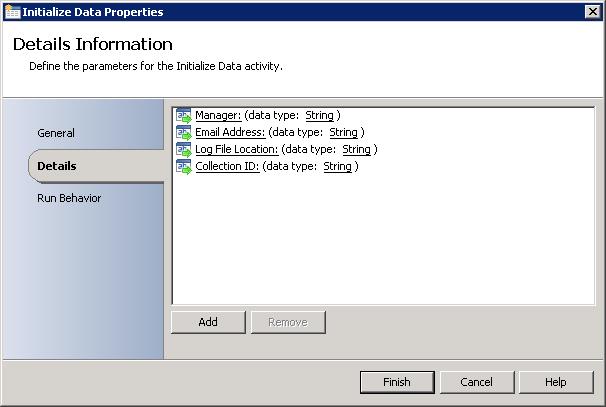
Example of an Orchestrator Initialize Data activity that meets the prerequisites (notice the Collection ID: parameter):
Installing Runbook Commander 2.0 (Local Installation) -
To complete the installation on a local system, download RBC20Setup.exe / RBC20Setup.msi from the following location – RBC20Setup.exe / RBC20Setup.msi. Once downloaded extract and execute the installer. The installation is very basic; you can select the installation defaults.
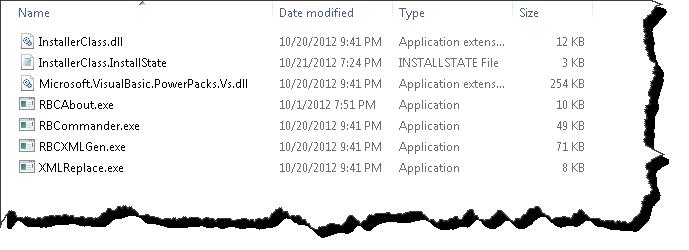
Once installed, the following executables will be created at the selected installation destination.
- RBCAbout.exe – simple splash screen with information about RBC.
- RBCommander.exe – this is the program that is launched from the console extensions.
- RBCXMLGen.exe – this is an application used to create the RBC configuration files.
- XMLReplace.exe – this application is used to replace RBC configuration files on an already deployed RBC installation.
What you will notice at this point is that Configuration Manager Console extensions have not been created. This is because the RBC files have only been staged on the computer. In order to configure Configuration Manager Console extensions, XML files need to be created and staged in the appropriate Configuration Manager Admin UI folder. I will discuss how to complete this in the next section of this guide.
Configuring Configuration Manager Console Extensions for Local Use –
With RBC 2.0 installed we can begin the console extension configuration.
The follow steps need to be taken
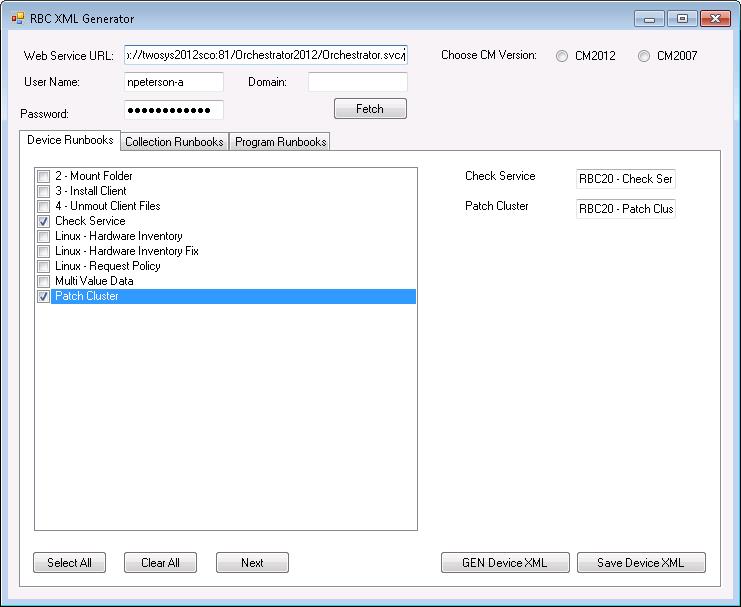
- Execute RBCXMLGen.exe (located in the RBC installation directory). Depending on the UAC of the current machine you may need to execute RBCXMLGen.exe as an Administrator.
- Enter the URL to the target Orchestrator 2012 Web Service.
- Enter a user name and password (domain can optionally be specified if working across domain boundaries)
- Click on the Fetch button which will retrieve from the Orchestrator Web Service a list of Runbooks which meet the RBC Prerequisites (See the Prerequisites section above - unless a Runbook contains a parameter with the proper name, it will not be displayed in the list).
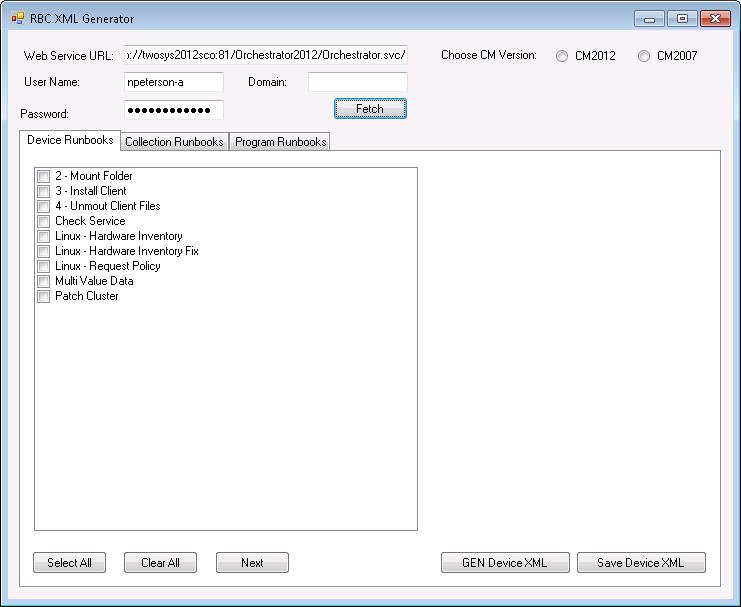
- Select the Runbooks that you would like to add as a console extension for each of the three categories present in the XML GEN tool (Device Runbooks, Collection Runbooks, and Program Runbooks) and click Next.
- Enter a User Friendly Name for the Runbook. This is the name that will be displayed on the Configuration Manager Console extension.
- Select a Configuration Manager version using the CM Version radio buttons.

- Select the GEN Device XML, GEN Collection XML, and/or GEN Program XML to create the console extension(s). Once these buttons have been selected the console XML is generated, placed in the appropriate Configuration Manager Admin UI location, at that time the console extension is ready for use. *Note in order for the GEN Device XML button to work the Configuration Manager Console must be present on the computer.
Using the Runbook Commander Console Extensions -
With the console extensions in place we can now open up the Configuration Manager Console. If the console was already open when the extension XML was generated, close and re-launch the console. The following experience will be almost identical for both the 2012 Configuration Manager and Configuration Manager 2007 consoles; here I will show only 2012 Configuration Manager.
Here is an example of the three areas or modules on which will can place RBC console extensions.
Device Runbooks:
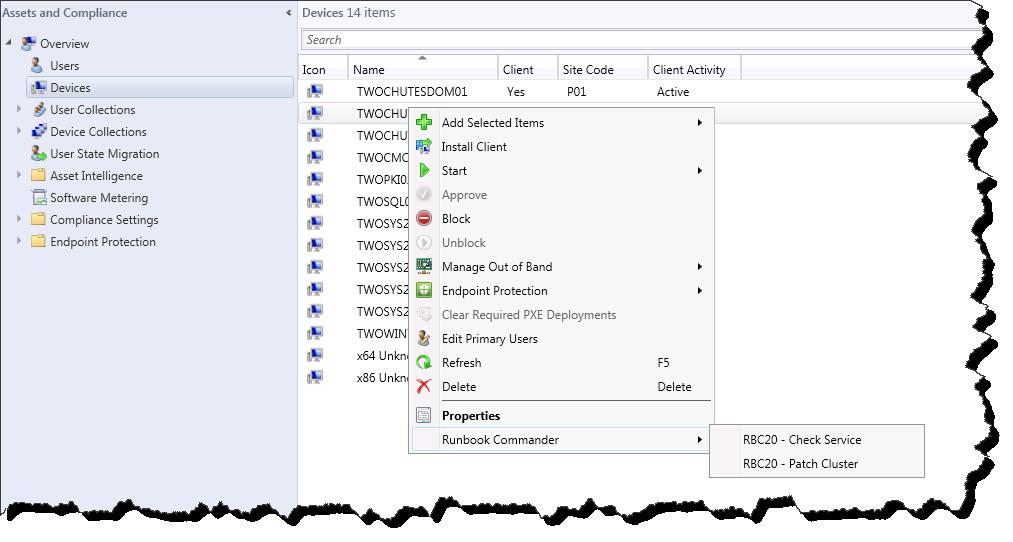
Collection Runbooks:
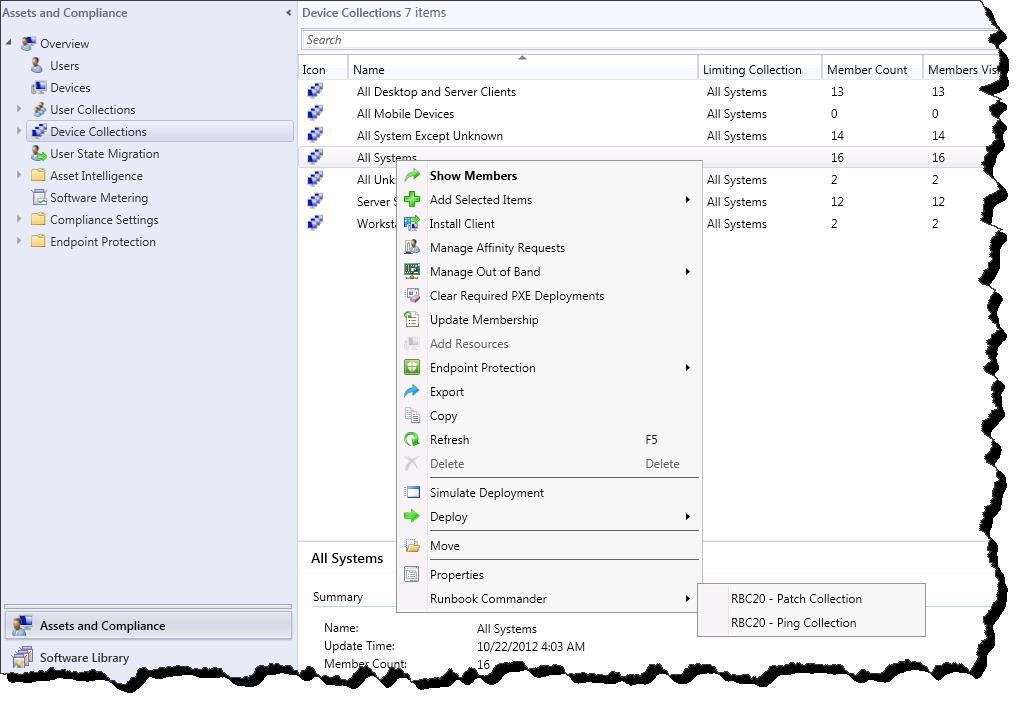
Program Runbooks:
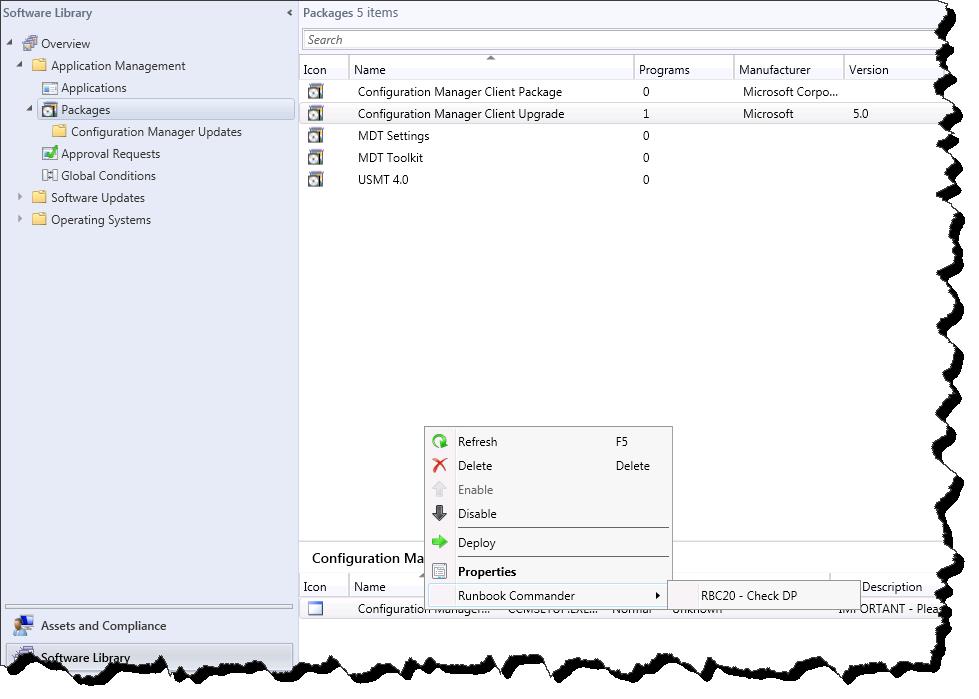
To execute, select and click on a Runbook. This will execute the Runbook Commander program (RBCommander.exe). Once executed RBCommander.exe reaches out to the Orchestrator Web Service, collects a list of input parameters specific to the selected Runbook, and dynamically creates the RBC Console extension form.
Uninstalling Runbook Commander 2.0 -
Runbook Commander can be uninstalled from the Programs and Features Windows Control Panel or programmatically using native Windows Installer methods . The un-installation will remove the RBC installation directory and all associated files as well as any RBC console extensions.*NOTE any other console extensions not related to RBC will not be effected.
Pre-Creating console extension XML for use in RBC deployment -
Up until this point this guide has discussed the installation, configuration, and use of Runbook Commander 2.0 in a locally installed and configured manner. The Runbook Commander installer also supports pre-staged deployments that have the Console Extensions baked into the installation process. An example in which a pre-staged deployment could be valuable: A desktop support manager would like to provide every member of the desktop support team with the ability to run specific Orchestrator Runbooks against computer objects found in the Configuration Manager Console. Each member of the desktop support team already has the Configuration Manager console installed on there computer system The desktop support administrator can pre-create the XML files that define the four Runbooks to be available in the Configuration Manager console, and then deploy Runbook Commander with pre-created XML files to the desktop support team. Once the deployment has occurred on the desktop support computer systems, the console extensions will be ready for use with no additional configuration.
In this section of the deployment and administration I will discuss the pre-creation of the console extension files. In the next section I will detail the deployment of these.
The follow steps need to be taken in order to pre-create the console extension XML Files.
- Execute RBCXMLGen.exe (located in the RBC installation directory). Depending on the UAC of the current machine you may need to execute RBCXMLGen.exe as an Administrator.
- Enter the URL to the target Orchestrator 2012 Web Service.
- Enter a user name and password (domain can optionally be specified if working across domain boundaries)
- Click on the Fetch button which will retrieve from the Orchestrator Web Service a list of Runbooks which meet the RBC Prerequisites (See the Prerequisites section above - unless a Runbook contains a parameter with the proper name, it will not be displayed in the list).
- Select the Runbooks that you would like to add as a console extension for each of the three categories present in the XML GEN tool (Device Runbooks, Collection Runbooks, and Program Runbooks) and click Next.
- Enter a User Friendly Name for the Runbook. This is the name that will be displayed on the Configuration Manager Console extension.
- Click on Save Device XML, Save Collection XML, and/or Save Program XML to initiate the creation and option to save the XML files.
- Note that it is very important to accept the default File Name values. The RBC Console Extensions will not work if the XML file values are altered.
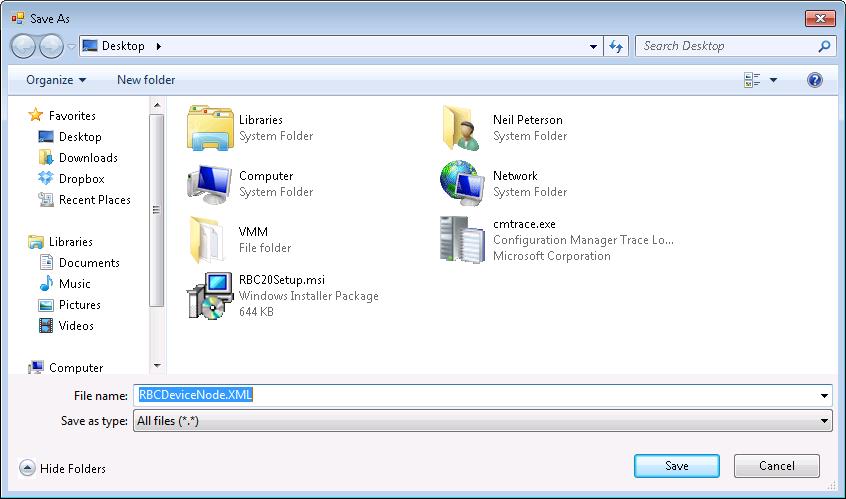
- Save the file to any location. These XML files will be used in the RBC deployment discussed in the next section of this guide.
Deploying RBC with console extensions pre-created console extension XML -
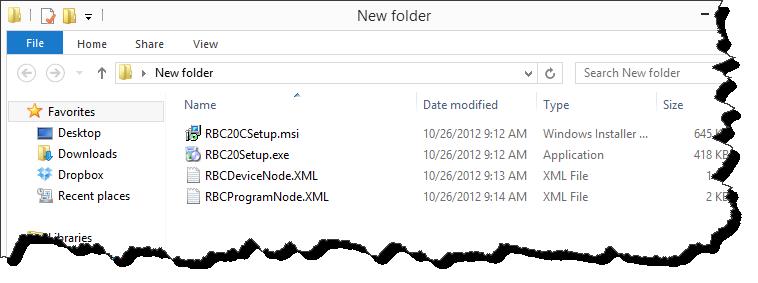
Quite Simple the only steps that need to be taken in order to deploy Runbook Commander 2.0 with the pre-created XML files, is that the XML files must reside in the same folder as RBC20Setup.exe / RBC20Setup.msi at execution time. So for instance if we were to stage a folder with the RBC20Setup.exe, RBC20Setup.msi file and two of the pre-created .XML files, the end result after .exe execution would be that RBC is installed and the Device and Collection extensions would be created and ready for use. On the back end, the installer itself is coded to look for the presence of the console extension .XML files and then copy these to the appropriate location for both the 2012 Configuration Manager console and Configuration Manager 2007 console. If you have a system with both consoles installed, the extensions will be staged for both consoles.
*NOTE: RBC Deployment requires execution of RBC20Setup.exe. For a silent installation the deployment string would be 'RBC20Setup.exe /quiet /norestart'.
In the below example if executed RBC20Setup.exe would stage the local console with the Collection and Device extensions.
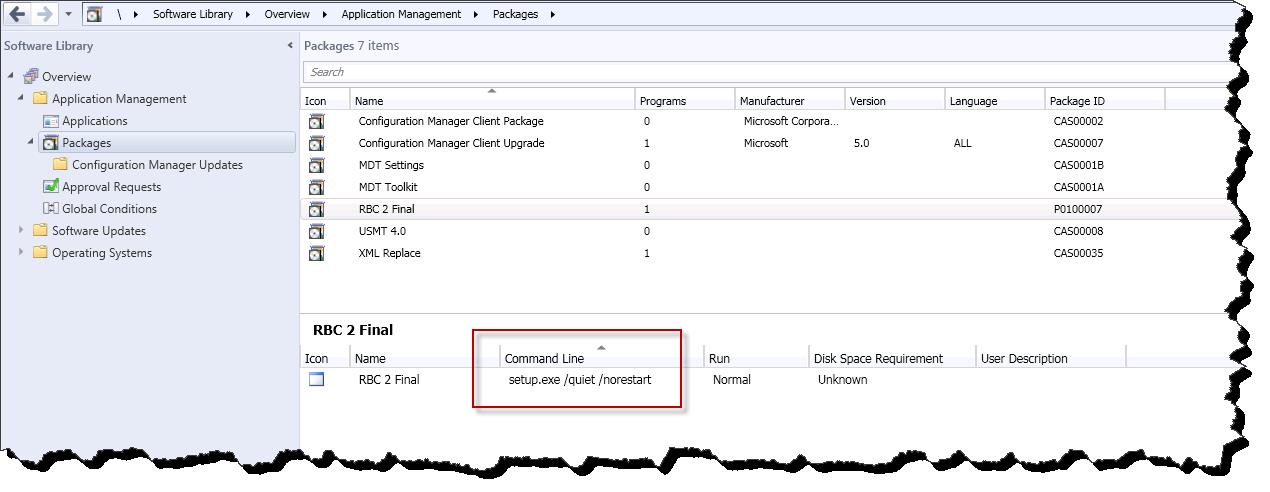
Taking this a step further, if the goal was to deploy RBC from Configuration Manager itself, an application or package deployment would be created with a content location consisting of RBCSetup.exe, RBC20Setup.msi and any of the pre-created console extension XML files.
Example of Runbook Commander configured as an package in 2012 Configuration Manager.
Updating Console extension XML when RBC is already installed -
Once the Runbook Commander 2.0 application has been installed on a system or group of system the console extensions can be maintained using XMLReplace.exe. XMLReplace.exe can be found in the Runbook Commander installation directory. XMLReplace.exe can be run locally on a machine however the true benefit is when using Configuration Manager itself to deploy XMLReplace.exe and a set of XML files to a group of remote computers.
- Create a new set of XML Files using the RBC XML Generator tool (RBCXMLGen.exe).
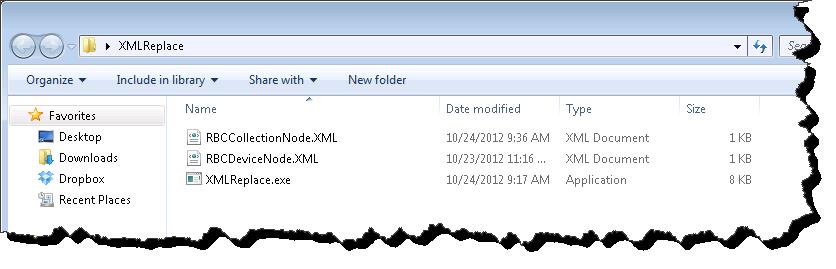
- Copy the new XML files and XMLReplace.exe into a single folder.
- Target and Execute XMLReplace.exe at a machine or machines containing Runbook Commander 2.0.
*XMLReplace.exe has no UI or user interface experience and thus does requires no commanded line option when deploying. Simple executing XMLReplace.exe with the XML files being collocated in the source folder will silently replace the RBC console extensions.
Once executed XMLReplace.exe will take any RBC XML files from its source folder and move these to the appropriate Configuration Manager Console Admin UI folder. This process can be used to initially stage XML files or to also replace existing files.
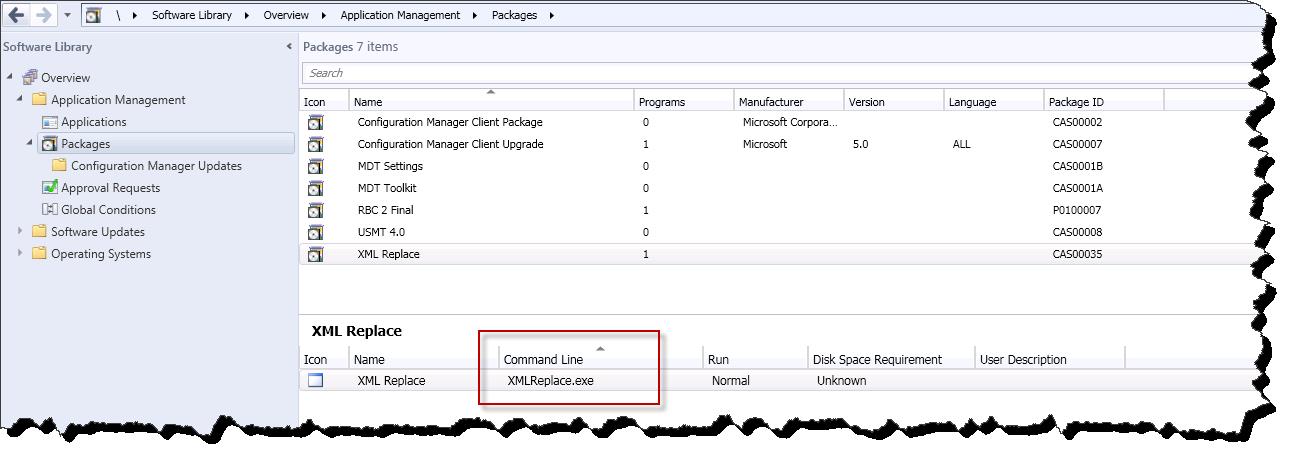
XMLReplace.exe staged with RBC XML Files for deployment
XMLReplace.exe configured for deployment as a Configuration Manager package.
Runbook Commander 2.0 Form Design and Drop Down Lists:
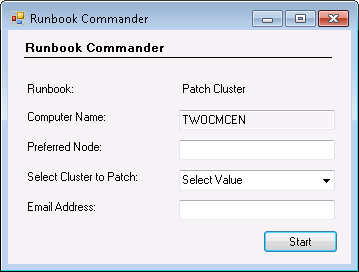
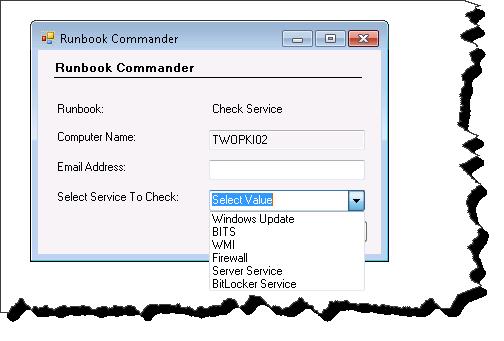
The Runbook Commander 2.0 console extension form is created dynamically at execution time based on the parameters defined on the initialize data activity of the target Orchestrator Runbook. For example the following Runbook example will check the status of a service and ultimately email the results to a specified email address.
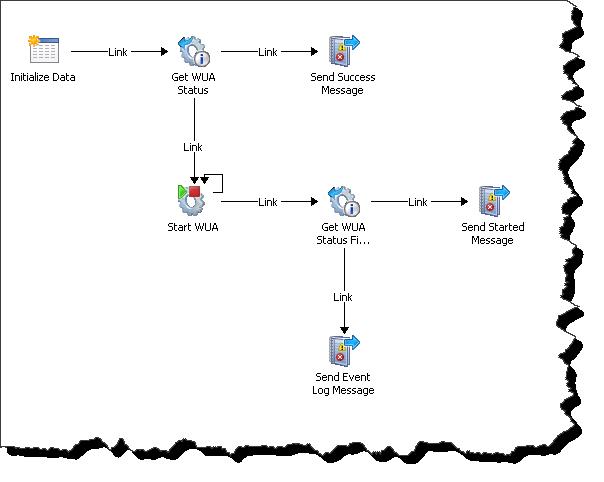
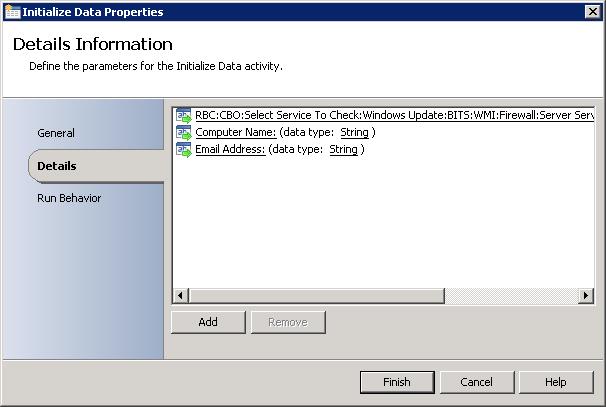
Looking at the Initialize Data activity we see three different parameters.
- Computer Name: - this maps to a read only parameter on the form as displayed in the Configuration Manager console. As noted in the prerequisites section of this document, in order for a Runbook to eligible for execution from RBC it must contain a parameter with the name of Computer Name: , Collection ID: , or Program Name:.
- Email Address: This maps to a input box (text box) in which the RBC user can enter text. In this case it would be an email address.
- RBC:CBO:Etc. – this odd looking parameter maps to the creation of a drop down list. I will focus on this individually.
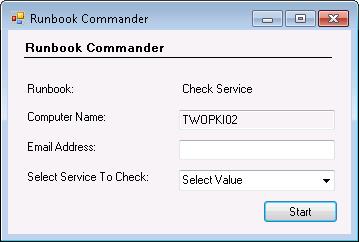
Here is the form as created based on the example Runbook.
New to Runbook Commander 2.0 is the ability to create a dynamic drop down list that will provide predefined options for the RBC user to choose from. This works through parsing a : delimited parameter name on the Orchestrator Runbook end. The example seen above has a parameter with the name of
RBC:CBO:Select Service To Check:Windows Update:BITS:WMI:Firewall:Server Service:BitLocker Service
This string breaks down into the following sections
- RBC:CBO - this indicates to RBCommander.exe that this will map to a drop down list.
- Select Service To Check - this becomes the name of the field to be displayed in the RBC form.
- Everything following - will become individual items in the drop down list.
Example of the drop down list.
If we for instance wanted a drop down lost with the name of Select Distribution Point, with a list of 2 distribution points, the parameter name would look like
RBC:CBO:Select Distribution Point:DP1:DP2
One final point to make or re-stress about all of these parameters is that this form is dynamic. When RBCommander.exe launches it reaches out the Orchestrator Web Service, gathers a list of parameters from the Web Service, and then creates the RBC form. If you need to make updates or add parameters to Runbooks that have already been defined as a console extension, RBC will reflect the changes at next console execution without intervention.
Technical Details: Inside the console extension XML -
It may be helpful at some point when troubleshooting or extending Runbook Commander to understand the XML backend. While the XML is stored in a different location for Configuration Manager 2007 and 2012 Configuration Manager, the XML itself is identical.
Storage Locations -
Configuration Manager 2007 – Console Installation Directory\AdminUI\XmlStorage\Extensions\Actions\
- 7ba8bf44-2344-4035-bdb4-16630291dcf6 – Device
- a8859bde-df8c-4df7-93a8-4d55c5294cfd - Collection
- de41d5d8-3845-4e67-9657-0121f06f5e27 – Program
2012 Configuration Manager – Console Installation Directory\AdminConsole\XmlStorage\Extensions\Actions\
- 3fd01cd1-9e01-461e-92cd-94866b8d1f39 - Device
- a92615d6-9df3-49ba-a8c9-6ecb0e8b956b - Collection
- d13e9848-2c76-418c-ab96-9a2940aaf0de - Program
- ed9dee86-eadd-4ac8-82a1-7234a4646e62 - Device
The XML file as you will recall is created using the RBC XML Generator (RBCXMLGen.exe) tool. This tool formats the XML appropriately and places into the file the location of RBCommander.exe file, the location of the Orchestrator Web Service, and the UID of the target Runbook.
Example XML with one Runbook defined as a target.
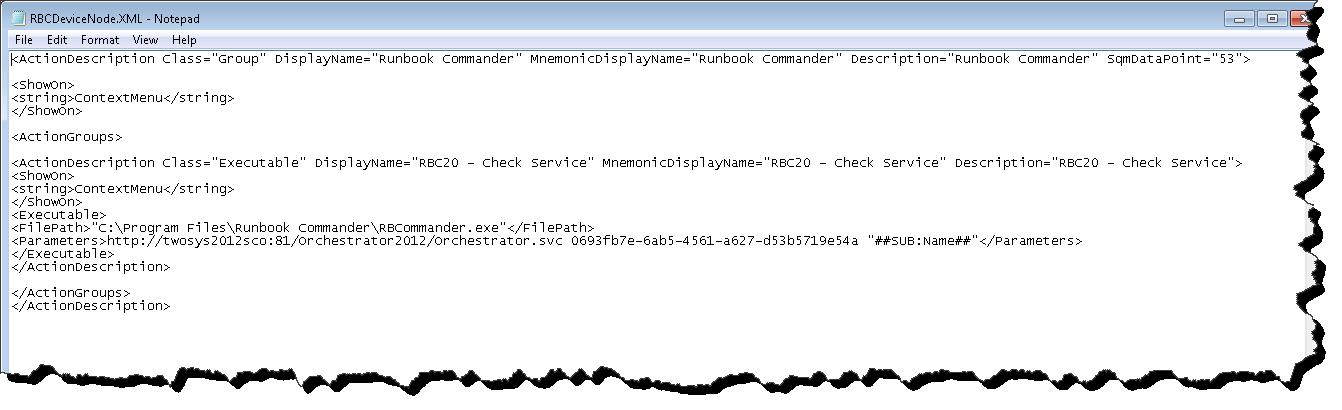
During the XML Generation process several items were derived from the RBCXMLGen.exe tool execution and placed in this XML file. Most notably the following –
- Location of the Orchestrator Web service – taken from the input box in the RBCXMLGen.exe form.
- Location of RBCommander.exe – this is taken from the location from which RBCXMLGen.exe is executed. When creating the XML using RBCXMLGen.exe you will want to execute the program from the intended source location.
- UID of each Runbook – this is pulled from the Orchestrator Web Service for each selected Runbook.
- Display Name – this is taken from the friendly name text box on the RBCXMLGen.exe form.
Troubleshooting / Gotchas -
Question: Why do I not see my Runbooks in the RBCXMLGen.exe tool.
Answer: Validate that the Runbooks have the correct parameter prerequisites. In order for a Runbook to be selected for use as a console extension, it must contain a parameter named Computer Name: , Collection ID: , and or Program Name: .
Question: When deploying RBC via. Configuration Manager the installation fails with an error code 1603.
Answer: Ensure that you are executing RBC20Setup.exe and not RBC20Setup.msi.
Question: I see the console extensions however when I launch one the RBC form is not displayed.
Answer: Ensure that the location of RBCommander.exe specified in the console extension XML matches the actual installation location.