Deploying Device Drivers in OSD Task Sequences Using SCCM
Written by Neil Harrison, Microsoft Premier Field Engineer
In a previous post, we looked at ways of importing our drivers into Microsoft System Center ConfigMgr so that we can use them for our various Operating System Deployments (OSD). We also touched on adding drivers to our boot images as this can easily be accomplished during the Import process for the driver.
In this post, let’s look at the two ways these drivers can be deployed within our Task Sequences that we have built to deploy our OS images.
ConfigMgr provides us with two built-in task sequence steps that can be used during the OSD process: ‘Auto Apply Drivers ’ and ‘Apply Driver Packages’. These two steps provide a different set of functionality.
1. Auto Apply Drivers
This task sequence step will do a Plug-n-Play (PnP) scan of the client hardware and send these results up to the Management Point. The Management Point will return a list of compatible drivers based on all drivers within the catalog. This means that your driver packages do not factor in to the selection of the driver. If a driver exists in any package that is on an accessible distribution point then it will be looked at as a potential candidate for the device.
If we want to narrow down the search a little, then we do have the option of specifying that drivers only in one or more categories be considered.
2. Apply Driver Package
This task sequence step will download all of the drivers within a ConfigMgr package and install these on the Windows OS. When using this step it becomes more important to consider the placement of our drivers in their packages.
Why would we choose the ‘Apply Driver Package’ ? There are several situations in which this becomes necessary:
- Using Stand-Alone media. As described, the ‘Auto Apply Drivers’ is dependent on a connection to a Management Point which is not possible with Stand-Alone Media.
- Installing boot-critical drivers on pre-Vista operating systems.
- Installing drivers for devices that will not be found through PnP. An example of this would be network printers.
- Installing only specific drivers. By placing specific drivers into specific packages we can then use those packages to selectively install drivers on the operating systems we deploy.
Which Task Sequence Step Should You Use?
Now that we know what the two steps are going to do, we need to decide which to use in our Task Sequence. The answer is often “both”. It’s quite common to have the ‘Auto Apply Drivers’ step run to tackle as much of the PnP as possible and then follow this with one or more ‘Apply Driver Package’ steps. Let’s face it, when dealing with device drivers, one size hardly ever fits all.
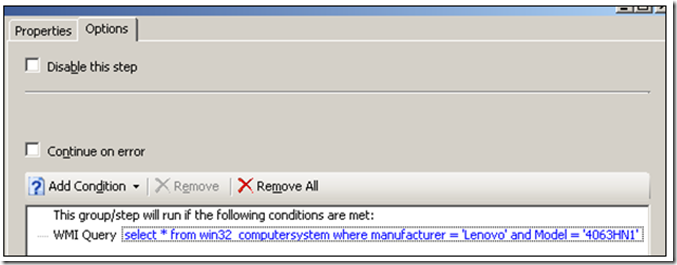
One other topic we should quickly touch on is how we create one Task Sequence that handles multiple hardware types. Naturally, we don’t want to be applying dozens of driver packages to every piece of hardware just to satisfy the multiple variations of hardware that exist. This can be accomplished using some simple WMI filters for criteria.
For example, if I have a driver package specific for my laptop model then I can easily perform a WMI query to make sure that the ‘Apply Driver Package’ only gets applied when that particular model is running the task sequence. This is accomplished on the Options tab of the Apply Driver Package step.
I hope this helps clarify the options available when deploying drivers through an OSD task sequence!
