Enterprise Mobility End to End // Part 2 – Basic Mobile Device Management
This first technical part will describe how to configure System Center Configuration Manager to manage iOS, Android (including Samsung KNOX), Windows 10 Mobile and Windows 10 devices with the Microsoft Intune online service over the Internet. Followed by a chapter with instructions how to enroll all platform devices to Mobile Device Management (MDM). At the end you will be able to have all platforms enrolled and managed via System Center Configuration Manager.
Set-Up Hybrid MDM with Configuration Manager and Intune Integration
This walkthrough shows you how to configure System Center Configuration Manager to manage iOS, Android (including Samsung KNOX), Windows Phone, and Windows devices with the Microsoft Intune online service over the Internet. Although you use the Intune service, management tasks are done using the service connection point site system role in the Configuration Manager console.
You can configure Configuration Manager to let users access company resources on their devices in a secure, managed way. By using device management, you protect company data while letting users enroll their personal or company-owned mobile devices and giving them access to company data. When you use Configuration Manager with Intune, you have the following management capabilities on devices:
- Retire and wipe devices
- Configure compliance settings such as passwords, security, roaming, encryption, and wireless communication
- Deploy line of business apps to devices
- Deploy apps to devices that connect to Windows Store, Windows Phone Store, App Store, or Google Play
- Collect hardware inventory
- Collect software inventory by using built-in reports
Note:
An Intune tenant can only be connected to one Configuration Manager hierarchy, and a Configuration Manager hierarchy can only be connected to one Intune tenant.
Use the following information to determine the prerequisites dependencies external to Configuration Manager for managing mobile devices.
- Sign up for a Microsoft Intune account.
- Make sure that you have a publicly registered domain name and users have a public domain UPN.
- All user accounts must have a publicly registered UPN that can be verified by Intune. GoDaddy or Symantec are typical examples of companies that provide domain names. Before synchronizing the Active Directory user account, you must verify that user accounts have a public domain UPN.
- Optional, but strongly recommended: Deploy and configure Active Directory Federated Services (AD FS).
- When you set up single sign-on, your users can sign in with their corporate credentials to access the services in Intune.
- Deploy and configure directory synchronization.
- Directory synchronization lets you populate Intune with synchronized user accounts. The synchronized user accounts and security groups are added to Intune. Failure to enable Directory Synchronization is a common cause of devices not being able to enroll when setting up Configuration Manager MDM with Microsoft Intune.
- Optional, not recommended: If you are not using Active Directory Federation Services, Reset your users' Microsoft Online passwords.
- If you are not using AD FS, you must set a Microsoft Online password for each user.
Configuring the Microsoft Intune subscription
The Intune Subscription lets you specify your configuration settings for the Intune service. This includes specifying which users can enroll their devices and defining which mobile device platforms to manage. When you have created your subscription, you can then install the service connection point site system role that lets you connect to the Intune service. This site system role will push settings and applications to the Intune service. The Intune subscription does the following:
- Retrieves the certificate that the service connection point requires to connect to the Intune service
- Defines the user collection that enables users to enroll mobile devices
- Defines and configures the mobile platforms that you want to support
To create the Microsoft Intune subscription
If you haven't already, sign up for a Microsoft Intune account at Microsoft Intune.
For guidance, see Get started with Microsoft Intune.
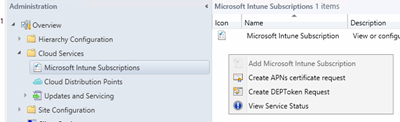
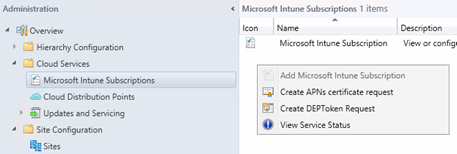
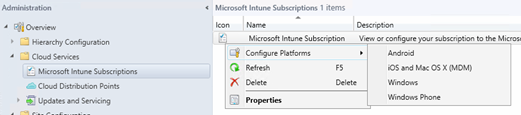
In the Configuration Manager console, click Administration.
In the Administration workspace, expand Cloud Services, and click Microsoft Intune Subscriptions. On the Home tab, click Add Microsoft Intune Subscription.
On the Introduction page of the Create Microsoft Intune Subscription Wizard, review the text and click Next.
On the Subscription page, click Sign in and sign in by using your work or school account. In the Set the Mobile Device Management Authority dialog, select the check box to only manage mobile devices by using Configuration Manager through the Configuration Manager console. To continue with your subscription, you must select this option.
Important:
Once you select Configuration Manager as your management authority, you cannot change the management authority to Microsoft Intune in the future. Unless you call and open a Microsoft Support to change the configuration.
- Click the privacy links to review them, and then click Next.
- On the General page, specify the following options, and then click Next.
- Collection: Specify a user collection that contains users who will be able enroll their mobile devices to Intune.
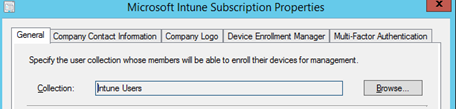
- Collection: Specify a user collection that contains users who will be able enroll their mobile devices to Intune.
Note: If a user is removed from the collection, the user's device will continue to be managed for up to 24 hours when the user record is removed from the user database.
- Company name: Specify your company name.
- URL to company privacy documentation: If you publish your company privacy information to a link that is accessible from the Internet, provide a link that users can access from the company portal, for example https://www.contoso.com/CP\_privacy.html. Privacy information can clarify what information users are sharing with your company.
- Color scheme for company portal: Optionally, change the default color of blue for the company portals.
- Configuration Manager site code: Specify a site code for a primary site to manage the mobile devices.
Note: Changing the site code affects only new enrollments and does not affect existing enrolled devices.
- Specify the Device enrollment limit. Each licensed user can have up to 5 devices enrolled. Users receive an error message if they attempt to enroll more than the specified number of devices.
- On the Company Contact Information page, specify the company contact information that is displayed in the company portal, and then click Next.
- On the Company Logo page, choose whether to display a logo in the company portal, and then click Next.
- Complete the wizard.
The Service Connection Point site system role
The service connection point sends settings and software deployment information to Configuration Manager and retrieves status and inventory messages from mobile devices. The Configuration Manager service acts as a gateway that communicates with mobile devices and stores settings.
Note: The service connection point site system role may only be installed on a central administration site or stand-alone primary site. The service connection point must have Internet access.
To configure the service connection point role
- In the Configuration Manager console, click Administration.
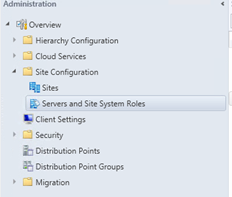
- In the Administration workspace, expand Site Configuration, and then click Servers and Site System Roles.
- Add the Service connection point role to a new or existing site system server by using the associated step:
- New site system server: On the Home tab, in the Create group, click Create Site System Server to start the Create Site System Server Wizard.
- Existing site system server: Click the server on which you want to install the service connection point role. Then, on the Home tab, in the Server group, click Add Site System Roles to start the Add Site System Roles Wizard.
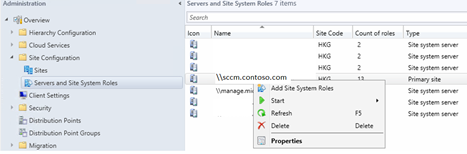
- On the System Role Selection page, select Service connection point, and click Next.
- Complete the wizard.
How does the service connection point authenticate with the Microsoft Intune service?
The service connection point extends Configuration Manager by establishing a connection to the cloud-based Intune service that manages mobile devices over the Internet. The service connection point authenticates with the Intune service as follows:
- When you create an Intune subscription in the Configuration Manager console, the Configuration Manager admin is authenticated by connecting to Azure Active Directory, which redirects to the respective ADFS server to prompt for user name and password. Then, Intune issues a certificate to the tenant.
- The certificate from step 1 is installed on the service connection point site role and is used to authenticate and authorize all further communication with the Microsoft Intune service.
Verify mobile device management configuration
You can verify certain device management components by checking the following log files:
- Check the Cloudusersync.log to verify that user accounts are successfully synchronized.
- Check the Sitecomp.log to verify that the service connection point was created successfully.
Reference: https://technet.microsoft.com/en-us/library/mt627883.aspx
Set-Up MDM for iOS, Android and Windows Devices
To enable iOS device enrollment
Before you can manage iOS and Mac devices, you must import an Apple Push Notification service (APNs) certificate from Apple. This certificate allows Intune to manage iOS and Mac devices and establishes an accredited and encrypted IP connection with the mobile device management authority services.
- Download a certificate signing request - A certificate signing request file (.csr) is required to request an APNs certificate from Apple.
In the Configuration Manager console in the Administration workspace, go to Cloud Services> Microsoft Intune Subscriptions.
On the Home tab, click Create APNs certificate request. The Request Apple Push Notification Service Certificate Signing Request dialog box opens.
Browse to the path to save the new certificate signing request (.csr) file. Save the certificate signing request (.csr) file locally.
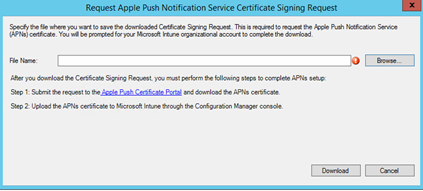
Click Download. The new Microsoft Intune .csr file downloads and is saved by Configuration Manager. The .csr file is used to request a trust relationship certificate from the Apple Push Certificates Portal.
- Request an APNs certificate from Apple - The Apple Push Notification service (APNs) certificate is used to establish a trust relationship between the management service, Intune, and enrolled iOS mobile devices.
- In a browser, go to the Apple Push Certificates Portal and sign in with your company Apple ID.
Note:
This Apple ID must be used in future to renew your APNs certificate.
- Complete the wizard using the certificate signing request (.csr) file. Download the APNs certificate and save the .pem file locally. This APNs certificate (.pem) file is used to establish a trust relationship between the Apple Push Notification server and Intune's mobile device management authority.
- Enable enrollment and upload the APNs certificate - To enable iOS enrollment, upload the APNs certificate.
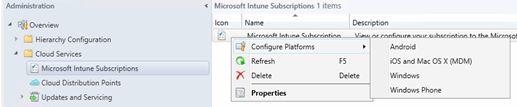
- In the Configuration Manager console in the Administration workspace, go to Cloud Services > Microsoft Intune Subscription.
- On the Home tab in the Subscription group, click Configure Platforms > iOS.
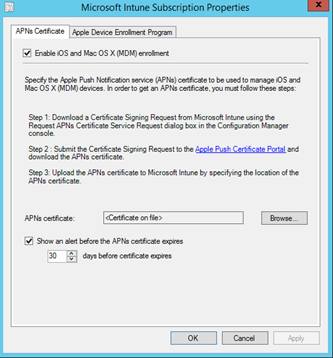
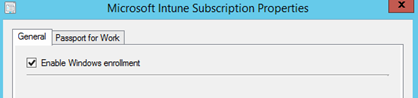
- In the Microsoft Intune Subscription Properties dialog box, select the iOS tab and click to select the Enable iOS enrollment checkbox.
Note: Do not upload the Apple Push Notification service (APNs) certificate until you enable iOS enrollment in the Configuration Manager console.
- Click Browse, and go to the APNs certificate (.cer) file downloaded from Apple. Configuration Manager displays the APNs certificate information. Click OK to save the APNs certificate to Intune.
Reference: https://technet.microsoft.com/en-us/library/mt629418.aspx
To enable Android enrollment:
- Prerequisites - Before you can set up enrollment for any platform, complete the prerequisites and procedures in Manage mobile devices with System Center Configuration Manager and Microsoft Intune.
- In the Configuration Manager console in the Administration workspace, go to Cloud Services > Microsoft Intune Subscription.
- On the Home tab in the Subscription group, click Configure Platforms > Android.
- In the Microsoft Intune Subscription Properties dialog box, select the Android tab and click to select the Enable Android enrollment checkbox.

Reference: https://technet.microsoft.com/en-us/library/mt629417.aspx
To enable Windows device enrollment:
- Create DNS alias for device enrollment
A DNS alias (CNAME record type) makes it easier for users to enroll their devices by automatically populating the server name during device enrollment. To create a DNS alias (CNAME record type), you have to configure a CNAME in your company's DNS records that redirects requests sent to a URL in your company's domain to Microsoft's cloud service servers.
For example, if your company's domain is contoso.com, you should create a CNAME in DNS that redirects EnterpriseEnrollment.contoso.com to EnterpriseEnrollment-s.manage.microsoft.com.
Type |
Host name |
Points to |
CNAME |
EnterpriseEnrollment.company_domain.com |
EnterpriseEnrollment-s.manage.microsoft.com |
CNAME |
EnterpriseRegistration.company_domain.com |
EnterpriseRegistration.windows.net |
- In the Configuration Manager console in the Administration workspace, go to Cloud Services > Microsoft Intune Subscriptions.
Warning : If other Configuration Manager dialog boxes are open, close them before continuing with this procedure.
- On the Home tab, click Configure Platforms, and then click Windows.

- On the General tab, select Enable Windows enrollment.
References: https://technet.microsoft.com/en-us/library/mt629421.aspx
Set-Up Mobile Device Enrollment for iOS, Android and Windows
To enroll your iOS device
Follow the steps in Install and sign in to the Intune Company Portal app.
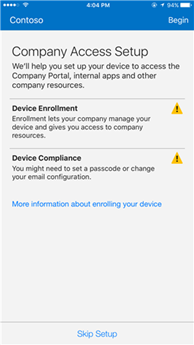
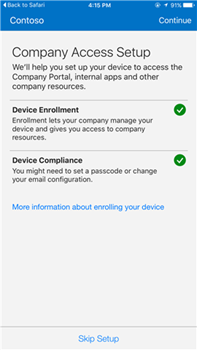
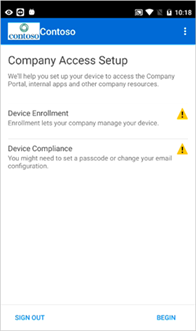
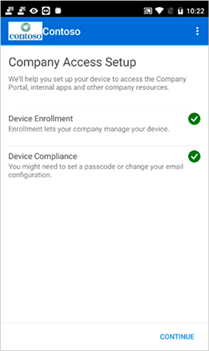
On the Company Access Setup page, tap Begin.
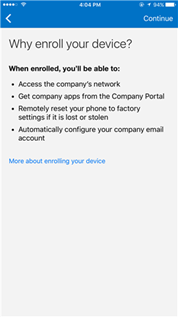
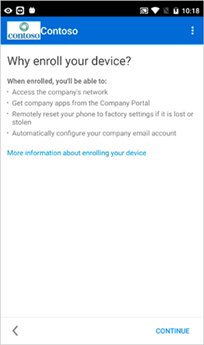
On the Why enroll your device? screen, read about what you can do when you enroll your device, and then tap Continue.
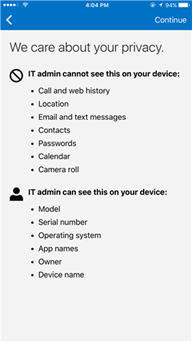
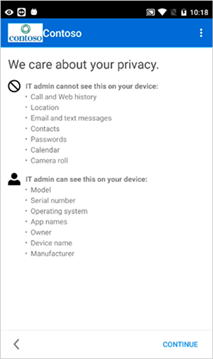
Review a list of what your IT administrator can and can't see on your enrolled device, and tap Continue.
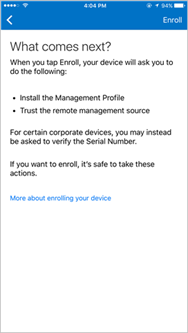
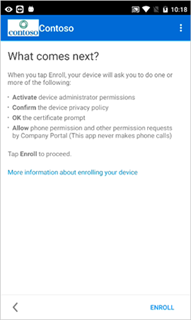
On the What comes next screen, read about what happens during enrollment, and then tap Enroll.
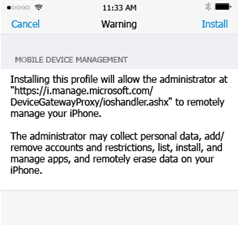
On the Install Profile screen, tap Install, and enter your passcode, if prompted.
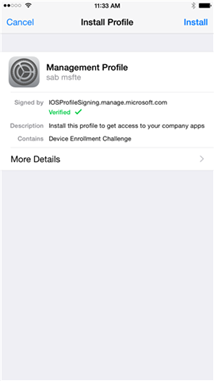
Tap Install.
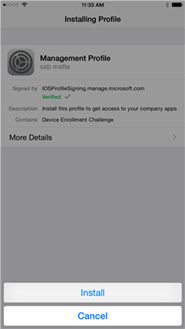
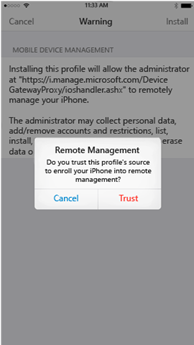
Tap Install to indicate that you've read the warning.
Tap Trust.
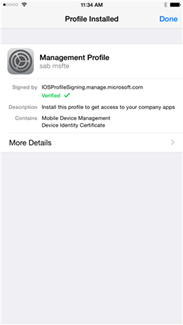
When the screen changes to show that the profile has finished installing, Tap Done.
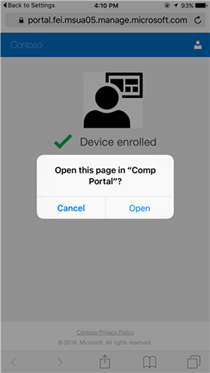
An "Enrolling device" message displays on the screen.
When a message displays asking if you want to open the page in the Company Portal, tap Open.
On the Company Access Setup screen, tap Continue.
Note:
If your IT administrator set up additional security requirements, such as the need to set a password, follow the on-screen instructions until you meet all of the compliance requirements and are returned to the Company Access Setup screen, and then tap Continue.
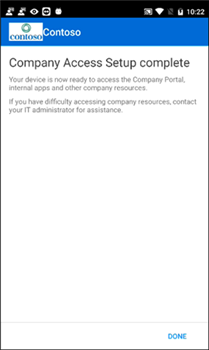
Tap Done.
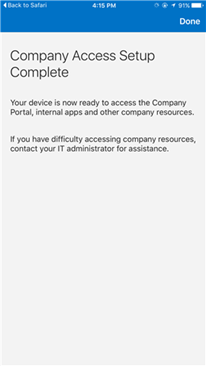
Your device is now enrolled in Intune, and you are taken back to the Company Portal app.
Reference: https://docs.microsoft.com/en-us/intune/enduser/enroll-your-device-in-intune-ios
To enroll your Android device
Before trying to install company apps, go to Settings > Security, and turn on Unknown sources. If you don't turn on this option before trying to install apps, you'll see the message "Install blocked." For security reasons, your device is set to block installations of apps obtained from unknown sources." You can tap Settings on the error dialog to go to the Unknown sources option.
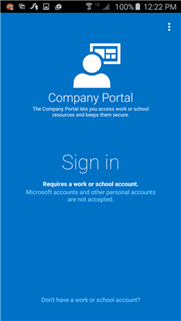
Install the free Intune Company Portal app from Google Play.
Open the Microsoft Intune Company Portal app.
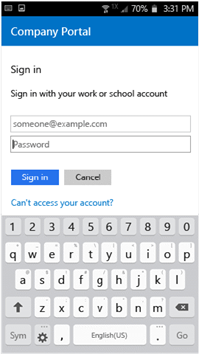
On the Company Portal Welcome screen, tap Sign in, and then sign in with your work or school account.
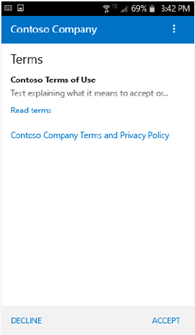
If your IT administrator set up company terms and conditions, tap ACCEPT to accept the terms.
If you're using Android 6.0 or later, do this step. Otherwise, go to the next step.
If your IT administrator has set up certain policies, you may see the following messages:
- Allow Company Portal to make and manage phone calls?
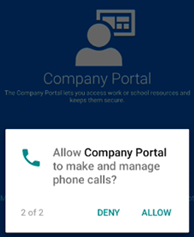
If you see this message, tap ALLOW. It is safe to tap ALLOW, because Microsoft never makes or manages your phone calls! Google controls the message text, and Microsoft cannot change it. When you allow access, all you're doing is allowing your device to write data logs to the device's SD card, which in turn lets you move those logs by using a USB cable.
If you deny access, the message will appear again the next time you sign in to the Company Portal, but you can turn off future messages by tapping the "Never ask again" check box. If you later decide to allow access, go to Settings > Apps > Company Portal > Permissions >Phone, and then turn on the permission.
- Allow Company Portal to access your contacts?
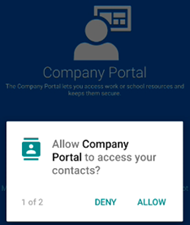
If you see this message, tap ALLOW. It is safe to tap ALLOW, because Microsoft never accesses your contacts! Google controls the message text, and Microsoft cannot change it. When you allow access, it only allows the Company Portal app to create, use, and manage your work account.
If you deny access, the message will appear again the next time you tap Send Data, but you can turn off future messages by tapping the "Never ask again" check box. If you later decide to allow access, go to Settings > Apps > Company Portal > Permissions > Storage, and then turn on the permission.
Sign in to the Company Portal app using your work or school account and password, and tap Sign in.
On the Company Access Setup screen, tap BEGIN.
On the Why enroll your device? screen, read about what you can do when you enroll your device, and then tap CONTINUE.
Review a list of what your IT administrator can and can't see on your device, and tap CONTINUE.
On the What comes next screen, read about what happens during enrollment, and then tap ENROLL.
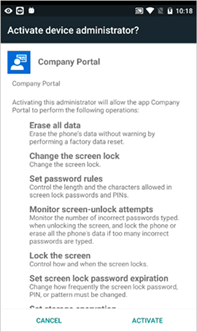
On the Activate device administrator screen, tap Activate.
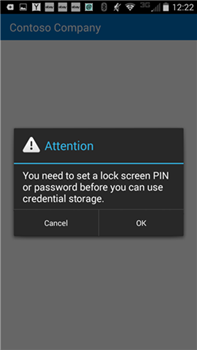
Follow the prompts to enter a PIN or password. If you already set up a PIN or password on this device, you won't see this screen or be required to enter a new PIN or password.
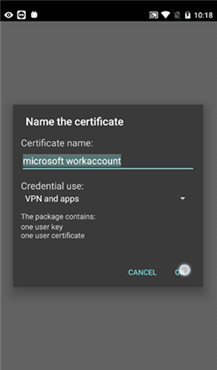
Follow the instructions below that match the type of device you're using (native Android or Samsung Knox). To determine if you have a Samsung Knox device, go to Settings > About device. If you don't see "KNOX version" listed there, you have a native Android device.
- Native (non-Samsung Knox) device: On the Name the certificate screen, tap OK to accept the default certificate.
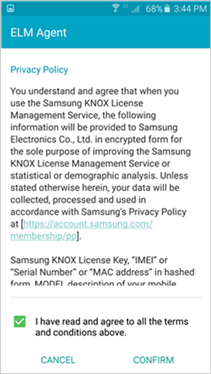
- Samsung Knox device: Accept the privacy policy, and tap CONFIRM.
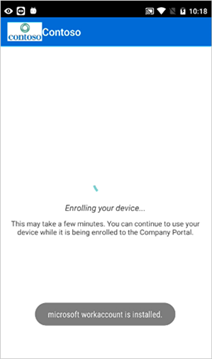
You'll see the following message appear on your screen as Intune enrolls your device.
When the Company Access Setup screen appears, tap CONTINUE. If you see a message indicating that your device is out of compliance, follow the instructions to fix the issue, and then tap CONTINUE.
On the Company Access Setup complete screen, tap DONE. Your device is now enrolled.
Reference: https://docs.microsoft.com/en-us/Intune/EndUser/enroll-your-device-in-intune-android
To enroll your Windows 10 Mobile or Windows 10 desktop device
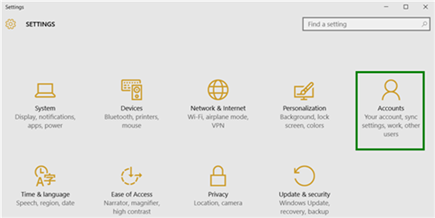
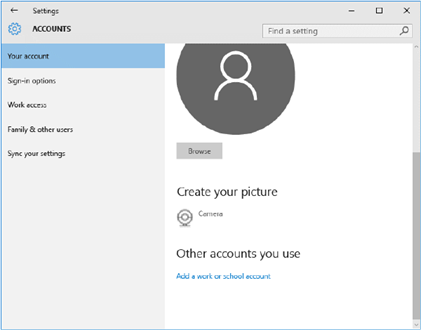
Go to Windows Settings and tap Accounts.
Tap Your account.
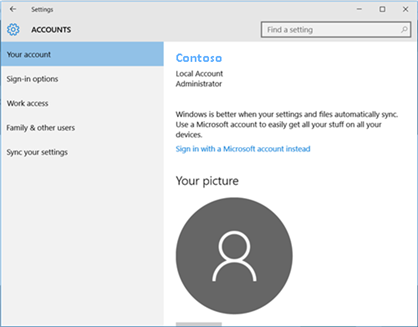
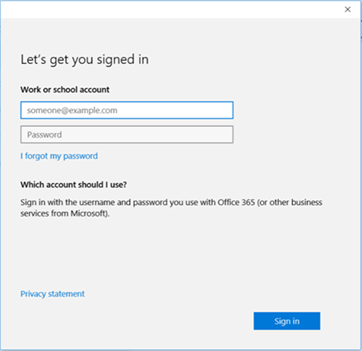
Tap Add a work or school account.
Sign in with your work or school credentials.
If you followed the steps above, but still can't access your work or school email, files, and other data, go back to Accounts and tap Work access.
- If you see your work or school account, congratulations. You're connected.
- If you don't see your work or school account, tap Connect, and then sign in with your work or school credentials.
We also recommend that you install the Company Portal app, which lets you easily identify and get the company apps that are relevant to you and your role. Depending on how your company configured Intune, the Company Portal app may have been installed as part of your enrollment process. To check if you have the app, look for Company Portal in your apps list. If you don't see the Company Portal in your list of apps, follow these steps to install it.
- Tap Start > Store.
- Tap Search and type company portal.
- In the list of results, tap Company Portal > Install.
- Tap either Install or Free. The option shown depends on how your company configured the app.
Reference: https://docs.microsoft.com/en-us/intune/enduser/enroll-your-w10-phone-or-w10-pc-windows
This Blog post was published by the authors
Lutz Seidemann (Architect) and Raymond Michael Sy Guan (Consultant). We both with Microsoft Consulting Services – Worldwide Enterprise Mobility Center of Excellence (CoE).
Disclaimer: The information on this site is provided "AS IS" with no warranties, confers no rights, and is not supported by the authors or Microsoft Corporation. Use of included script samples are subject to the terms specified in the Terms of Use.