MDT 2012 Update 1: Roles and Features improvements
Apparently I was so wrapped up in the MDT 2012 Update 1 development process that I forgot to talk about one of the areas that consumed weeks of my time before the MDT 2012 Update 1 release: improvements to the “Roles and Features” logic.
In MDT 2010 and MDT 2012, we had a task sequence action to “Install Roles and Features” that you could use to install roles and features on various operating systems. But it didn’t support Windows 8 or Windows Server 2012; it tried (unsuccessfully in some cases) to merge all of the role and feature lists into one single list for the rest of the OSes; it didn’t include a complete list of roles and features for all the OSes (e.g. Windows 7); etc. Basically, it needed a lot of work.
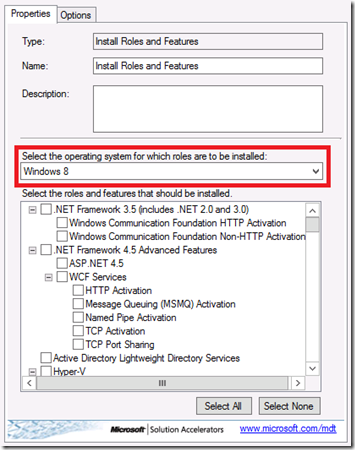
So in MDT 2012 Update 1, we took the opportunity to do some housecleaning. First, we changed the “Install Roles and Features” task sequence UI to allow you to display a filtered list of roles and features for the particular OS you are deploying:
We also made sure that the complete lists were present for all the various OSes: Windows 7, Windows 8, Windows Server 2008 (full install and core install), Windows Server 2008 R2 (full install and core install), and Windows Server 2012 (full install and core install). (We didn’t change the list for Windows XP and Windows Server 2003. Given that those are already in extended support and rapidly approaching their end-of-life date, we’re not adding new functionality for them.) And we verified the lists – something that gave our test team a real workout, as we had to make sure that we properly handled all the dependencies between the roles and features on OSes where that wasn’t handled automatically (e.g. Windows 7).
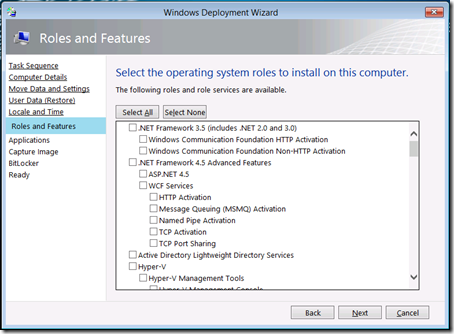
Then, we added a new Lite Touch wizard pane to let you dynamically choose roles and features. It automatically displays the right list based on the OS being deployed, allowing you to choose additional roles and features to install later in the task sequence:
What do you need to enable this wizard pane? Just add a step to the task sequence (somewhere in the State Restore phase; the exact location doesn’t matter, but I typically choose to put it in the “Custom Tasks” group) and the new pane will automatically show up. If you don’t want the wizard pane, you can turn it off through Custom Settings.ini by specifying “SkipRoles=YES”.
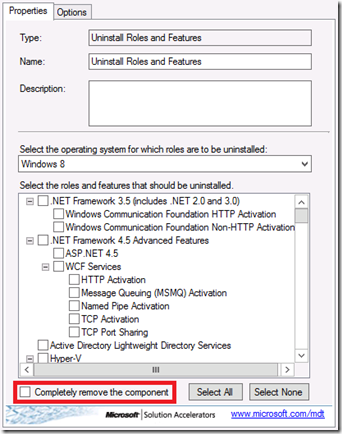
We also added a new “Uninstall Roles and Features” task sequence step that can be used to remove roles and features that you no longer want. It presents exactly the same list of roles and features inside the task sequence editor:
Notice the red box above, which I highlighted to point out one specific Windows 8 and Windows Server 2012 feature (and only shows up when you choose Windows 8 or Windows Server 2012): Not only can you uninstall roles and features, but you can also completely remove the components, getting rid of all the files related to that component. (If you ever want to add those back, Windows can download the components from Windows Update, or you can provide the original media to pull them from the WIM file. See https://technet.microsoft.com/en-us/library/hh824822.aspx for more details around this, as well as https://technet.microsoft.com/en-us/library/hh825020 for information about how to specify an alternate “repair source” instead of Windows Update.)
It’s worth noting too that we added some extra logic to handle the installation of .NET 3.5 on Windows 8 and Windows Server 2012. For both of these OSes, the .NET 3.5 feature is not present in the standard WIM file, but the files do exist on the media in the \sources\sxs folder. So for Lite Touch deployments, we will automatically provide these files to Windows as long as you have imported the full source files into your deployment share. For ConfigMgr clients, you would need to do a little bit more:
- Set up a network share containing the contents of the “sources\sxs” folder from the original Windows 8 or Windows Server 2012 media.
- Set a task sequence variable (either through CustomSettings.ini or directly in the task sequence) called “WindowsSource” that points to the location of that folder.
Behind the scenes, the script responsible for performing the role and feature work, ZTIOSRole.wsf, figures out the right thing to do for each OS:
- For Windows Server 2003, use SYSOCMGR.EXE.
- For Windows Server 2008, use SERVERMANAGERCMD.EXE.
- For Windows 7 or Windows 8, use DISM.EXE.
- For Windows Server 2008 R2 (non-core) or Windows Server 2012, use PowerShell.
- For Windows Server 2008 R2 (core), use OCSETUP.EXE.
Fun stuff. (For those of you keeping track, this also means that MDT now actually uses PowerShell itself during a deployment task sequence to install or uninstall roles and features on Windows Server 2008 R2 and Windows Server 2012. To keep things simple, the ZTIOSRole.wsf script calls the ZTIOSRolePS.ps1 script to take care of this. Look at the logic in ZTIOSRole.wsf and the new ZTIPSUtility.vbs script to see how that works, in case you ever have the need to do something similar, e.g. do some work in VBScript and some in PowerShell.)


