Customizing Wizards with MDT 2012
Many of you have customized the MDT 2010 wizards, and I expect that will be fairly common with MDT 2012 as well – after all, one of the design goals with having HTA-based wizards is to enable customization by creative IT pros. But the process is going to be slightly different with MDT 2012.
First, let’s review the basic process most of you would go through with MDT 2010:
- Download the MDT Wizard Editor from https://mdtwizardeditor.codeplex.com/. This makes editing the wizard simpler (although not necessarily trivial – there can still be a fair amount of work to do, depending on the extent of the changes that you intend to make).
- Open the “DeployWiz_Definition_ENU.xml” file and make the necessary changes: Adding new panes, changing the HTML and properties of existing pane, etc.
- Using Notepad or any other text editor, add any custom scripting to DeployWiz_Initialization.vbs or DeployWiz_Validation.vbs.
- Test out all the changes using the MDT Wizard Editor, or if this isn’t possible (due to conditions on the wizard pane or logic contained in the pane itself) drop the changed files into the deployment share and try a deployment.
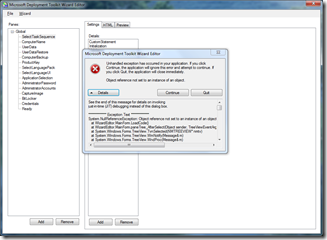
So it’s quite reasonable for you to try the same thing with MDT 2012. But you’ll quickly discover that you can’t get very far. You can open the file, but as soon as you click on one of the wizard panes in the left-hand column, you get this exception:
So what causes this? Well, if you look at the files in the deployment share, you’ll notice that there are quite a few more that start with “DeployWiz”. That’s because the entire wizard has been restructured. Instead of having one set of large files (DeployWiz_Definition_ENU.xml, DeployWiz_Initialization.vbs, DeployWiz_Validation.vbs), there are now separate files for each wizard pane (e.g. DeployWiz_ComputerName.xml and DeployWiz_ComputerName.vbs). The original files (DeployWiz_Definition_ENU.xml, etc.) are still around, but are much smaller – the bulk of the content has been separated out.
Why was this done? Mainly because it makes the wizard code much easier to maintain. It’s now much more obvious what script pieces are used for which wizard panes. Additionally, it makes the wizard easier to test, as you can work on a single pane at a time without worrying about breaking another unrelated pane.
The individual panes are then tied together by the DeployWiz_Definiton_ENU.xml file. If you look at this file, you’ll see that it’s pretty short, with entries like this:
<Pane id="SelectTaskSequence" reference="DeployWiz_SelectTS.xml">
<Condition><![CDATA[UCASE(Property("SkipTaskSequence"))<>"YES" ]]></Condition>
</Pane>
All that is there is a reference (or link) to the separate files for each wizard pane, along with the conditions for when each wizard pane should be displayed. (This helps with the testing as well: By keeping the conditions in the DeployWiz_Definition_ENU.xml file instead of in the individual wizard files, those conditions don’t get in the way of “offline testing”, e.g. running just that one single wizard pane without going through a full deployment.)
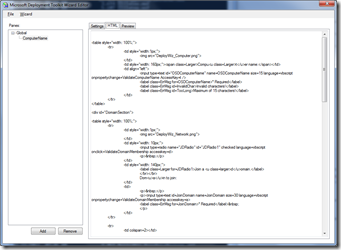
So why does that cause problems with the Wizard Editor? Simple: It doesn’t understand that the wizard pane body is in a separate file. It can’t follow the reference link (highlighted in yellow above) to the separate wizard pieces. So does that mean the Wizard Editor is no longer useful? Not at all – you can still use it to work on (and test) individual pages like DeployWiz_ComputerName.xml:
But you’ll need to edit the DeployWiz_Definition_ENU.xml file by hand.
I’m working on a new version of the Wizard Editor in my “free time” so that it learns how to follow these links (with other improvements added in too), but it might take a while before I can complete that work.
So what does the recommended workflow look like if you wanted to add a new wizard pane to MDT 2012? Here are the basics:
- Download the MDT Wizard Editor from https://mdtwizardeditor.codeplex.com/.
- Make a copy of files for one of the wizard pane files. For example, copy DeployWiz_AdminPassword.xml as “MyPane.xml” and DeployWiz_AdminPassword.vbs as “MyPane.vbs”.
- Use the Wizard Editor to customize and test the new wizard pane.
- When you are happy with the functionality of the new wizard pane, add an entry for it into DeployWiz_Definition_ENU.xml (just like all the others, with any conditions that you might need), then test it out as part of a normal deployment.
This new flow has another advantage too: It makes it much easier to integrate a new wizard pane into MDT. You don’t have to worry about reintegrating your changes into the “big” XML file each time you upgrade MDT – your separate files will continue to exist, untouched, so all you will need to do is add the “link” into DeployWiz_Definition_ENU.xml again and you’re good to go.

