Things to check when a CDO mail-enabled Classic ASP site is not sending mail after a migration to IIS7+
I've run into multiple cases recently where customers migrated their older Classic ASP sites from IIS 6 (Server 2003) to IIS 7+ (Server 2008+) and were running into issues with the CDOSYS mail-enabled parts. This post can be used as a checklist to ensure the new IIS server is properly setup to handle this.
Summary
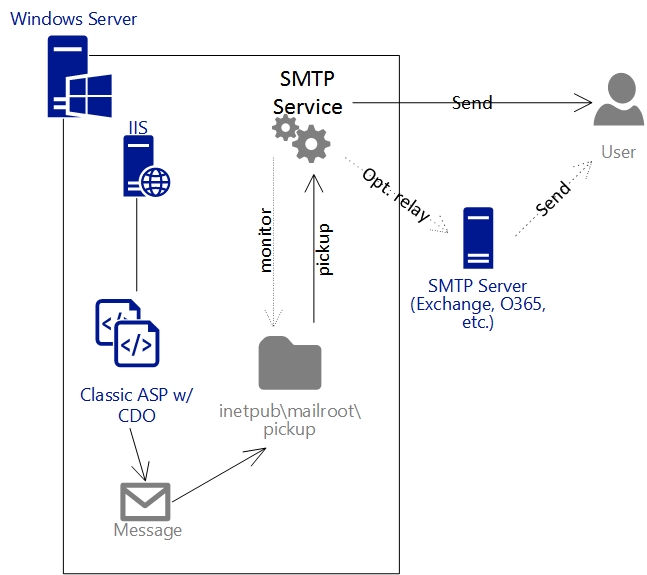
CDOSYS can send mail in a few different ways. If there is no code specifying which server to send mail from, then it attempts to send it from the server the code is hosted on with the SMTP server optional feature. Conversely, you can add code that specifies what server to use if you do not wish to use the built-in SMTP server. Each option has its own pros, cons and items to keep in mind. I outline these two scenarios below.
As an aside, I was able to gain massive insight on how to resolve these customers' issues by analyzing Failed Request Traces (FREB) and seeing how IIS moved through the code and when/where any errors were presented. Having the customer's code handy also proved very helpful. One of the main benefits of FREB tracing is that just about every Classic ASP line that is processed has its own line on the trace. Coupled with the customer's code, for example, you can see when an if statement is hit, then see if the code inside the if block executed to determine how the condition resolved, etc. This can be very useful when troubleshooting.
Note: This post assumes Classic ASP pages that are not mail-enabled are working just fine.
Scenarios
I will address two main scenarios on this page:
- Using the built-in SMTP server to send email from pages utilizing CDOSYS for email. The server will go through the motions to get the mail delivered. This is the prevalent scenario I've worked with customers on and does not require any code specifying how mail is sent.
- This option is great if you have multiple pages that send mail the same way - the server changes handle all of them. If you've got 20 sites that send email the same exact way, then this option will very likely get them all working without having to touch those pages.
- With some slight modifications this configuration can also be used to forward mail to a separate SMTP server for delivery. This can be useful if your organization requires all mail to pass through a specific server or cluster to be delivered. Using Office 365/Exchange Online as an SMTP service requires other actions to take place. Here is a TechNet guide on this.
- This option does require certain security measures to ensure the server is not exploited as an open relay.
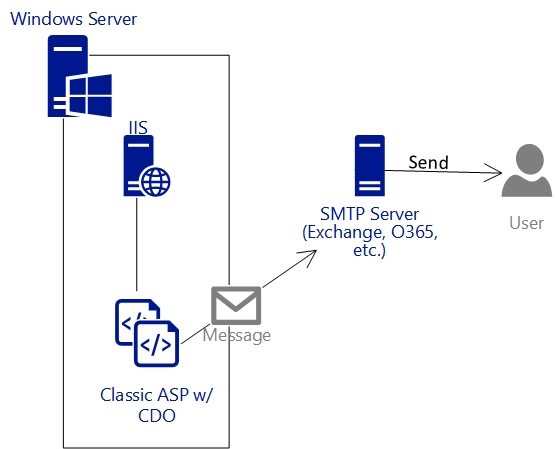
- Using code to connect to an external SMTP server for mail delivery.
- This is beneficial if you have very few sites that send email this way and you are able to utilize a separate SMTP server. You don't have to worry about modifying the server or even installing the SMTP Server feature.
- This option may not be the best if you have a high amount of sites that send email this way, as each one that sends email will need the code changes implemented. Along with code changes in Production come testing.
The most basic implementation of CDOSYS to send email looks something like this:
Set myMail=CreateObject("CDO.Message") myMail.Subject="CDOSYS Email" myMail.From="robot@contoso.com" myMail.To="user@contoso.com" myMail.TextBody="This message is using CDOSYS." myMail.Send set myMail=nothing
Below I dive into the two scenarios and detail what needs to be checked for each one.
Scenario 1: Server Configuration
In IIS Manager, navigate to the application pool that is hosting your mail-enabled site and note the identity it's running under. By default this is ApplicationPoolIdentity on IIS 7.5+, which is a good practice for single-server setups. If you're using a different account, like a domain account, then add it as a member to the local "IIS_IUSRS" group via the Local Users and Groups window (Start->Run->lusrmgr.msc). This will help us later and I am going to assume for the upcoming steps that this has been done.
Ensure the "SMTP Server" feature is installed. This installs the "Simple Mail Transfer Protocol (SMTP)" Service, which, by default, will not be started and is set to a "Manual' startup type. Ensure you start the service and change it's startup type to "Automatic" or "Automatic (Delayed)."
Note: Do not get this confused with the "SMTP Email" module you see in the standard IIS Manager. That module and its settings are for use with the System.Net.Mail API, not CDOSYS.
Folder Permissions
The SMTP Server feature adds a new folder inside C:\inetpub named "mailroot." On this folder, you'll need to add "Modify" permissions for the "IIS_IUSRS" group. Ensure this trickles down to all subfolders. This site has great explanations of the various subdirectories in the mailroot folder and how they are used.
SMTP Service Permissions
Now we need to take care of the permissions to actually use the SMTP service.
When the SMTP Server feature was installed, it also installed the IIS 6 Management Console dependency. This means you now have "Internet Information Services (IIS) 6.0 Manager" installed alongside the standard IIS Manager for 7.0+. You can find it in Administrative Tools. When you need to administer the legacy SMTP service settings, IIS 6 Manager is where you'll do it. There is one exception to this, however; for the permissions we need to change, we need Metabase Explorer from the IIS 6 Resource Kit. You can download it from here. When going through the installation, choose a custom installation and select only Metabase Explorer since we don't need anything else for this step.
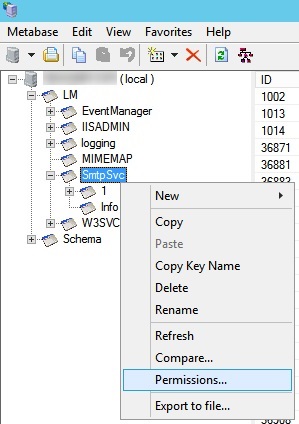
Once it's installed, run as administrator and navigate to down to the LM/SmtpSvc node. Right-click on it and select "Permissions." Add the "IIS_IUSRS" local group with Full Control perms. Do the same thing for the "1" node under LM/SmtpSvc.
Your sites should now be able to send email. But we aren't finished yet - right now we have an open relay that needs to be locked down.
SMTP Service Security
Note: Microsoft does not assume any liability if your SMTP server is used for malicious purposes, whether or not the hardening measures are applied here. Please ensure you thoroughly understand the security options available to you for this SMTP feature, including those not mentioned here. There will be some resources at the bottom of this post that you can utilize to gain a better understanding of the security principals needed here.
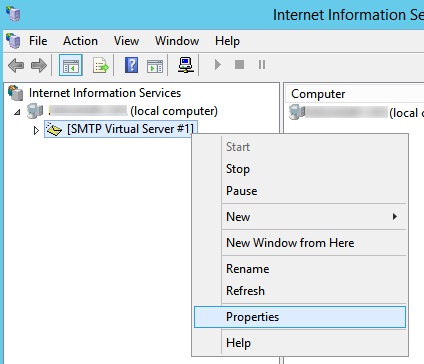
By default, any machine can use the SMTP service to send and/or relay mail. Let's fix that. Open the IIS 6 Manager and navigate to SMTP Virtual Server #1, right-click->Properties.
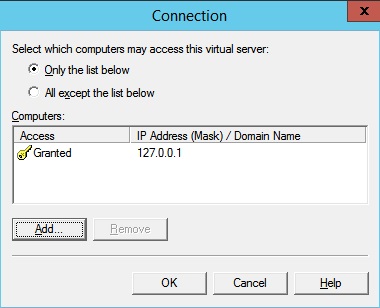
Navigate to the "Access" tab and click on "Connection" in the "Connection control" section. Make sure yours looks like the screenshot below (you'll need to add 127.0.0.1 to the list):
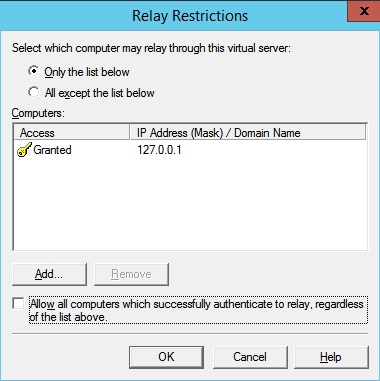
Click OK and click on "Relay" just below the "Connection" button. This opens a similar window as before; go through the same steps and ensure it looks like this:
Now the SMTP service will only accept mail sent from its host server. You can make modifications to these areas if you wish for other computers to be able to send email through this one. I do not cover those scenarios here.
Note: Depending on your firewall software, it's possible an automatic rule for SMTP port 25 was created when the SMTP Server feature was installed to allow incoming SMTP traffic to your server. This is not needed if messages originate on this server. If that is the case, and no other servers or code anywhere will be relaying mail via this server, then you can close the incoming SMTP port(s) as an extra layer of security.
All done! At this point your Classic ASP sites should be able to send email AND your SMTP server feature is more secure. There are other tweaks in this Properties window that you can make, such as limiting message sizes and where to send NDRs to as well. Take a look around to see if you want to modify any of those.
If you wish for your server to forward mail to another SMTP server, then keep reading.
Forwarding Email to Another SMTP Server
If your organization wishes to internally forward email to another server to be processed and sent to the recipients, then a few more changes are needed. We are now moving to the "Delivery" tab in IIS6 Manager -> SMTP Virtual Server -> Properties.
If your downstream server requires authentication, click the "Outbound Security..." button at the bottom and choose the appropriate settings. Click OK when finished.
The default port the SMTP service uses to make outbound connections is 25. If you need to change this or want to limit the number of overall connections, click the "Outbound connections..." button. Click OK when finished.
Now, in that Delivery tab, click on the "Advanced" button. In the "Smart host" field, enter the URL, FQDN or IP address (IP should be enclosed in brackets [ ]) where mail should be delivered for further processing. Click OK.
Note: If you want to use Office 365/Exchange Online to send and/or relay email, there are other points that must be addressed. This page lists the options available and how to go about implementing them.
All done!
Scenario 2: Code Changes
Note: If you did the server changes above, you do not need to make these code changes.
Note: As with any Production code changes, ensure you have properly tested before deploying! Microsoft assumes no liability due to any issues that arise from making the changes mentioned here.
The default way the code will send email is to use the built-in Windows SMTP Server on the same server the code is hosted. That is detailed in the above steps. If you want to modify your code to direct email elsewhere for delivery, here are the parameters you need to add. This does not require the built-in SMTP server to be installed.
This site has a great tutorial on what settings can be changed to make this happen.
Below is the same code as the top of this post with the most basic code changes applied:
Set myMail=CreateObject("CDO.Message") myMail.Subject="CDOSYS Email" myMail.From="robot@contoso.com" myMail.To="user@contoso.com" myMail.Configuration.Fields.Item("https://schemas.microsoft.com/cdo/configuration/sendusing") = 2myMail.Configuration.Fields.Item("https://schemas.microsoft.com/cdo/configuration/smtpserver") = “smtp.contoso.com” myMail.TextBody="This message is using CDOSYS." myMail.Send set myMail=nothing
The first configuration item (sendusing) tells the server the code wants to send email using a remote server (option '2'), which is specified below it. By default, the server will attempt anonymous authentication over port 25. There are configurations for authentication (smtpauthenticate), using SSL/TLS (smtpusessl), port (smtpserverport), and so on if needed. The tutorial site mentioned above utilizes some of those other configuration items. This MSDN link contains all the configurable options.
Resources
- Using CDOSYS in ASP: https://www.w3schools.com/asp/asp_send_email.asp
- Explanation of the SMTP Folders inside C:\inetpub\mailroot: https://www.vsysad.com/2014/01/iis-smtp-folders-and-domains-explained/
- CDO Configuration fields: https://msdn.microsoft.com/en-us/library/ms526318(v=exchg.10).aspx
- Securing SMTP Virtual Servers: https://www.microsoft.com/technet/prodtechnol/WindowsServer2003/Library/IIS/8ed22670-c66c-4295-be8b-3335b4eee45c.mspx?mfr=true
- Code tutorial: https://www.codeproject.com/Tips/754136/Send-email-using-classic-ASP
- Using Office 365 to send email: https://technet.microsoft.com/en-us/library/dn554323(v=exchg.150).aspx