Windows 8, Hyper-V, Vyatta Lab and Wireless adapter saga
I had some time recently to fine tune my lab environment on my laptop and thought I would share my experiences.
Microsoft was kind enough to provide me with a drive upgrade a couple of months back – a 250 GB Solid State Drive – Thank you Microsoft!!
I also took the liberty of purchasing an additional 128 GB Solid State to act as my OS drive.
So my setup is as follows:
- Lenovo W510 with 16GB RAM
- OS Drive: 128GB SSD
- Data Drive: 250GB SSD
I didn’t want to utilize my precious SSD space for ISO images so I still have my 1TB SATA external HDD that contain my bulky ISO’s that I use during my deployments.
My goal in my lab was very simple –
- Create a site resilient Exchange Server 2010 solution with a hardware load balancer.
- Configure a Hybrid deployment to Office 365.
- Use as little storage as possible.
First order of business was creating the virtual switches.
At this stage I didn’t want to create a situation where my VM’s might affect a customer production network where I might be working – and yes this has happened to me once before…many many moons ago…I won’t go into detail but I started providing DHCP IP’s to machines…hehehe, sounds funny now!
Anyway, the vSwitch configuration on Hyper-v is configured as follow:
External vSwitches:
- LAN pNic – vSwitch-LAN-Access
- WLAN pNic – vSwitch-WLAN-Access
- Planned Subnet: 192.168.41.0/24
Internal vSwitch:
- Internal only – vSwitch-Internal-Access
- Planned Subnets:
- 192.168.42.0/24
- 192.168.43.0/24
As seen above I planned on having two subnets internally within the Hyper-v environment and then my external home subnet for Internet access. I’ll then configure routing (I’ll cover this later) between these subnets to allow internet access and RDP from my home network.
Next step was to create my template VM.
- Deploy a VM called Template.
- Configure this VM with my base prerequisites – RDP, Hotfixes, whatever I wanted in the base.
- Sysprep this VM – OOBE with Generalize check box and Shutdown option.
This VM’s vhd will be used as the parent disk for all my other VM’s in the lab environment by using the Differencing disk feature.
Start deploying my VM’s as follow:
Save the following as PowerShell script and run in PowerShell window (Run as Administrator and change paths where required) :
 Import-module Hyper-v
$LABVMs =@('DC01';'DC02';’EX01’;’EX02’;’EX03’;’ADFS’;’SQL’;’LYNC’)

 Foreach ($LABVM in $LABVMs)

 {

 New-VHD -ParentPath "C:\LAB\TEMPLATE\Template.vhd" -Differencing -Path "D:\LAB\$LABVM\$LABVM.vhd"
 New-VM -VHDPath "D:\LAB\$LABVM\$LABVM.vhd" -VMName $LABVM -MemoryStartupBytes 1024MB -SwitchName vSwitch-Internal-Access
 Start-VM -Name $LABVM

 }
While the above executes go and download Vyatta Virtual Router here: https://www.vyatta.com/download/trial_software/VyattaCore
The reason I’m using Vyatta is that it has a very small footprint – less than 800mb.
Vyatta will act as my router between the subnets so it will require three interfaces:
- vNIC1 – Associated to vSwitch-LAN-Access
- vNIC2 – Associated to vSwitch-Internal-Access
- vNIC3 – Associated to vSwitch-Internal-Access
IMPORTANT: There are currently some issues with Windows 8 Hyper-v and Wireless LAN adapters – specifically routing via Wireless LAN adapters. If you assign the Vyatta interface to your Wireless LAN adapter the routing will NOT work. On top of that if you use the Wireless adapter and assign a static route on your Windows 8 machine to other subnets you will encounter an OS crash – I’ve replicated this behaviour a couple of times. Use the physical LAN adapter or you’ll be troubleshooting for hours. I’ve communicated this to the Hyper-v dev team as well – I’ll update this blog if I get a fix for this issue.
So to continue….
Create the Vyatta VM with the ISO downloaded and login with vyatta/vyatta.
My config is very simple no weird NATs or anything like that – just plain routing. I assign IP’s to my interfaces created.
#configure
#set interfaces ethernet eth0 address 192.168.41.254/24
#set interfaces ethernet eth2 address 192.168.42.254/24
#set interfaces ethernet eth3 address 192.168.43.254/24
#set system gateway-address 192.168.41.1
#set service ssh port 22
#save
#commit
As this is lab environment I didn’t bother with any other config as I didn’t require it.
Config looks like this:
interfaces {
ethernet eth0 {
address 192.168.41.254/24
duplex auto
hw-id 00:15:5d:29:04:3f
smp_affinity auto
speed auto
}
ethernet eth1 {
address 192.168.42.254/24
duplex auto
hw-id 00:15:5d:29:04:3e
smp_affinity auto
speed auto
}
ethernet eth2 {
address 192.168.43.254/24
duplex auto
hw-id 00:15:5d:29:04:40
smp_affinity auto
speed auto
}
loopback lo {
}
}
service {
ssh {
port 22
}
}
Next step was to add some static routes on my home router:
- Added a route to 192.168.42.0/24 using gateway IP 192.168.41.254
- Added a route to 192.168.43.0/24 using gateway IP 192.168.41.254
Next was configuring all my VM’s with static IP’s and using gateway IP of 192.168.42.254 or 192.168.43.254 depending on which subnet I want the VM in.
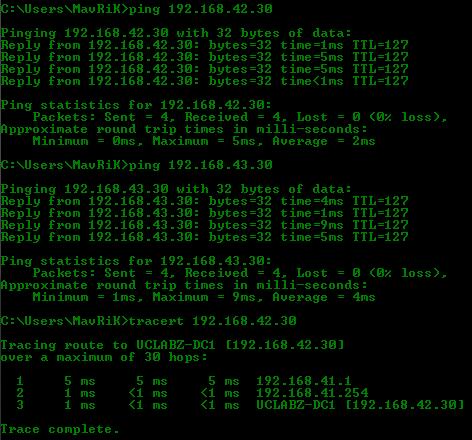
Test network – life is good:
And then you can create and configure your ADDS, Exchange Server 2010, SQL, Lync etc. as per usual. If you configure DHCP on your internal subnets it won’t breach the physical network, but you still have access to those VM’s via RDP from you physical network at home.
I can get about 12 VM's running on my Laptop with this parent/child configuration on the VHD's while the SSD drives are still idling along nicely and the laptop is still as responsive as always. My bottleneck at this stage is RAM.
Hope this helps anyone. I read alot of people struggling with Vyatta, but it’s really that simple.
Until next time…..
Michael
