How to create a bootable Vista DVD with your own custom WIM
and securely embed your MAK!
I've had several requests to document this since I posted the how-to on embedding your MAK in a custom WIM for departmental usage. The next logical step is to create your own DVD using this image. So if you haven't read my first article on this topic, now would be the time to go back and do so.
<edit - just a quick editorial note - although this does not expose your MAK in clear text, you should still be cognoscente of who you are trusting with an embedded key. See your licensing documents for more details.>
This operation is actually quite simple. Let's start out by assuming you have created a customized WIM by running setup and installing Vista on a workstation or VM, optionally using an autounattend.xml file on removable media, possibly including your MAK in pass 4 if desired. Run sysprep with OOBE and Generalize selected, shutdown, and finally capture the image either using ImageX or WDS. You could also automate the whole process, quite easily, using BDD (I did).
Next we leverage a tool that is conveniently provided with WAIK, named "oscdimg". This executable has been around for a long time as part of the OPK, and has for many years been a tool I keep handy. The process for building a custom DVD is very similar to creation of spanned media, so I recommend you also take a look at the article named "Create Spanned Media" in the WAIK User's Guide.
In addition to WAIK, we also need a Vista DVD image. Copy everything from the DVD in to a new folder, in my case I already had the files in my BDD deployment point.
Now, take your custom WIM image and rename it to install.wim. Copy or cut and paste this file in to the \Sources folder in the location where you copied your DVD.
Note: You can also specify the location of a custom WIM in an answer file using the "Install From" parameter. This way, you could point to a network location and use the original, unmodified Vista DVD.
<edit> - After further testing and feedback from a University customer, I discovered that if you would like to embed the MAK, it is also necessary to delete the PID.txt file from \Sources folder you copy from the Vista DVD. Otherwise the default KMS client key will be injected and the MAK will be overwritten after the image has been applied. The result is the media will prompt for a key but if none is provided and the user selects "Next" and then "No", the embedded MAK will be used.
Now open a command prompt as Administrator and execute the following command. This will initiate the process of building your ISO using the etfsboot.com file to make the image bootable.
C:\Program Files\Windows AIK\Tools\PETools>oscdimg -n -m -b"c:\program files\windows aik\tools\petools\x86\boot\etfsboot.com" "<location where you copied the Vista DVD>" "<location and filename where you want the new DVD image>.iso" |
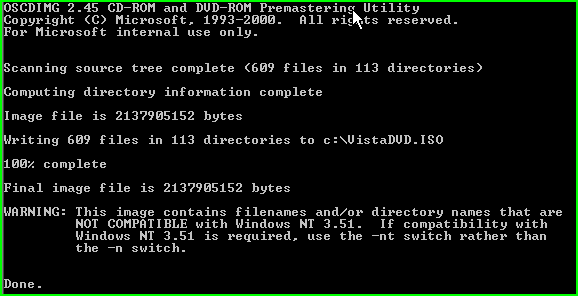
If all went according to plan, you should see the following operation complete successfully. Typically if I have an error it was a bad keystroke or I left a backslash (\) at the end of the string for "location where you copied the Vista DVD". BTW, that's the root folder where you copied the DVD where setup.exe is located, not the \Sources folder.
You can now boot a VM from the ISO to test or burn it to disc and boot a workstation from it. Note than any pass 4 settings that you applied during setup using an answer file on the original machine where you captured the WIM will be retained in the cached c:\windows\system32\sysprep\panther\unattend.xml. If you followed the instructions from my first article, that file would at minimum include your MAK which would now be stored securely within the WIM file on the DVD.
Technorati tags: Windows, Vista, DVD, custom image, activation, MAK