The magic re-imaging USB key
By now you should have a basic understanding of windows imaging using .WIM technologies and ImageX. In the WAIK there is an update for Server 2003 to install WDS, Windows Deployment Services. Many customers in the past have simply staged Windows images on a file share and boot to Windows 98 boot disks to apply them. If that is your existing process, WDS can be leveraged in much the same way and offers a richer and more flexible solution.
WDS is the next evolution of RIS. If you are an administrator of a RIS environment WDS will offer a familiar set of features, using PXE boot to contact the server and apply images. For many schools PXE is not an option or not all machines support PXE.
You may remember RIS has a tool named RBFG that allowed creation of a floppy boot disk for machines that do not support PXE. WDS has a very similar tool named a "discover boot image". This is a copy of WinPE with Windows setup embedded that looks for a WDS server. A USB key is supported WinPE media in Vista and that makes for a very attractive combination. When your technicians are working with customers they simply insert the key and reboot. The machine would completely re-image itself with whatever prompts you would like, authentication, drive configuration, image selection, computer name, or even no prompts at all.
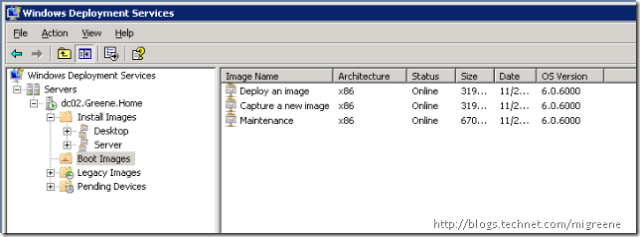
To create the discovery image you must first import a boot.wim from your Vista DVD in to WDS. You can name these images however you wish. I like to name boot.wim "Deploy an Image", then create a capture image and import the new WIM as "Capture a new Image", and finally import the WinPE.wim from WAIK and call it "Maintenance. These are the names that will appear in the network boot options when you PXE boot a machine.
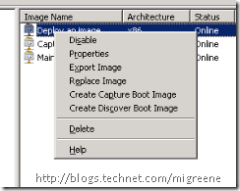
Next, right click on your boot.wim import and select "Create Discover Boot Image".
This will create a new WIM file. You can name it whatever you please and store it in a folder of your choosing. Now reference the WAIK for instructions on putting in on a USB key.
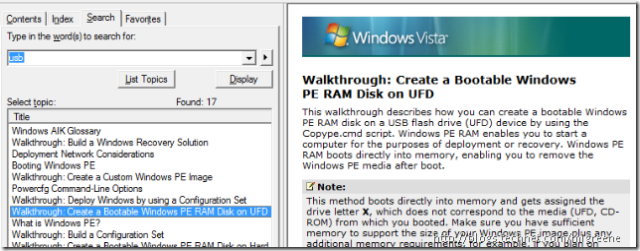
Using the walkthrough, create a bootable USB key but use the new WIM file you created for the discovery image rather than the WinPE.wim file from WAIK.
Finally, create an answer file in system image manager containing the options you would like to suppress such as authentication, default language, drive configuration and image selection. In WDS, view the properties of your server and set the correct file for your architecture under "enabled unattended installation".
WDS is a very attractive solution for schools because it is very simple and inexpensive to deploy, and it offers very flexible solutions for technical administrators who are familiar with booting to a disk and applying an image. With WDS, you have the benefits of a full 32-bit boot environment with Windows setup as the GUI, or of course you could suppress all setup questions and make this your "magic re-imaging USB key".