Lync with Polycom RMX Integration
This Blog describes the integration between Microsoft Lync and Polycom RMX 2000
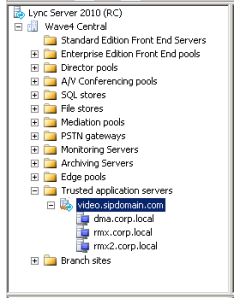
Create the Polycom RMX pools
Using the configuration in in the below figure, The application Pool video.sipdomain.com can be used as the Match URI for dialing.
The two "Device" RMX SIP signaling (FQDN) domains are rmx.corp.local and rmx2.corp.local are used as destination routes.
Add the Polycom RMX FQDN (SIP signaling IP address) in DNS
To register with Lync Server 2010, the POLYCOM RMX SIP signaling domain must be accessible via a DNS server for Lync Server 2010.
The POLYCOM RMX system and the Lync Server both need to resolve the POLYCOM RMX host record identically, regardless of the domain selected to store the DNS Host record.
Set the Routing for the Polycom RMX System
Use Lync Powershell to set the Polycom RMX system as a trusted host with a static route
1 Navigate to Start > All Programs > Microsoft Lync Server 2010 > Lync Server Management Shell to open the Lync Powershell terminal.
2 Use the New-CsStaticRoute command to set up a static route for the RMX system.
$route = New-CsStaticRoute -TLSRoute -destination " rmx.sipdomain.com " -port 5061 -matchuri " video.sipdomain.com " -usedefaultcertificate $true
where rmx.sipdomain.com is the FQDN of the RMX SIP signaling domain and video.sipdomain.com is the name of the Trusted Application Pool you created.
3 Set the routing configuration. By configuring the static route, matched URI dialing is enabled.
The following example sets the route to be global:
Set-CsStaticRoutingConfiguration -identity global -route @{Add=$route}
4 Optional. To check that the commands were entered correctly in the Powershell, enter:
Get-CsStaticRoutingConfiguration
Use Lync Powershell to create the trusted application
1 Navigate to Start > All Programs > Microsoft Lync Server 2010> Lync Server Management Shell to open the Lync Powershell terminal.
2 Use the New-CsTrustedApplication command to set up a trusted application for the RMX system.
New-CsTrustedApplication -applicationId VideoProxy -TrustedApplicationPoolFqdn video.sipdomain.com -port 5061
Use Lync Powershell to update the topology
1 Navigate to Start > All Programs > Microsoft Lync Server 2010> Lync Server Management Shell to open the Lync Powershell terminal.
2 Use the Enable-CsTopology command to update the Lync topology.
Enable-CsTopology
The Polycom RMX system is now set as a trusted host, and calls from an Lync client to a SIP address in the Polycom RMX system’s domain will be routed through that system.
Create a Security Certificate for the Polycom RMX
You must install a security certificate on the POLYCOM RMX system so that Lync Server trusts it. This can be accomplished in two ways:
•Purchase and install a certificate from a commercial Trusted Root Certificate Authority (CA) such as VeriSign or Thawte. Use the procedures in the POLYCOM RMX system’s documentation for Certificate Management to create a Certificate Signing Request and to install the certificate(s) received from the CA.
•Request and obtain a certificate from your enterprise CA. You can do this in two ways:
—If certificate requests must be submitted through the enterprise’s CA team or group, use the procedures in the POLYCOM RMX system’s help for Certificate Management to create a Certificate Signing Request and to install the certificate(s) received from the CA team or group.
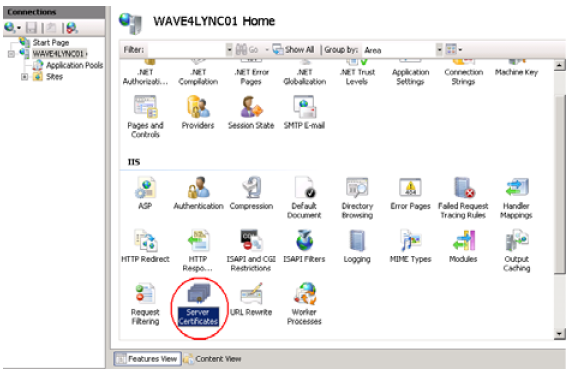
To request a security certificate for the POLYCOM RMX system using IIS Manager 7
- On the Lync Server, select Start > All Programs > Administrative Tools > Internet Information Services (IIS) Manager (7.0) to open IIS 7.
- Under Connections, double-click the server name.
- In the Features View, double-click Server Certificates under IIS.
- In the Actions pane (far right), select the Create Domain Certificate action. (The Create Certificate wizard displays.)
- In the Distinguished Name Properties panel, complete all fields. Do not leave any fields blank.
— In the Common Name field, enter the FQDN of POLYCOM RMX SIP signaling interface.
— Do not leave any fields blank.
6. Click Next.
7. In the Online Certification Authority panel, select a Certificate Authority from the list and enter a friendly name.
8. Click Finish.
Your certificate is created.
To use the Microsoft Management Console to export the created certificate
- Open Microsoft Management Console and add the Certificates snap-in, if it has not been added already.
- Choose File > Add/Remove Snap-in.
- Select Certificates from the Available Snap-ins area and click Add.
- On the Certificates snap-in page, select Computer Account and click Next.
- On the Select Computer page, select Manage Local Computer.
- Click Finish.
- Click OK.
- Browse to Certificates (Local Computer) > Personal > Certificates.
4. Right-click the created certificate and select All Tasks > Export… to view the Certificate Export wizard.
5. In the Certificate Export wizard, do the following:
- In the Export Private Key panel, select Yes, export the private key.
- Click Next.
- In the Export File Format panel, select Include all certificates in the certification path if possible.
- Click Next.
- In the Password panel, enter a simple password, e.g., password.
- Click Next.
6. In the File to Export panel, enter a path where you want to save the new file, e.g., c:\temp\pbxcert.pfx.
Import the certificate
Create a flat text file and enter the password you chose for the certificate
Once the *.pfx file is on your PC, you can upload it to the Polycom RMX system and install it, you need to Upload the certificate and the password text file at the same time.
Creating Lync Entries for Polycom RMX
1- Create New Contact Object on AD Server ”DC.sipdomain.com”
Make sure that the Display Name matches what you’d like your users to see in the lync 2010 client.
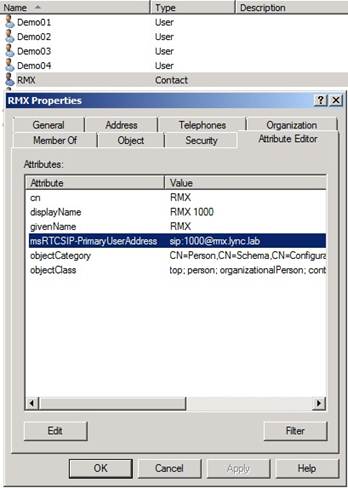
2- Locate your contact object; Open its properties and Select Attribute Editor.
3- Set the msRTCSIP-PrimaryUserAddress to sip:<MeetingRoomID>@<RMXRoutingAddress>. For example: sip:1000@video.sipdomain.com
4- Synchronize the Lync Address book with AD by running the command “Update-CsAddressBook –Verbose” using lync Management shell on lync server “se.sipdomain.com”
5- Once the address book has synchronized & your client has downloaded the updated address book file, you will be able to find the room by name in Lync 2010 Client.
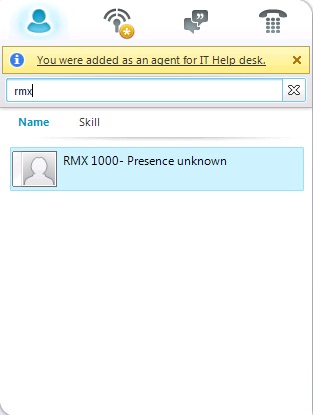
Note:
- You can force the Address book download by deleting the cached one “\Users\%ALIAS%\AppData\Local\Microsoft\Communicator”
- Since the RMX is not registering to Lync the presence will show as unknown.