ADAM: A powerful and flexible directory solution
Many of you will no doubt be aware that Microsoft released Active Directory Application Mode, otherwise known as ADAM, along with the release of Windows Server 2003 R2. ADAM is essentially an LDAP directory service specifically designed for directory enabled applications. It can be used when you want to provide an LDAP directory service for an application, where you don’t want to use Active Directory. There can be many reasons for this, the AD schema may not be suitable and you want to customise the schema to meet the applications specific needs or you simply may want to separate the application data from your production AD.
One of the great things about ADAM is its flexibility. It does not need Active Directory as an installation requirement, so it can be installed on a standalone server running Windows 2003 or on a workstation running XP. This flexibility means that you can implement an ADAM instance quickly and easily and use it for any purpose you want where you need an LDAP directory. For example the Exchange 2007 Edge server role, typically deployed in a perimeter network, uses an ADAM instance to hold user object details rather than exposing Active Directory to potential security threats.
ADAM is based on Active Directory and gives you many of the benefits associated with it, such as multi-master replication. It does not have the core NOS functionality of AD, such as Kerberos or DNS, but then it doesn’t need them. You get exactly what you need for creating a powerful LDAP directory solution without the overhead of a full blown Active Directory implementation. I’ve found it to be really handy in a number of situations. For example, developers who are writing an Active Directory aware application can use an ADAM instance on their own workstation for test and development rather than requiring access to a test AD forest. You can also run multiple instances on a single server/workstation if required.
Recently one of my customers asked me if it was possible to create a consolidated view of 2 separate LDAP directories in their organisation. One of these was used for authentication onto a UNIX platform and the other was acting as a repository for all users mail addresses. The quick and easy answer to the question was “Yes, use ADAM to create a central LDAP directory and then use vbscripts with ADSI to populate ADAM with the relevant user details from both directories.” The customer was able to implement this quickly, easily and cheaply using ADAM – I felt this was a perfect example of how the product can be used to meet this sort of requirement.
Installing ADAM and creating an ADAM instance is a straightforward task. The entire process takes about 10 minutes end to end:
- Download ADAM if you don’t already have it with Windows Server 2003 R2. It can be downloaded free of charge from:
- Run the executable to install ADAM
- From the Start Menu navigate to Start, Programs, ADAM and choose “Create an ADAM instance”. Click Next on the first screen You will then see the following:
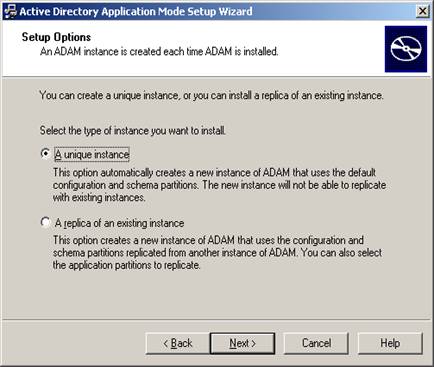
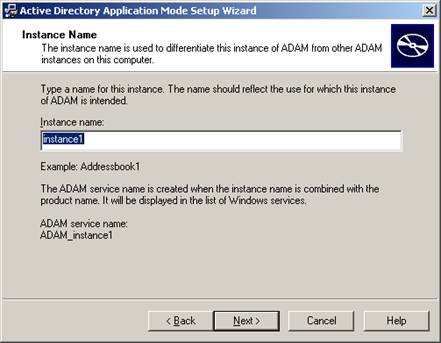
- Choose to create a unique instance and click Next. Choose a name for the instance on the next screen as follows and click Next:
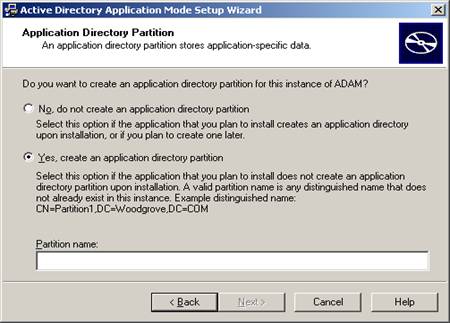
- On the next screen choose an LDAP and an SSL port number for connections to use. Feel free to use 389 as the LDAP port, as long as the server is not a domain controller, will ever be a domain controller or is already hosting an LDAP application which uses 389. Click Next to continue. On the next screen choose to create an application directory partition and give it a distinguished name as shown in the next screenshot. This will be the name you use to access the directory partition, for example cn=testadam,dc=mydir,dc=com
- Accept the defaults on the next 5 screens and you’re done! You now have a fully functional LDAP directory.
For more information on ADAM, including white papers and FAQ’s check out the following link:
https://www.microsoft.com/windowsserver2003/adam/default.mspx