Assigned Access with Intune and AssignedAccess CSP - Part I
Hello all,
Back again, much faster this time around! This two part blog picks up or adds to my last blog regarding creating AppLocker policies with AppLocker CSP and Intune. If you missed that post, check it out here:
Summary
In my previous blog post, I mentioned my thoughts on the whitelisting approach to blocking application activity on devices. I mentioned that when an administrator desires to take a whitelisting approach, they want to lock down the application activity on their devices. I also mentioned that leveraging a whitelist approach will, more than likely, result in a ton of Allow rules in your AppLocker policy. And finally, I mentioned that for those who want to take a whitelisting approach, why not consider leveraging an Assigned Access profile? This two part blog is going to explain what Assigned Access is, the use cases for it, and how to create an Assigned Access profile in Intune. In this part, we'll discuss the background of our strategy, examine the docs, and build our XML. In part II of the blog, we'll configure our policy in Intune and validate our results.
NOTE: While you can certainly deploy an Assigned Access profile to an already provisioned device that is enrolled in Intune (for the policy to apply, the user must log out and back into the device), this blog will assume you are provisioning devices with Windows 10 Autopilot. We will not cover configuring Windows 10 Autopilot in this blog. If you have not already setup Windows 10 Autopilot, below is a bulleted list (in order) to get you started on configuring Windows 10 Autopilot before jumping in on this blog:
- Gather device hardware IDs - https://blogs.technet.microsoft.com/mniehaus/2017/12/12/gathering-windows-autopilot-hardware-details-from-existing-machines/
- Prepare the Intune tenant for Windows 10 Autopilot - /en-us/intune/enrollment-autopilot
- Configure an Enrollment Status Page in Intune - https://github.com/MicrosoftDocs/IntuneDocs/blob/master/intune/windows-enrollment-status.md
Pre-Requisites
- Windows 10 Autopilot is configured in your Intune tenant
- Devices that are at least Windows 10 1709
- Devices that are physical in nature. NOTE: It is possible to test with a VM, but works best with a physical device. More on this later
- Azure AD group that contains users who will log into devices that will leverage the Assigned Access policy
What is Assigned Access and Why Use It?
With Assigned Access, an administrator can limit an existing user account to use only one or multiple installed Windows apps that they choose. This can be useful to set up single-function devices, such as restaurant menus or displays at trade shows (kiosks). Or, it can be useful for provisioning highly restricted devices. Use cases for this would include provisioning of contractor devices, multi-user devices, training room devices, or for admins who want to restrict their user base to certain activity. Our example will follow that of an admin who wants to restrict a subset of different users on their devices.
Now, if you are aware of the feature set in Intune, you may be aware that I'm already describing a feature that exists in Intune. And you would be correct, to an extent. At the time of writing this blog, Intune currently has a feature called Kiosk Mode. However, it is in preview. This means you can use the feature, but should not use the feature for wholesale use as results can be inconsistent since the feature is not generally available yet. If you have already tested this feature thoroughly, you know this to be the case. I have tested the feature and it's great! I can't wait to see it fully ready and how it will evolve over time. But it's not ready for primetime just yet. Unfortunately, kiosk mode does not work with an Enrollment Status Page, which is also in preview. The importance of the Enrollment Status Page is that this page keeps the device in OOBE so all the Intune policies and applications are applied/deployed to the device so that when the user logs on, it's ready to go and there is no need to wait for policy to come down for the device. Specific to Assigned Access policy, we want the policy applied from the moment the user is logged in rather than waiting on the policy to come down, be applied, and requiring the user to log out and back in for the Assigned Access profile to take effect. Also, kiosk mode (Preview) is also limited to Windows 10 1803. If your devices are not Windows 10 1803, the policy will not be applicable and Intune will let you know that in the policy configuration status node.
Lastly, I'll be the first to admit that everything I just said and everything you read below becomes a moot point over time as Windows 10 1803 becomes standard across organizations and kiosk mode in Intune becomes a full fledged feature in Intune. In the meantime, all is not lost! We can leverage the AssignedAccess CSP for devices that are at least Windows 10 1709 to deploy an Assigned Access profile. Buckle up, this ride is bumpy and a little complex, but we'll get through it!
The Plan
I love it when a plan comes together! Bonus points if you know where that saying comes from. As always, the legwork has been completed already to provide this example so you don't have to struggle though it. For those of you who read my blogs religiously, you know I'm a documentation fiend. So our first item is to consult the documentation on the AssignedAccess CSP.
/en-us/windows/client-management/mdm/assignedaccess-csp
Let's examine the docs:
First thing we want to understand is our OMA-URI path. We see from the documentation that the OMA-URI path is:
./Device/Vendor/MSFT/AssignedAccess/Configuration
We also see from the documentation that Configuration setting was added in Windows 10 1709 devices and is used to configure the settings of our Assigned Access policy. Reading the documentation further, we see the policy setting requires an XML and it must be a string value. And that's about it for the documentation. It's a lot of information, but there are still questions on how we need to approach this. Continuing down in the documentation, there is an AssignedAccess XML example that is provided. However, there isn't much context around what any of contents of the XML means. We can find that information in the link below. You should review this in order to understand the XML contents better:
/en-us/windows/configuration/lock-down-windows-10-to-specific-apps
From reviewing the example XML tags, it gives us our outline on how we need to build this policy.
- <AllowedApps> tag - We need to build our list of apps we want to allow in the XML
- <StartLayout> tag - We need to provide a Start Menu layout in the XML
- <Account> tag - We need to configure an account config in the XML
I have provided a sample XML file as part of this blog. It will be much easier on you to use the provided sample. Before we move on any further, I want to call out a couple pitfalls in the documentation XML example. Just as I mentioned in the AppLocker blog, a subset of the example XML is what is needed as part of the string value for our policy and that was not called in the documentation. <?xml version="1.0" encoding="utf-8" ?> should not be included in the string value for your policy. Everything else in the XML is fine. If you include this line in your XML, you'll get a Remediation Failed error.
The next pitfall is the <Account>MultiAppKioskUser<Account/>. The bolded text in the previous sentence is merely a placeholder. This is not called out in the docs. So if you don't update this configuration, thinking it is a universal variable of sorts, and you leave this as is in your string XML, you'll get a Remediation Failed error. I'm probably being a little critical of our docs here, but I can see where this could cause confusion and frustrate someone to no end.
Building the XML
Earlier we mentioned by reviewing the example XML, we see the steps we need to do to build our XML file. The first step is building our AllowedApps list. Let's review an <AllowedApps> section example: Apologies for the formatting, but for some reason, I can't indent the text to look like typical a XML tree.
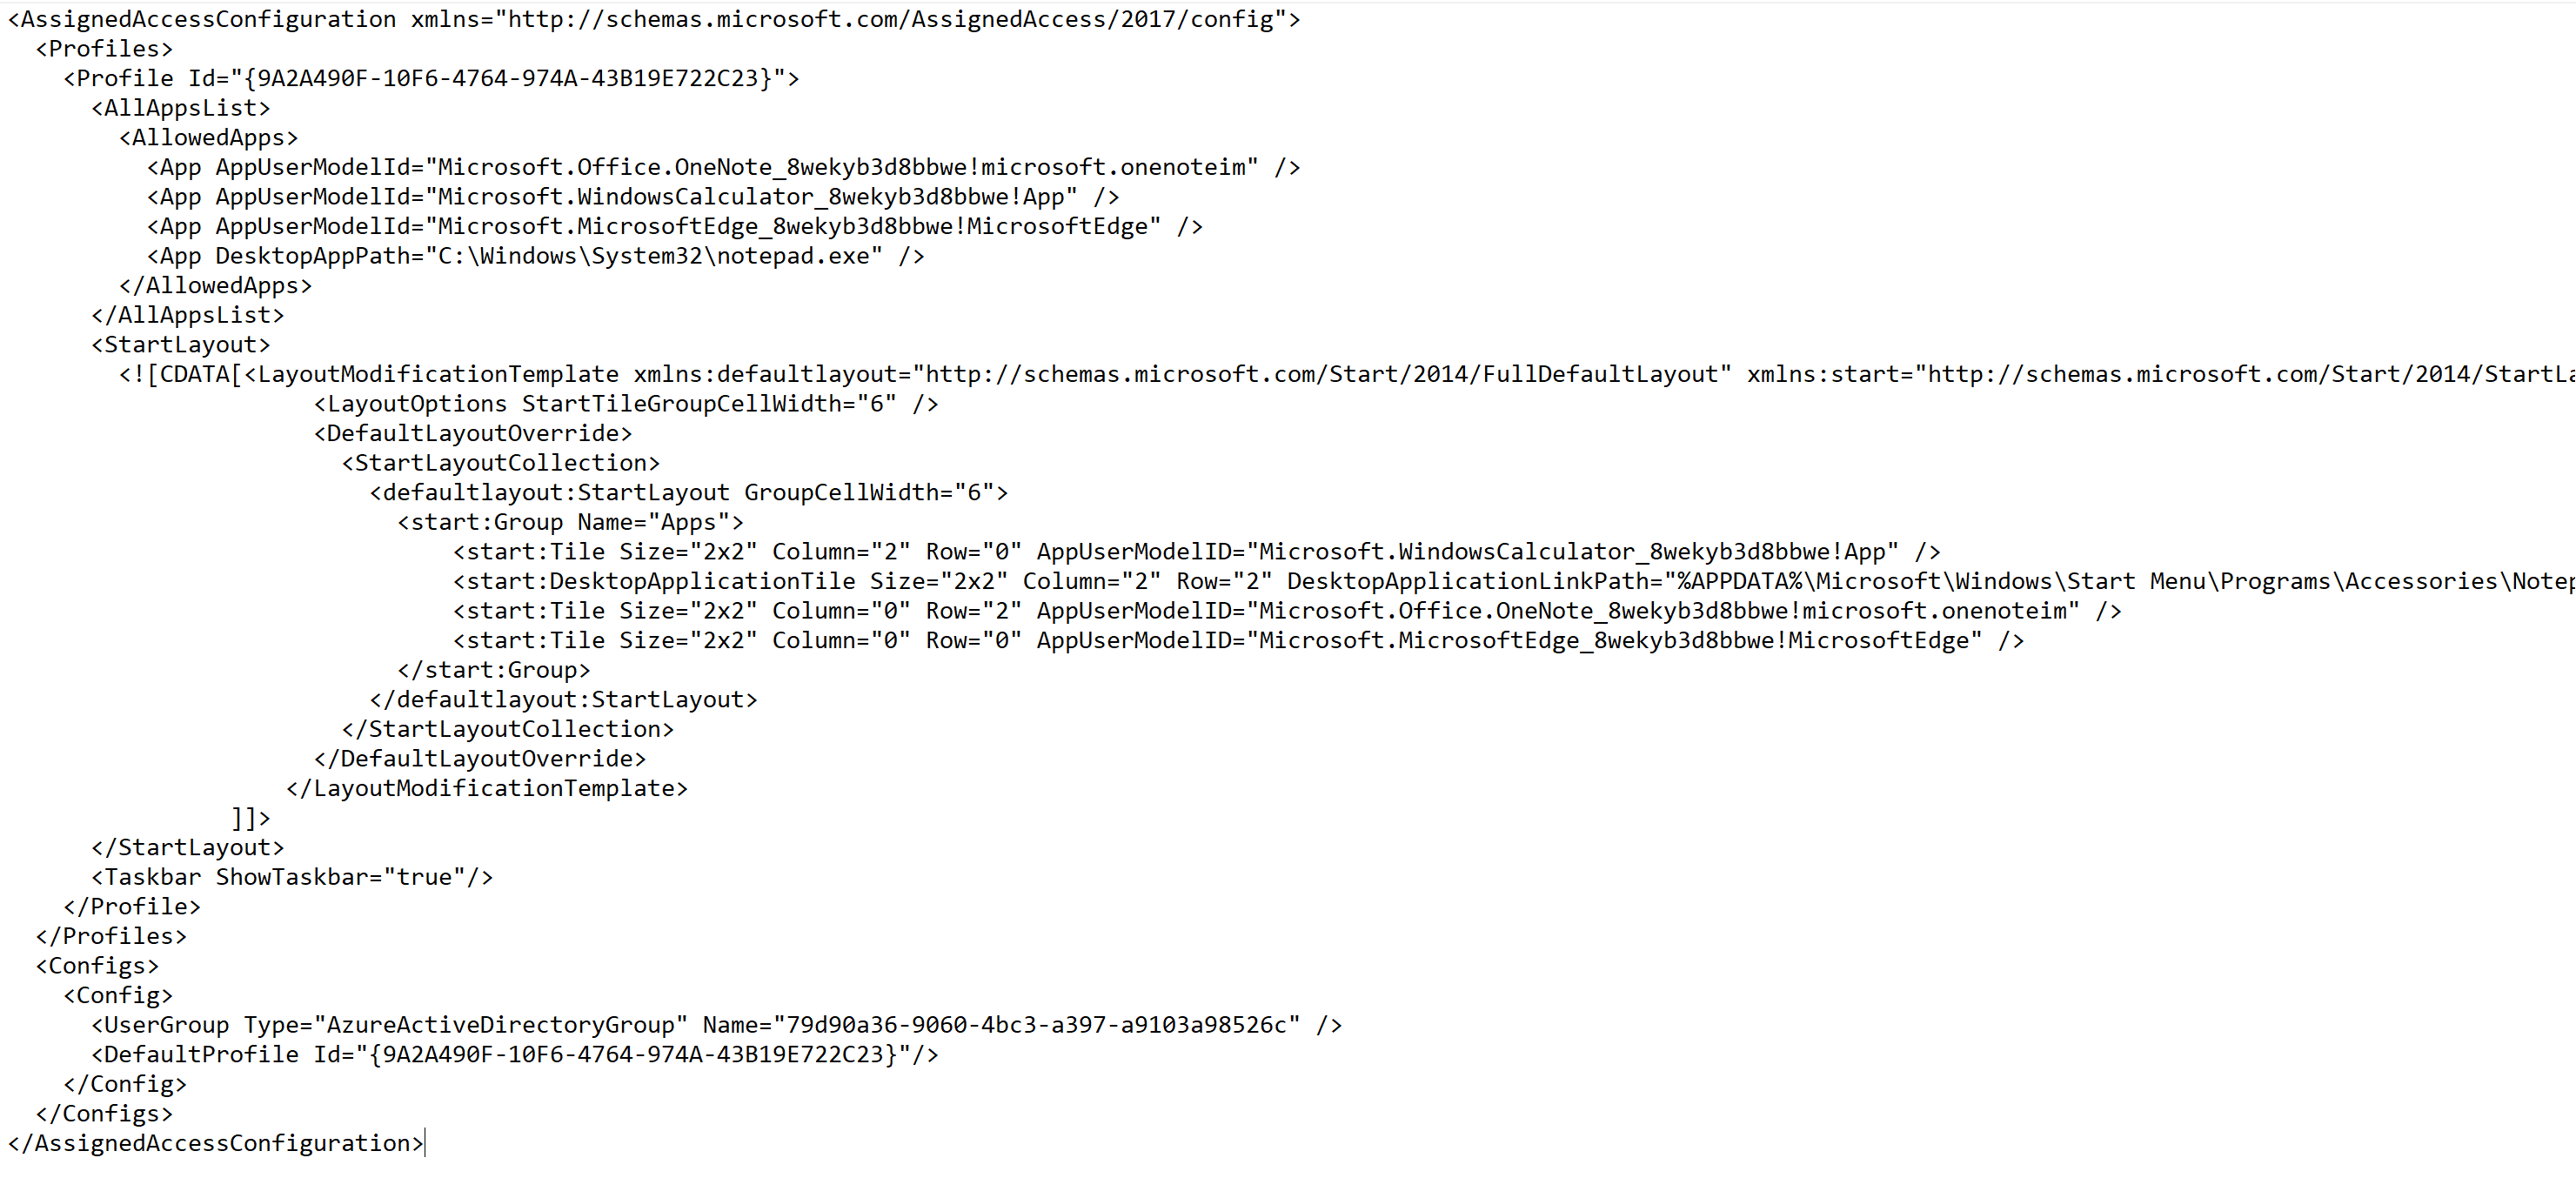
<AllAppsList>
<AllowedApps>
<App AppUserModelId="Microsoft.ZuneMusic_8wekyb3d8bbwe!Microsoft.ZuneMusic" />
<App AppUserModelId="Microsoft.ZuneVideo_8wekyb3d8bbwe!Microsoft.ZuneVideo" />
<App AppUserModelId="Microsoft.Windows.Photos_8wekyb3d8bbwe!App" />
<App AppUserModelId="Microsoft.BingWeather_8wekyb3d8bbwe!App" />
<App AppUserModelId="Microsoft.WindowsCalculator_8wekyb3d8bbwe!App" />
<App DesktopAppPath="%windir%\system32\mspaint.exe" />
<App DesktopAppPath="C:\Windows\System32\notepad.exe" />
</AllowedApps>
</AllAppsList>
Notice the red text above. The first line is an example tag for a UWP app that we want to allow leveraging the <App AppUserModelId> tag. The bottom two lines are an example of EXE apps that we want to allow leveraging the <App DesktopAppPath> tag. Looking at the values of these tags, the <App DesktopAppPath> tag is pretty easy to discern. The examples show you can use a literal path or system variables as part of the value. Leveraging a test device, that is of the same version you plan on deploying the policy, simply open up File Explorer and find the paths of the EXE you want to allow. Copy and paste the paths into the "" for the <App DesktopAppPath> tag. Then copy and paste the entire line to the next line in the XML. Rinse and repeat until you have added all the EXE files you want to allow.
Now the <App AppUserModelId> tag is a bit more challenging just because of the lovely ID format that UWP apps use. In order to get the AppIDs, run the following Powershell script on a test device that is of the same version you plan on deploying the policy:
$installedapps = get-AppxPackage
$aumidList = @()
foreach ($app in $installedapps)
{
foreach ($id in (Get-AppxPackageManifest $app).package.applications.application.id)
{
$aumidList += $app.packagefamilyname + "!" + $id
}
}
$aumidList | Out-File -FilePath C:\AUMIDList.txt
Again, apologies for the formatting. But the Powershell script above will spit out a text file with all the IDs for the UWP apps. Open the text file and review the IDs of the apps you wish to allow. Similar to the way you configured your <App DesktopAppPath> tags, simply copy and paste the App ID into the "" for the <App AppUserModelID> tag. Then copy and paste the entire line to the next line in the XML. Rinse and repeat untl you have added all the modern apps you want to allow.
<StartLayout>
The <StartLayout> section is much easier to obtain. On a test device that is of the same version of Windows 10 that you wish to deploy the policy to, configure the Start menu tiles to your liking. For Assigned Access profiles, you'll only want to include the tiles that correspond to your Allowed apps in your policy.
Once you are happy with the Start menu, open up Powershell and run the following Powershell script:
Export-StartLayout -Path C:\Start.xml
Once you have the Start.xml file, open the Start.xml in Notepad and copy the entire contents of the Start.xml into the policy XML under the <StartLayout> in between the <![CDATA[ ]]> tag. If this is confusing, review the example in the documentation to understand where you should paste the Start.XML contents.
<Account>
The last item we need to configure is the <Account> tag. At the linked doc within the AssignedAccess CSP docs:
/en-us/windows/configuration/lock-down-windows-10-to-specific-apps
We can see the different account types we can configure here. We can configure local users, domain users, Azure AD users. We can also configure user groups such as local groups, AD groups, and AzureAD groups. In our example, configuring an Azure AD group is ideal as we want the policy to apply to multiple users. In order to leverage an AzureAD group, we need to get the group ID of the Azure AD group that contains the users you wish this policy to apply to.
- Open a browser and go to portal.azure.com
- Open the Azure Active Directory blade
- Open the Groups blade
- On the Groups blade, search for the group that contains the group of users you wish the Assigned Access policy to. Click on the Group
- In the left pane, click Properties
- Copy the Object ID of the Azure AD group and notate this
Now that we have our Azure AD group ID, let's build the <Account> tag, which for us, is actually the <UserGroup> tag since we are leveraging an Azure AD group
<Configs>
<Config>
<UserGroup Type="AzureActiveDirectoryGroup" Name="79d90a36-9060-4bc3-a397-a9103a98526c" />
<DefaultProfile Id="{9A2A490F-10F6-4764-974A-43B19E722C23}"/>
</Config>
</Configs>
Within the <UserGroup> tag, copy the Azure AD group Object ID you notated earlier between the "" of the Name value. See above for an example.
Once you have completed this section, you are done! Save your XML. We will use this XML in the next blog to configure our Assigned Access policy in Intune.
Wrap Up
You can see why I split this up into a two part blog! I told you it'd be bumpy, but we got through it. The hard part is over. Nice job! In the next part, we'll configure the Intune policy and deploy it out and we'll validate the results of our Assigned Access policy.
Here is the link to download the sample XML for our example:
https://1drv.ms/t/s!Avb5Zr26pC54gt5AaxHwwsSvZWqHUw
Ready to keep going? Part II is below.
And now, the obligatory disclaimer for the provided example at the link above:
© 2018 Microsoft Corporation. All rights reserved. Sample scripts or files in this blog are not supported under any Microsoft standard support program or service. The sample scripts or files are provided AS IS without warranty of any kind. The entire risk arising out of the use or performance of the sample scripts and documentation remains with you. In no event shall Microsoft, its authors, or anyone else involved in the creation, production, or delivery of the scripts be liable for any damages whatsoever (including, without limitation, damages for loss of business profits, business interruption, loss of business information, or other pecuniary loss) arising out of the use of or inability to use the sample scripts or documentation, even if Microsoft has been advised of the possibility of such damages.