22 Minutes to 2nd Place in a Kaggle Competition, with Deep Learning & Azure
This post is the second in a three-part series by guest blogger, Adrian Rosebrock. Adrian writes at PyImageSearch.com about computer vision and deep learning using Python. He recently finished authoring a new book on deep learning for computer vision and image recognition.
Introduction
A few weeks ago I wrote a blog post on deep learning and computer vision in the Microsoft Azure cloud that was meant to be a gentle introduction to Microsoft's Data Science Virtual Machine (DSVM). Today we're going to get a bit more hands-on and practical, beginning with an email I received from PyImageSearch reader, Kostas:
"Hey Adrian, I'm interested in competing in Kaggle competitions (in particular the computer vision ones). I have some experience in computer vision and machine learning/deep learning but not a lot. Is it even worth my time? Do I even stand a chance against other competitors?"
Great question, Kostas — and I'm sure you're not alone feeling this way.
Let me answer your question with a story:
When I first set out to write my new book, Deep Learning for Computer Vision with Python, my goal was to create a book/self-study program that was accessible to both novices and experienced researchers and practitioners.
We start off with the fundamentals of neural networks and machine learning, and by the end of the program you're training state-of-the-art networks from scratch.
It's a logical, progressive education program that takes you from novice to experienced practitioner – makes sense, right?
But a funny thing happens along the way…
By the time you're ~25% through the book you have enough experience to start seeing computer vision problems through a deep learning practitioners eyes.
Problems that you once thought were near impossible are now obtainable — and in some cases, solvable using a specific technique.
A great example of this is the Kaggle Dogs vs. Cats challenge:
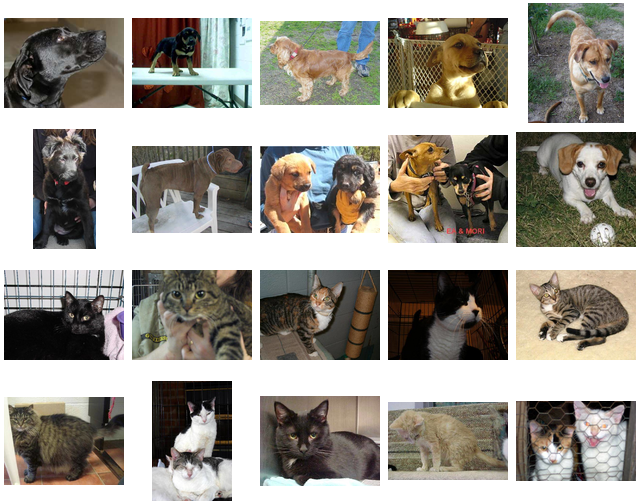
The goal is simple:
Classify an input image as either a dog or a cat.
For us, that's easy — the human brain can easily tell the difference between these two household pets.
But a computer?
Not so easy. All a computer sees is a big matrix of 0's and 1's.
How can we learn patterns in these images, enabling us to discern dogs from cats?
When this challenge was released back in 2014, it was incredibly popular.
It was challenging for researchers and engineers. It brought a lot of attention due to the (seemingly) simplicity of the problem. And who doesn't enjoy looking at cute animals?
Over 200 teams competed in this challenge. Hundreds of algorithms and associated variations were tried. Thousands of hours of computation were poured into it.
But today?
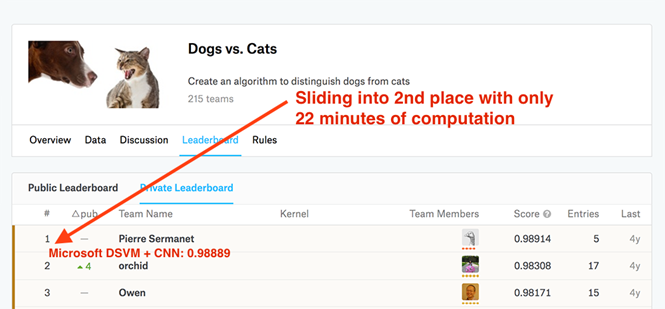
We can achieve the equivalent of 2nd place in this challenge using features extracted from a pre-trained Convolutional Neural Networks.
And the best part is, using Microsoft's Data Science Virtual Machine, which comes pre-installed with all our necessary computer vision and deep learning libraries, we'll be able to achieve this 2nd place result in only 22 minutes!
Grab my Jupyter Notebook with all the code here, spin up an Ubuntu DSVM instance, and set your stop watches!
Transfer Learning via Feature Extraction
Typically, we think of Convolutional Neural Networks as end-to-end image classifiers:
- We input an image to the network
- The image forward propagates through the network
- We obtain the final classification probabilities at the end of the network
However, there is no "rule" that says we must allow the image to forward propagate through the entire network.
Instead, we can stop the propagation at an arbitrary layer, such as an activation or pooling layer, extract the values from the network at this point, and then use the extracted activations as feature vectors.
For example, let's consider the VGG16 architecture by Simonyan and Zisserman:
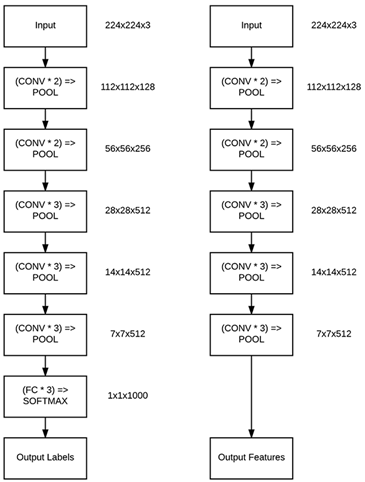
On the left we have the original VGG16 architecture that outputs probabilities for each of the 1,000 ImageNet class labels.
To turn the network into a feature extractor, we can conceptually "remove" the fully-connected layers from the network and instead return the output of the final pooling layer (right) – this output will serve as our feature vector.
Since CNNs trained on the ImageNet dataset tend to learn a rich set of discriminating filters, we can often use these pre-trained networks on datasets they were not trained on – we call this process transfer learning.
We can transfer the knowledge of our CNN trained on the ImageNet dataset and apply the knowledge learned encoded as feature vectors and later train a simple machine learning model (such as a Logistic Regression classifier, Linear SVM, etc.) on top of the feature vectors.
Downloading Kaggle: Dogs vs. Cats
To see how this process works, make sure you download:
- My Jupyter Notebook which includes the cover covered in this post.
- The Kaggle Dogs vs. Cats dataset.
For the sake of simplicity, we will not be submitting the testing set to the evaluation server. Instead, just download "train.zip" file.
NOTE: If you try to use "test1.zip" we won't be able to extract the class labels from the file paths. Do not download "test1.zip".
Once you have "train.zip" downloaded, unarchive it, and you'll have a directory named "train" filled with 25,000 JPG images of dogs and cats.
From here, we can apply transfer learning.
Transfer Learning on the DSVM
To follow along, make sure you download the Jupyter Notebook associated with this post.
The first step here is to grab the paths to all 25,000 images in the Kaggle Dogs. vs. Cats dataset (cell 3):
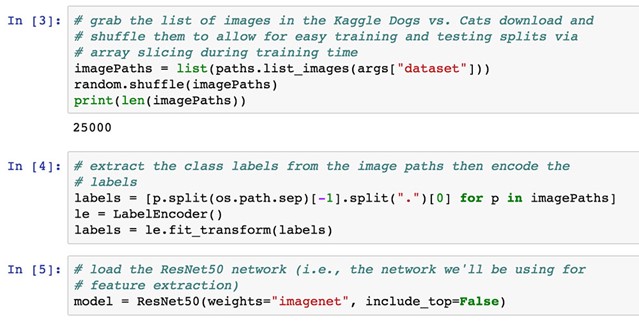
All files in the Dogs vs. Cats dataset have filenames such as "cat.153.jpg" or "dog.4375.jpg" – since the class labels are baked right into the filenames, we can easily extract them (cell 4).
In order to perform feature extraction, we need a pre-trained network – ResNet50 is a good choice for this application (cell 5). Notice how we have set include_top=False to leave off the fully-connected layers, enabling us to easily perform feature extraction.
Once we have all image paths we need to loop over them individually and build batches to pass through the network for feature extraction.
The entire loop is too much to review in this section (please see our Jupyter Notebook with thoroughly documented code), but the most important code snippet can be seen below:
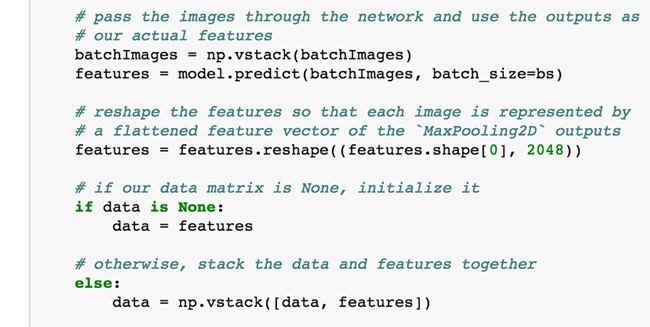
For each batch of images, we pass it through the network, and treat the output of our max pooling layer as our features. We flatten the output of the max pooling layer into a 2048-d feature vector. The features are stacked together in a data matrix, so we can train a model on them.
For 25,000 images, the entire data matrix takes up ~204MB of RAM, easily manageable by even the most modest of machines.
The entire feature extraction took 22min 48s using the Ubuntu DSVM (which again, we did not have to manually configure or build, saving us considerable time).
Given our extracted features, we train a Logistic Regression classifier (grid searching the appropriate parameters) using 75% of the data for training and 25% for testing:
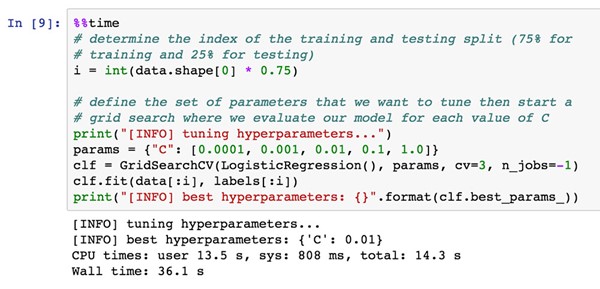
Training the model takes only 36s.
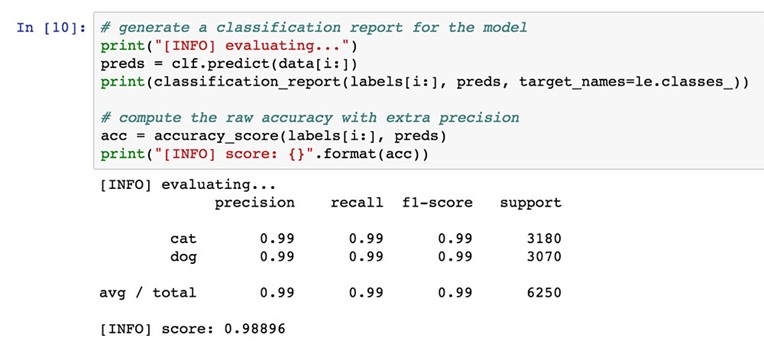
So, How Did We Do?
Evaluating our Logistic Regression classifier, we see that our model reaches 98.8896% accuracy on the testing set:
This accuracy is enough to claim the #2 spot on the Kaggle Dogs vs. Cats leaderboard:

Now, this isn't an entirely fair comparison as we did not evaluate on the testing set provided by the Kaggle competition (instead we generated our own testing set) and submit to the evaluation server (as that's outside the scope of this introductory tutorial), but I think you get the point. In under 25 minutes of computation time we were able to use:
- Microsoft's Ubuntu DSVM and
- Transfer learning/feature extraction
to build a model that gives us a highly competitive accuracy in the challenge.
Feel free to use the code in this post as a starting point for your own deep learning projects.
Where to Next?
In this post you learned how to use the Microsoft Data Science Virtual Machine to obtain the equivalent of second place in the Kaggle Dogs vs. Cats challenge with deep learning and Convolutional Neural Networks.
We obtained this result using a technique called transfer learning, in particular, feature extraction.
Since the DSVM comes with all the necessary computer vision and deep learning libraries you need to get up and running with this project, we:
- Not only obtained 2nd place,
- But also, did so in record time – just over 20 minutes.
Combining a bit of deep learning knowledge along with the pre-configured Ubuntu DSVM environment enabled us to achieve this result quickly and efficiently – it really goes to show how much thought, effort, and hard work the Microsoft team has (and continues to) put into the DSVM.
You can learn more about the DSVM, and spin up your first instance, by clicking here.
If you're interested in studying deep learning in more detail, be sure to take a look at my book and self-study program, Deep Learning for Computer Vision with Python – I've personally gone through each and every code example to ensure it works out-of-the-box on the Ubuntu DSVM.
I'll be back in a couple of weeks to share more of my experiences using computer vision and deep learning on the Data Science Virtual Machine. See you then!
Adrian
Twitter: @PyImageSearch | LinkedIn : Adrian Rosebrock