Deep Learning & Computer Vision in the Microsoft Azure Cloud
This is the first in a multi-part series by guest blogger Adrian Rosebrock. Adrian writes at PyImageSearch.com about computer vision and deep learning using Python, and he recently finished authoring a new book on deep learning for computer vision and image recognition.
Introduction
I had two goals when I set out to write my new book, Deep Learning for Computer Vision with Python. The first was to create a book/self-study program that was accessible to both novices and experienced researchers and practitioners — we start off with the fundamentals of neural networks and machine learning and by the end of the program you're training state-of-the-art networks on the ImageNet dataset from scratch. My second goal was to provide a book that included:
- Practical walkthroughs that present solutions to actual, real-world deep learning classification problems.
- Hands-on tutorials (with accompanying code) that not only show you the algorithms behind deep learning for computer vision but their implementations as well.
- A no-nonsense teaching style that cuts through all the cruft and helps you on your path to deep learning + computer vision mastery for visual recognition.
Along the way I quickly realized that a stumbling block for many readers is configuring their development environment — especially true for those wanted to utilize their GPU(s) and train deep neural networks on massive image datasets (such as ImageNet). Of course, some readers may not want to invest in physical hardware and instead utilize the cloud where it's easy to spin-up and tear-down instances. I spent some time researching different cloud-based solutions. Some of them worked well, others either outright didn't work as claimed or involved too much setup.
When Microsoft reached out to me to take a look at their Data Science Virtual Machine (DSVM), I was incredibly impressed.
The DSVM included TensorFlow, Keras, mxnet, Caffe, CUDA/cuDNN all out of the box, pre-configured and ready to go. Best of all, I could run the DSVM on a CPU instance (great if you're just getting started with deep learning) or I could switch to a GPU instance and seamlessly watch my networks train order of magnitudes faster (excellent if you're a deep learning practitioner looking to train deep neural networks on larger datasets). In the remainder of this post, I'll be discussing why I choose to use the DSVM — and even adapted my entire deep learning book to run on it.
Why I like Microsoft's Data Science Virtual Machine

Microsoft's Data Science Virtual Machine (DSVM) runs in the Azure cloud and supports either Windows or Linux (Ubuntu). For nearly all deep learning projects I recommend Linux; however, there are some applications where Windows is appropriate — you can choose either. The list of packages installed in the DSVM is complete and comprehensive (you can find the full list here), but from a deep learning + computer vision perspective you'll find:
- TensorFlow
- Keras
- mxnet
- Caffe/Caffe2
- Microsoft Cognitive Toolkit
- Torch
- OpenCV
- Jupyter
- CUDA/cuDNN
- Python 3
Again, the complete list is very extensive and is a huge testament to not only the DSVM team for keeping this instance running seamlessly, but also to Microsoft's desire to have their users utilize and even enjoy working in their environment. As I mentioned above you can run the DSVM in either CPU only or one or more GPUs.
Once you have your DSVM up and running you'll find many sample Jupyter notebooks for various machine learning, deep learning, and data science projects. These sample Jupyter notebooks will help you get up and running and familiarize yourself with the DSVM. If you prefer not to use Juptyter Notebooks you can also access your DSVM instance via SSH and VNC.
To spin up your first DSVM instance (including a free $200 credit) you'll want to follow this link: https://azure.microsoft.com/en-us/free/.
I recommend reading through the DSVM docs as well. Finally, be sure to read through the Tips, Tricks, and Suggestions section of this post, where I discuss additional advice and hacks you can use to better your experience with the DSVM.
Your First Convolutional Neural Network
I have put together a Jupyter Notebook demonstrating how to train your first Convolutional Neural Network using the following toolset:
- Python (2.7 and 3).
- TensorFlow.
- Keras.
You can find the Jupyter Notebook here:

Note: Make sure (1) you install Jupyter Notebooks on your local system or (2) use a DSVM instance to open the notebook.
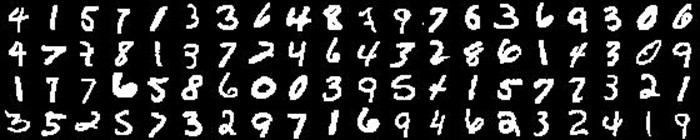
Inside the notebook you'll learn how to train the classic "LeNet" architecture to recognize handwritten digits:
And obtain over 98% classification accuracy after only 20 epochs:
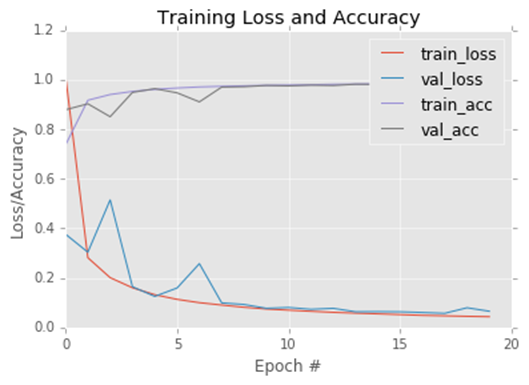
Be sure to take a look at the Jupyter Notebook for a full explanation of the code and training process.
I also want to draw attention to the code associated with this tutorial is the exact same code that I used when writing Deep Learning for Computer Vision with Python — with only two modifications:
- Using %matplotlib inline to display plots inside the Jupyter Notebook.
- Swapping out argument parsing for using a built-in Python args dictionary.
There areno other required changes to the code, which again is a huge testament to the DSVM team.
Tips, Tricks, and Suggestions
In this section I detail some additional tips and tricks I found useful when working with the DSVM. Some of these suggestions are specific to my book, Deep Learning for Computer Vision with Python, while others are more general.
Additional Python Packages
I installed both imutils and progressbar2 in the DSVM once it was up and running:
$ sudo /anaconda/envs/py35/bin/pip install imutils
$ sudo /anaconda/envs/py35/bin/pip install progressbar2
The imutils library is a series of convenience functions used to make basic image processing and computer vision operations easier using Python and the OpenCV library.
The progressbar2 package is used to make nice progress bars when running tasks that take a long time to complete (such as building and packing an image dataset).
Updating MKL
I ran into a small issue when trying to work with the Intel Math Kernel Library (MKL):
Intel MKL FATAL ERROR: Cannot load libmkl_avx2.so or libmkl_def.so.
Process ForkPoolWorker-14:
Process ForkPoolWorker-12:
Process ForkPoolWorker-13:
This was resolved by running the following command to update the mkl package:
$ sudo /anaconda/envs/py35/bin/conda update mkl -n py35
Avoiding Accidental ResourceExhaustedError
When leaving your Jupyter notebook open/running for long periods of time you may run into a ResourceExhaustedError when training your networks.
This can be solved by inserting the following lines in a cell at the end of the notebook:
%%javascript
Jupyter.notebook.session.delete();
Command Line Arguments and Jupyter Notebooks
Many deep learning and machine learning Python scripts require command line arguments...
...but Jupyter notebooks do not have a concept of command line arguments.
So, what do you do?
Inside Deep Learning for Computer Vision with Python I made sure all command line arguments parsed into a built-in Python dictionary.
This means you can change command line argument parsing code from this:
# construct the argument parse and parse the arguments
ap = argparse.ArgumentParser()
ap.add_argument("-i", "--image", required=True,
help="path to input image")
To this:
args = {
"image": "/path/to/your/input/image.png"
}
Here we have swapped out the command line arguments for a hard-coded dictionary that points to the relevant parameters/file paths. Not all command line arguments can be swapped out so easily, but for all examples in my book I opted to use a Python dictionary to make this a near seamless experience for Jupyter notebook users.
SSH and Remote Desktop
You can access your Azure DSVM via SSH or remote desktop.
If you opt for remote desktop make sure you install the X2Go Client as discussed in the DSVM docs.
If you're using macOS, make sure you install XQuartz as well.
Where to Next?
In this post you learned about the Microsoft Data Science Virtual Machine (DSVM). We discussed how the DSVM can be used for deep learning, and in particular, how the code from my book and self-study program, Deep Learning for Computer Vision with Python can executed on the DSVM. My goal when writing this book was to make it accessible to both novices and experienced researchers and practitioners — I have no doubt that the DSVM facilitates this accessibility by removing frustration with deep learning development environment configuration and getting you up and running quickly. If you're interested in learning more about the Microsoft Data Science Virtual Machine, be sure to click here.
Once you're up and running with the DSVM take a look at my deep learning book — this self-study program is engineered from the ground up to help you master deep learning for computer vision (you'll also find more detailed walkthroughs of LeNet and other popular network architectures, including ResNet, SqueezeNet, GoogLeNet, VGGNet, to name a few).
Stay tuned for my next post in this series, where I will share my experience and tips for running more advanced deep learning techniques for computer vision on the Data Science Virtual Machine.
Adrian
Twitter: @PyImageSearch | LinkedIn : Adrian Rosebrock