Deploying Machine Learning Models using Azure Machine Learning
This post is authored by Raymond Laghaeian, Principal Program Manager at Microsoft.
Azure Machine Learning provides command line interfaces (CLIs) for deploying and managing machine learning models. CLIs provide an easy way to deploy trained ML models as web service APIs which you can use in web, mobile, and line-of-business applications. This includes running the web services on a local machine for development and testing, or on a cluster for high-scale production use.
In this document, we use a model trained based on the Newsgroup sample from Scikit-Learn to show the Azure ML deployment process. The sample uses the Newsgroup dataset to train a model that categorizes documents into 20 different categories of newsgroups.
See Sickit-Learn's Working with Text to learn more about the sample training code and dataset.
To learn more about model management in Azure ML, see the model management overview document.
Prerequisites
You need the following:
- Azure Machine Learning Workbench.
- An active Azure subscription with owner permission.
Get the Code and Data
We will deploy Newsgroup sample's trained model as a web service. The complete code and the data files for this blog, including the trained model, are available on GitHub.
To get started, download the code and data to a folder on your local machine. Open Azure ML Workbench, click File, then Open Project. Then click Browse to select the newsgroup folder, and click Create.
Next, click on the Files icon in the left menu panel of the Workbench to view the project files.
We will walk through the project files and highlight the parts related to model deployment.
Saved Model
Azure ML Model Management packages a trained model into a Docker image that it deploys as a web service API.
In the train.py file, after the model is trained, we use the following code to save the trained model:

Scoring File
A scoring file, here called score.py, is required to deploy the model. Azure ML packages the scoring file with the trained model, and uses it to load and return a prediction.
The scoring file should include two functions called init() and run(). These functions become part of your deployed web service API.
Define the init and run Functions
Open the score.py file, and note the init function. The init function, loads the saved model which, in this case, is called "model.pkl." You can deploy one or more models. The snippet below shows the relevant parts of the code. For the full code sample, see the score.py file.

Next, is the run() function. The run function uses the model to return a prediction based on the input data. This is the function that processes the web service's input request.

Web Service Schema
The schema.json file includes the web service schema. Azure ML uses the schema to validate web service's input requests. And provides libraries that auto-generate the schema file. See the main() function in the score.py file for how the generate-schema is called.
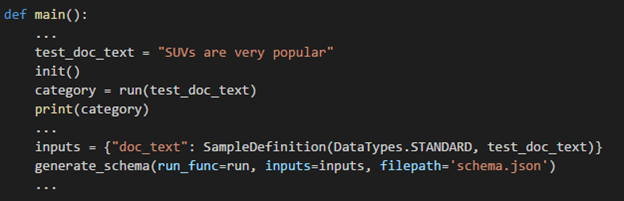
The schema.json file is already included in the sample folder. Running the sample score.py file would re-generate the file.
Swagger Support
Using a schema file, Azure ML creates a Swagger document for the web service. The Swagger document is a great tool for developing client applications that call the web service APIs. It can also be used to automatically create the client applications since the methods, types and sample data provide the necessary information to build application.
Specify Model Dependencies
Azure ML uses Docker images to package the model and its dependencies. The model management images come pre-installed with Python and Spark libraries. During deployment, the images are registered in Azure Container Registry (ACR).
Using Docker simplifies the deployment. In combination with ACR, it provides a convenient way to download the images into Docker hosts to run the services locally, or to deploy the images Azure Container Service (ACS) for high-scale production scenarios.
To include additional libraries with your deployment, use the conda_dependencies.yml file from the Azure ML Workbench. You can also create it manually.
For this example, the conda_dependencies.yml file includes scikit-learn as a dependency.

Deploy the Model as a Web Service
Now that we have the necessary files, we are ready to deploy the web service. We will start with setting up an environment to deploy a model to run as a web service. This will create a number of resources in your Azure subscription and requires that you be an owner of the subscription you are deploying the services to.
Azure ML provides two options for running web services: locally or on a cluster. Local deployment requires Docker to be installed, and is meant for development and testing. Cluster deployment uses Azure Container Service and can provide scale capabilities to support high throughput for web services.
Set Up the Environment for Web Service Deployment
Azure ML CLIs provide the commands to set up the environment and the necessary services to deploy a web service. The setup creates a resource group, and provisions a storage, ACR, and ACS inside it.
To start setting up your deployment environment for Model Management, in Azure ML Workbench, click File, Open Command-line Interface to open the command window.
Type the following commands to start the environment setup, and follow the prompts:
az provider register -n Microsoft.MachineLearningCompute
az ml env setup -n myamlenv -l eastus2 -c
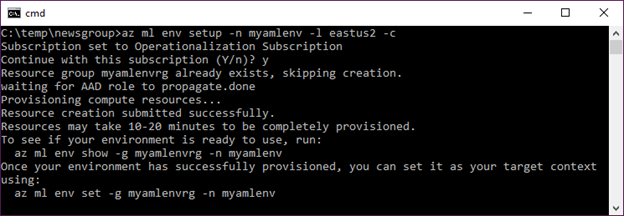
The deployment could take 15 minutes or longer. To check the status of the deployment, type:
az ml env show -g myamlenvrg -n myamlenv
After the setup is completed, the provisioning state will show "succeeded". Set this as the environment to be used:
az ml env set -n myamlenv -g myamlenvrg
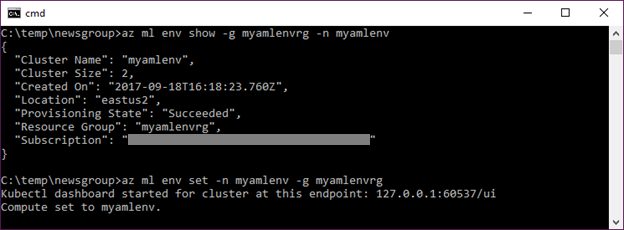
This sets up the services for deployment in a resource-group. You can access the resource-group listed in the output of the previous command in Azure Portal to see the provisioned services.
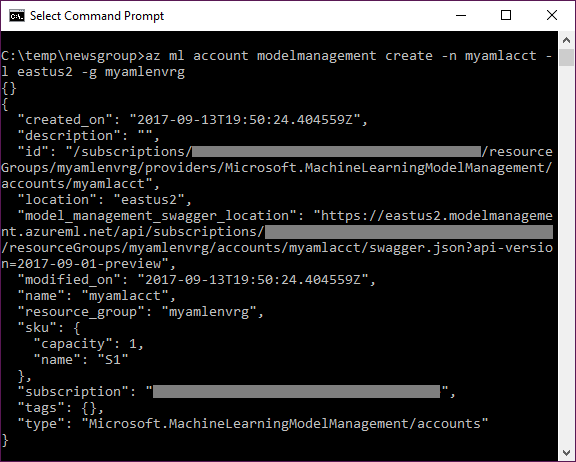
Create a Model Management Account
You need an account to keep track of your service usage. The following command creates a pricing plan SKU to track your usage. Create an account using the following command:
az ml account modelmanagement create -n myamlacct -l eastus2 -g myamlenvrg
With the setup out of the way, you are ready to deploy your web service.
Deploy the Web Service
Next, we create and deploy the service to run on the local machine:
az ml service create realtime -n newsgroupservice -m model.pkl -f score.py -s schema.json -c conda_dependencies.yml -r python
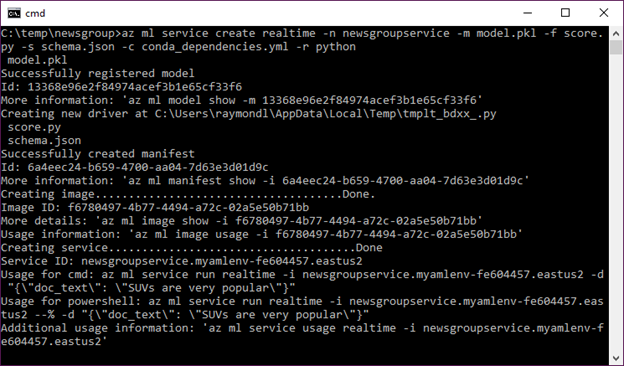
The service was created, and the output shows the web service's information. A couple of things to note:
- As part of creating the service, model management also creates and stores an image. To get details on the image, use the id specified in the output. You can download and use that image to deploy to a Docker host.
- You can create an image separately, without creating the service, using the image create command. For getting help on that command use the - -help flag.
Let's get the usage information on the service we created using the service id listed in the previous command's output:
az ml service usage realtime -i <your service id>
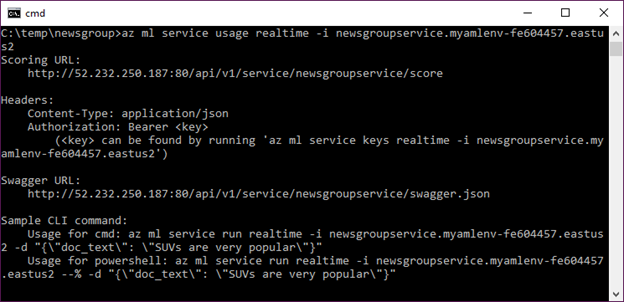
You can access the service's Swagger document by copying the swagger.json endpoint URL to the browser window.
We can now call the service using the Sample CLI command from the output window. Azure ML uses the schema.json file to provide the Sample CLI command with sample data which provides a convenient way to test the web service.
Run the following command to call the new web service:
az ml service run realtime -i <your service id> -d "{\"doc_text\": \"SUVs are very popular\"}"

Success! The web service returned a news category based on the input text called "rec.autos."
Call the Web Service from a Client App
Azure ML web services provide RESTFul APIs making them easy to integrate into a number of platforms and client applications.
For restricting access to web services, Azure ML creates web service keys that are needed to authenticate web requests.
To get the keys, use the following command:
az ml service keys realtime -i <your web service id>

As an example of a client application, we then use the Primary key to call the web service from the following sample Python code:
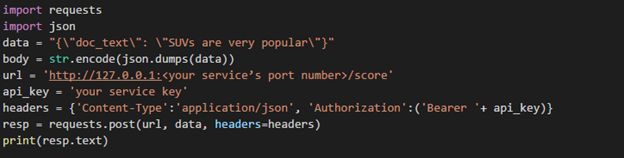
The pythonclient.py file has the sample code for calling the web service.
For more info on consuming web services, see the consumption document.
Summary
Azure Machine Learning simplifies the deployment and management of machine learning models. It provides interfaces to setup a deployment environment to support local deployment and testing, and enables provisioning of clusters to support a high-scale production use.
Raymond
@raymondlag