Building Deep Neural Networks in the Cloud with Azure GPU VMs, MXNet and Microsoft R Server
This post is by Max Kaznady, Data Scientist; Richin Jain, Solution Architect; Tao Wu, Principal Data Scientist Manager; Miguel Fierro, Data Scientist and Andreas Argyriou, Data Scientist, all at Microsoft.
Deep learning has been behind several recent breakthroughs in machine learning applications. In the field of computer vision, novel approaches such as deep residual learning developed at Microsoft Research have helped reduce the top-5 classification error at the ImageNet competition by 47% in just one year. In the field of speech and machine translation, deep neural networks (DNNs) have already enabled millions of Skype users to communicate without language barriers.
Two major factors contribute to deep learning's success:
- The availability of large training datasets, and
- Compute acceleration that general purpose graphics processing unit (GPU) offers.
Microsoft's Azure cloud ecosystem, a scalable and elastic big data platform, recently introduced advanced GPU support in its N-Series Virtual Machines. These VMs combine powerful hardware (NVIDIA Tesla K80 or M60 GPUs) with cutting-edge, highly efficient integration technologies such as Discrete Device Assignment, bringing a new level of deep learning capability to public clouds.
This article is the first in a series of blog posts showcasing deep learning workflows on Azure. In this article, we will go over setting up N-Series VMs on Azure with NVIDIA CUDA and cuDNN support. We use MXNet as an example of deep learning frameworks that can run on Azure. MXNet is an open-source framework for deep neural networks with support for multiple languages and platforms that aims to provide both execution efficiency and design flexibility. In addition, we will also show how Microsoft R Server can harness the deep learning capabilities provided by MXNet and GPUs on Azure using simple R scripts.
1. Preparation
For the purposes of this blog post, we will use an NC24 VM running on Ubuntu 16.04. N-Series VM sizes are currently under preview and available for select users; you can register interest at https://gpu.azure.com/. In addition to the default Ubuntu 16.04 distribution, the following libraries were used:
- CUDA – CUDA8.0 RC1 (registration with NVIDIA required). In addition to the base package, you also need to download CUDA Patch 1 from the CUDA website. The patch adds support for gcc 5.4 as one of the host compilers.
- cuDNN – cuDNN 5.1 (registration with NVIDIA required).
- Math Kernel Library (MKL) – MKL 11.3 update 3 (registration with Intel required). The serial number and download link will be in the email.
- MXNet – We used the latest MXNet checkout from GitHub (tested with SHA f6fa98d645d2b9871e7ac5f0ad977c1e5af80738)
- Microsoft R Server (MRS) – Microsoft R Server 8.0.5 (registration with Microsoft required). Alternatively, one can download Microsoft R Open (MRO) for Ubuntu here. Please note that while MRS comes with Intel MKL already bundled, MRO requires an additional MKL installation from this link. Also, while MRS and MRO both rely on MKL, a separate MKL installation is required to build MXNet. This is because the MKL package for Microsoft R only contains shared libraries and not the header files which are needed to build external packages such as MXNet.
- CIFAR-10 training algorithm – Test script used to validate MXNet installation by training a simple ResNet deep neural network on CIFAR-10 dataset.
2. Installation
In this section, we provide step-by-step instructions on how to install all components discussed earlier, including their dependencies. The installation can be completed in an hour or less. It is also important to note that you can "copy" a configured VM for future usage, making the installation a one-time process. Furthermore, you can create a generalized image of the configured VM and use it in an ARM template to create similar VMs – learn more about it here.
We recommend using Ubuntu version 16.04 or later, as it comes ready with a recent Linux kernel that contains the pass-through driver needed to recognize the GPU instances (made available to these VMs).
For installation, we assume all the packages (CUDA, cuDNN, MKL and MXNet) are in the user's home directory.
a) The first step is to install the following dependencies (you can replace the Python installation with a local Anaconda one later, if you want to use a different version of Python):
sudo apt-get install -y libatlas-base-dev libopencv-dev libprotoc-dev python-numpy python-scipy make unzip git gcc g++ libcurl4-openssl-dev libssl-dev
followed by update to alternatives for cc:
sudo update-alternatives --install /usr/bin/cc cc /usr/bin/gcc 50
b) Install downloaded CUDA driver:
chmod 755 cuda_8.0.27_linux.run
sudo ./cuda_8.0.27_linux.run --override
During installation, select the following options when prompted:
- Install NVIDIA Accelerated Graphics Driver for Linux-x86_64 361.77? – Yes
- Do you want to install the OpenGL libraries? – Yes
- Do you want to run nvidia-xconfig? – not necessary for this example.
- Install the CUDA 8.0 Toolkit? – Yes
- Enter Toolkit Location [default is /usr/local/cuda-8.0] - select default
- Do you want to install a symbolic link at /usr/local/cuda? – Yes
- Install the CUDA 8.0 Samples? – they are not needed for this article.
c) Next, run the cuda patch 1 that you downloaded above, to support gcc 5.4 as host compiler
sudo ./cuda_8.0.27.1_linux.run
Select the same options as in the previous step – default location for toolkit installation should be the same. Next, update alternatives for nvcc:
sudo update-alternatives --install /usr/bin/nvcc nvcc /usr/bin/gcc 50
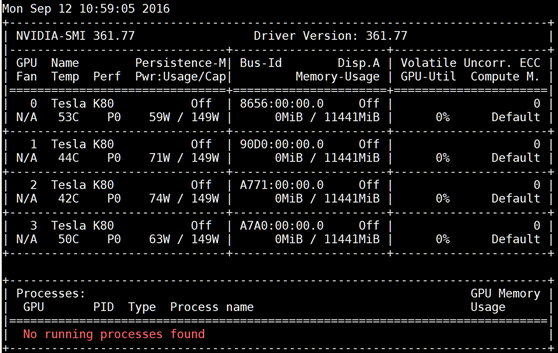
At this point, running the nvidia-smi command, a GPU management and monitoring tool that is part of the CUDA package, should result in something like the following screenshot. We recommend enabling the persistence mode for this utility before you run the actual command.
sudo nvidia-smi -pm 1
nvidia-smi
d) Install downloaded cuDNN and create a symbolic link for cudnn.h header file:
tar xvzf cudnn-8.0-linux-x64-v5.1.tgz
sudo mv cuda /usr/local/cudnn
sudo ln -s /usr/local/cudnn/include/cudnn.h /usr/local/cuda/include/cudnn.h
e) Install MKL:
tar xvzf l_mkl_11.3.3.210.tgz
sudo ./l_mkl_11.3.3.210/install.sh
Follow the prompt and enter the MKL serial number that you received in email from intel. The default installation location is /opt/intel – you'll need this for the next step.
f) Install and build MXNet:
First, get MXNet code from its GitHub repository (we tested the version with SHA f6fa98d645d2b9871e7ac5f0ad977c1e5af80738). For convenience, we will refer to MXNet directory path on your disk as MXNET_HOME.
git clone --recursive https://github.com/dmlc/mxnet
cd mxnet
git checkout f6fa98d645d2b9871e7ac5f0ad977c1e5af80738
cp make/config.mk .
Also, please note that MXNet repo has the following submodules – we list the SHAs for each submodule below:
- dmlc-core:c33865feec034f1bc6ef9ec246a1ee95ac7ff148
- mshadow:db4c01523e8d95277eae3bb52eb12260b46d6e03
- ps-lite:36b015ffd51c0f7062bba845f01164c0433dc6b3
You can revert each submodule by going to its folder and running the same "git checkout <SHA>" command.
Please note that we're using the checkout mechanism, which means that you can either go back to current MXNet state after the build, or branch from the state and do your own work going forward.
Next, modify the $MXNET_HOME/config.mk make file to use CUDA, cuDNN and MKL. You need to enable the flags and provide locations of the installed libraries:
USE_CUDA = 1
USE_CUDA_PATH = /usr/local/cuda
USE_CUDNN = 1
If MKL is to be used, USE_BLAS and USE_INTEL_PATH should be set as follows (you can remove default "atlas" setting and replace it with MKL):
USE_BLAS = mkl
USE_INTEL_PATH = /opt/intel/
To enable distributed computing, set:
USE_DIST_KVSTORE = 1
Finally, you need to add links to CUDA and cuDNN libraries. You can persist those on the system by modifying /etc/environment, but since this is a local build, we recommend adding the following lines to your ~/.bashrc file instead:
export LD_LIBRARY_PATH=/usr/local/cuda/lib64/:/usr/local/cudnn/lib64/:$LD_LIBRARY_PATH
export LIBRARY_PATH=/usr/local/cudnn/lib64/
Now it is time to build – you can type "bash" in the current prompt to apply the aforementioned changes to .bashrc or open a new terminal or simply re-type the above export commands into the current terminal.
Next, if you want to build in parallel, use the –j option as follows from MXNET_HOME:
make –j${nproc}
g) To install MRS, follow these steps:
tar xvzf en_microsoft_r_server_for_linux_x64_8944657.tar.gz
cd MRS80LINUX
sudo ./install.sh
sudo mv /usr/lib64/microsoft-r/8.0/lib64/R/deps/libstdc++.so.6 /tmp
sudo mv /usr/lib64/microsoft-r/8.0/lib64/R/deps/libgomp.so.1 /tmp
To add MXNet library into MRS, first add the following two lines to /etc/ld.so.conf:
/usr/local/cuda/lib64/
/usr/local/cudnn/lib64/
followed by reconfiguring dynamic linker run-time bindings:
sudo ldconfig
Next, make sure you're again in the MXNET_HOME folder:
sudo Rscript -e "install.packages('devtools', repo = 'https://cran.rstudio.com')"
cd R-package
sudo Rscript -e "install.packages(c('Rcpp', 'DiagrammeR', 'data.table', 'jsonlite', 'magrittr', 'stringr', 'roxygen2'), repos = 'https://cran.rstudio.com')"
cd ..
make rpkg
sudo R CMD INSTALL mxnet_0.7.tar.gz
We now have a functional VM installed with MXNet, MRS and GPU. As we suggested earlier, you can "copy" this VM for use in the future so the installation process does not need to be repeated.
Troubleshooting
Here is some information to help you troubleshoot, in case you encounter error messages:
- Build error with im2rec: The easiest solution is to disable this in $MXNET_HOME/Makefile by commenting out the line "BIN += bin/im2rec".
- MKL not linking correctly: The default root of the MKL installation is "/opt/intel". If you install MKL in a different location, you should specify in $MXNET_HOME/config.mk. Note the path should point to the parent directory and not the MKL folder.
- Library linking errors during MXNet compilation: Make sure that LD_LIBRARY_PATH is set correctly as specified earlier (Azure GPU VMs come with blank LD_LIBRARY_PATH by default).
3. Test Drive
Now it's time to build some deep neural networks! Here, we use the CIFAR-10 problem and dataset as an example. This is a 10-class classification problem, and the dataset has 60,000 color images (6,000 images per class). We published a simple CIFAR-10 training algorithm which can be executed from either MRS or MRO. You should first install a few dependencies which don't come standard with MRS:
sudo Rscript -e "install.packages('argparse', repo = 'https://cran.rstudio.com')"
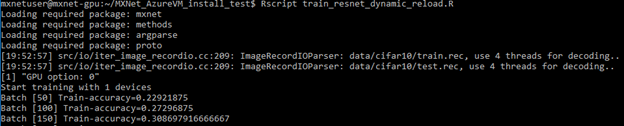
Now you can run the following command from the extracted folder:
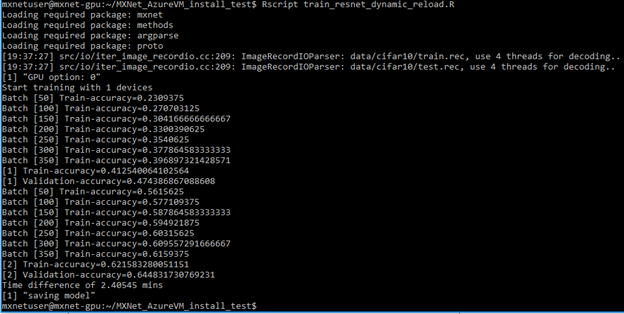
Rscript train_resnet_dynamic_reload.R
You should see output which is similar to the screenshot below:
You can monitor GPU utilization using "watch -n 0.5 nvidia-smi" command, which should result in something like the following (and refreshed twice a second):
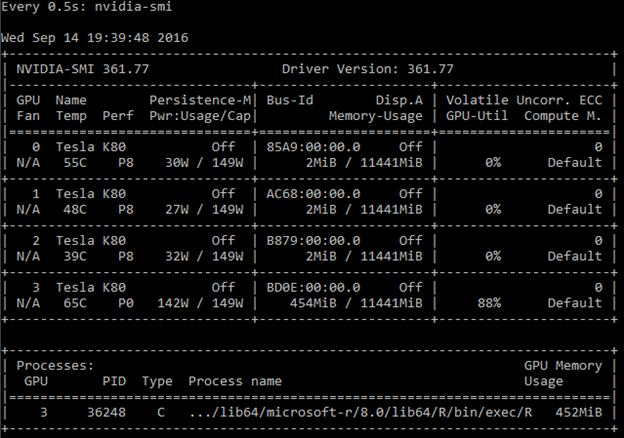
In the screenshot above, we can see that the training is taking place on GPU #3.
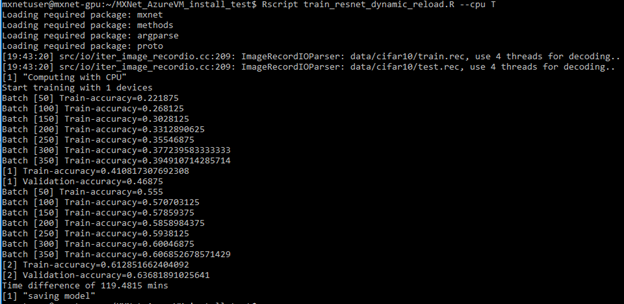
If you are curious how to train the same model without GPU, simply change the default training context by adding "--cpu T", which should produce a similar output (we also highly recommend Linux "htop" utility for monitoring CPU usage):

In this case, training for 2 Epochs using CPU completes in 119.5 minutes:
As a comparison, training for the same 2 Epochs with GPU completes in 2.4 minutes as shown below. By using GPU, we have achieved 50x speedup in this example.
4. More About Training on CPUs vs GPUs
Now that we have trained an MXNet model using both GPUs and CPUs, here's some more behind-the-scene information about how computation is done at each setup:
CPU
When training using CPU, Intel Math Kernel library provides great speedup in basic linear algebra operations required for Deep Learning; other libraries which can be used in its place are ATLAS and OpenBLAS.
Another important library which MXNet utilizes under the hood is OpenMP, which allows multithreading of C/C++ programs without too much effort from the developer. By adding #pragma directives to make loops parallel, developers can avoid managing threads explicitly.
Finally, since deep learning is commonly used in the vision domain, OpenCV vision library is also required. This library automates most computer vision tasks, which MXNet relies heavily on for pre-processing.
GPU
Convolutional operations found in deep neural networks are traditionally very slow to execute on CPUs. GPUs are great at accelerating these types of operations and other linear algebra routines required to train deep neural networks.
CUDA is the primary platform which allows programing GPU operations from within C/C++ code on an NVIDIA GPU. NVIDIA also provides the cuDNN library which is more specialized for accelerating specific deep learning operations on the GPU. Both libraries accelerate MXNet operations directly on the GPU. Azure GPU-enabled VMs have minimal GPU virtualization overhead.
Summary
In this article, we demonstrated how to quickly install and configure MXNet on an Azure N-Series VM equipped with NVIDIA Tesla K80 GPUs. We showed how to run MXNet training workload from Microsoft R Server using GPU, achieving significant speedups compared to the CPU-only solution. In the next blog, we will discuss a more comprehensive deep learning workflow that includes accelerated training on Azure GPU VMs, scalable scoring on HDInsight that integrates with Microsoft R Server and Apache Spark, accessing data on Azure Data Lake Store. We will present the above work at the upcoming Microsoft Data Science Summit. You can also checkout our tutorial based on this blog in GitHub.
Max, Richin, Tao, Miguel & Andreas
Acknowledgements
We’d like to thank Qiang Kou, Tianqi Chen and other MXNet developers and Karan Batta, Huseyin Yildiz, Alex Sutton and Hakan Erdogan from Microsoft for their assistance and feedback. We also would like to acknowledge the use of CIFAR dataset from Alex Krizhevsky’s work in our test script.