Try Dynamics 365 for Marketing
Dynamics 365 for Marketing
Growing businesses need more than basic email marketing tools to turn their prospects into business relationships.
Microsoft Dynamics 365 for Marketing is available in public preview for organizations seeking a marketing automation solution that tightly integrates with your CRM system to allow transfer of lead information seamlessly between marketing and sales, ensuring you present the right messages at the right time and guide leads to the next best action.
Microsoft Dynamics 365 for Marketing is designed to help you nurture more sales-ready leads, align sales and marketing and make smarter decisions. Most importantly, Dynamics 365 for Marketing works together with Dynamics 365 for Sales on the same platform which aligns teams with common data, connected processes and Office 365 collaboration tools.
With Microsoft Dynamics 365 for Marketing, you can seamlessly:
- Generate more leads from multi-channel campaigns across email, landing pages, webinars, phone calls, in person events, LinkedIn and more. New customizable templates for emails and landing pages help you create campaign content quickly. And with a dedicated email marketing service, you can get the word out reliably
- Nurture more sales-ready leads by personalizing the buyer’s journey that guides your leads to next best experience based on their engagement
- Target the right audience using embedded intelligence capabilities like dynamic segmentation. With multiple lead scoring models you can prioritize the leads that are ready to buy. Automated insights can help you track how your leads are engaging during your campaigns
- Organize events with ease using the event portal to manage in-person events and integration with webinar providers
- Track and improve marketing performance using built-in dashboards. Run surveys from the application that help you better understand your customers
How to Trial
The free public preview of Dynamics 365 for Marketing is available here: https://trials.dynamics.com/Dynamics365/Preview/Marketing
To trial Dynamics 365 for Marketing you must run a setup wizard. This setup wizard is provided to help you set up Dynamics 365 for Marketing for the first time.
Follow the guidance in this blog post "How to Create a Dynamics 365 for Marketing Trial" to setup a trial
Example
To help you get a feel for the app, you can try out the below simple example of creating a
- segment
- marketing email
- customer journey (to send of the emails to the members of the segment)
Note: this blog post will be followed by other posts helping you to build more advanced customer journeys, marketing pages, lead scoring models, event management and more. Stay tuned.
Segments
One of your first tasks as a marketer is to define the right audience, to tailor your message to best appeal to that group of people.
In Dynamics 365, you can set up a collection of segments, which you define by using terms that resemble those you already use to describe groups of customers, such as "female wine enthusiasts over 40 living in San Francisco" or you can leverage some of the predefined relationships (eg Primary Contacts)
You use these segments to target marketing initiatives like email-marketing campaigns and customer journeys. Segments you define by using a set of rules and conditions are called dynamic segments because membership in these segments changes constantly and automatically based on information in your customer engagement database.
Create Your First Segment
Let’s create a new segment based on one of the predefined relationships in Dynamics 365; the relationship between accounts and their primary contacts. Obviously you should ensure that you already have accounts, contacts, and primary contacts in your Sales App before creating the below segment.
Expand the Sitemap (1), go to Customers (2) and then click Segments (3) to open the list of existing segments
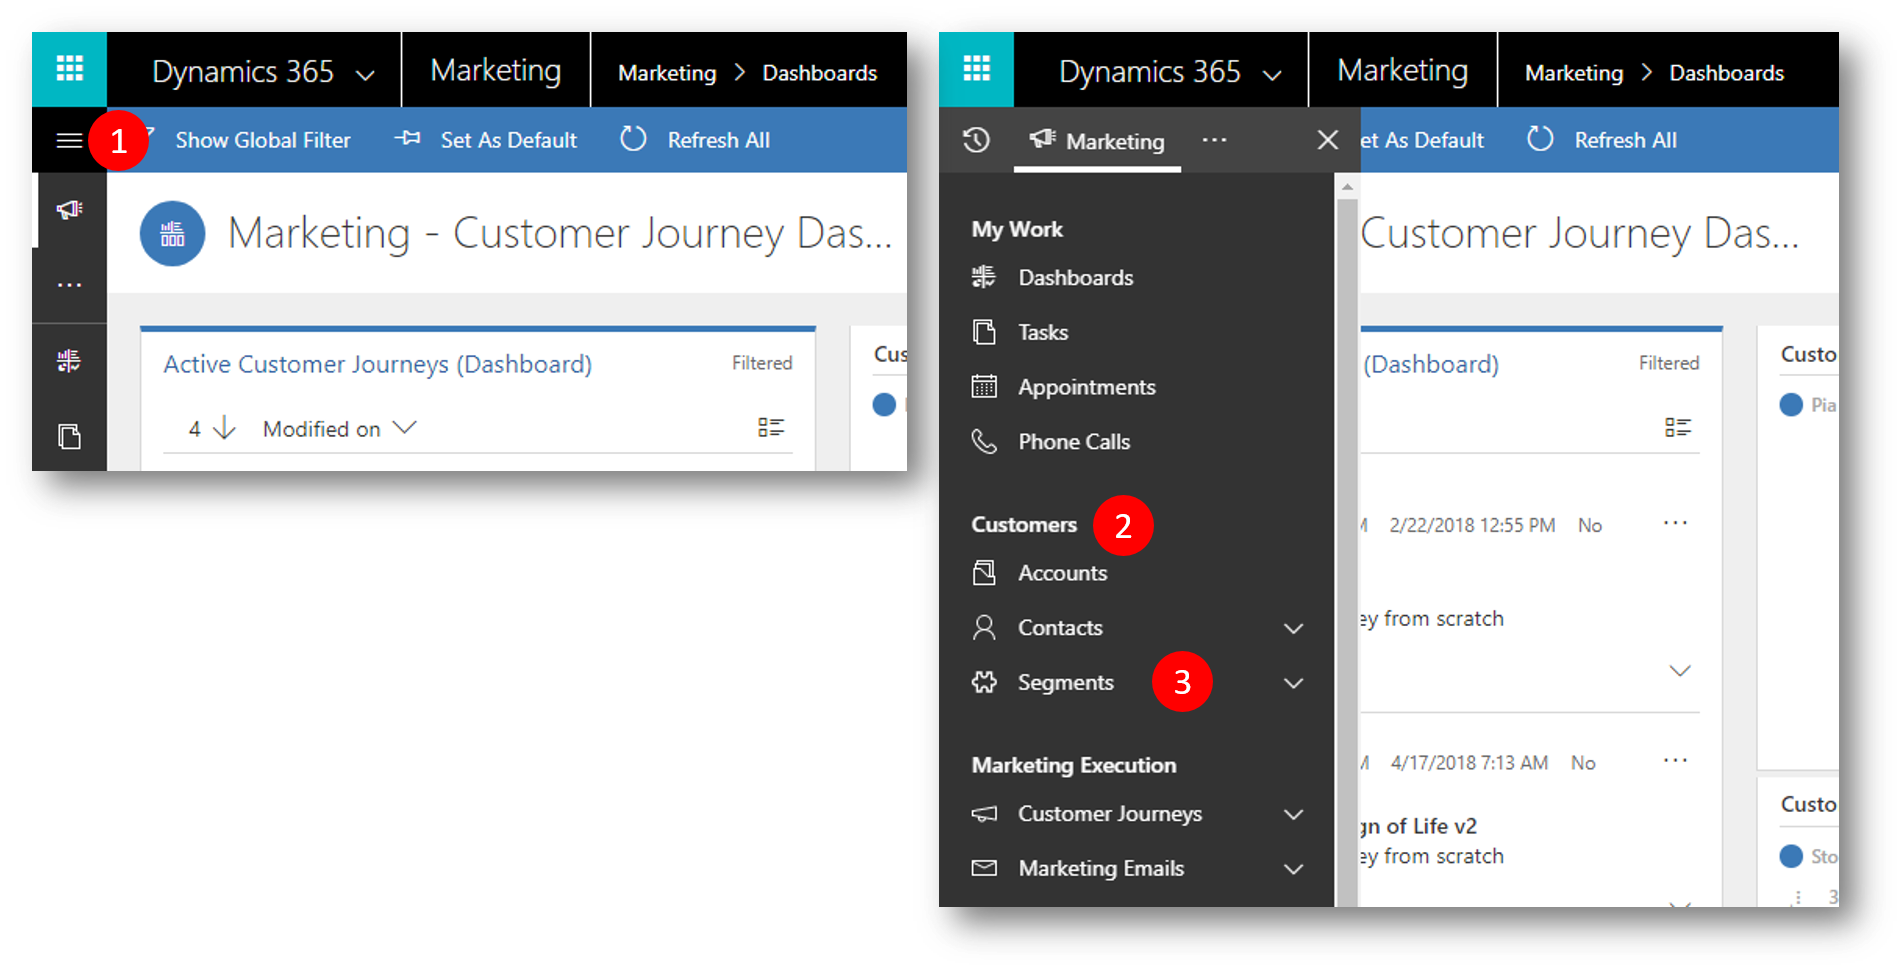
On the command bar, click New (1) to open the New Segment form
In the New Segment form, on the General tab, name (2) and describe (3) your new segment.
Leave the Segment type set to Dynamic segment 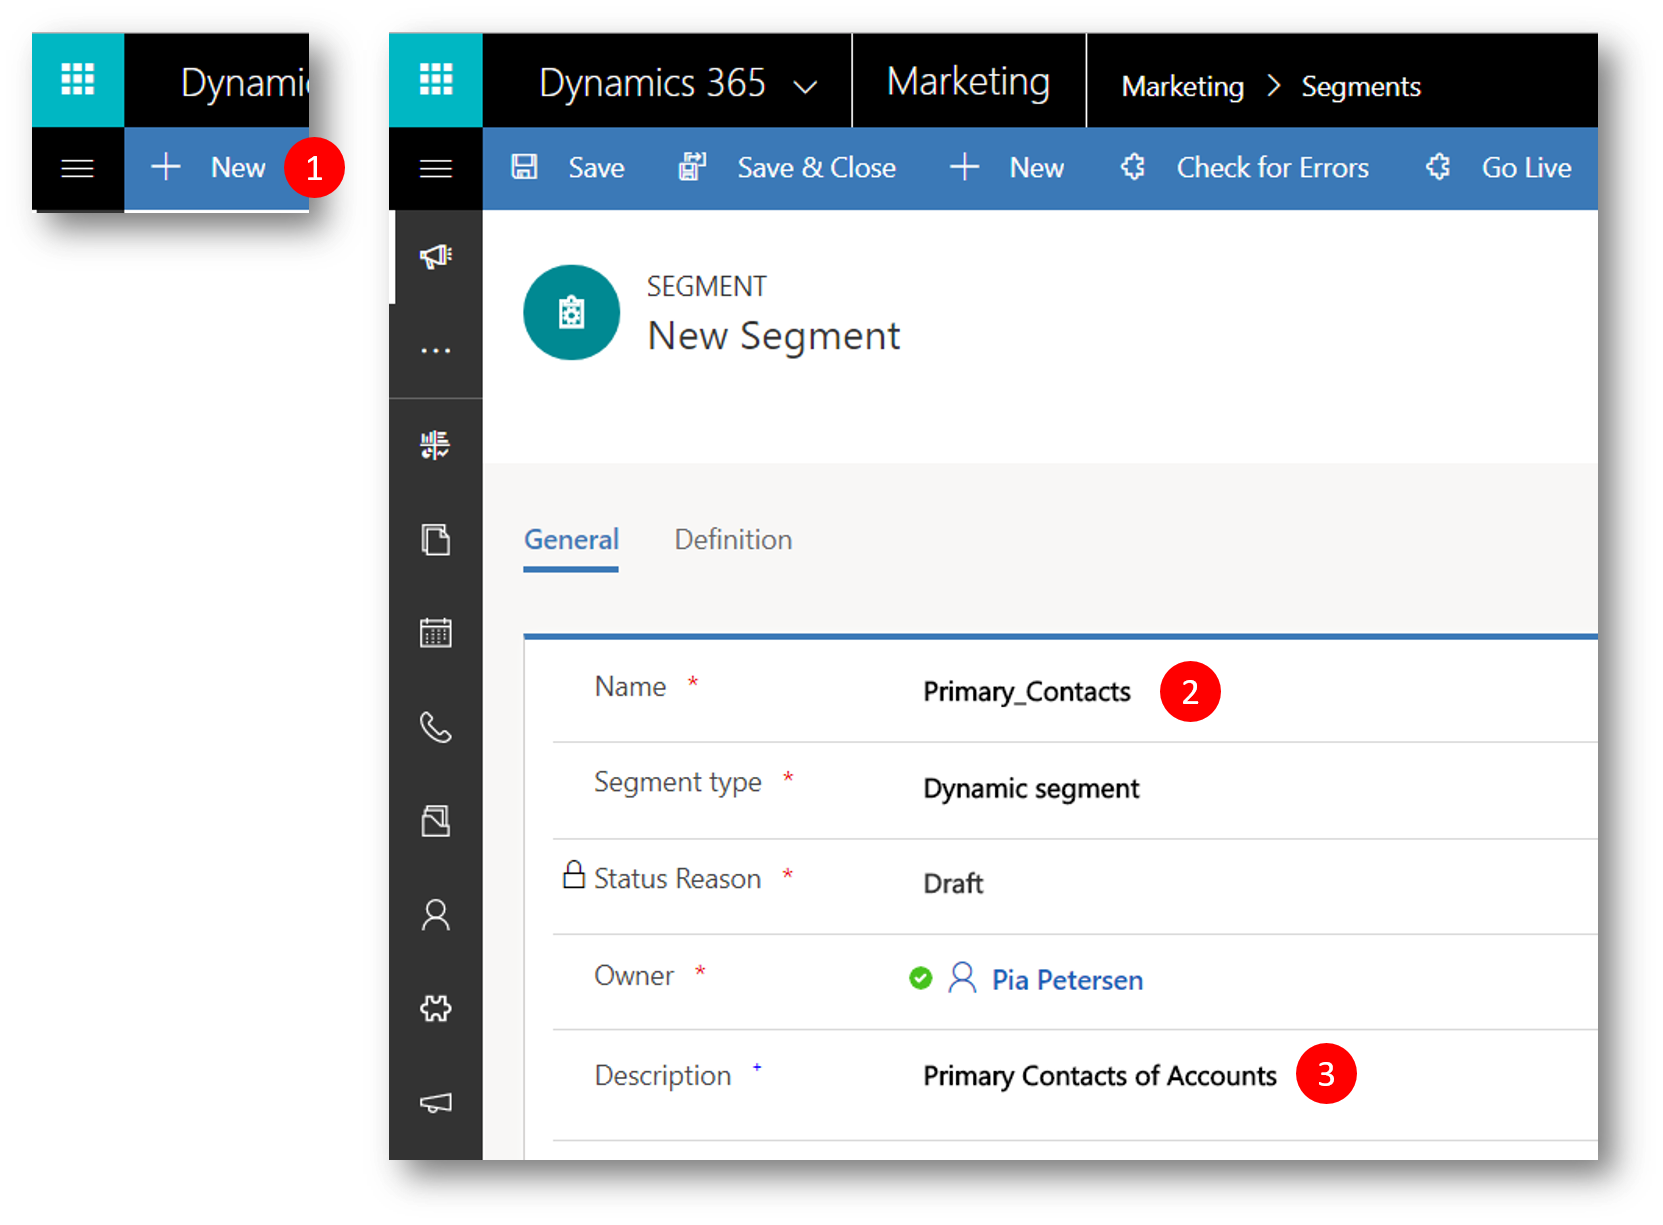
Click the Definition (1) tab to establish the rules of membership for your segment by building a database query.
The Definition tab offers three different ways (2) to build and view your query:
- DESIGNER is optimized for combining segments by using logical operators.
- FLOW is optimized for defining sets of logical rules and conditions that filter out contacts.
- QUERY presents the query as text, which is very compact and suitable for users who are used to working with database queries.
You can use whichever view you prefer—the result will be the same. For this example, we will use the DESIGNER view, which is both easy to use and compact.
Because you're creating a new segment, you see a single row in the DESIGNER, with the Contact entity selected (in the leftmost drop-down list) and set to All* .
We won't be working with all contacts, so we will delete this row
Click the X to the right of the row (3) to delete the row
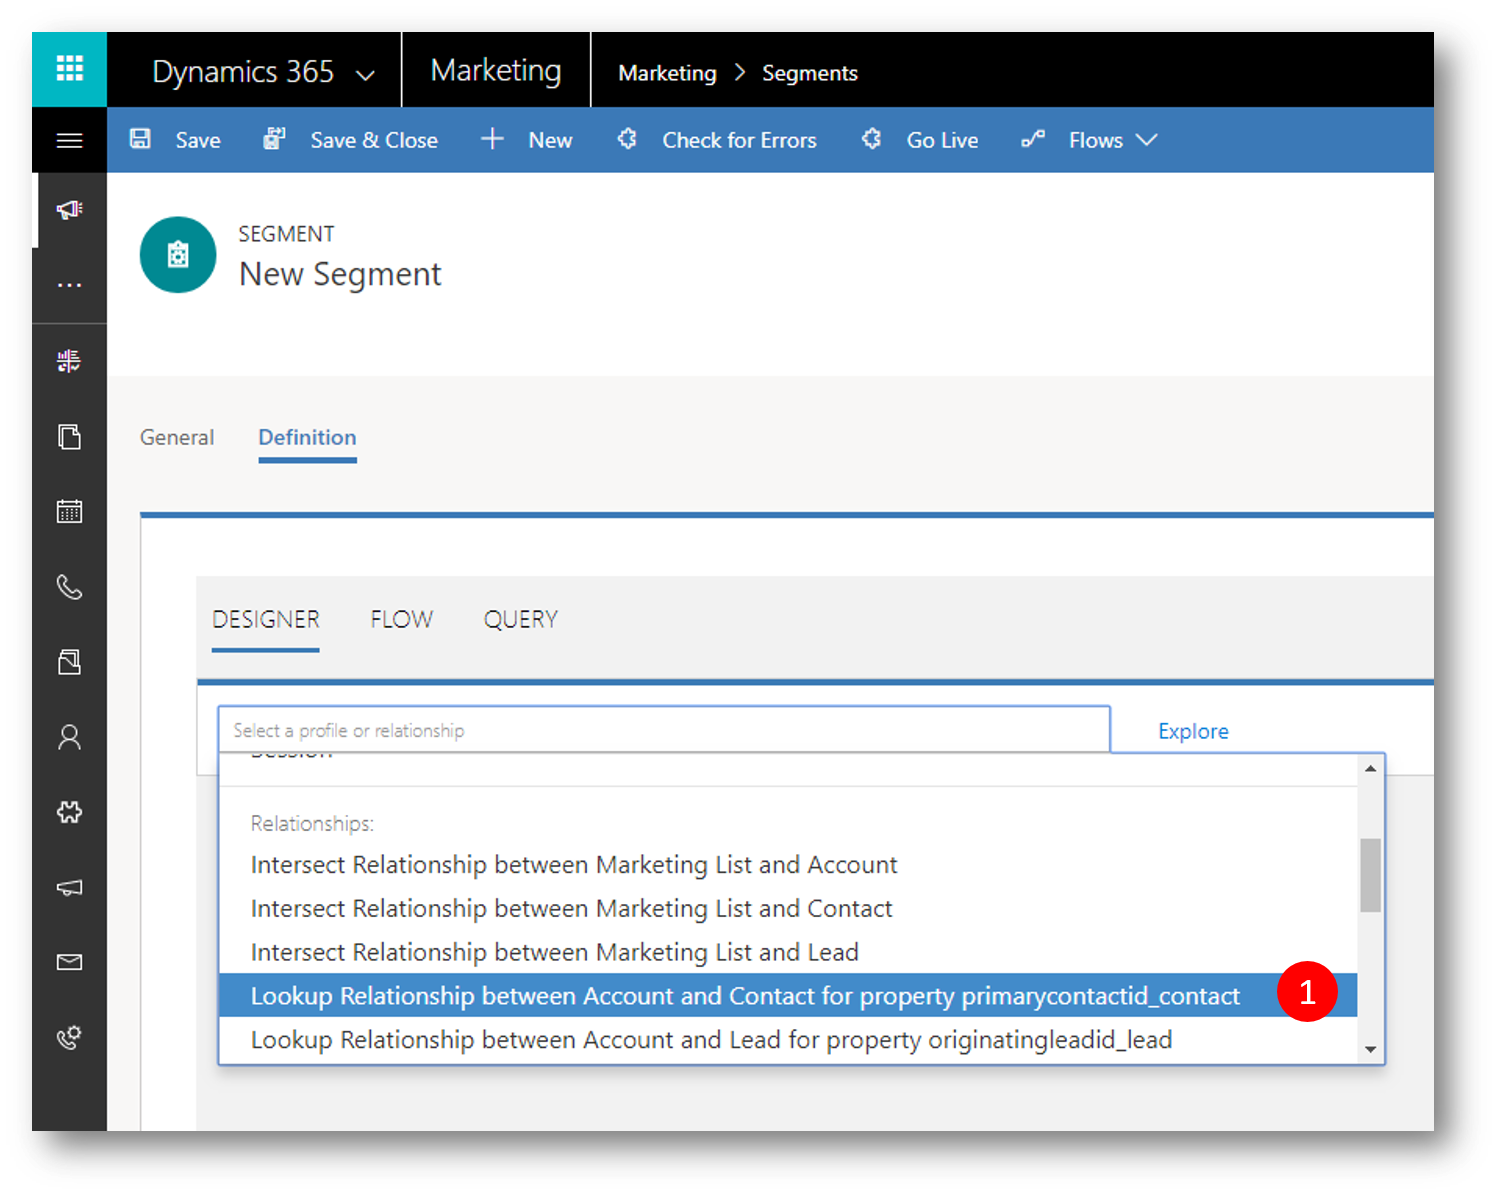
The DESIGNER now offers a drop-down in which you can select predefined relationships for your segment.
In the drop-down select “Lookup Relationship between Account and Contact for property primarycontactid_contact”
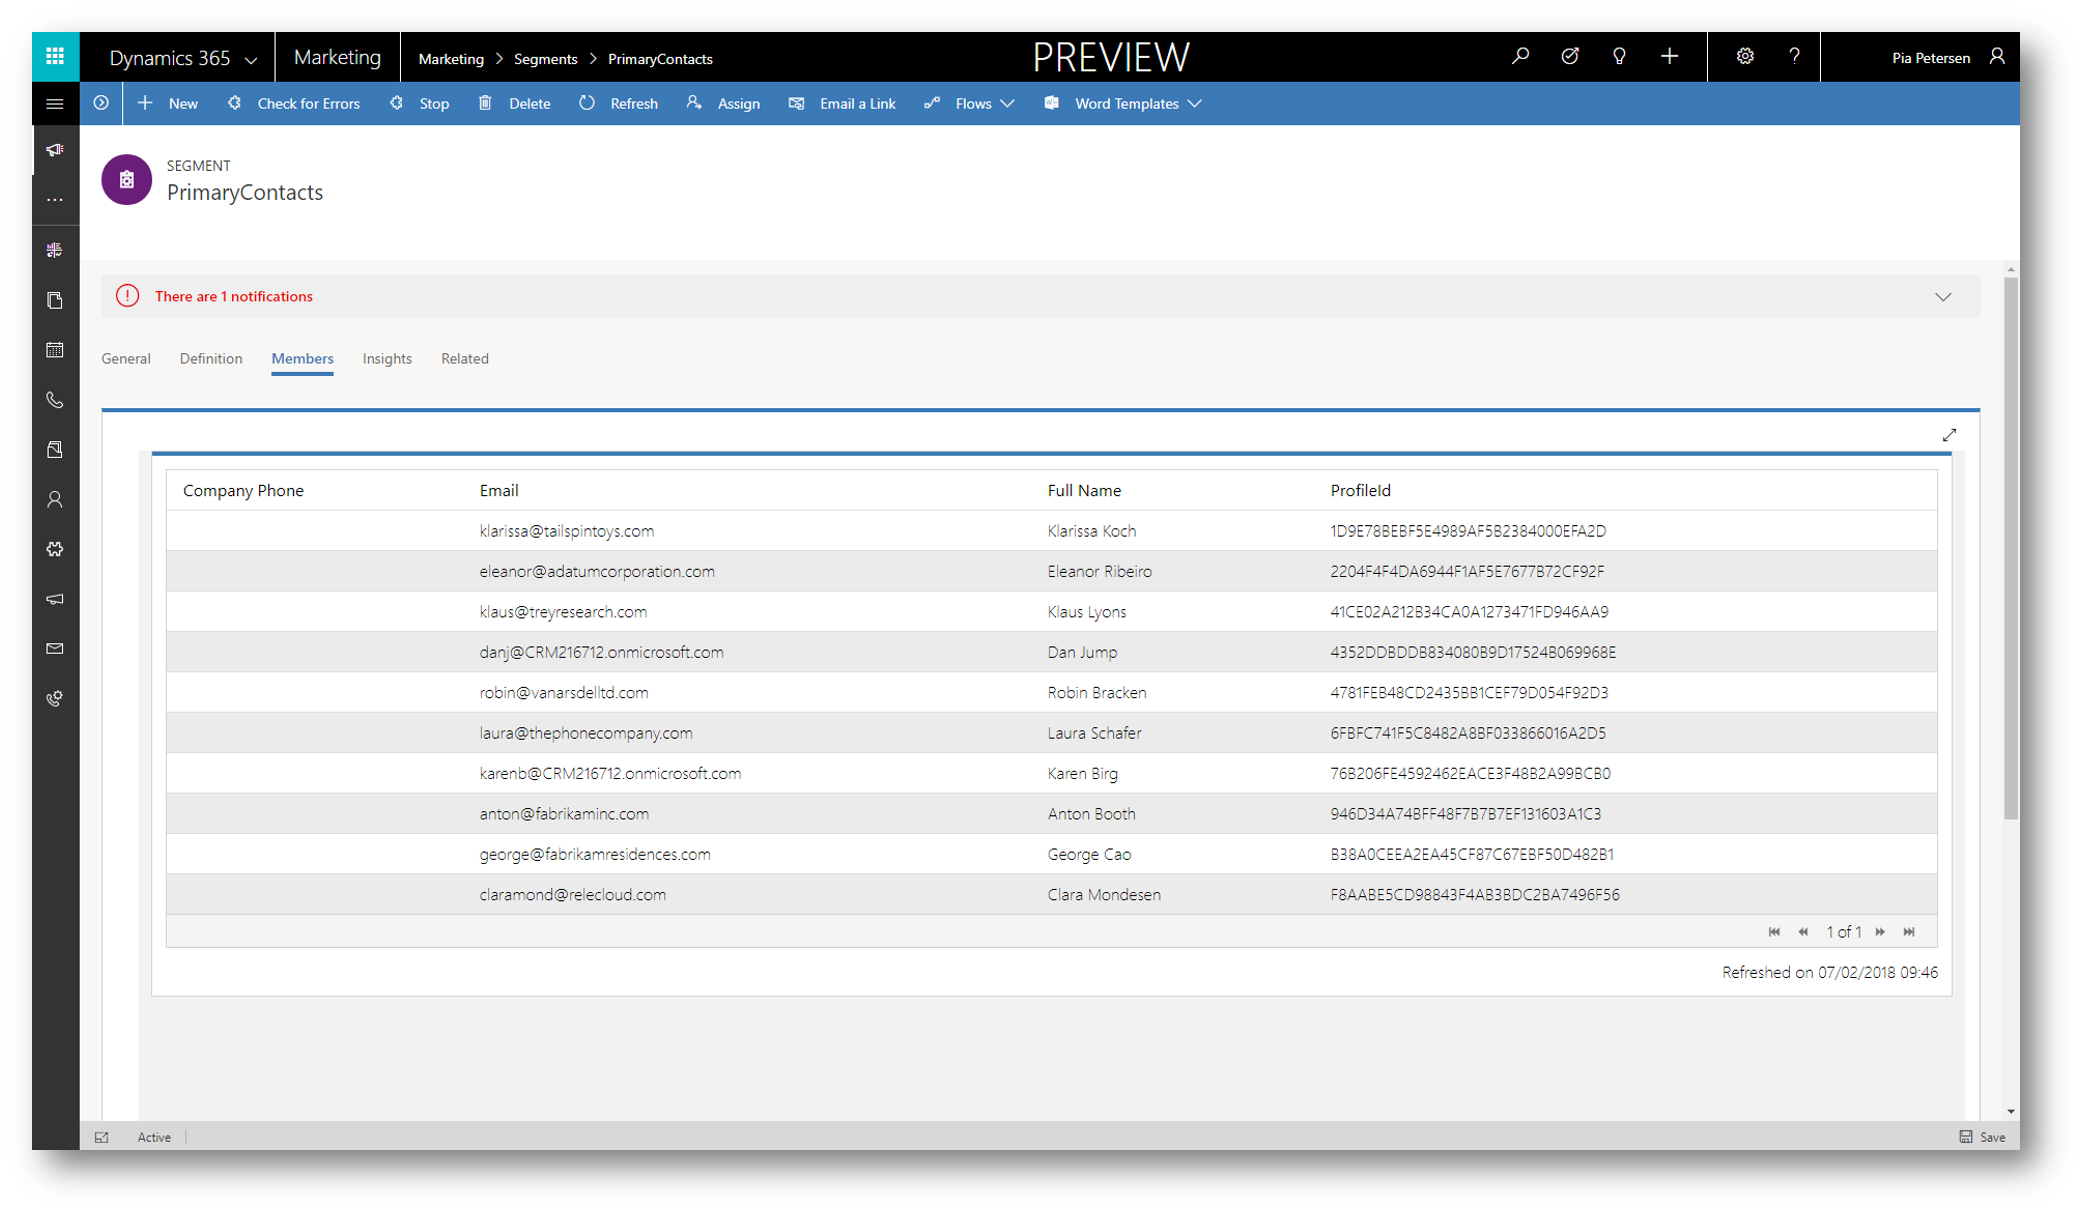
Click Save to save the segment, and then click the Members tab to see the contacts in the segment.
Note that the contacts Dan Jump and Karen Birg I have given email addresses I own and can access for test purposes.
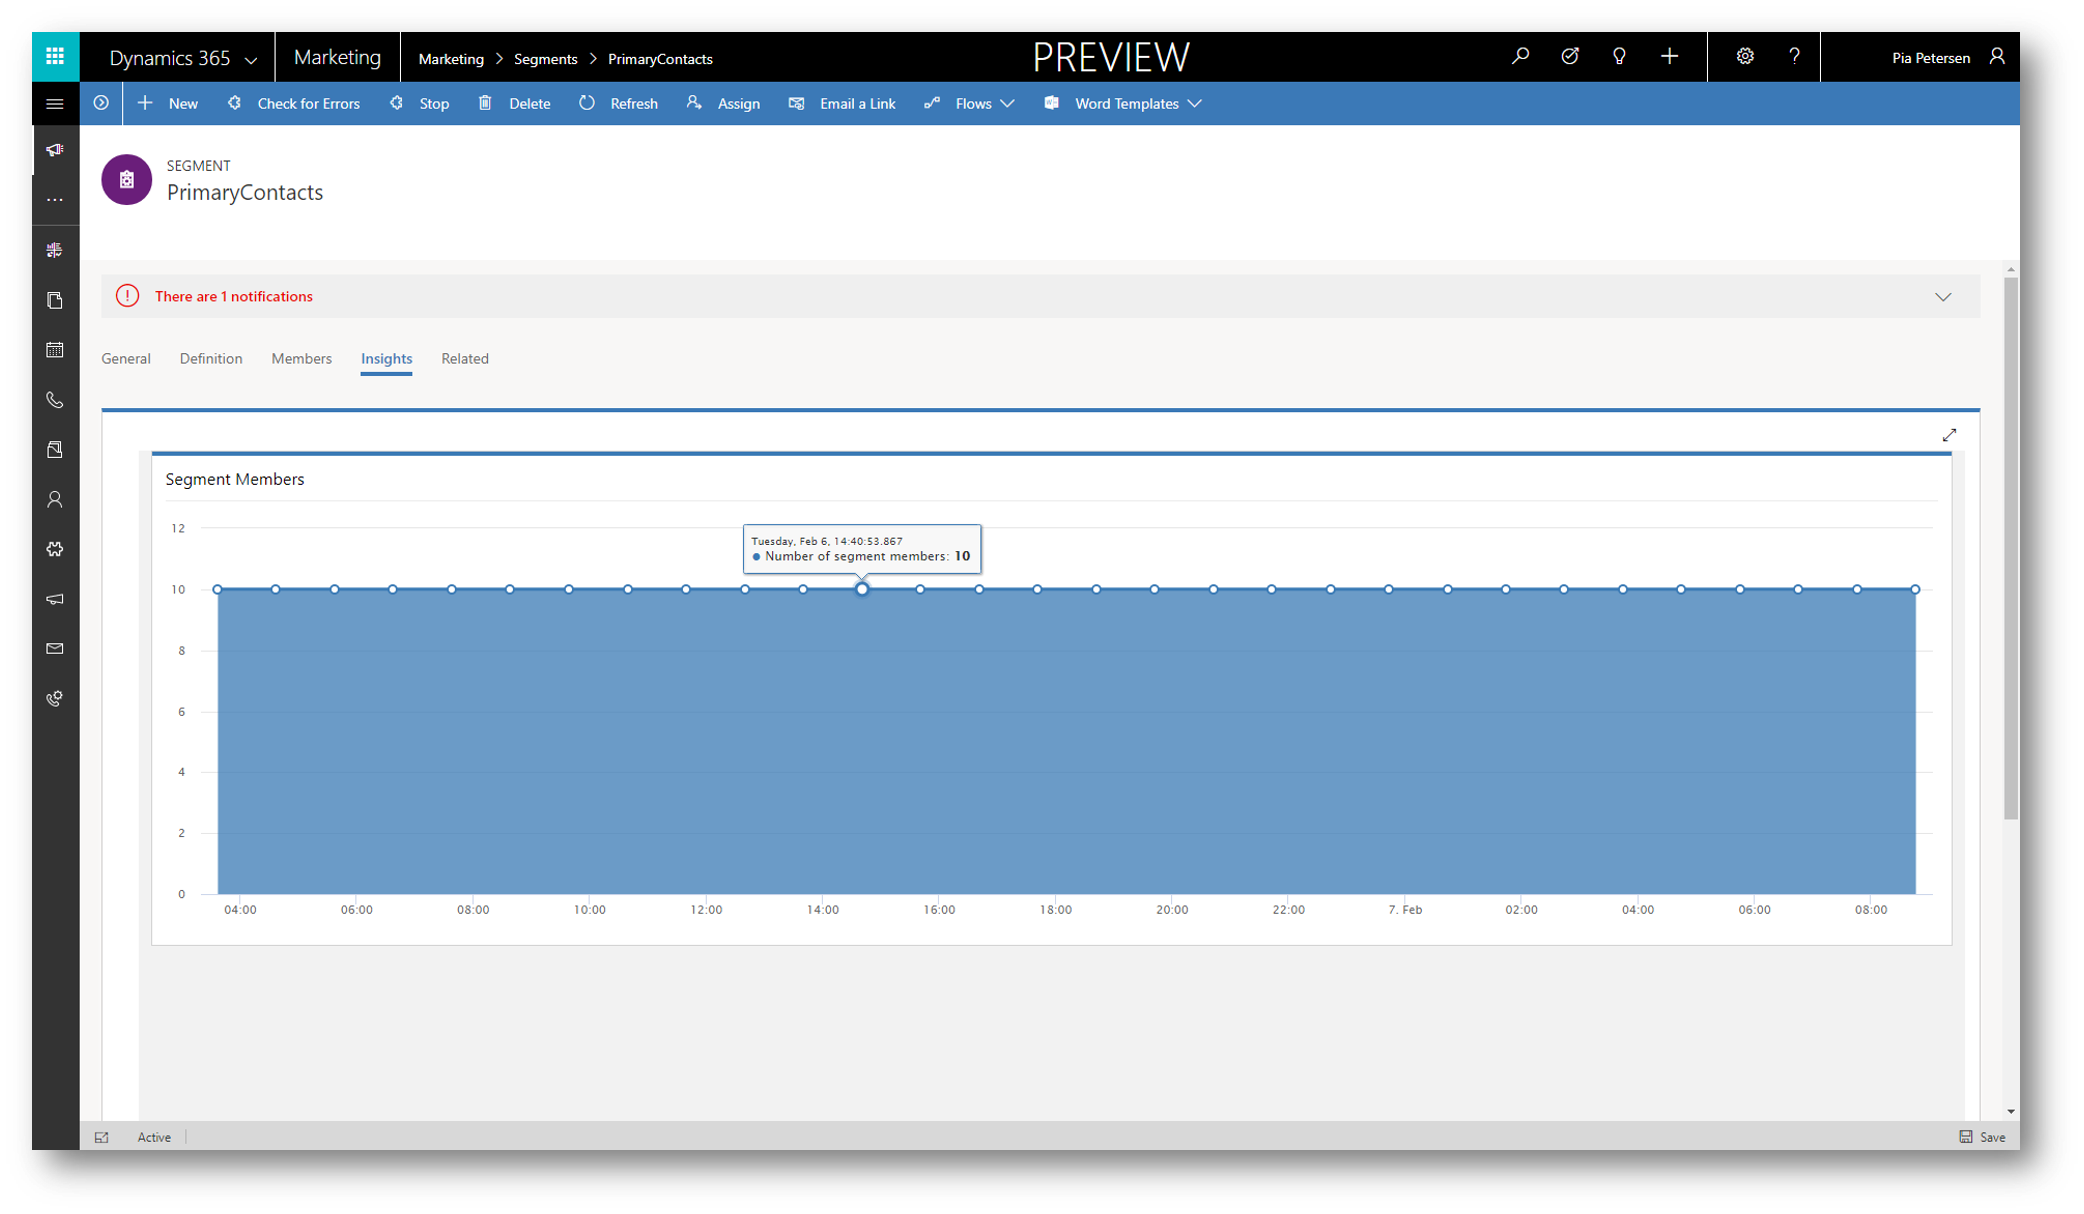
Click the Insights tab to see the current count of members of your dynamic segment
On the command bar, click Save (1) to save the segment, and then click Go Live (2) to publish the segment
You won't be able to use a segment in a customer journey until it goes live, even though you've saved it. Dynamics 365 checks the segment for errors and reports any problems it finds. If an error is reported, fix it and try again. If no error is found, your segment is copied to the Dynamics 365 email marketing service, which makes it available for use by a customer journey.

Marketing Emails
Email is a vital marketing channel for most modern organizations. It's also a core feature of Dynamics 365 for Marketing, which provides tools for creating graphically rich marketing emails with dynamic, personalized content. Dynamics 365 can send large volumes of personalized marketing emails, monitor how each recipient interacts with them, drive customer-journey automation based on these interactions, and present results both for individual contacts and with aggregate statistical analytics.
Process overview—to set up and execute a simple email campaign, you must do the following:
1. Create an email design that delivers your message and includes required elements, such as
- Subscription-center link
- Physical address
- Subject (email)
- From address (email address)
2. Publish the email design (Go live)
- this copies the design to the Dynamics 365 email marketing service, which makes the message available for use by a customer journey (but doesn't deliver any messages yet).
- the go-live process also activates any dynamic code and replaces links with trackable versions that are redirected through Dynamics 365.
3. Set up a customer journey
- identify a published target segment
- Identify a published email message to deliver to that segment
4. Activate the customer journey (Go Live)
- the journey then drives the email-delivery process and other automation features.
- the journey personalizes and sends each individual message, collects interaction data, and can follow up with additional processes based on those interactions.
Create Your First Marketing Email
In this example you will create a blank email, and add (static and dynamic) text, an image, a link, your physical address and subscription center to the email (required content)
Pick a Template
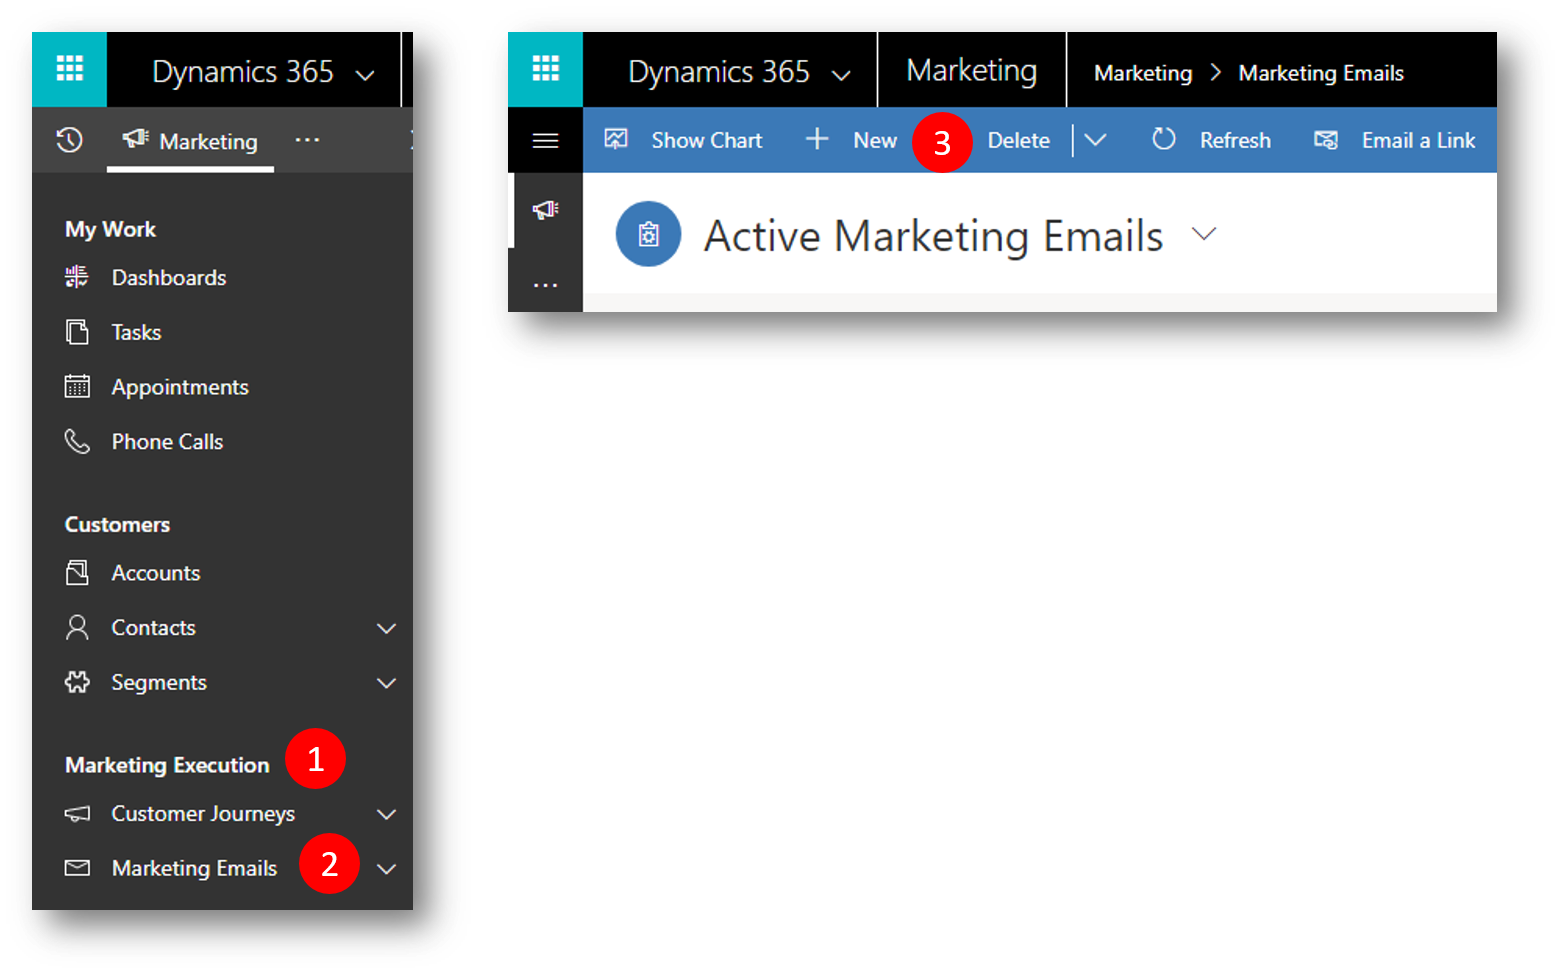
Go to Marketing Execution (1) and click Marketing Emails (2) to open the list of Active Marketing Emails
In the list of Active Marketing Emails click New (3) to open the New Marketing Email designer
In the New Marketing Email designer the Select an Email Template (4) dialog opens automatically
In the Select an Email Template dialog click Blank (5).
Note:
Each template provides a starting point for designing a particular type of message. The template dialog box provides tools for searching, browsing, and previewing your template collection. All other templates than the Blank template includes the required field, that we for the purpose of this example will add manually.
Click Select (6) to apply the template to your new message and close the Select an Email Template dialog 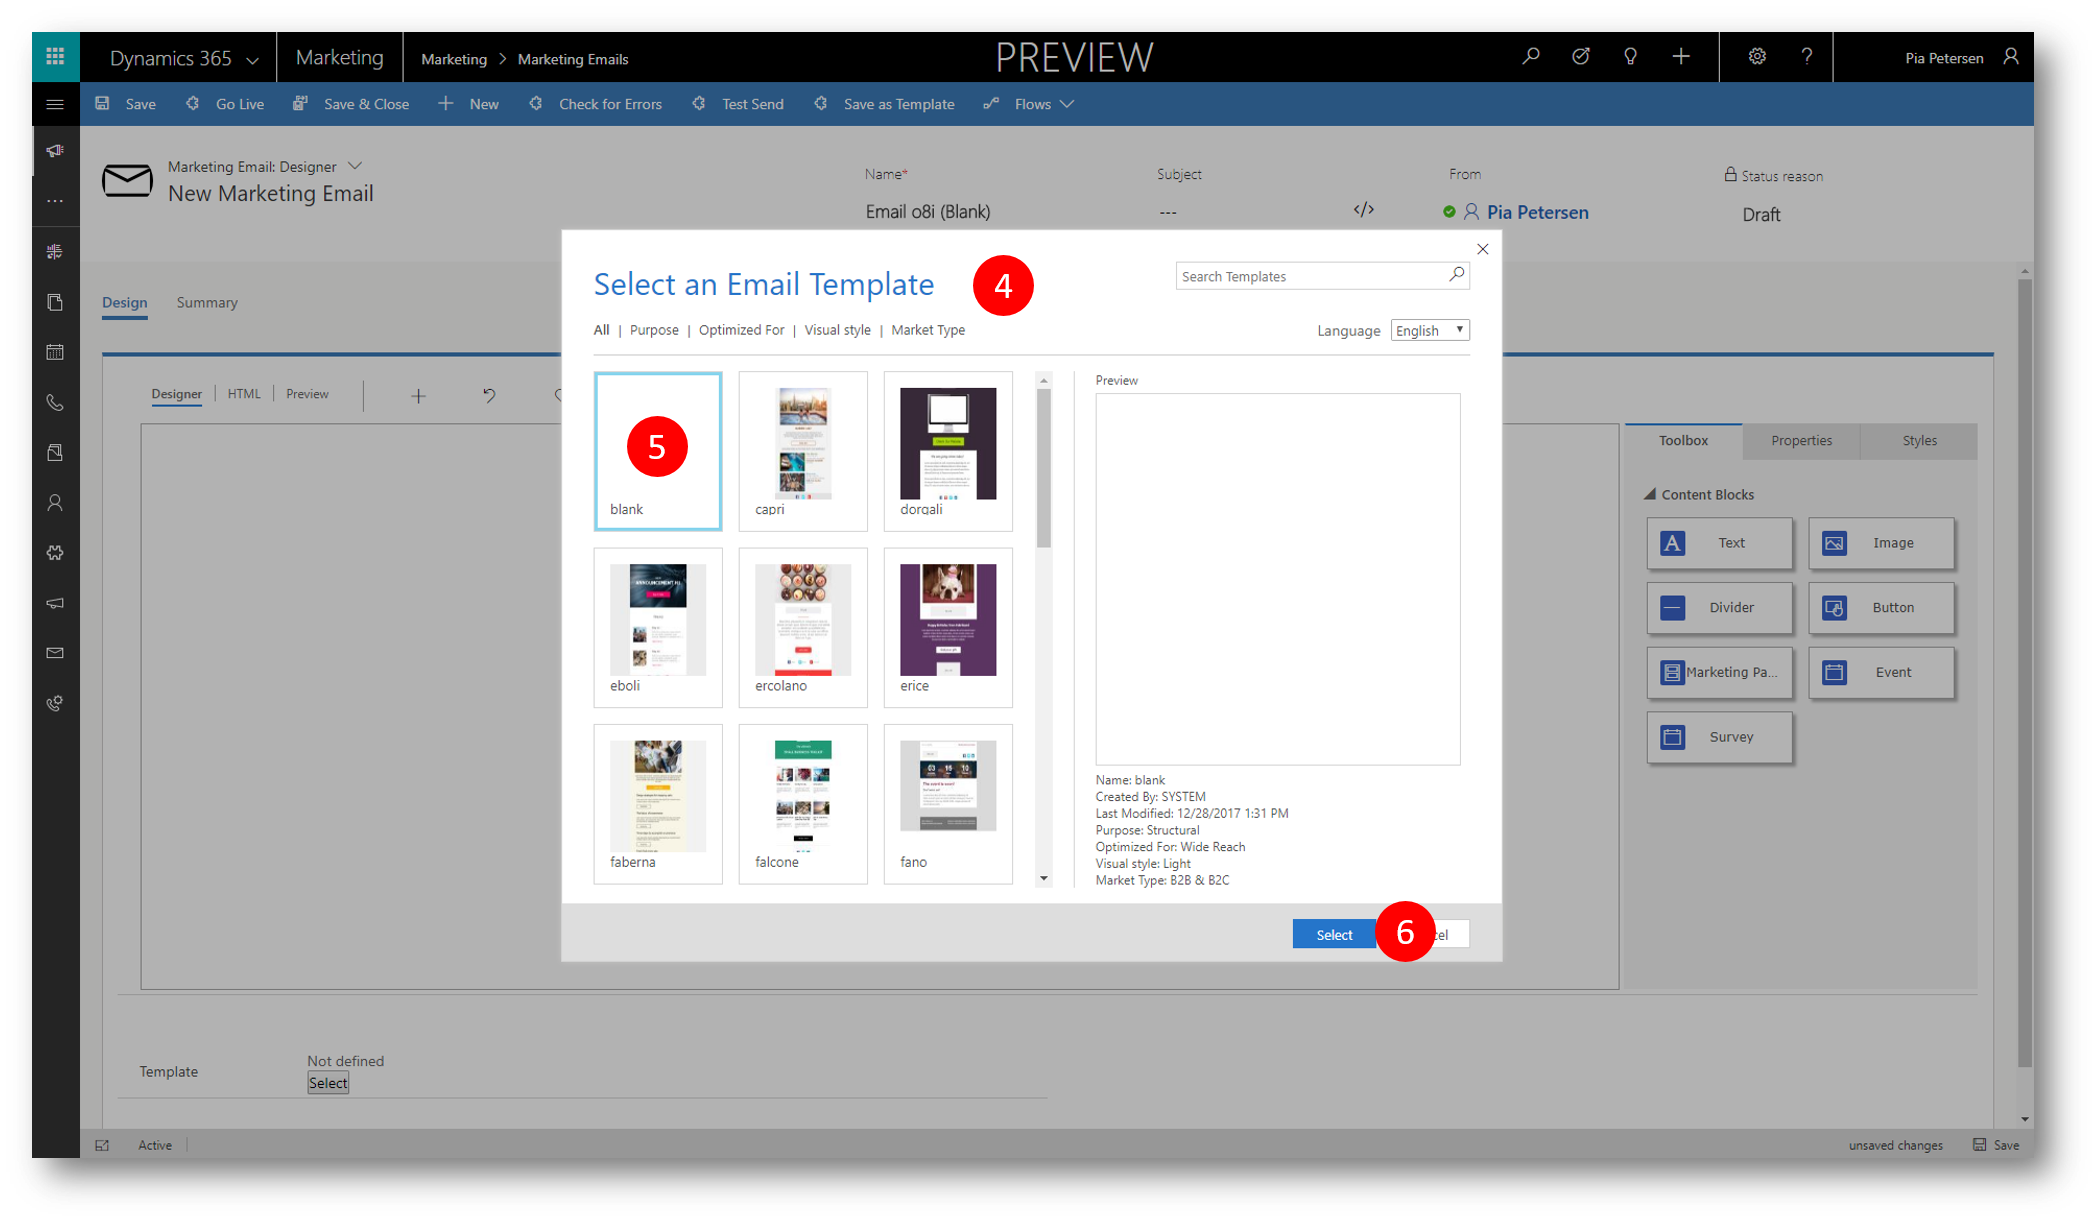
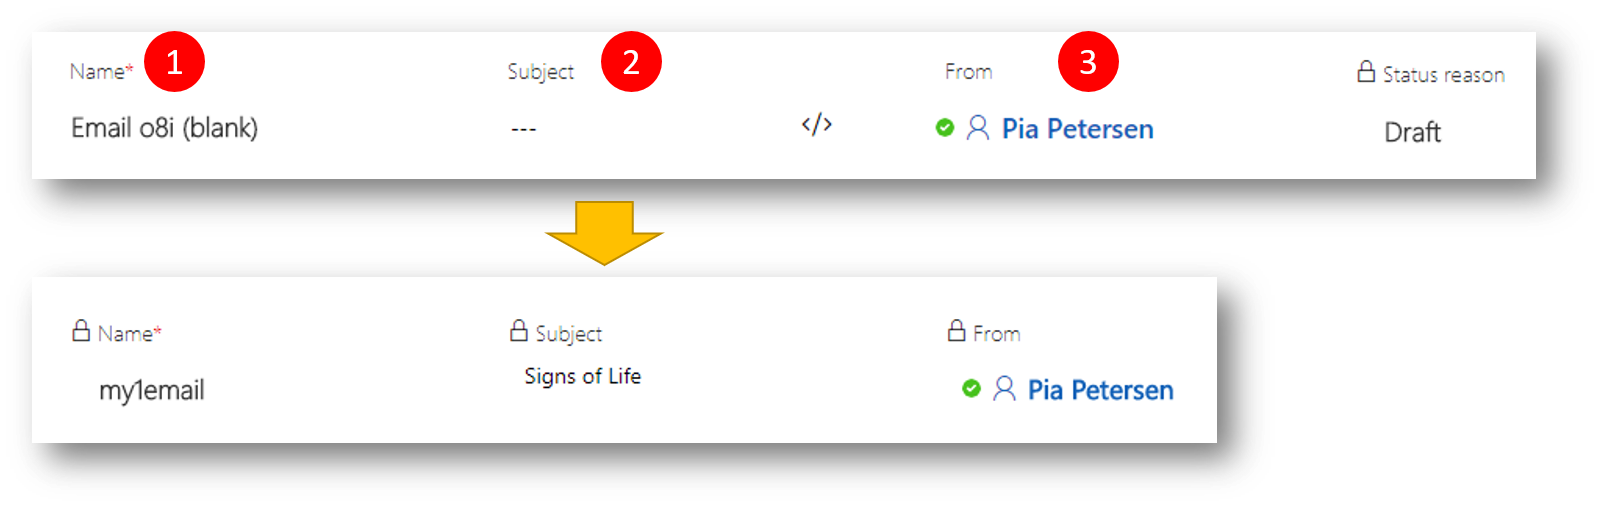
At the top right of the email designer page you will see three required fields: Name, Subject, and From. If your browser window is too narrow to show all the fields, you'll also see a down arrow that opens a menu where you can see the fields that didn't fit
Type or change the following:
- Name: This is an internal name for your message. Enter any name that you will easily recognize later.
- Subject: This is the subject that email recipients will see when they receive the message.
- From: Select here to choose/change the Dynamics 365 user who email recipients will see as the sender of the message.
Add Text
In the main part of the page, you now see the design canvas (on the left side), where you can drag, arrange, and enter content.
A Toolbox on the right side of the page provides content blocks that you use to construct your message.
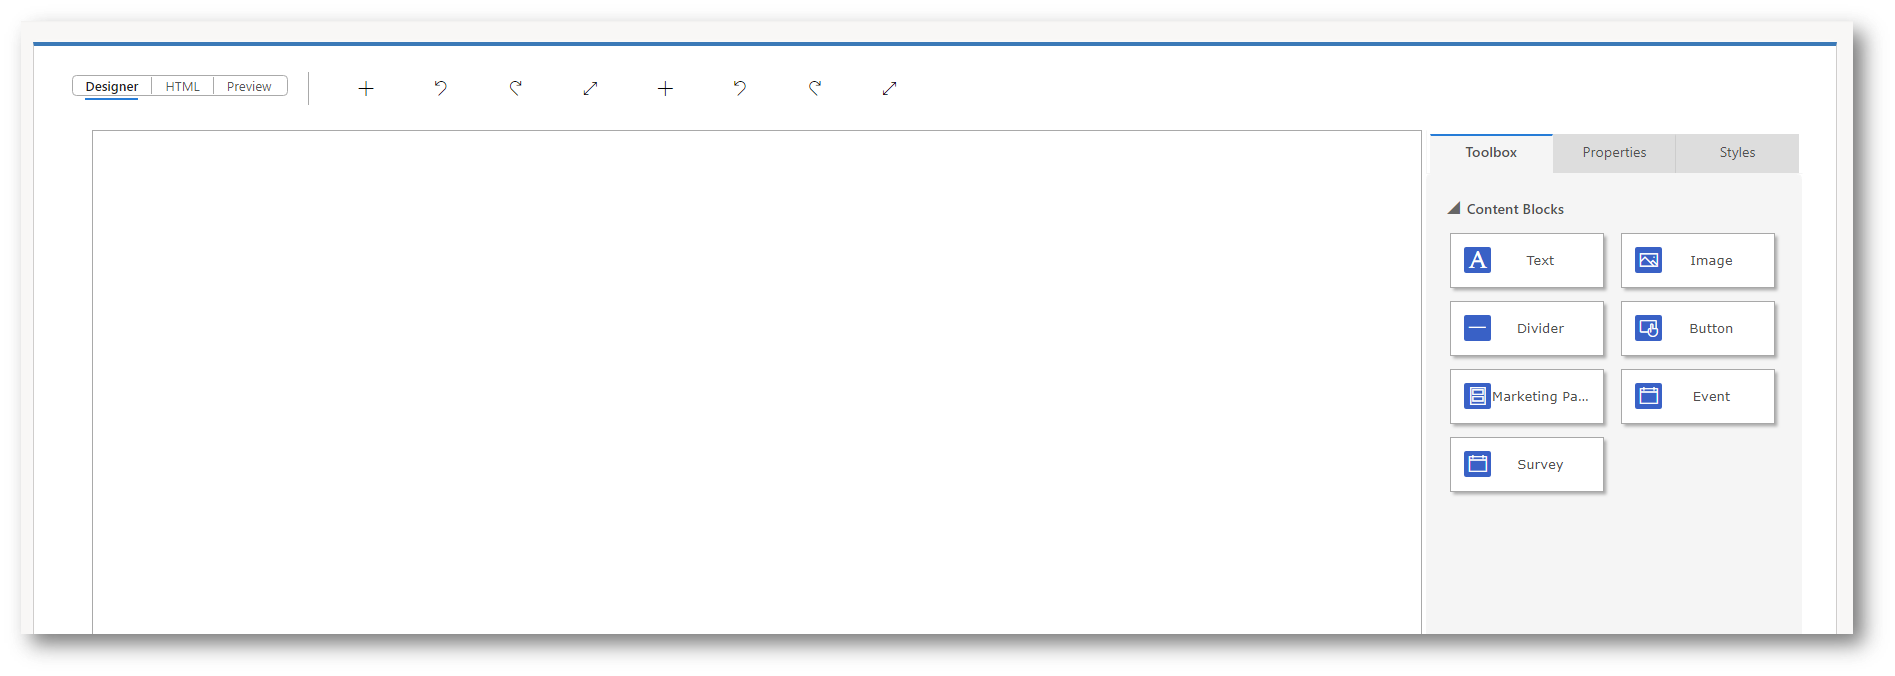
To add a Text content block to the canvas
- Select the Text tile in the content block from the Toolbox tab (hold down the mouse)
- Drag the tile over to the top of the canvas.
- When you have dragged the block to a suitable location, a blue shaded region appears.
- Release the mouse button to drop the block at that location.
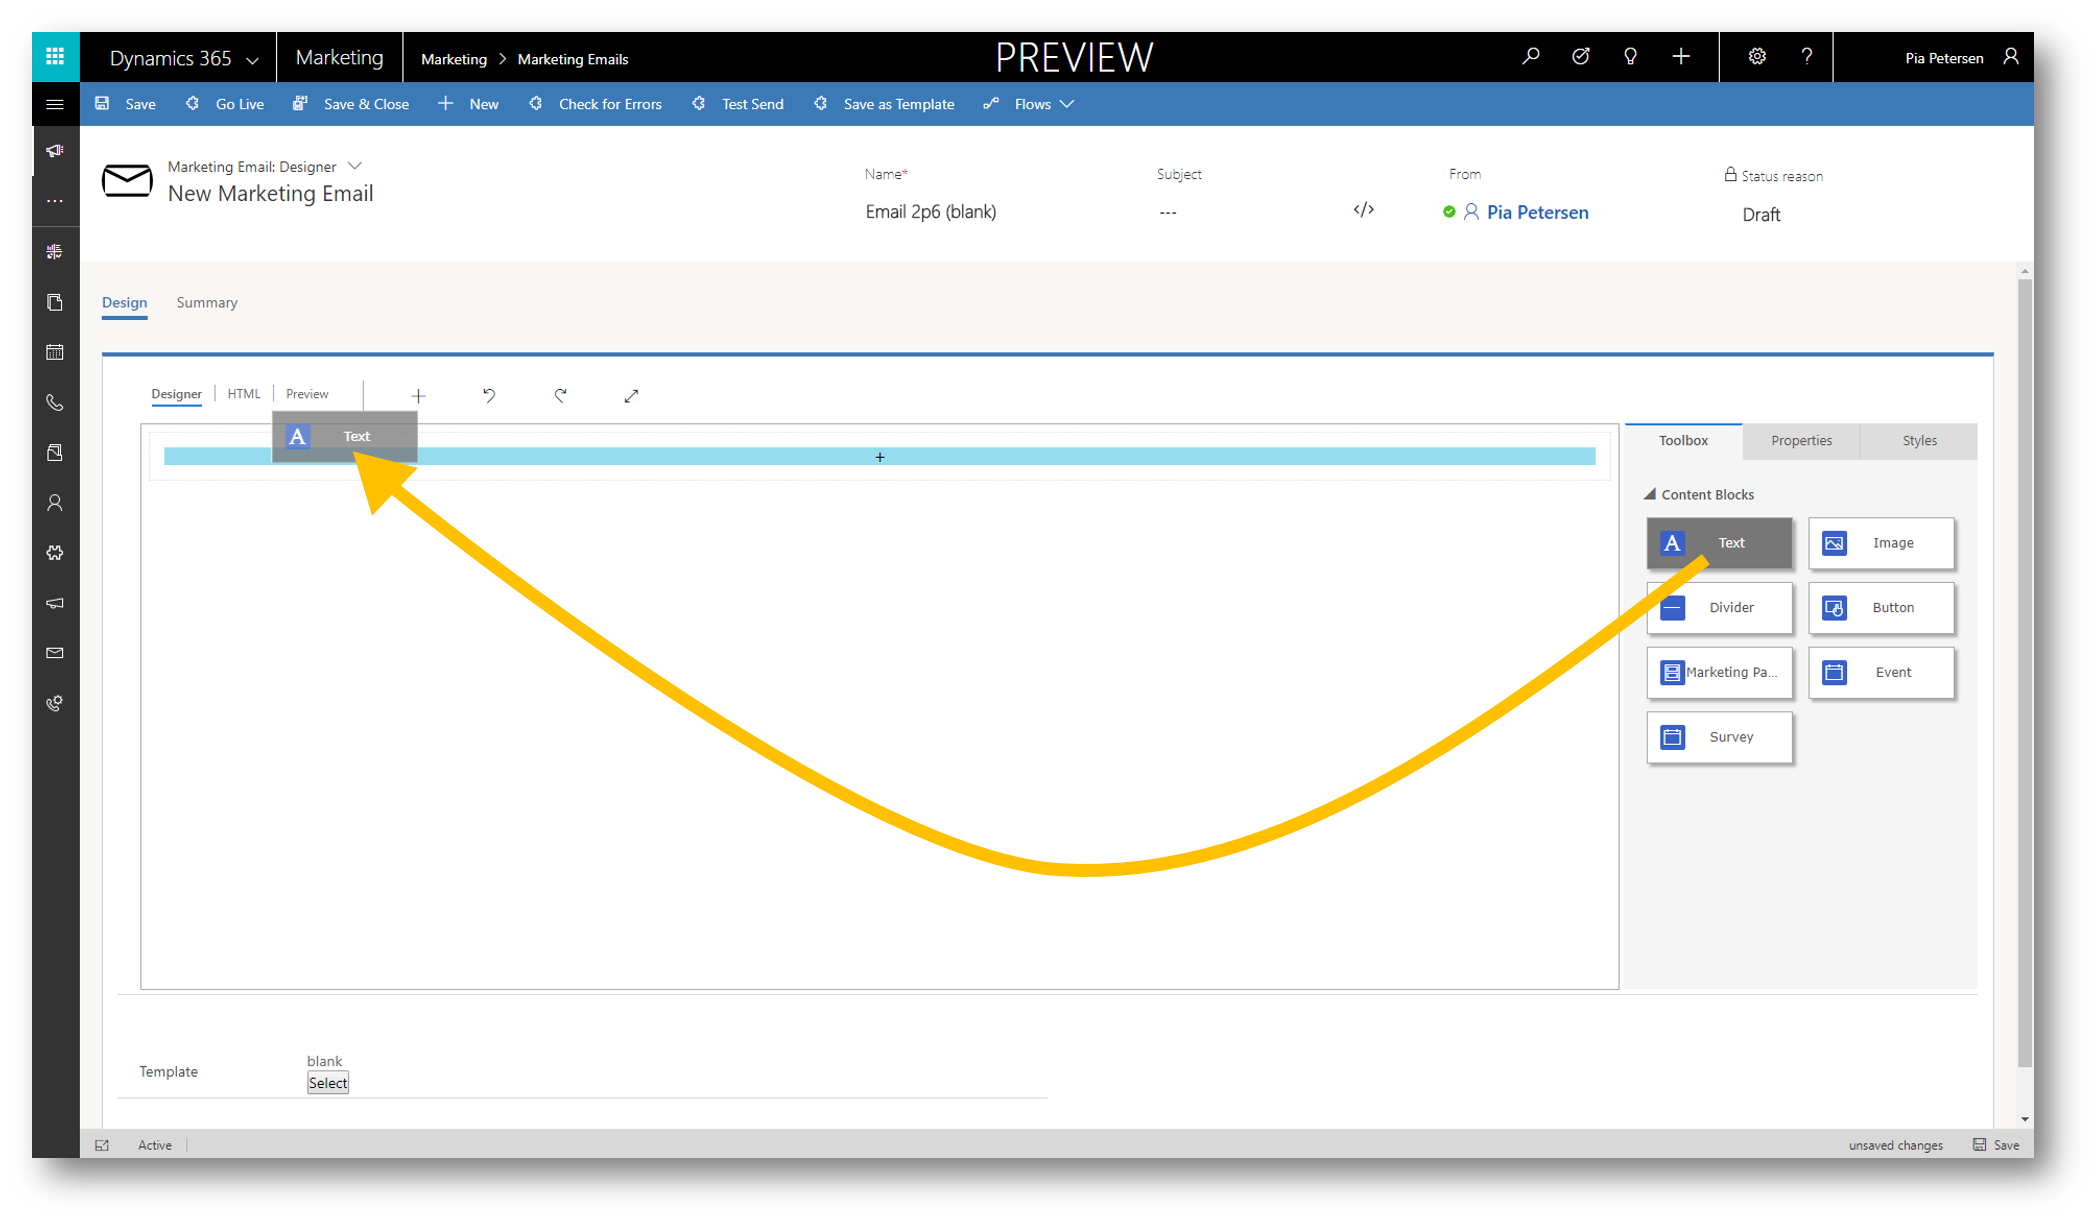
When you drop the text block, you see a placeholder text within the block (1) and a floating toolbar below the placeholder (2)
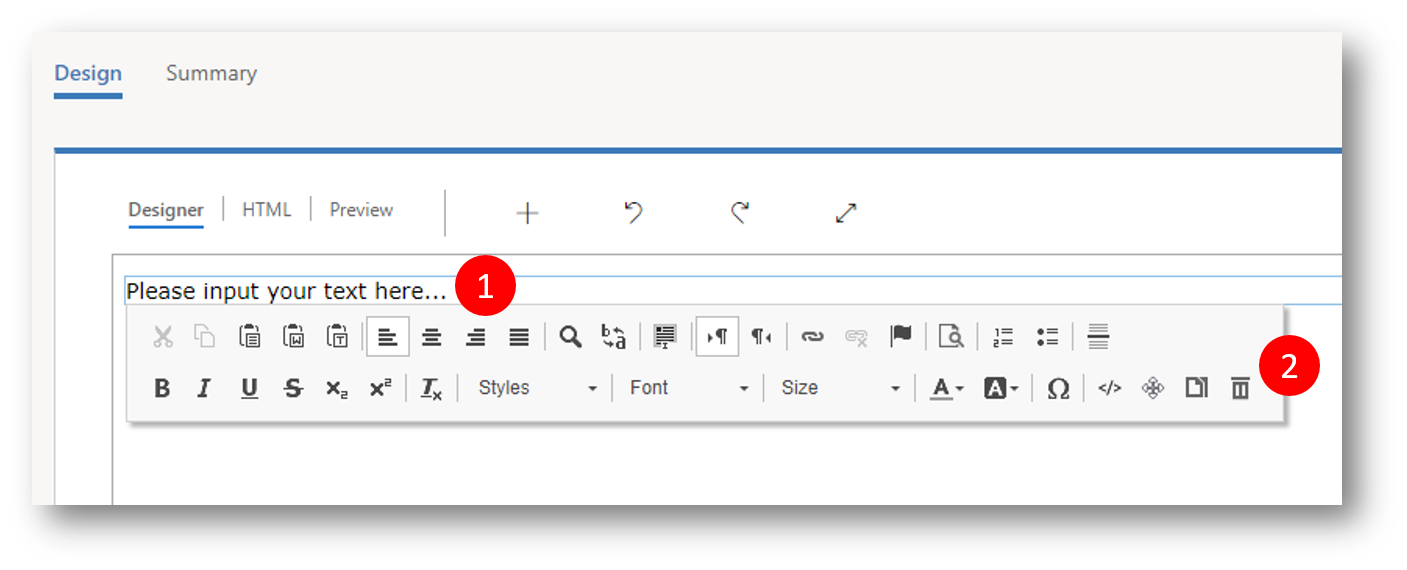
Select and remove the placeholder text, and then add your own text, eg "Dear "
Add your body text to the message, and use the toolbar buttons to style your text as you would in a text editor like Microsoft Word (point to any toolbar button to see what it does). Most of the buttons are for styling text and paragraphs, but there are also buttons for creating links; entering dynamic text (more on this later); and moving, copying, or deleting the entire text block.
Insert Dynamic Field
An easy way to personalize the message is to include the name of the recipient in the greeting.
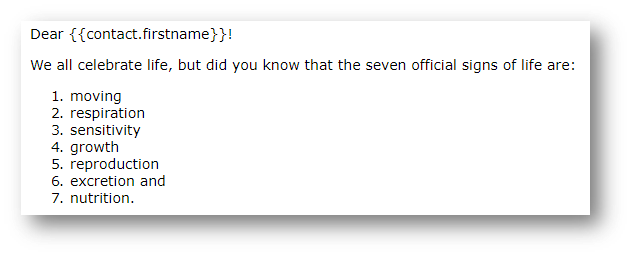
Working in the text block you just added, enter a suitable opening such as "Dear ".
On the pop-up toolbar, click the assist-edit button </> (1) to open a drop-down list at your insertion point in the text block.
In the assist-edit drop-down list, select Contact[context] (2)
The assist-edit tool enters code that references the contact entity, advances the insertion point to the next position in the code, and opens a new dropdown list that shows each field from the contact entity.
In the assist-edit drop-down list, select First Name (3)
The assist-edit tool finishes the code so that it references the first-name field from the contact entity.

The full salutation now looks something like this: Dear {{contact.firstname}}. (If you prefer, you can enter that code directly without using assist-edit.)
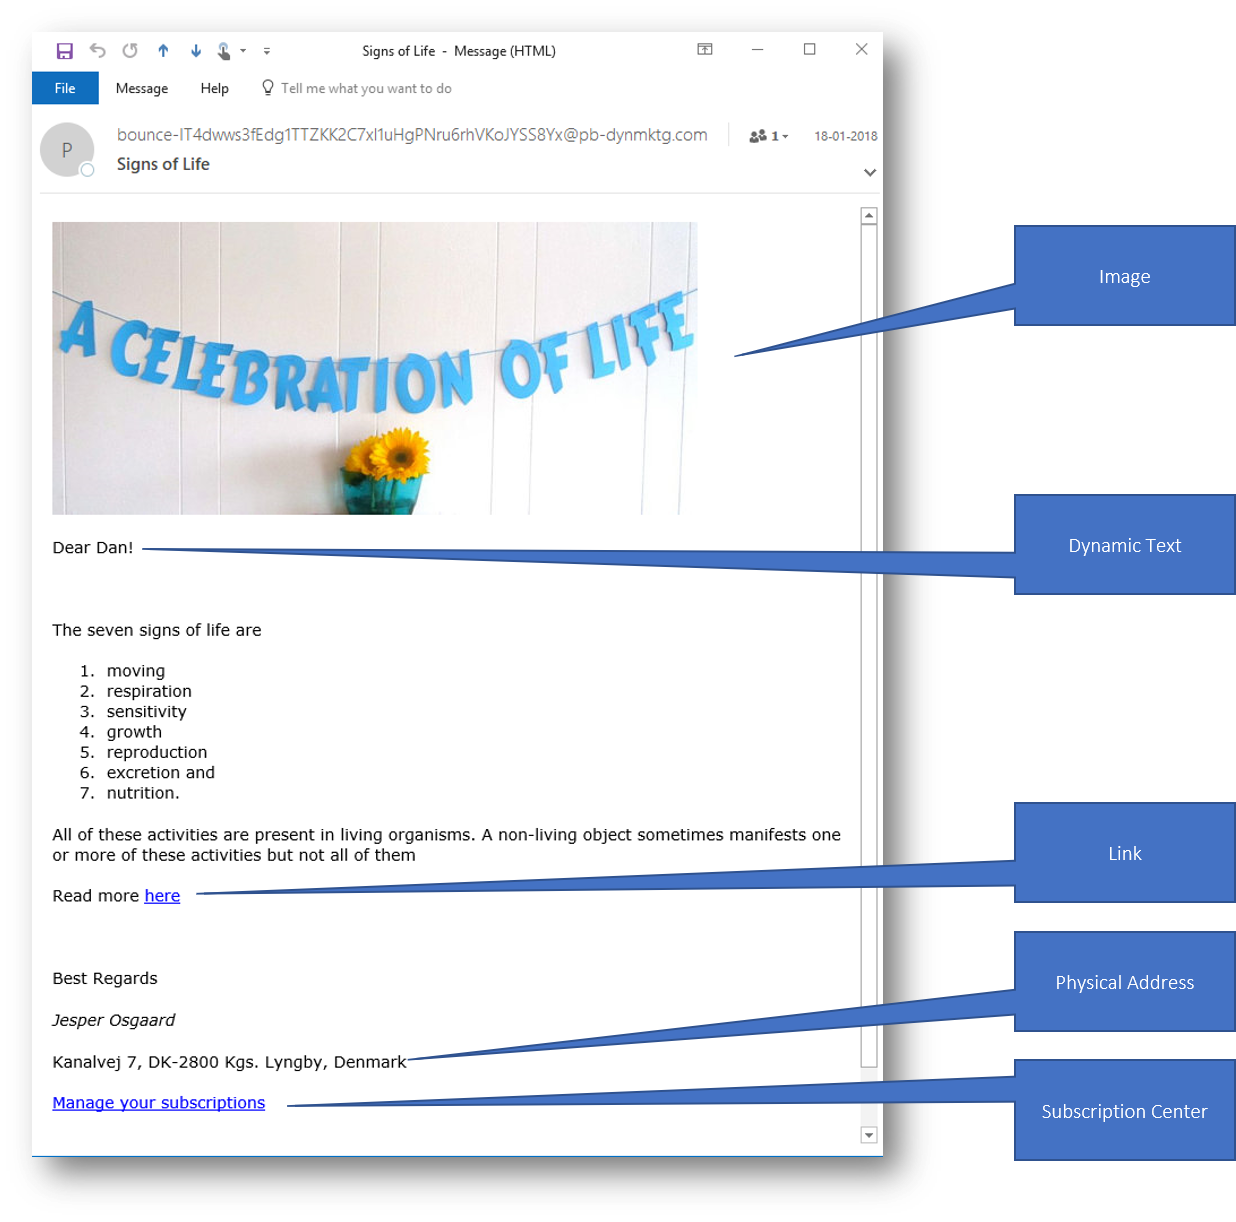
Add Image
You should usually include at least one visible image in your design because this will invite recipients to load images, which is required for Dynamics 365 to log the message-open event.
Drag an Image block from the Toolbox onto the canvas - when you drop the block, you'll see an image placeholder and the Properties tab becomes active
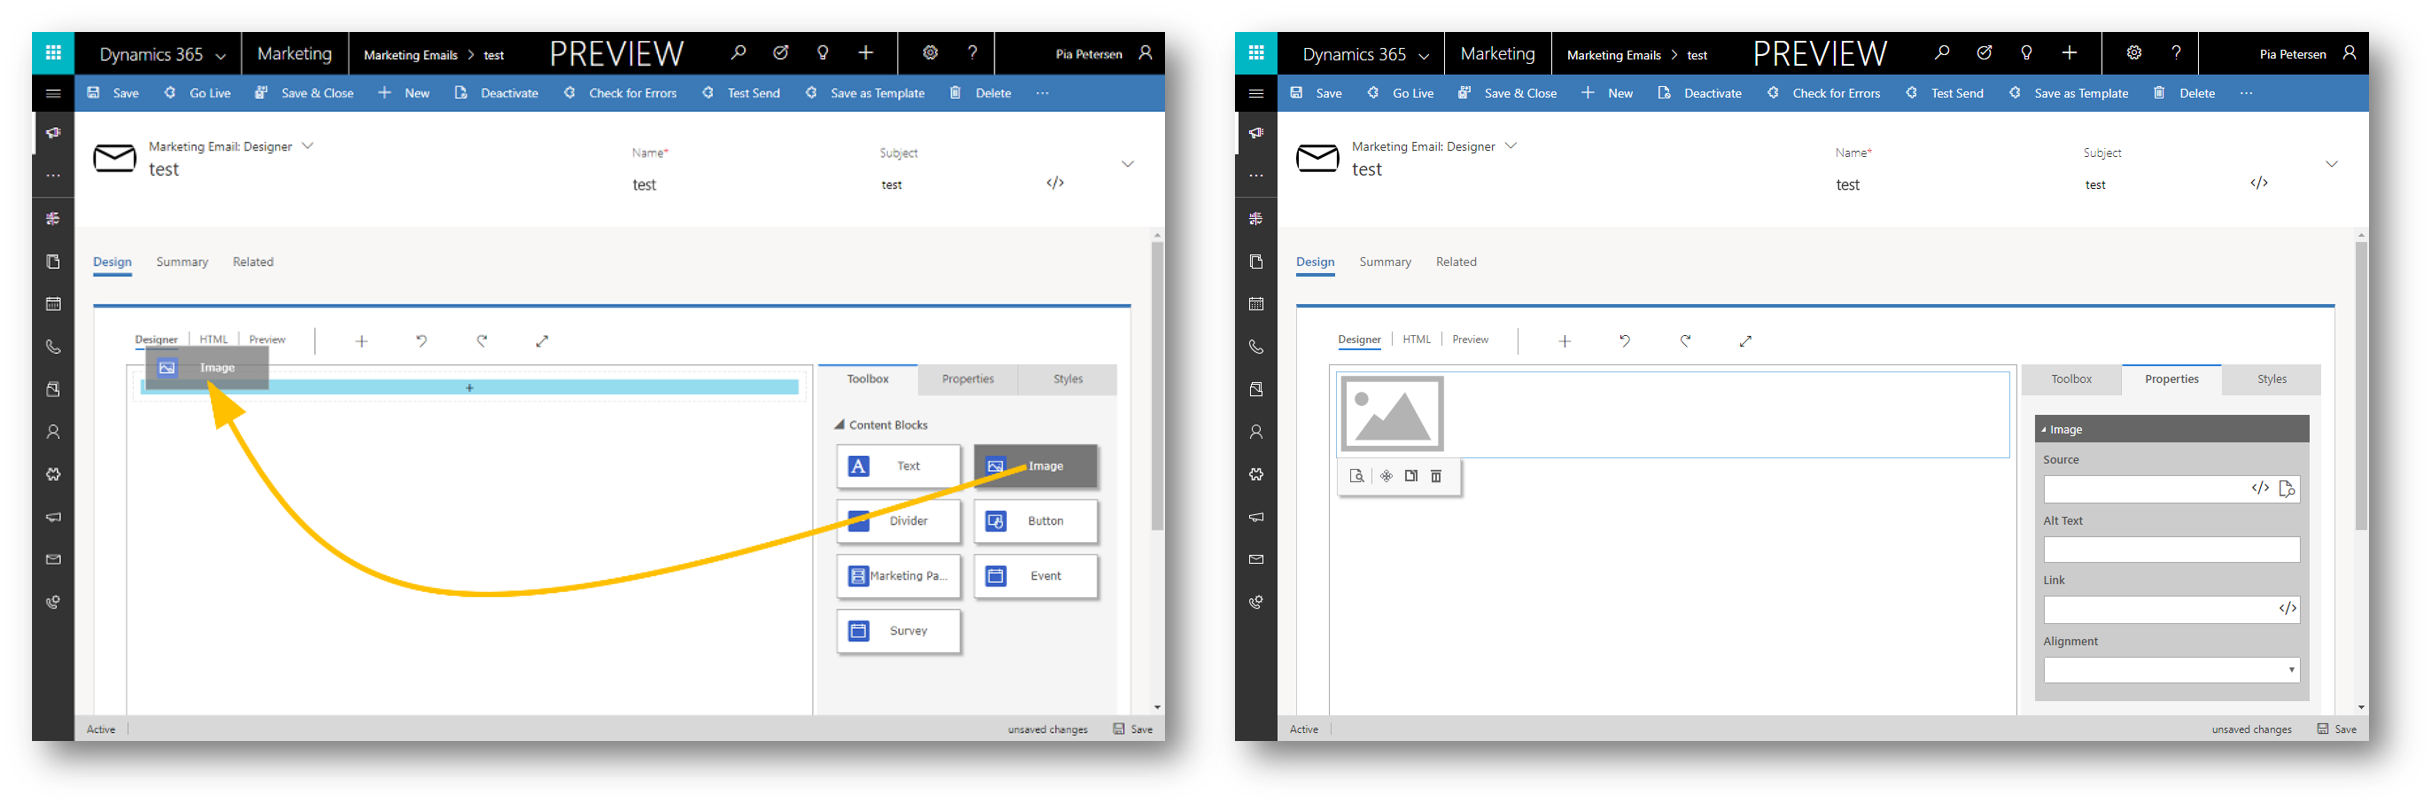
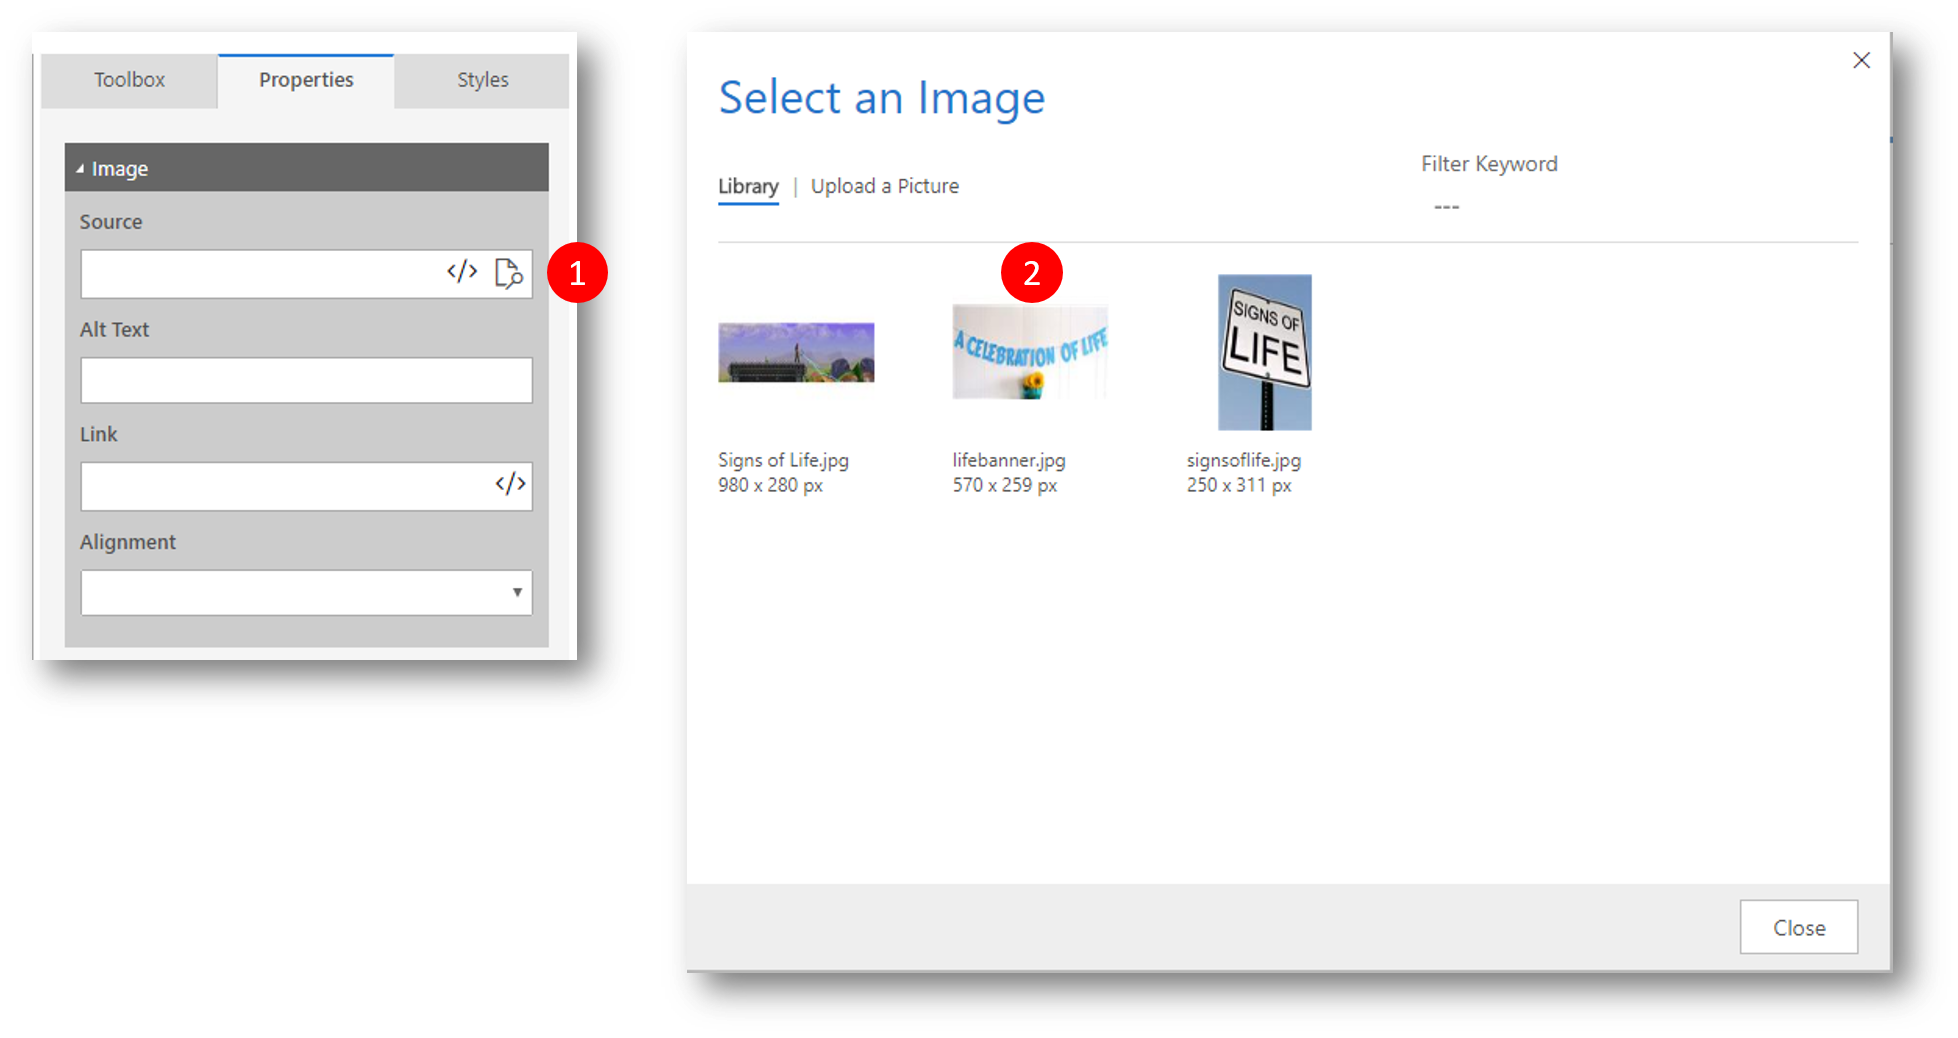
On the Properties tab, select the Image Gallery button (1) at the right side of the Source field to open the Select an Image dialog box opens
Here you can see all the images that have already been uploaded to your Dynamics 365 server (Internet Marketing > Files)
Select an image (2), and then click Select to place it in your message design. (If you don't see any images, choose the Upload a Picture tab to add a new one.)
The image is added to the message

Add Link
You can insert links to websites you’d like the recipients to navigate to for more information (or Marketing Pages with Forms you’d like the recipients for fill out – more in that later blog posts).
When the recipient clicks the link, Dynamics 365 for Marketing records the click (this insight can be leveraged for Lead Scoring and other things)
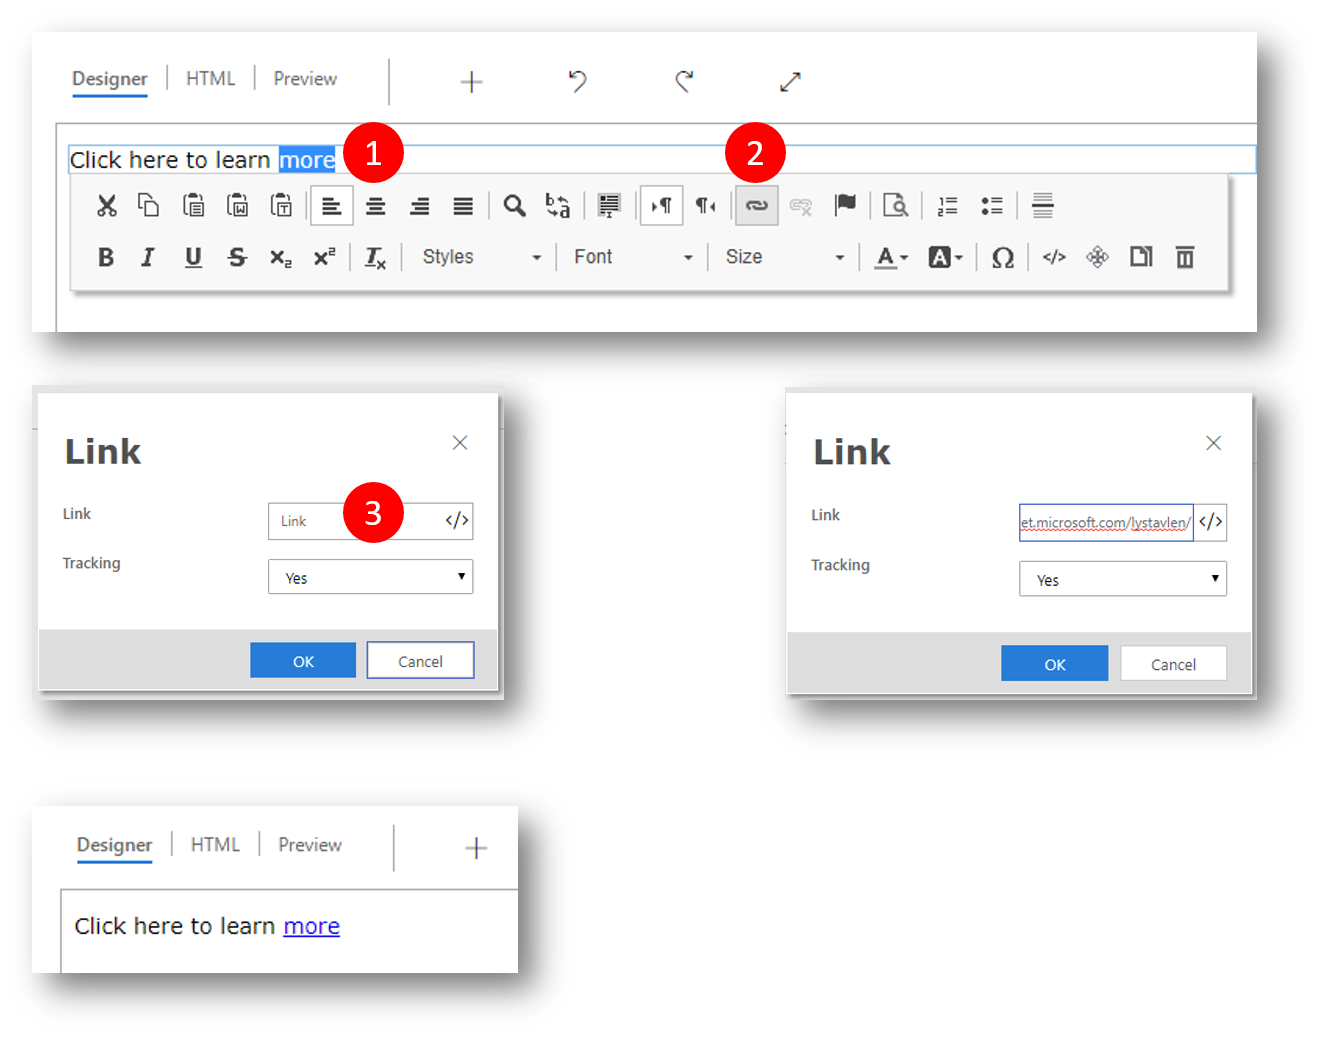
Choose a suitable location in the text block for the link, and then enter an anchor text there, such as “Click here to learn more” (1)
Select the anchor text, and then select the Link button (2) from the floating toolbar, which opens the Link dialog box
Paste your website URL in the Link box (3) and then click OK, to close the dialog and hyperlink the anchor text. When a recipient clicks this link in a mail he/she will be taken to the webpage, and Dynamics 365 for Marketing will track that interaction.
Add Physical Address and Subscription Center
The body of all email messages must include both a subscription-center link and your organization's physical address. These are required by law in many jurisdictions, and Dynamics 365 won't let you publish any marketing email that doesn't have them.
Most email templates include them already, but when you're working with a blank template you must add them yourself. Like you did with the recipient's name, you'll place them by using assist-edit as follows
Choose a suitable location for your physical address, and then use assist-edit to place it.
Select ContentSettings[context] in the first drop-down list, and then select AddressMain in the second drop-down list
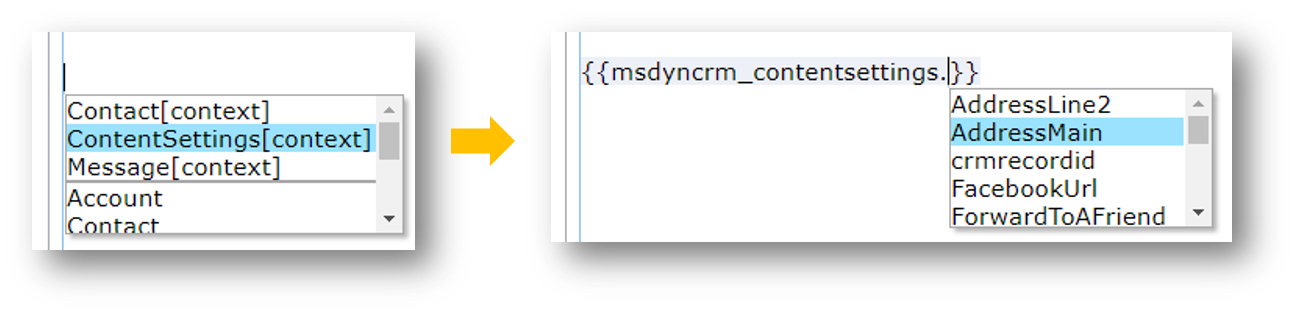
The expression should look like this

Note: When the final mail is sent, the Physical Address is resolved to the address you entered (during First Run Experience). To change the Physical Address navigate to Settings > Advanced Settings > Marketing > Default Marketing Settings > Email Marketing > Default Content Settings
To insert the subscription center link repeat the above, only this time choose SubscriptionCenter in the drop-down
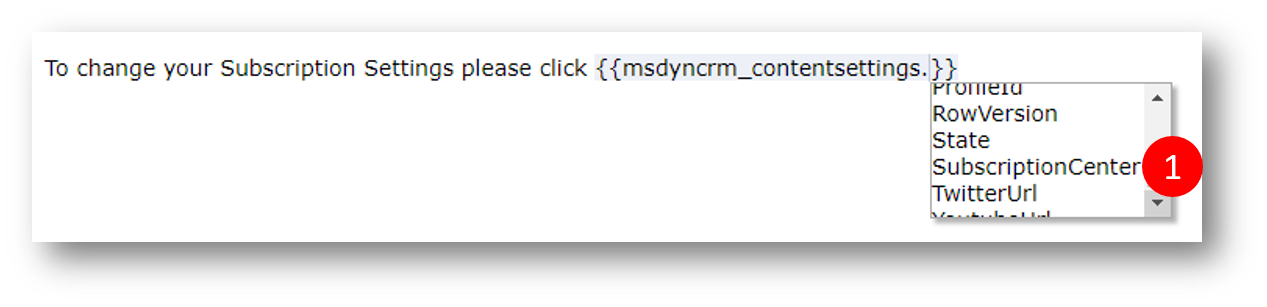
When a recipient clicks this link in a mail the recipient will be taken to a webpage (the subscription center) in which the recipient can opt out of emails and more.
Preview and Test Send
Since your message now includes all the minimal required and recommended content, you will want to test if the email looks and works as intended - that is, preview your message and then perform a test send (i.e. send the message to yourself)
Go to the Preview tab (1) to see an approximation of how it will be rendered on various screen sizes and how its dynamic content will get resolved.
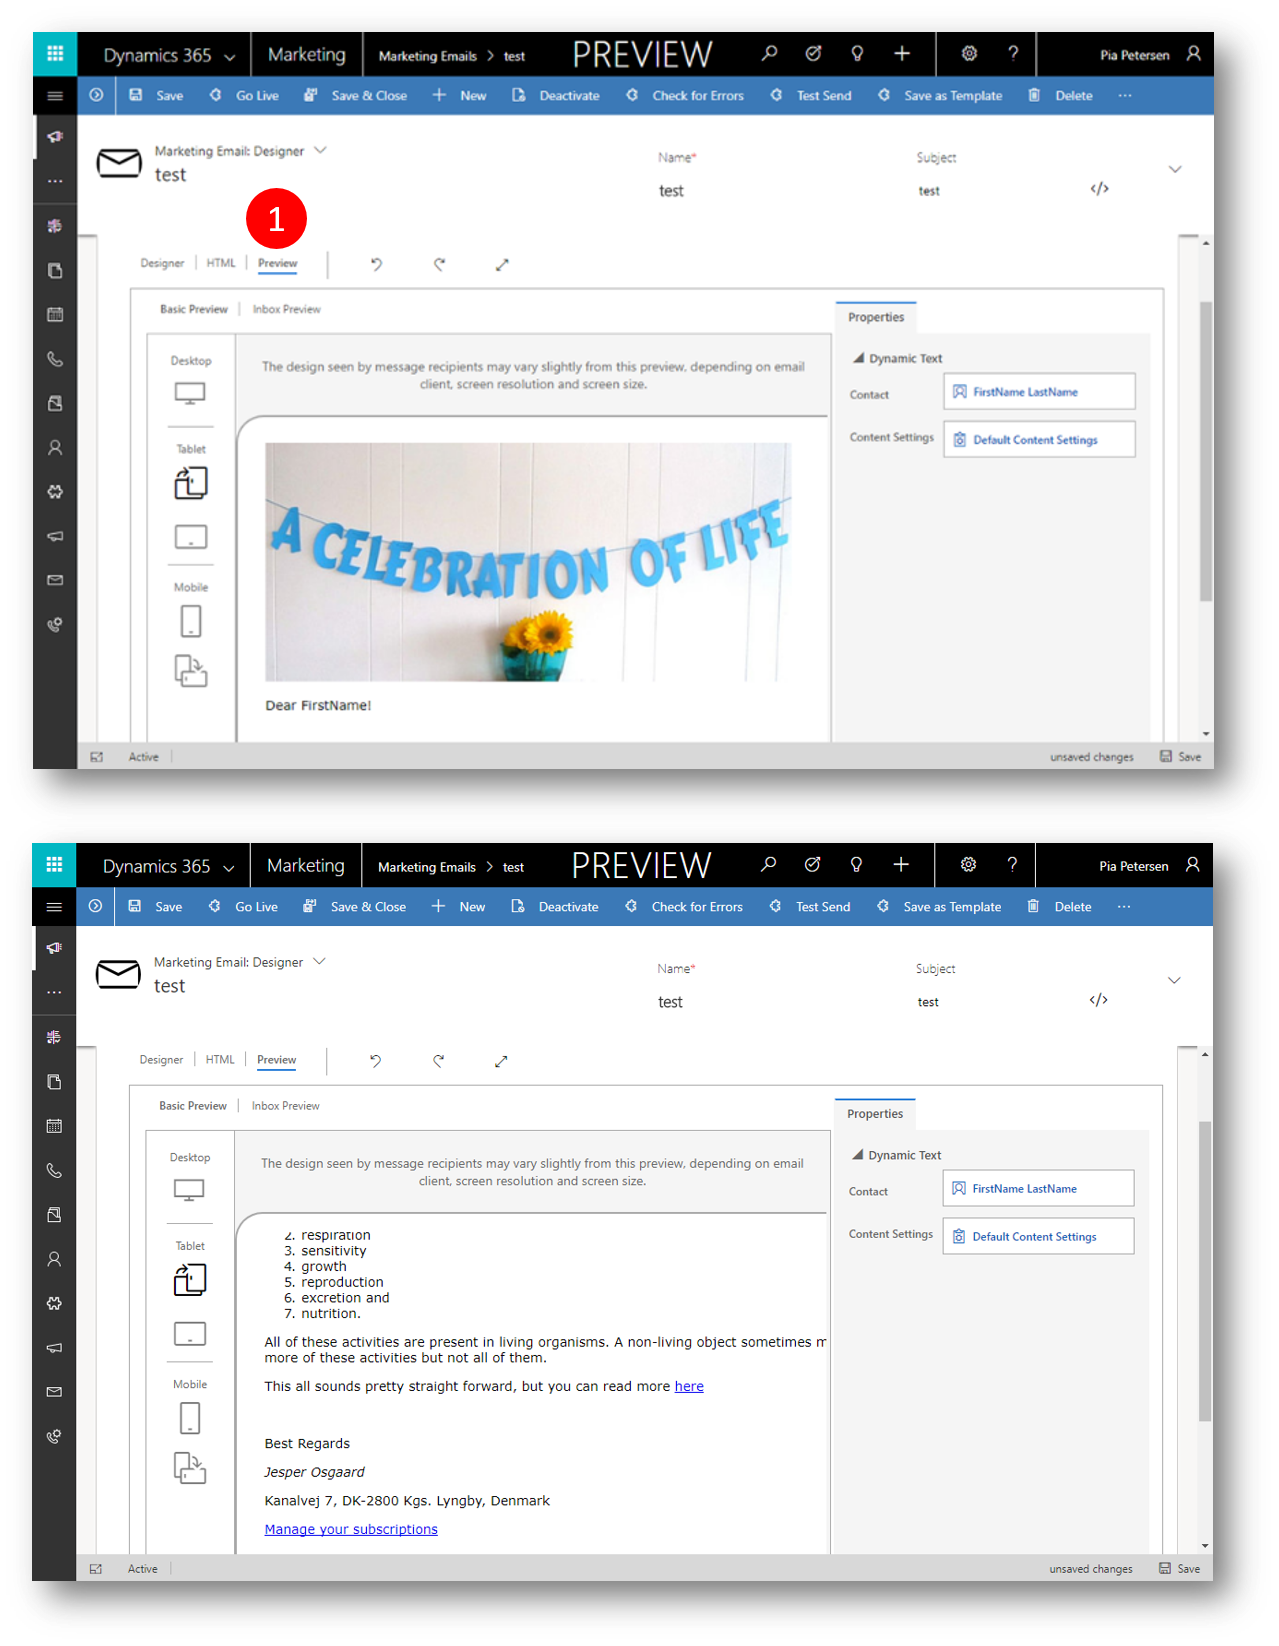
Use the buttons in the leftmost column to choose a screen size and orientation to preview

To make sure your message includes all required content and is ready to send, select Check for Errors in the command bar.
Dynamics 365 for Marketing checks your message, and then displays results in the notification bar.
Expand the notification bar to read the results.
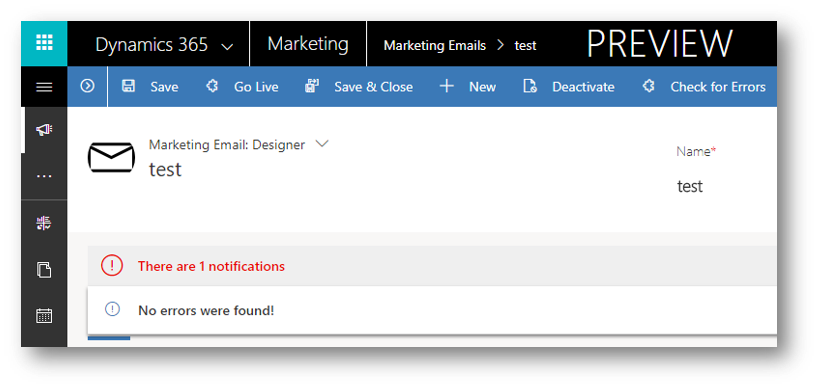
If you followed this procedure, your message should pass the error check. If it doesn't, read the error message, fix the reported issue, and try again until it passes.
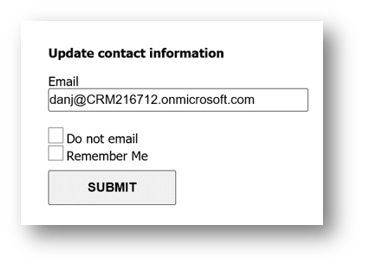
Until now, your previews and error checks have been simulated. The final test is to deliver the message to yourself, open it in your email program, and inspect the results.
On the command bar, click Test Send 
A Quick Create form slides in from the right.
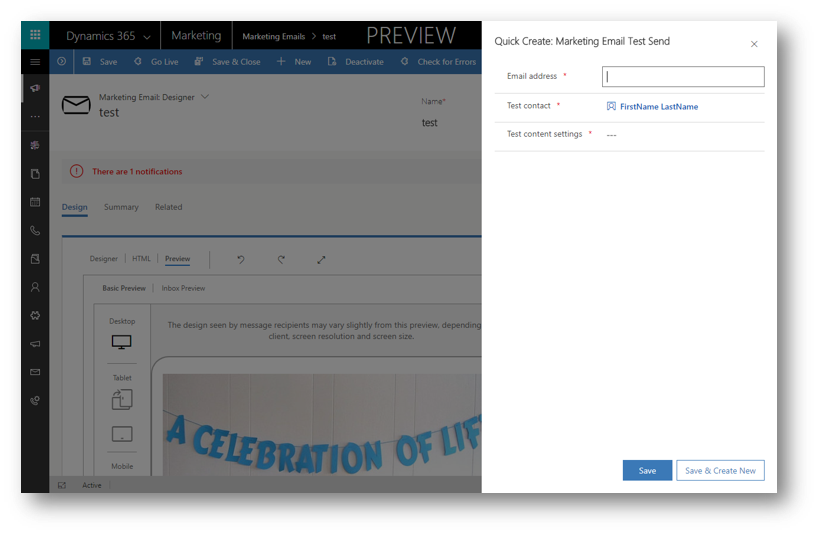
Enter an (one you own) Email Address in the field provided, and select a contact for the Test Contact and Default Content Settings for Test content settings 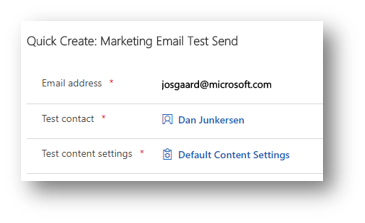
Select Save to send the message, and then open your mailbox to verify everything looks as expected
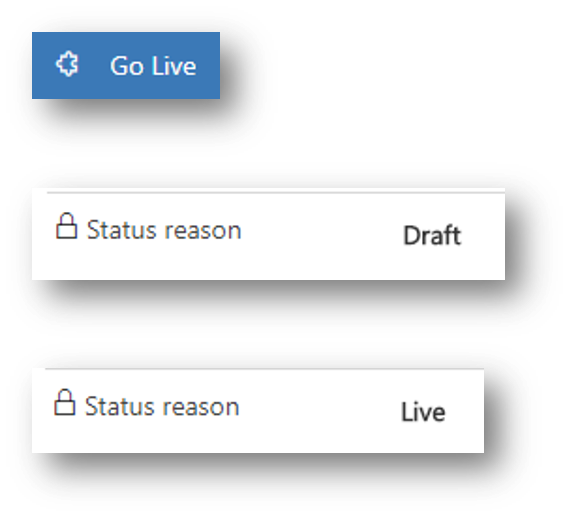
Publish Your Message
If your message still looks good after you receive it in your inbox and open it, you're ready to publish it.
Click Go Live on the command bar
Dynamics 365 copies your design to the email marketing service, which makes the message available for use by a customer journey (but doesn't deliver any messages yet).
Your message Status Reason is updated from Draft to Live.
Customer Journeys
As you engage potential customers, they start by discovering your product, evaluate whether it meets their needs, look for a good offer, and finally make a purchase. We call this process the customer journey.
Use Dynamics 365 customer journeys to create a model that helps you guide the members of a selected marketing segment through this process by using automated messaging, activity generation, interactive decision points, and more.
A simple customer journey can include just two steps:
- identifying the target segment
- creating an activity that addresses the members of that segment
In the following example, you'll set up a simple customer journey that sends an email message to all the members of a target segment.
Before you start, you'll need:
- A segment containing the contacts you will send your email to (make sure one or two of your primary contacts have email addresses you can access)
- A marketing email that is both valid and live
You should be able to use the segment and message you designed and published above.
Create Your First Customer Journey
Navigate to Marketing Execution (1) and then click Customer Journeys (2) to open a list of Active Customer Journeys.
In the list of Active Customer Journeys click New (3) to open the New Customer Journey form 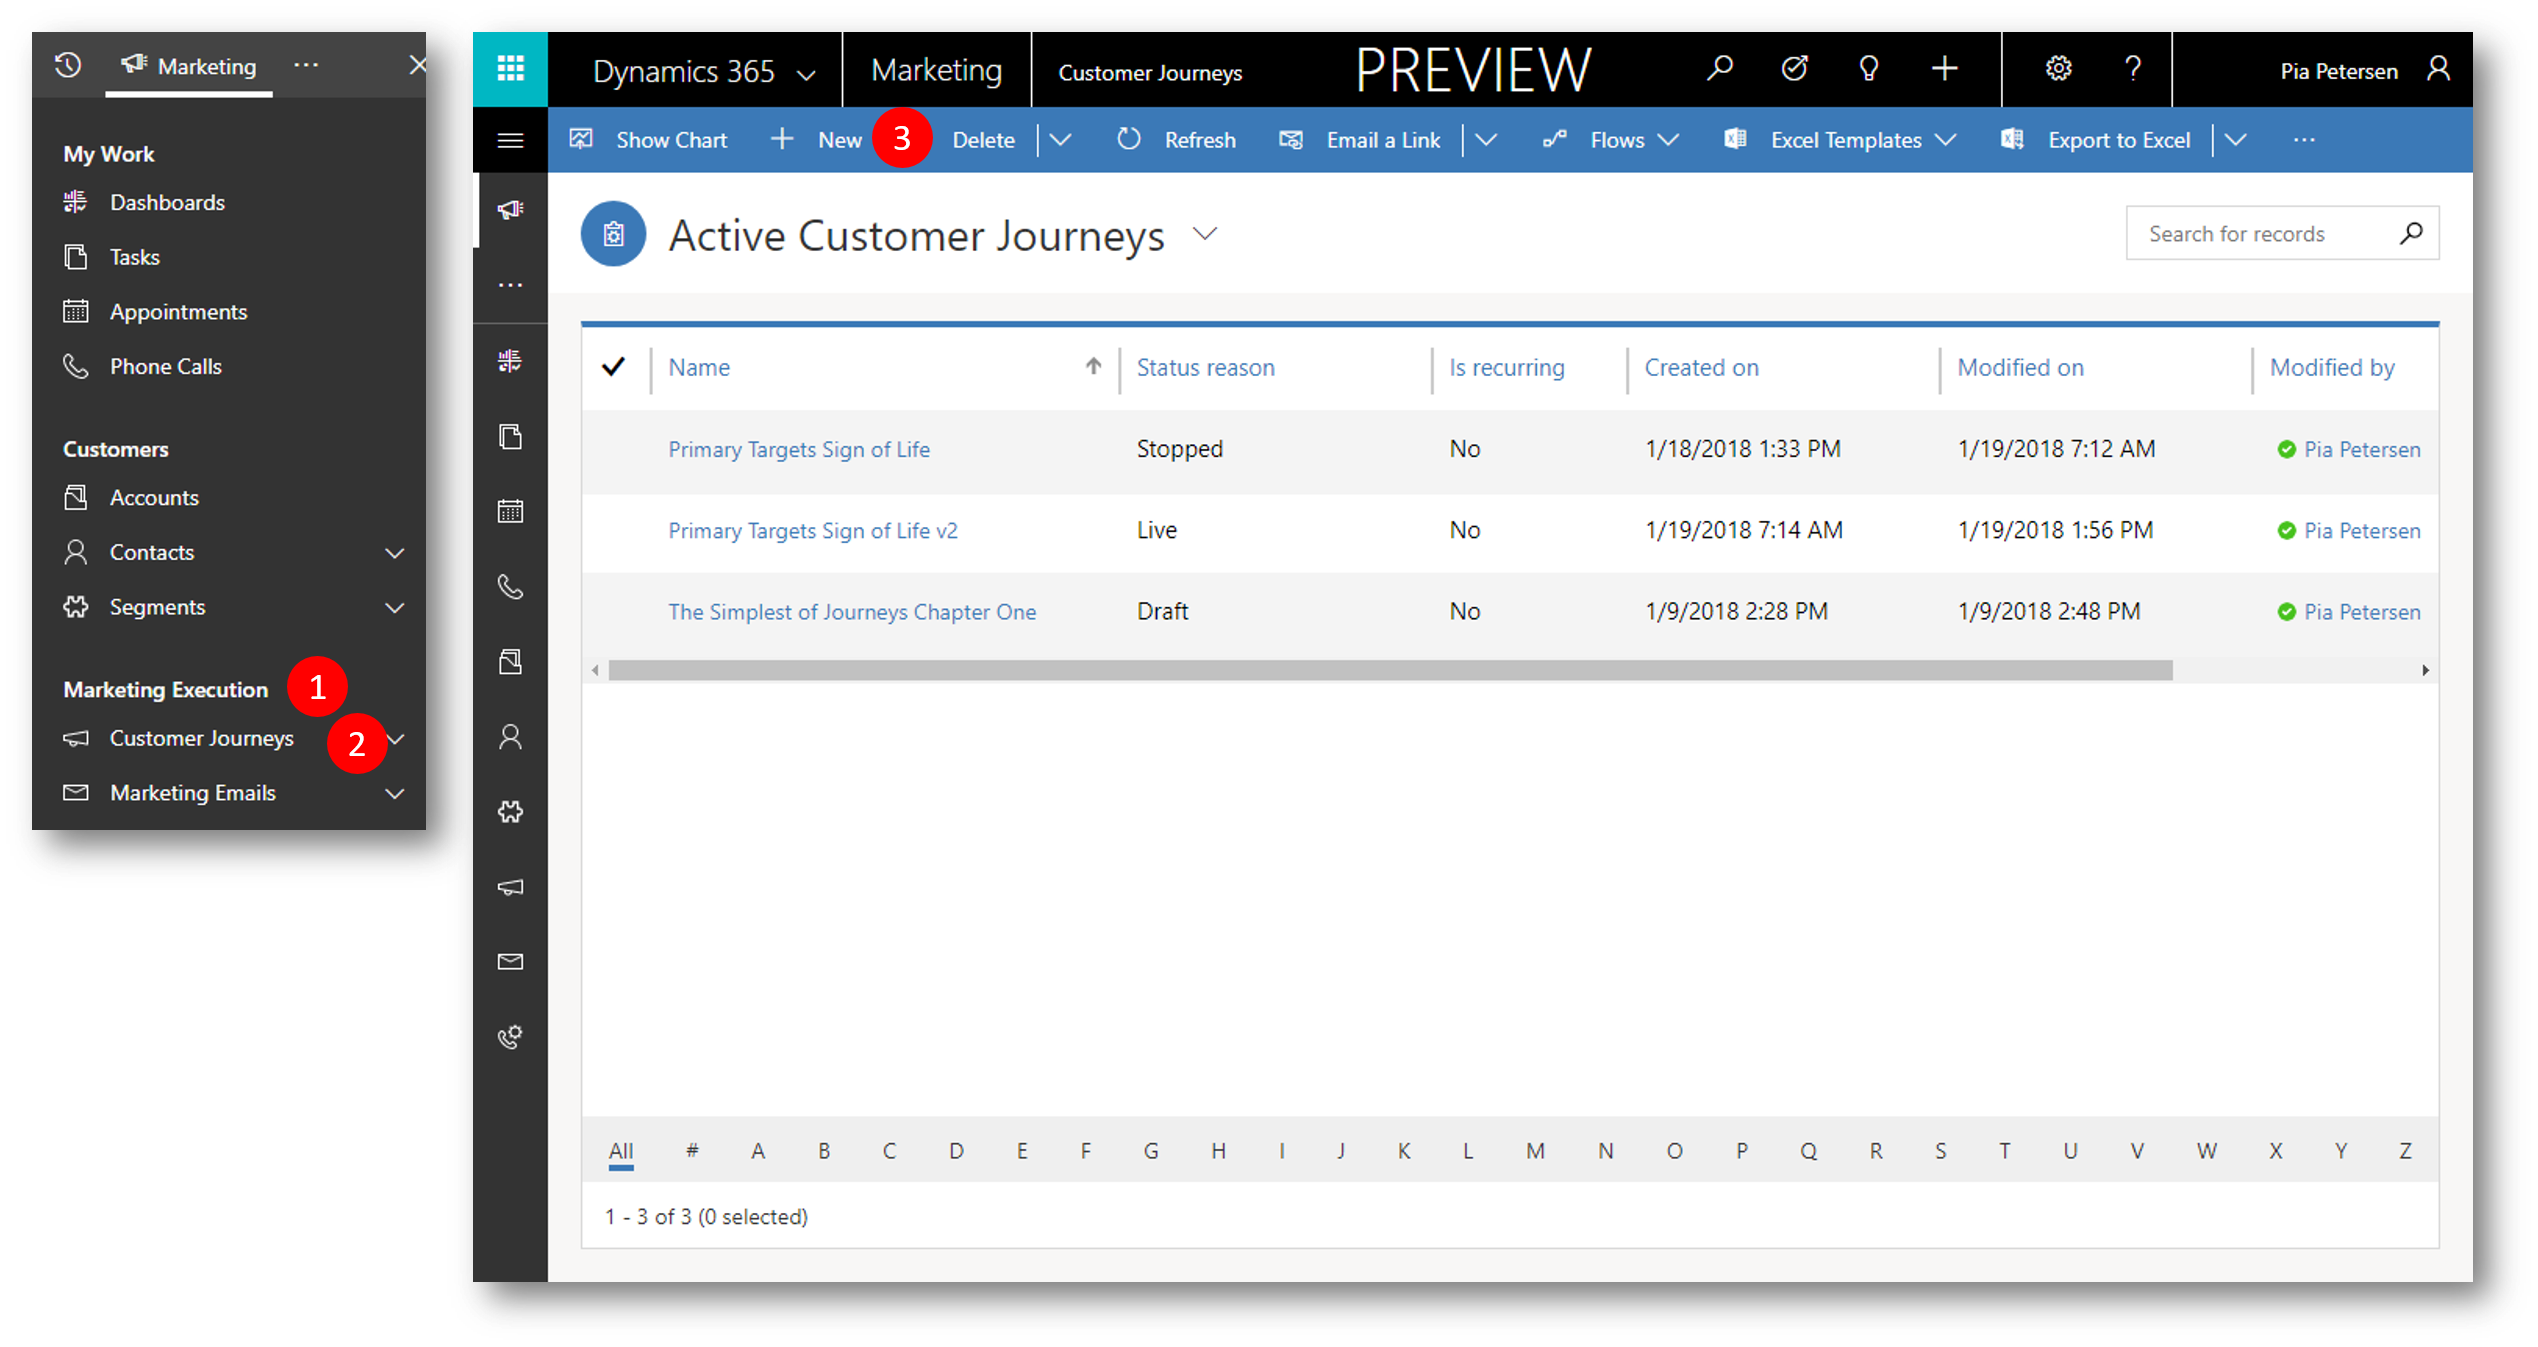
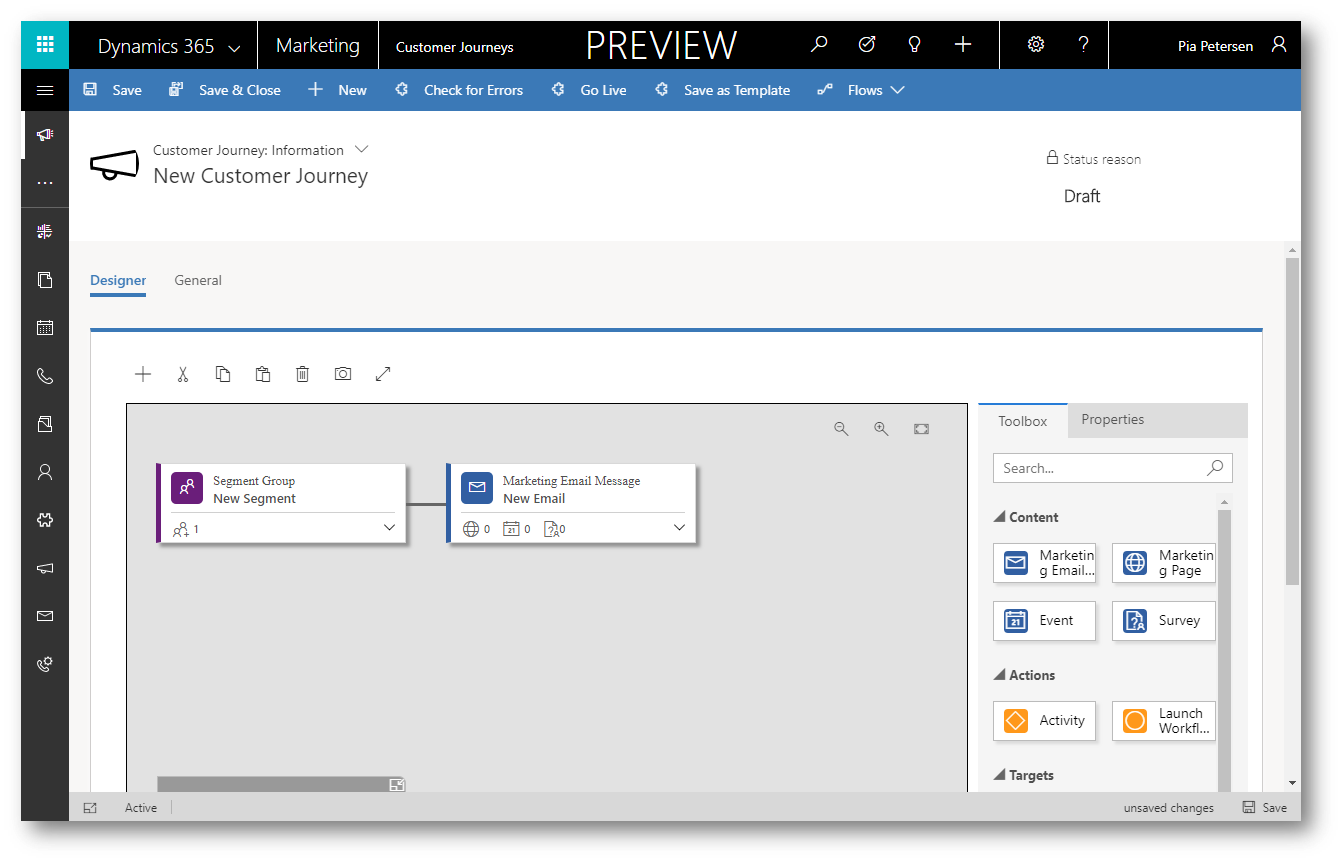
The New Customer Journey page opens with the Select a Customer Journey Template dialog box shown
Each template provides a starting point for designing a particular type of customer journey. The template dialog box provides tools for searching, browsing, and previewing your template collection.
Select Simple Email Journey template (1), and then click Select (2)to close the dialog, and copy your selected template to your new journey.

Now you are looking at the customer journey designer, where you will define each step of the journey.
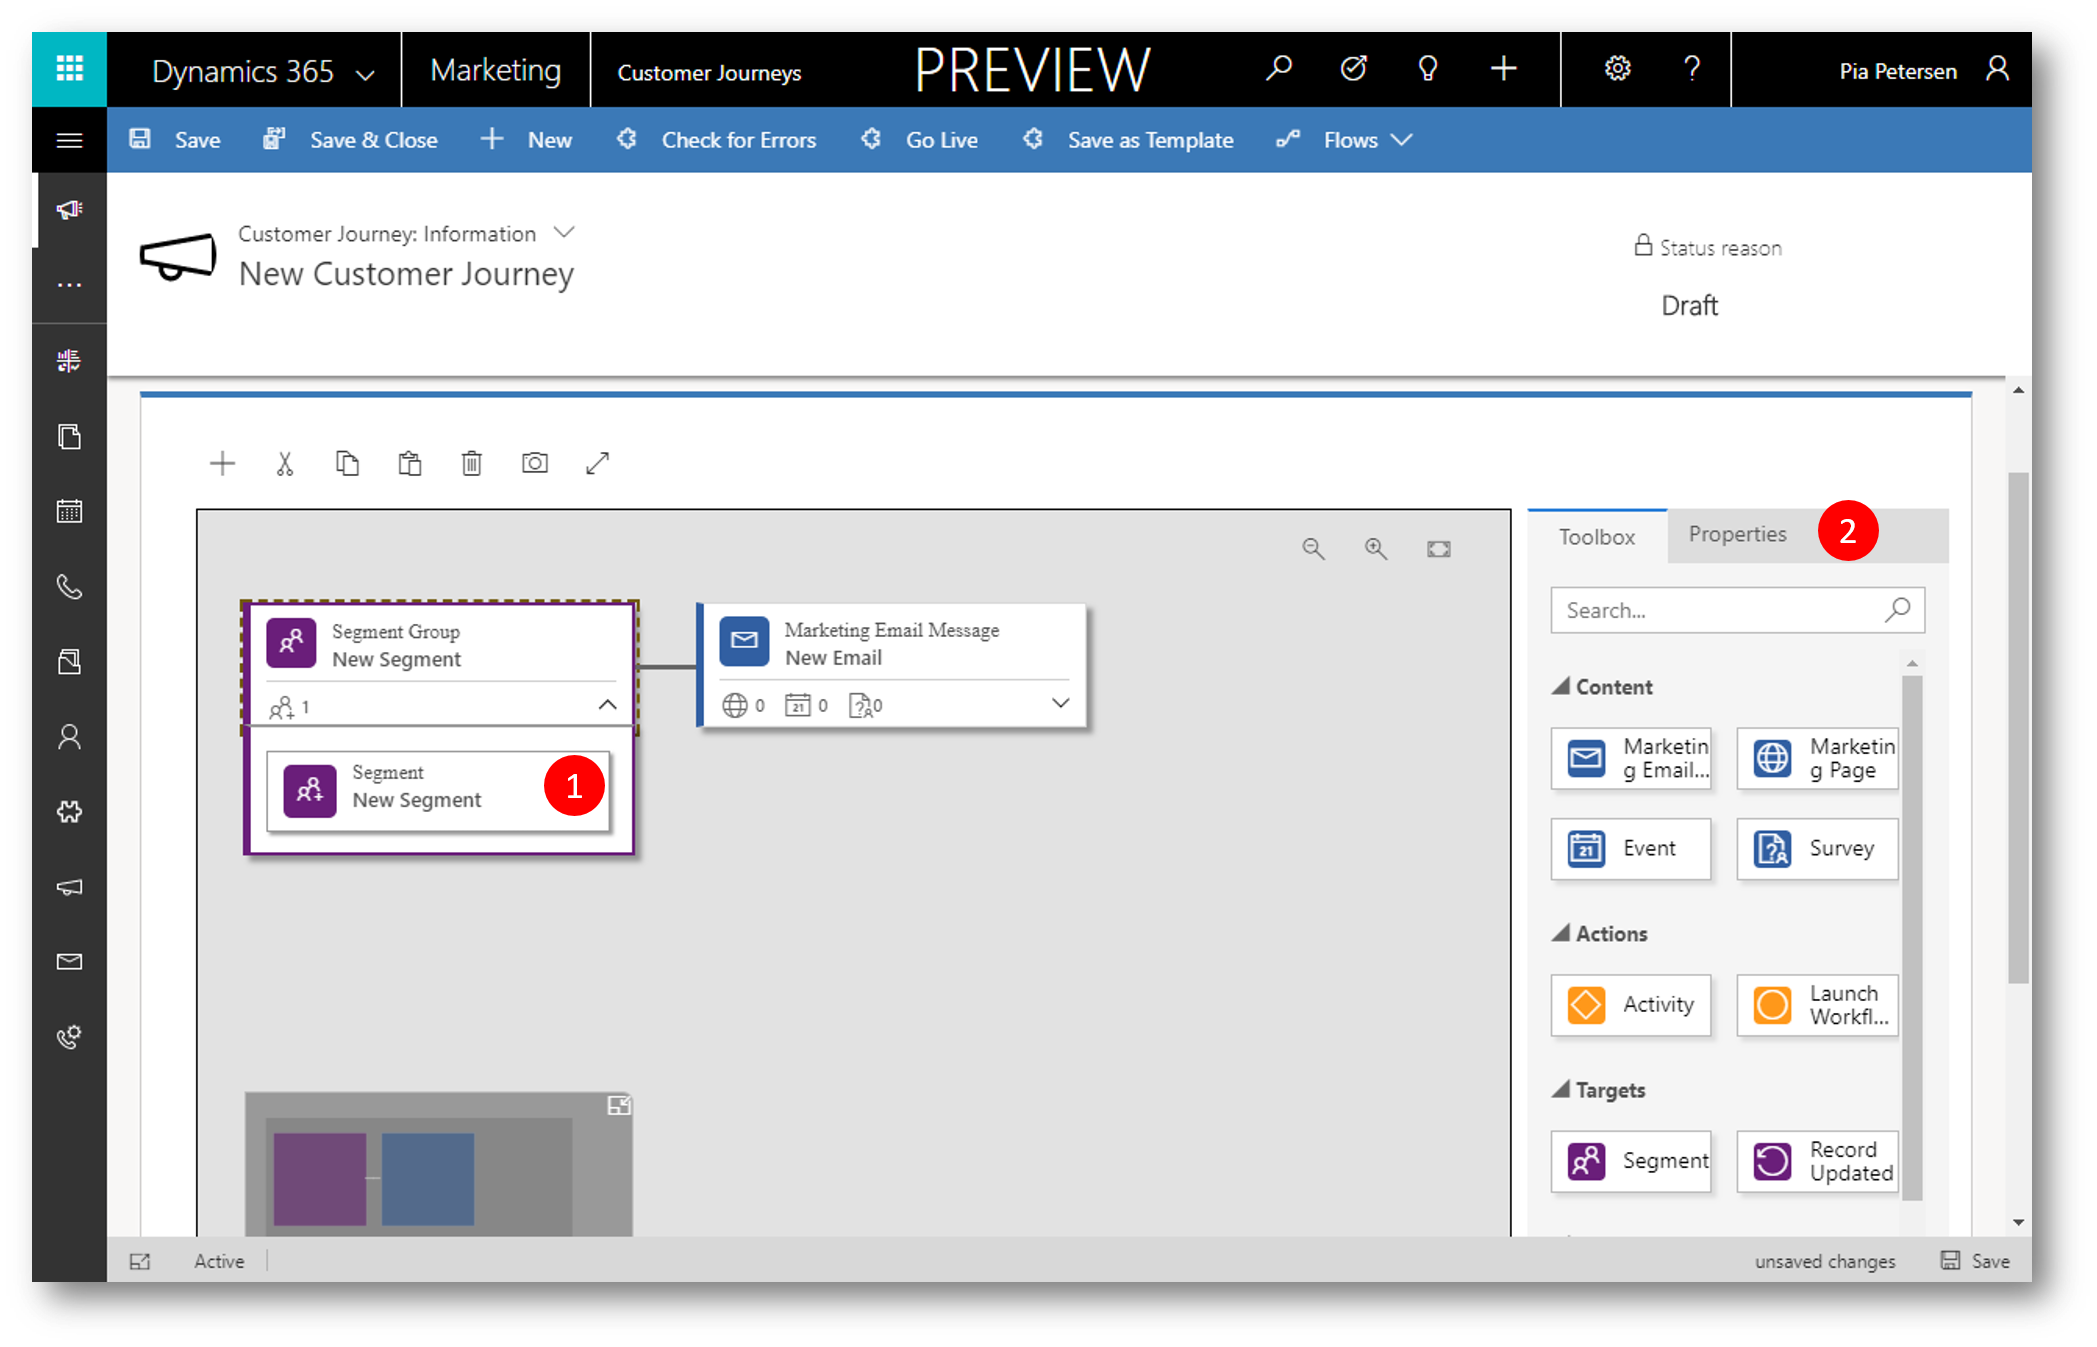
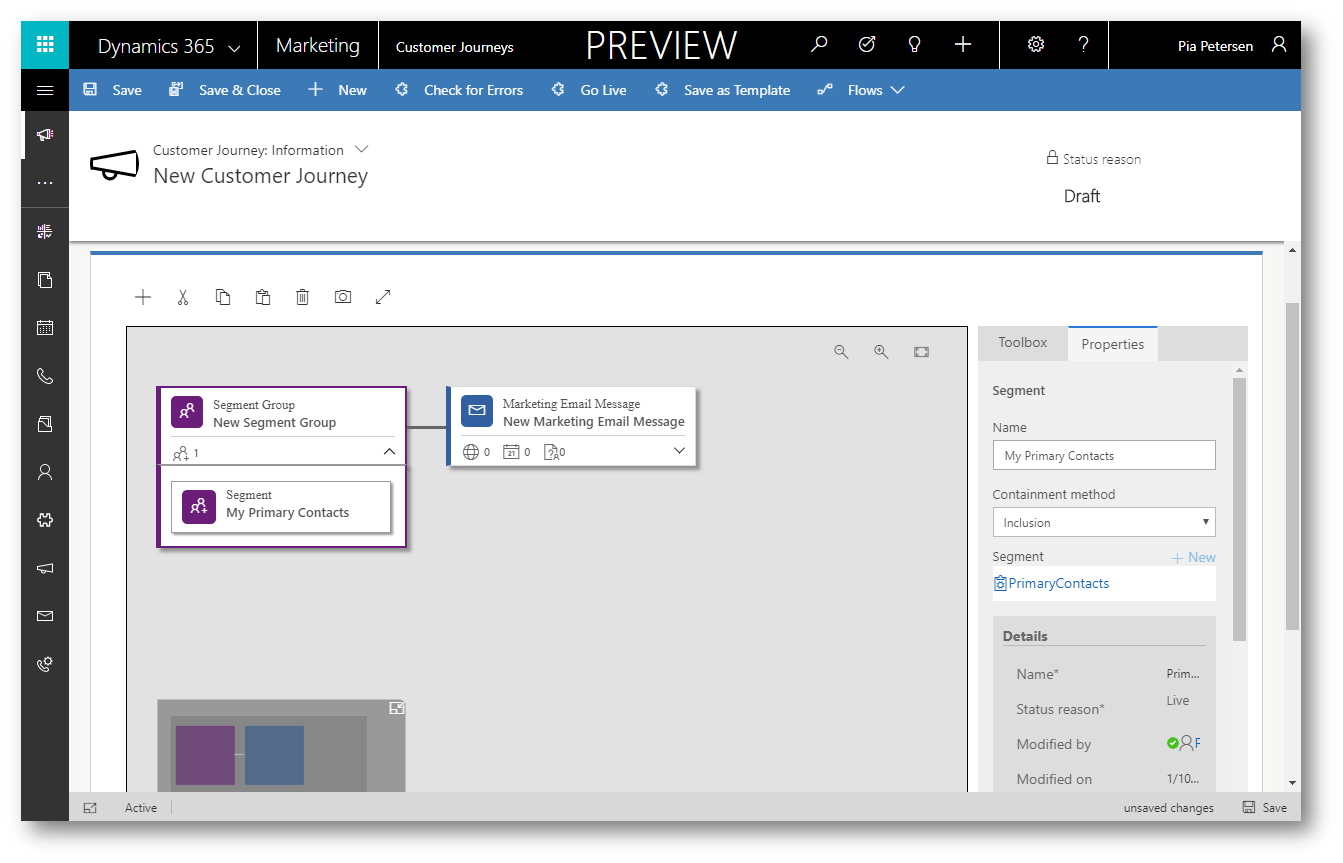
Define Segment Step
Like all journeys, this one starts with the participants, who in this case are the people you specify as part of a market segment
Expand the Segment Group tile and select the child Segment New Segment (1)
Select the Properties tab (2)
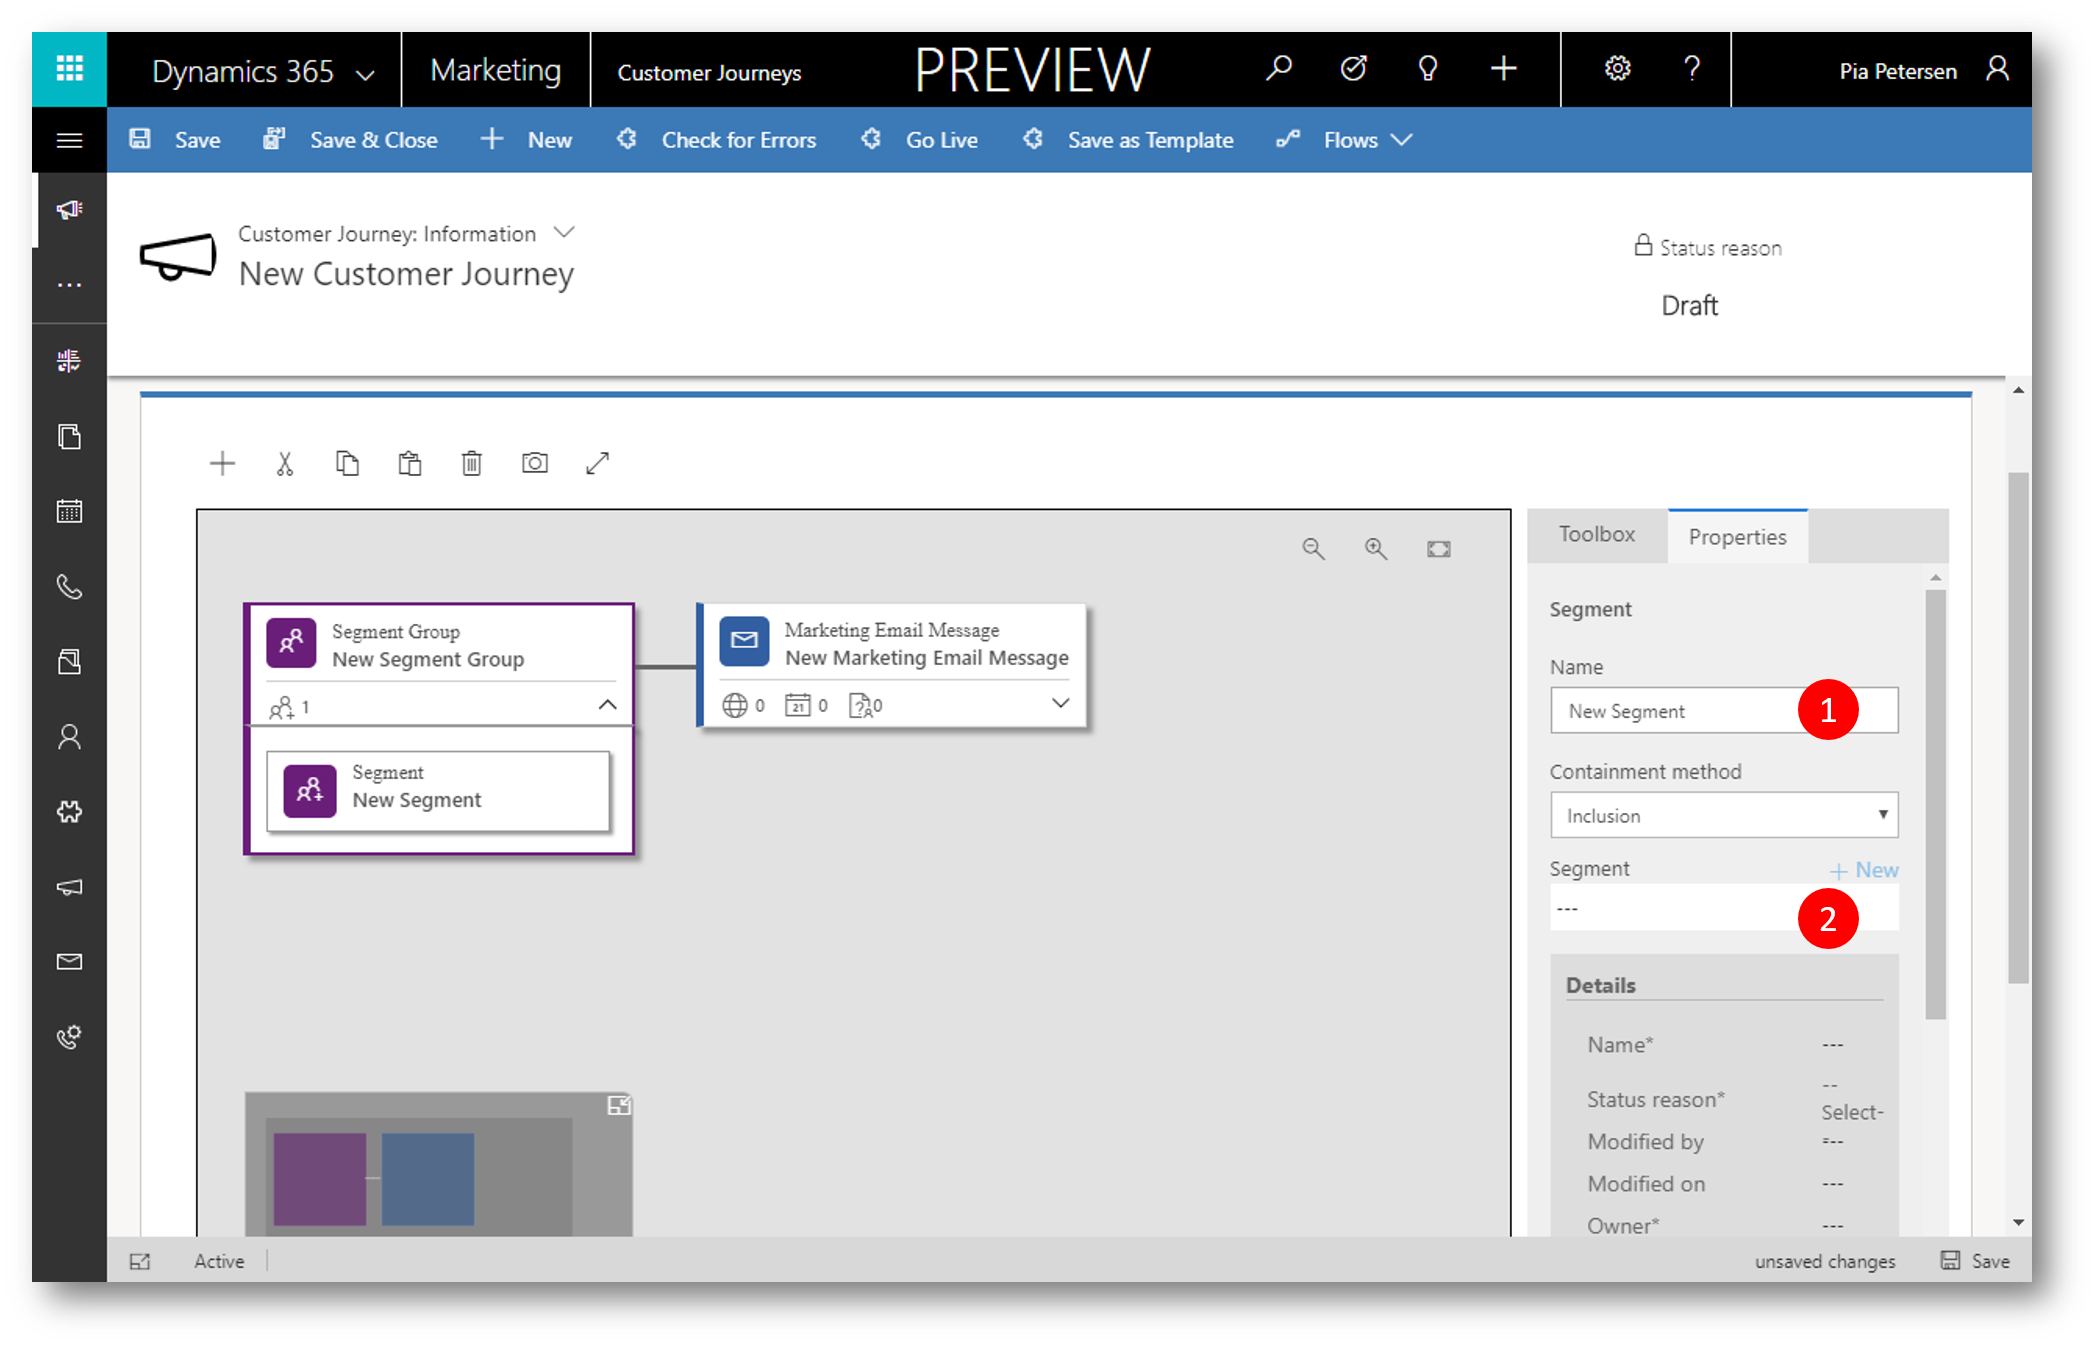
Type a name for your segment in the Name box (1) and select your segment from above in the Segment drop-down (2)
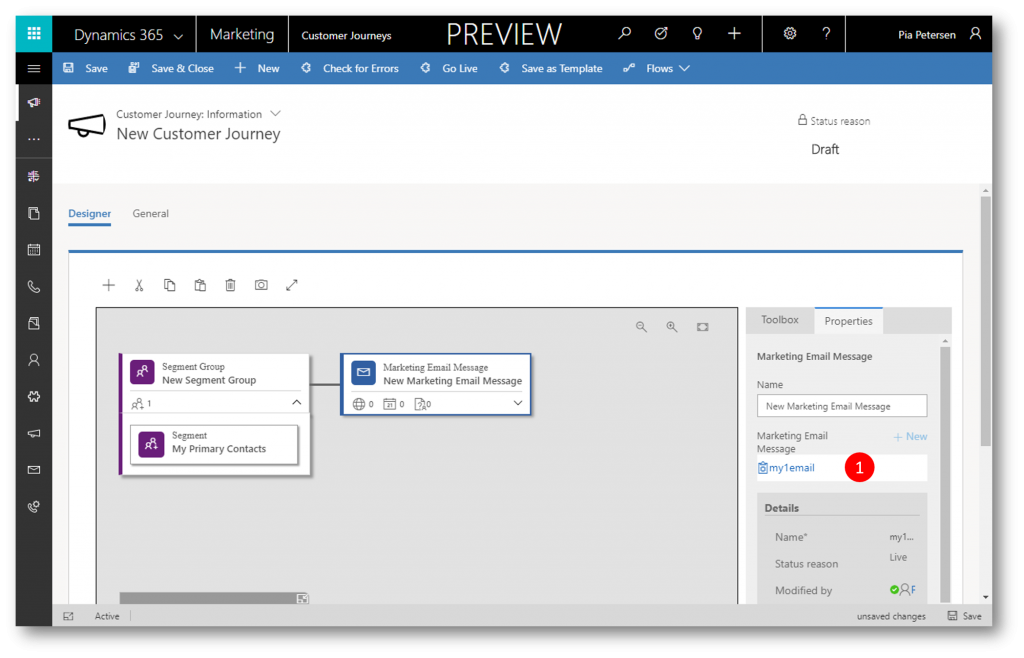
Define Email Step
Select the Marketing Email Message tile
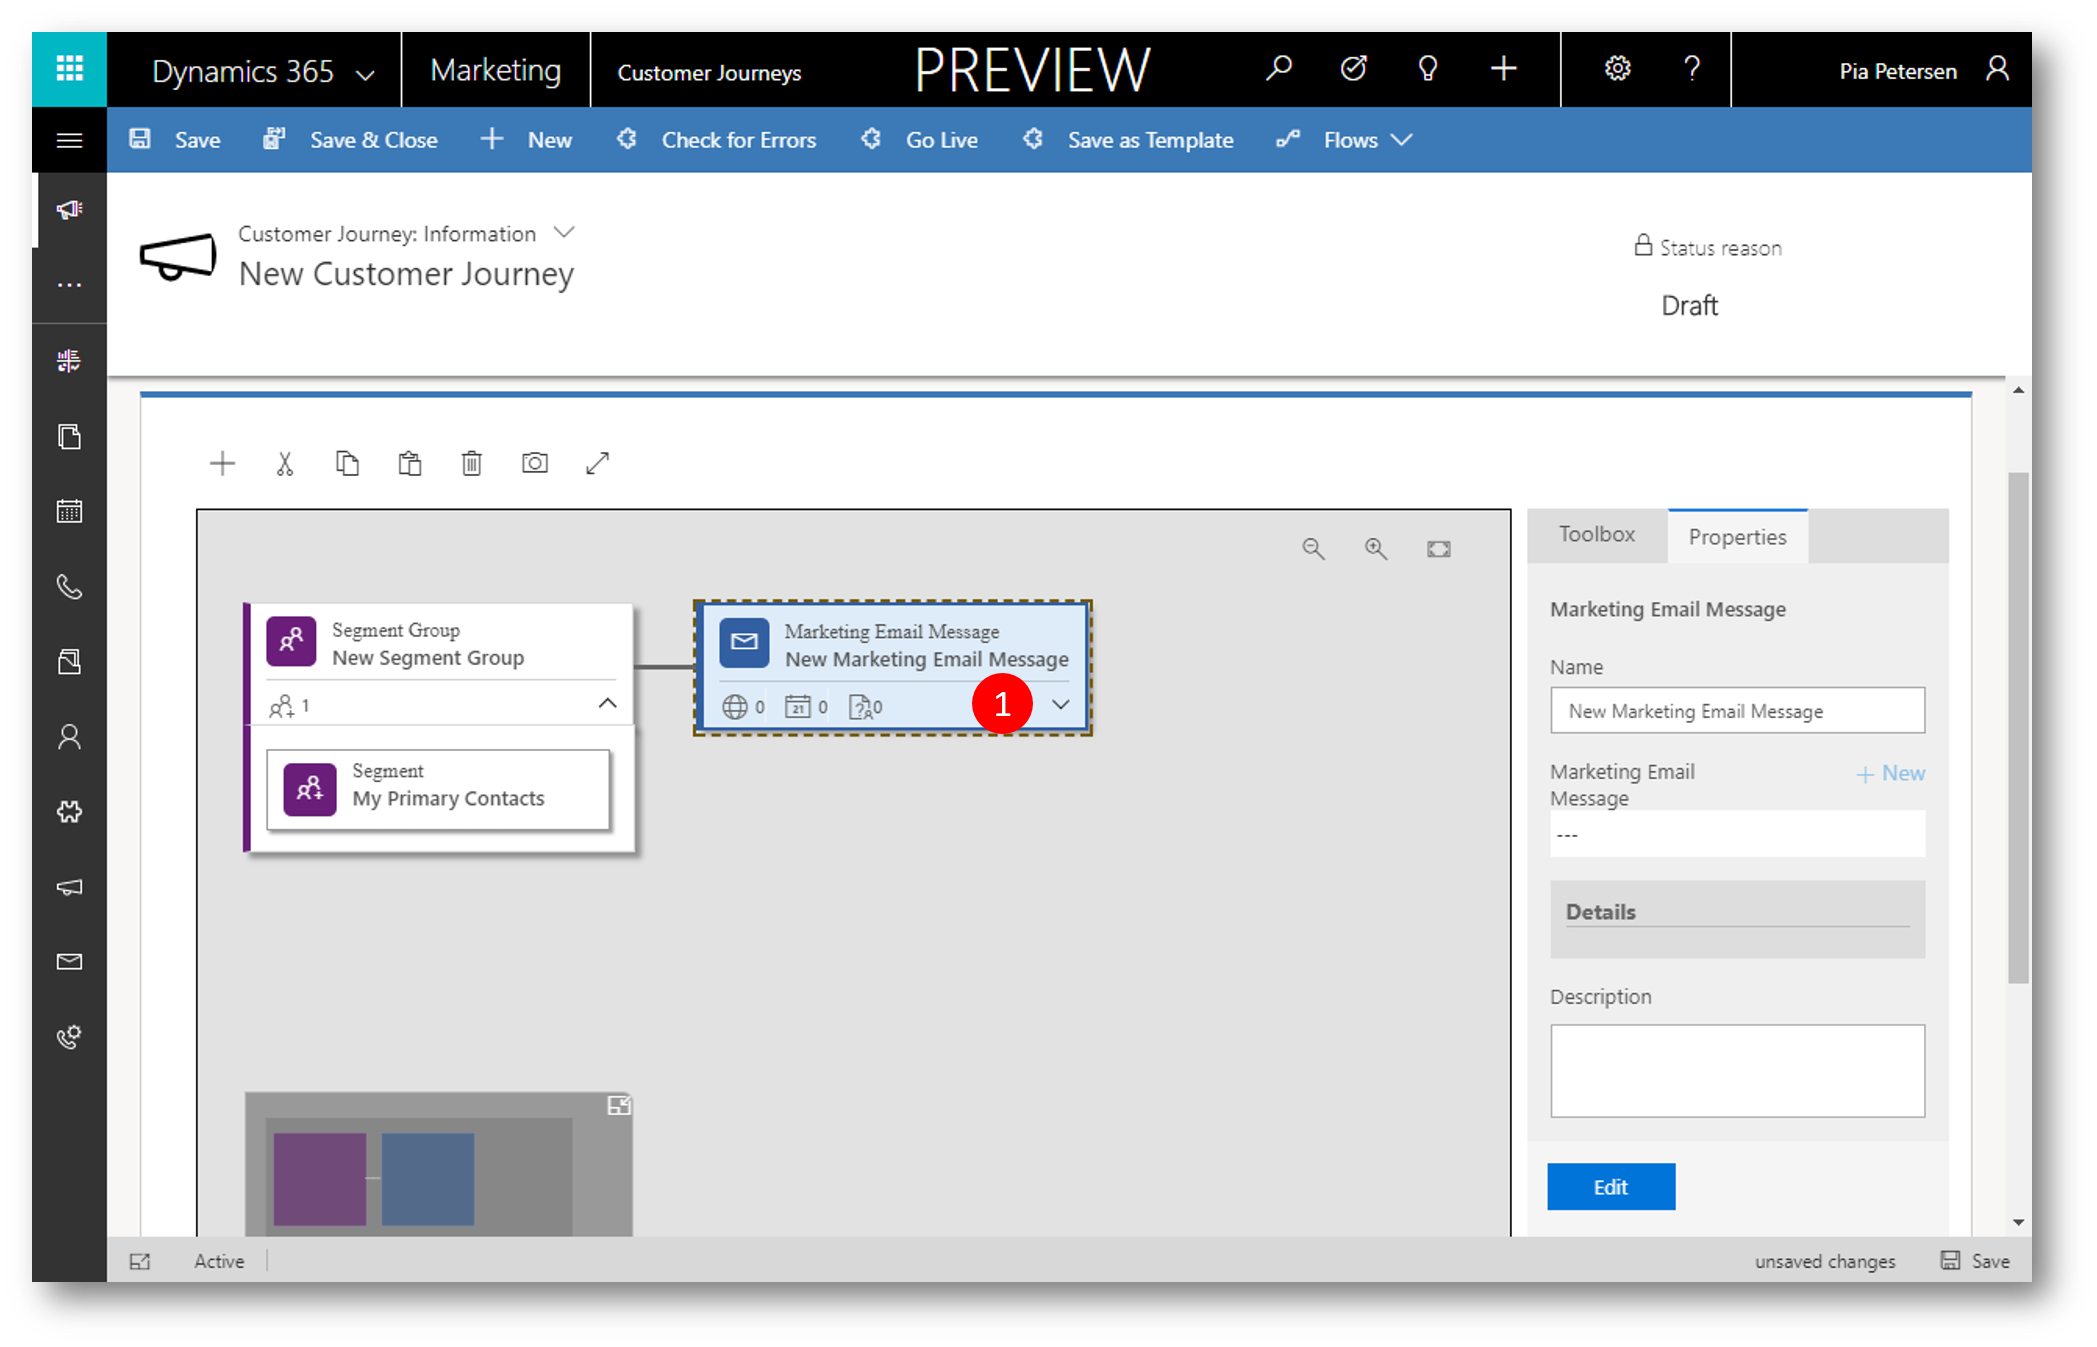
Type a name for your email in the Name box and select your email in the Marketing Email Message drop-down
Configure Run Schedule
Until now, you've been working on the Designer tab.
Now go to the General tab, where you can name your journey and configure its run schedule.
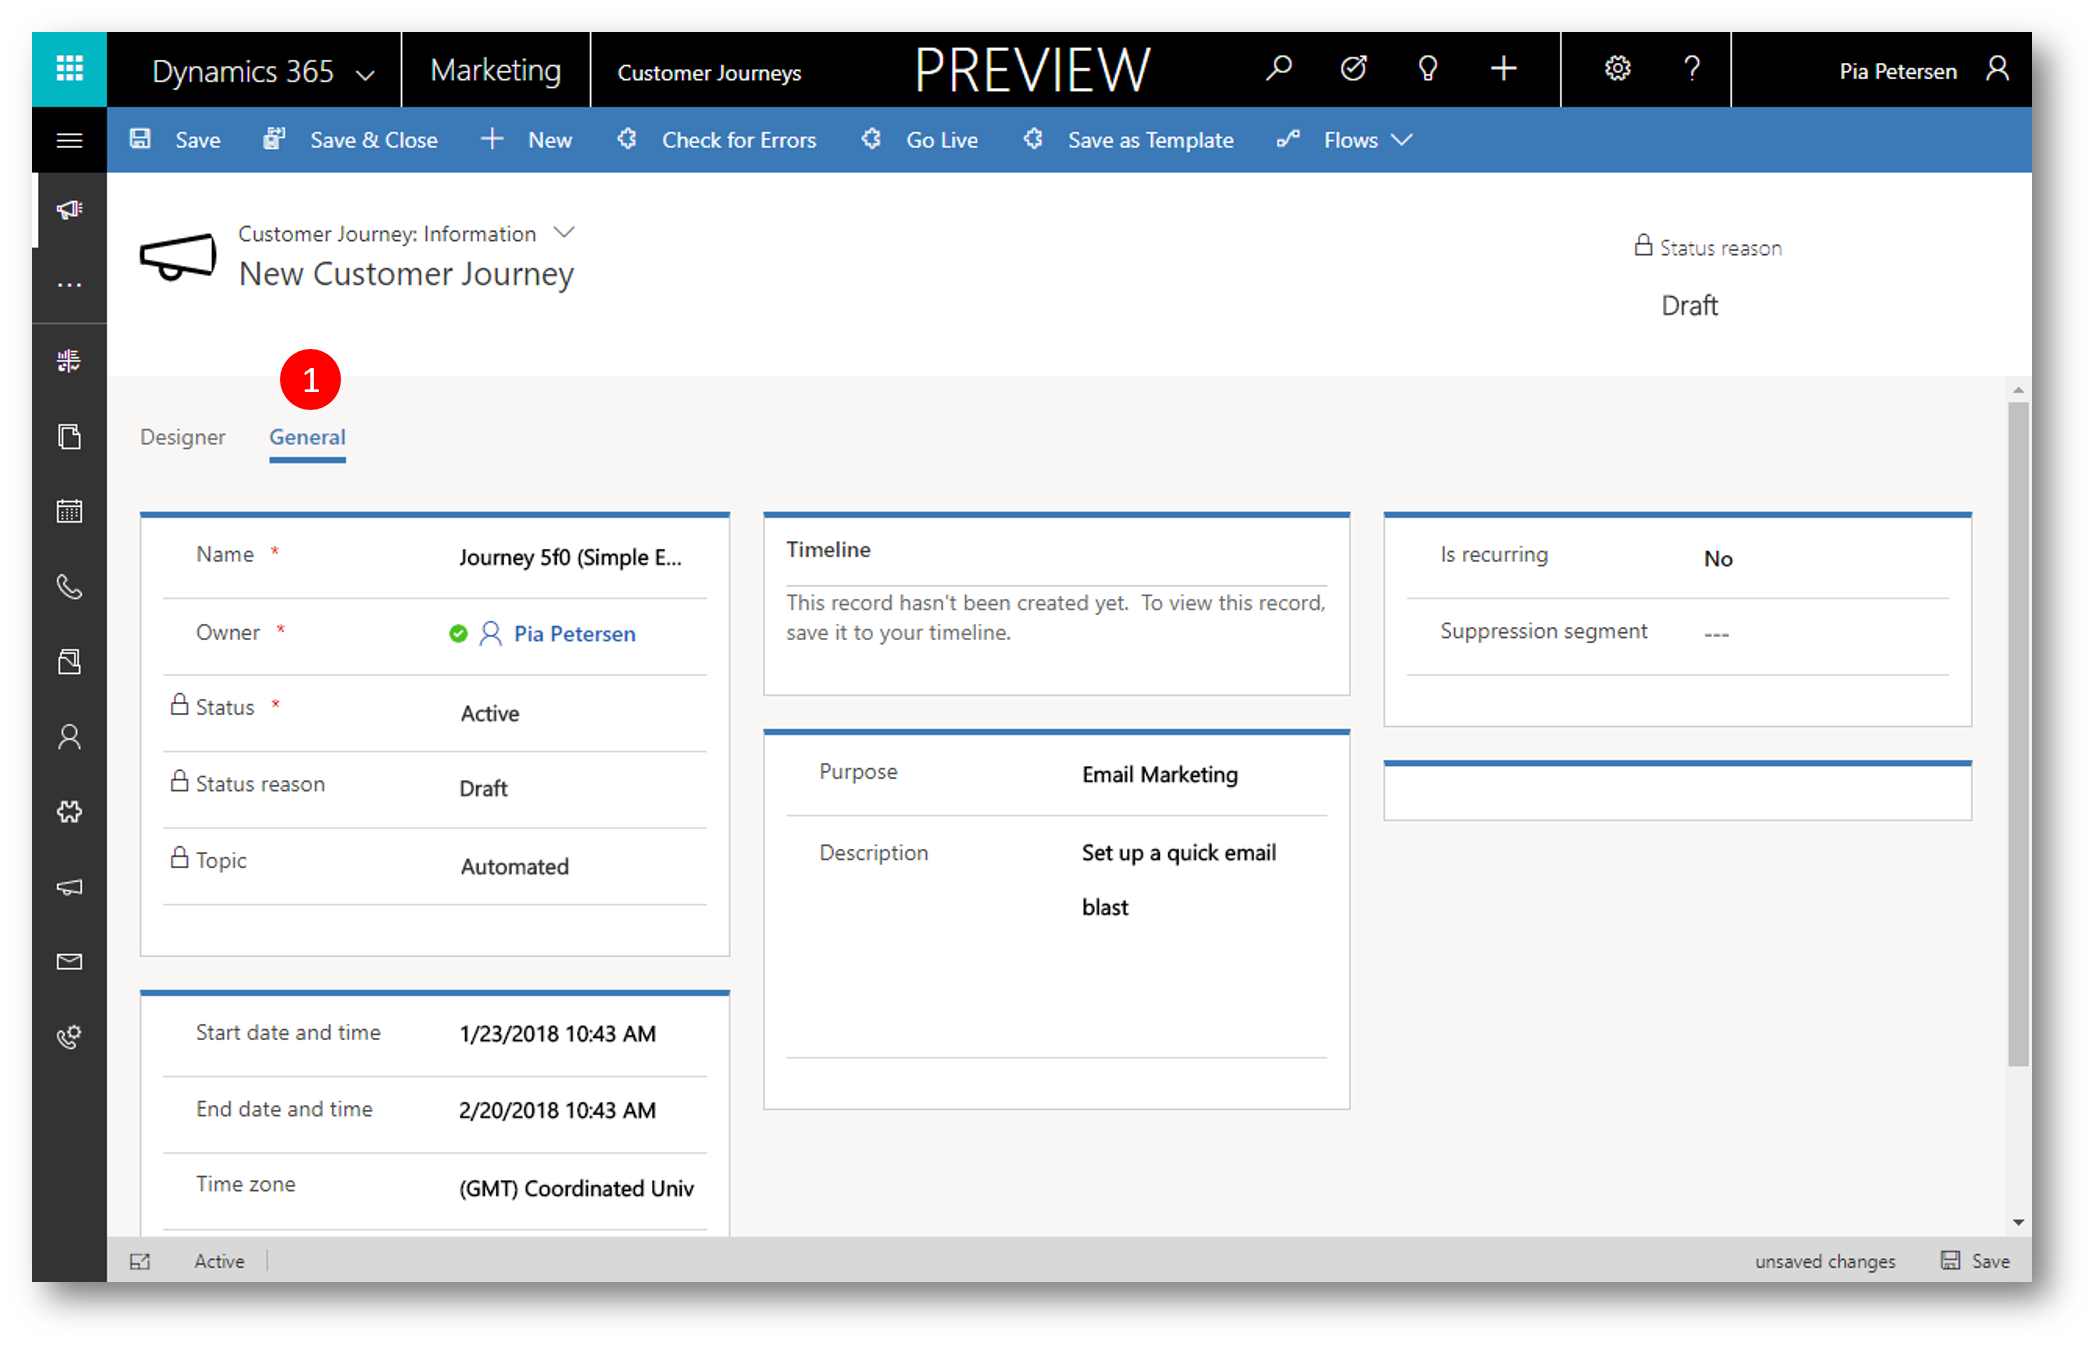
Make the following settings here:
- Name: Enter a name for the customer journey that you can easily recognize later. This name is internal-only.
- Time Zone: Select your local time zone (if needed). The other dates and times on the page will be displayed relative to this zone.
- Start Date Time: Enter the time when the journey should begin processing contacts. When you select the field, a suggested default time is provided.
- End Date Time: Enter the time at which the journey should stop processing contacts. All actions will stop at this time, even if some contacts are still in the middle of the journey. If you're just testing, allow a couple of weeks.
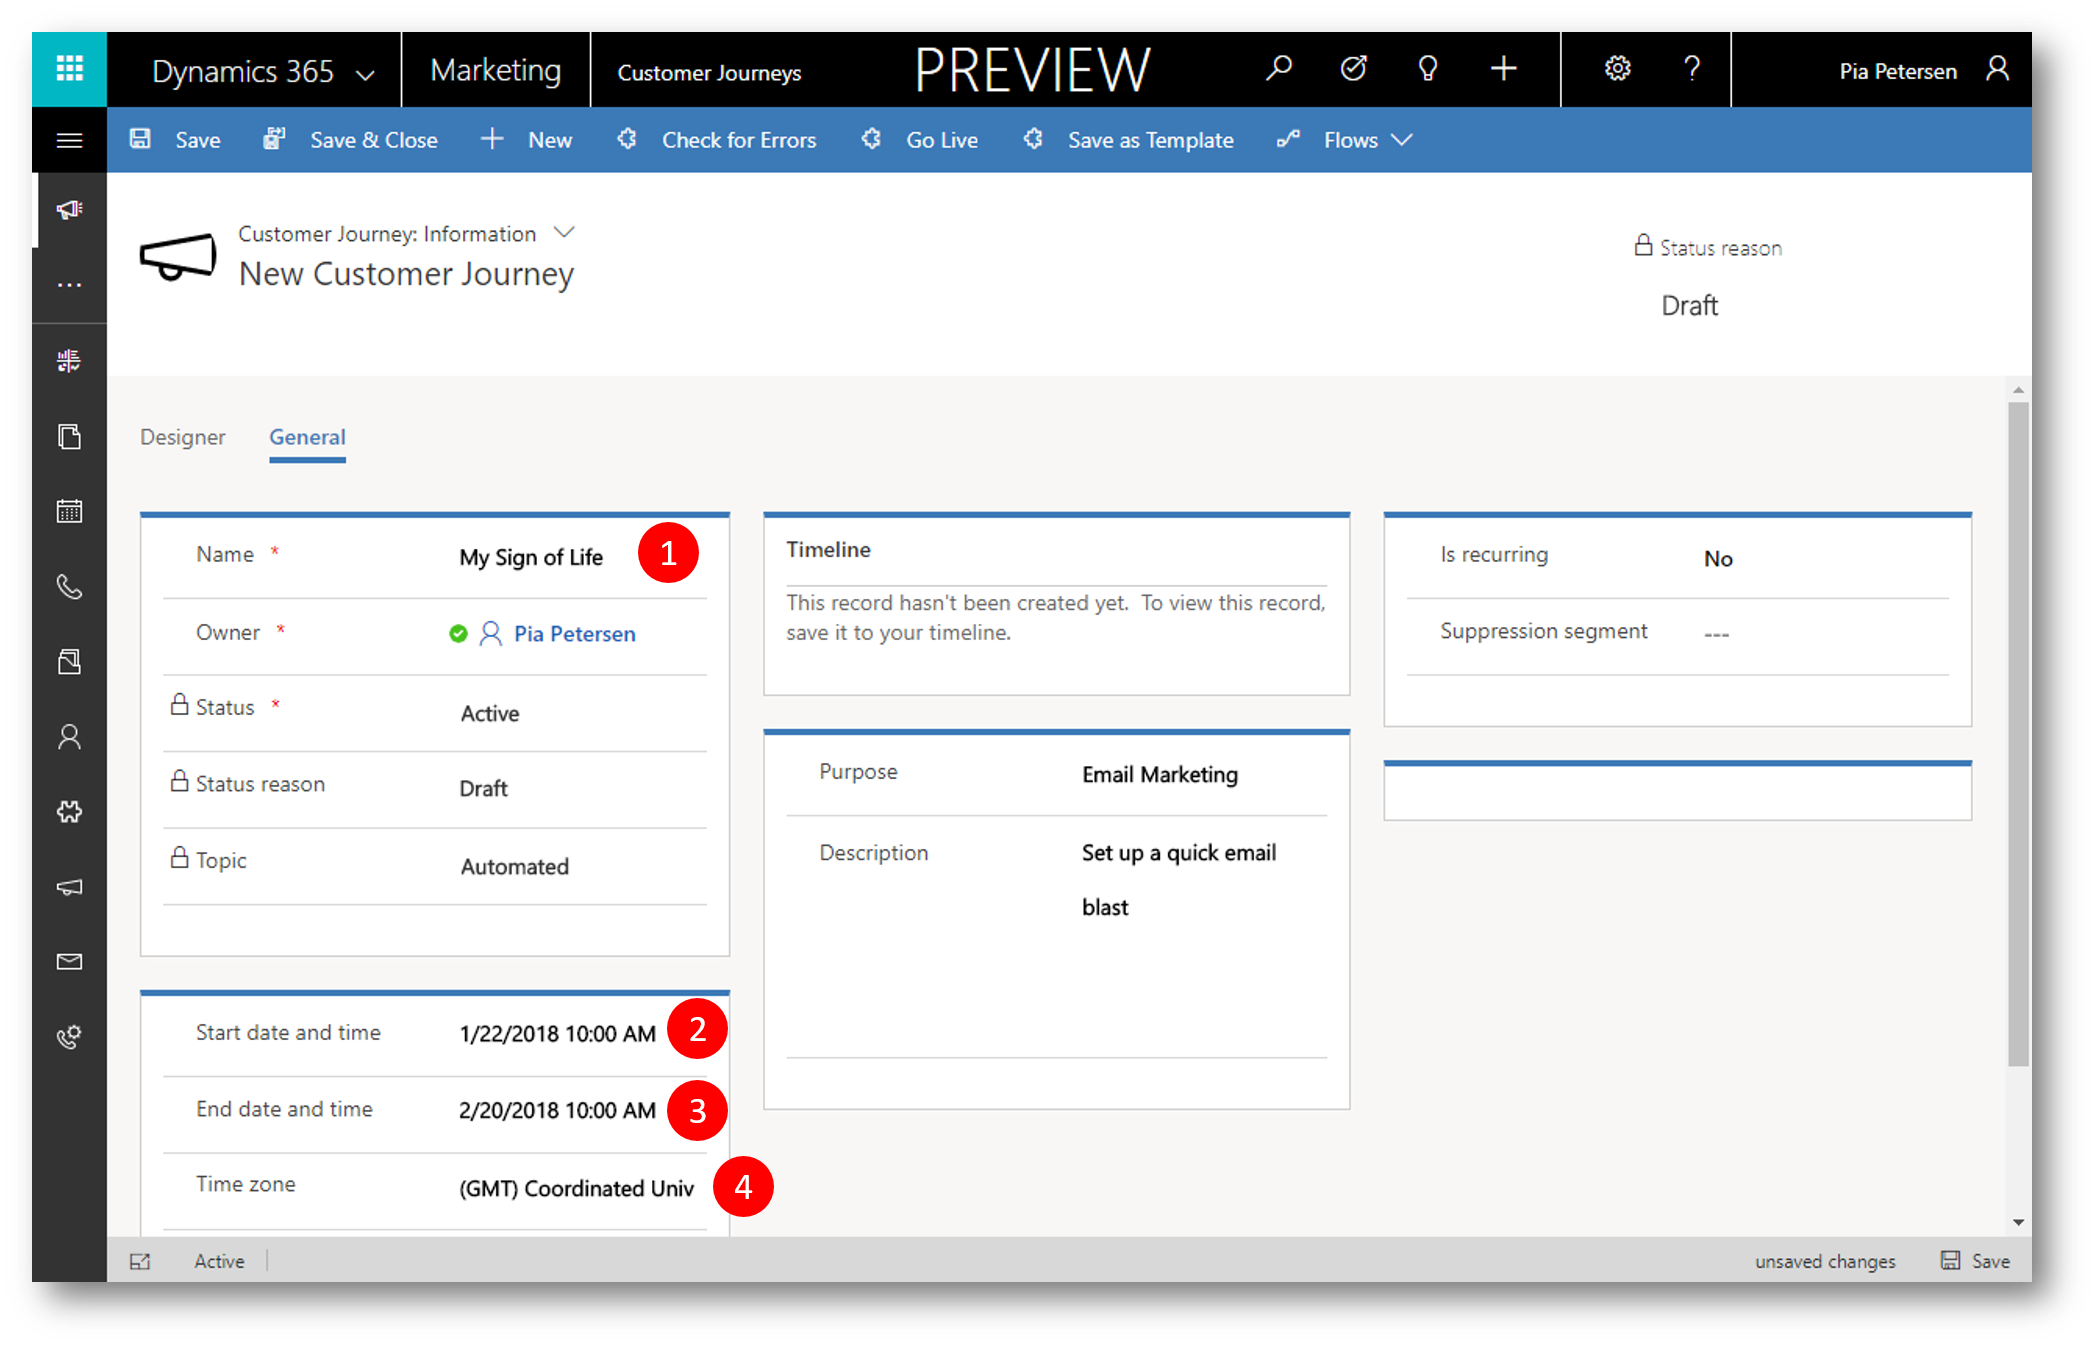
On the command bar, select Save to save the work you've done so far.
Check for Errors and Go Live
To make sure your journey includes all required content and settings, click Check for Errors in the command bar.
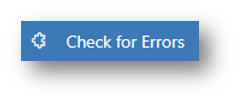
Dynamics 365 checks it and then displays results in the notification bar. Expand the notification bar to read the results.
If you followed this procedure and your email message is live, your journey should pass the error check. If it doesn't, read the error message, fix the reported issue, and try again until it passes.
Your journey is now ready to go.
To start it running, publish it by selecting Go Live on the command bar.
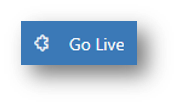
Dynamics 365 copies the journey to its email marketing service, which executes the journey by processing contacts, performing actions, and collecting results during the time it is set to run. The journey's Status Reason is updated to Live.
Insights
Allow some time for the messages to get sent, and arrive in the recipients inboxes. After they do, open them and load the images.

Then you can go back to Dynamics 365 and see how your journey is going.
Open your customer journey in Dynamics 365 for Marketing, click the down arrow (1) in the form name to display the form selector
Click Customer Journey: Insights (2) to switch to the Insights view
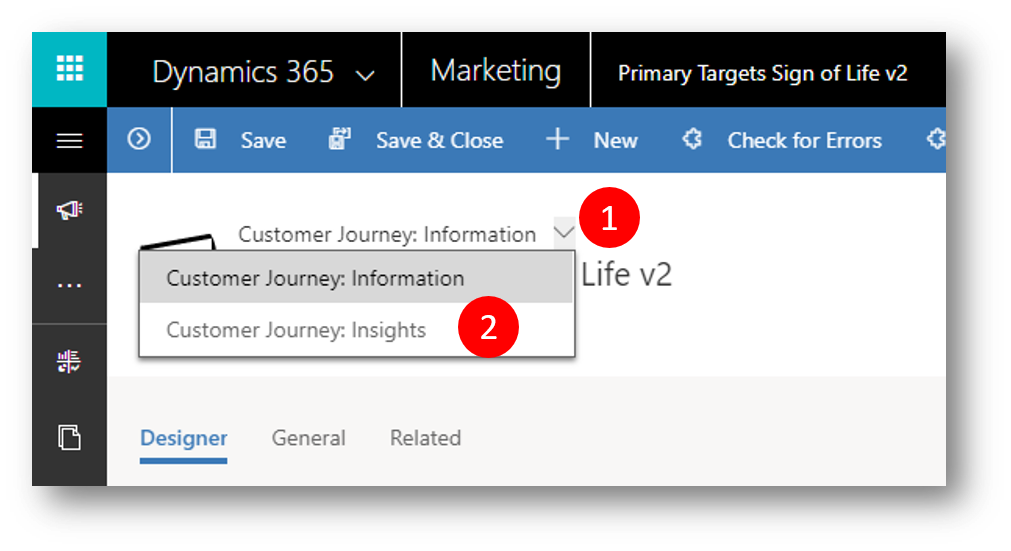
From here, use the Designer and Dashboard tabs to see detailed analytics
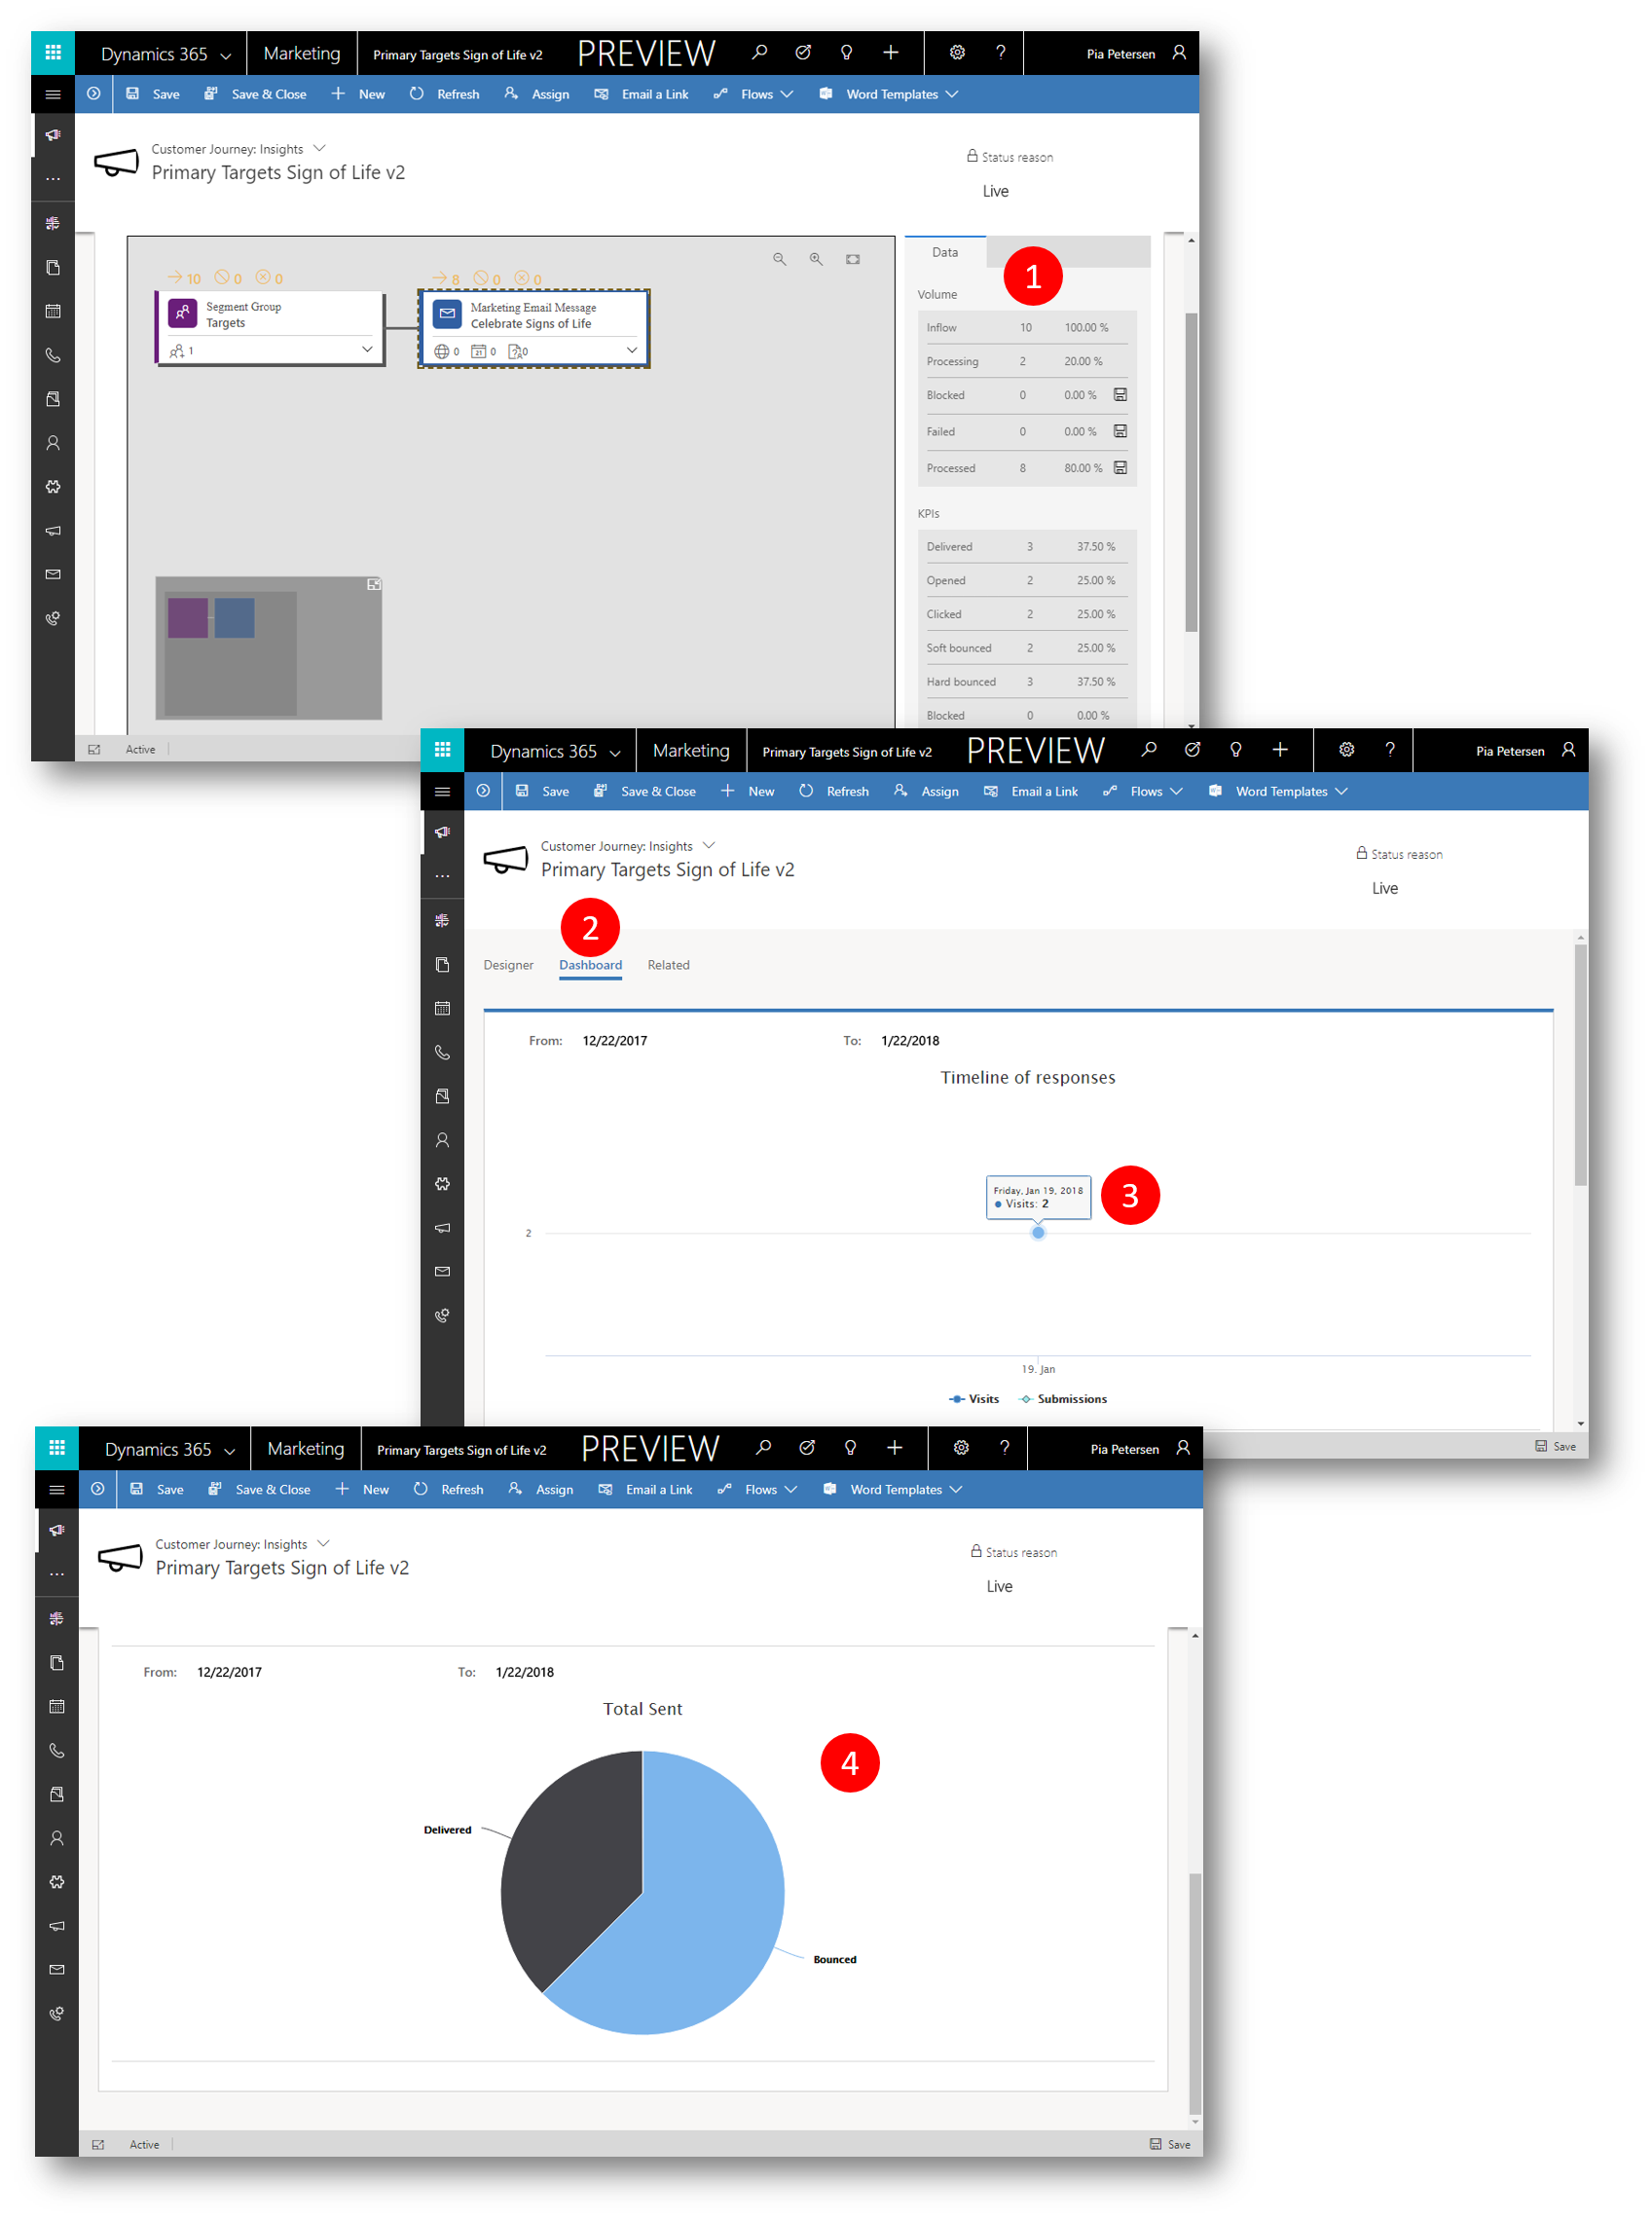
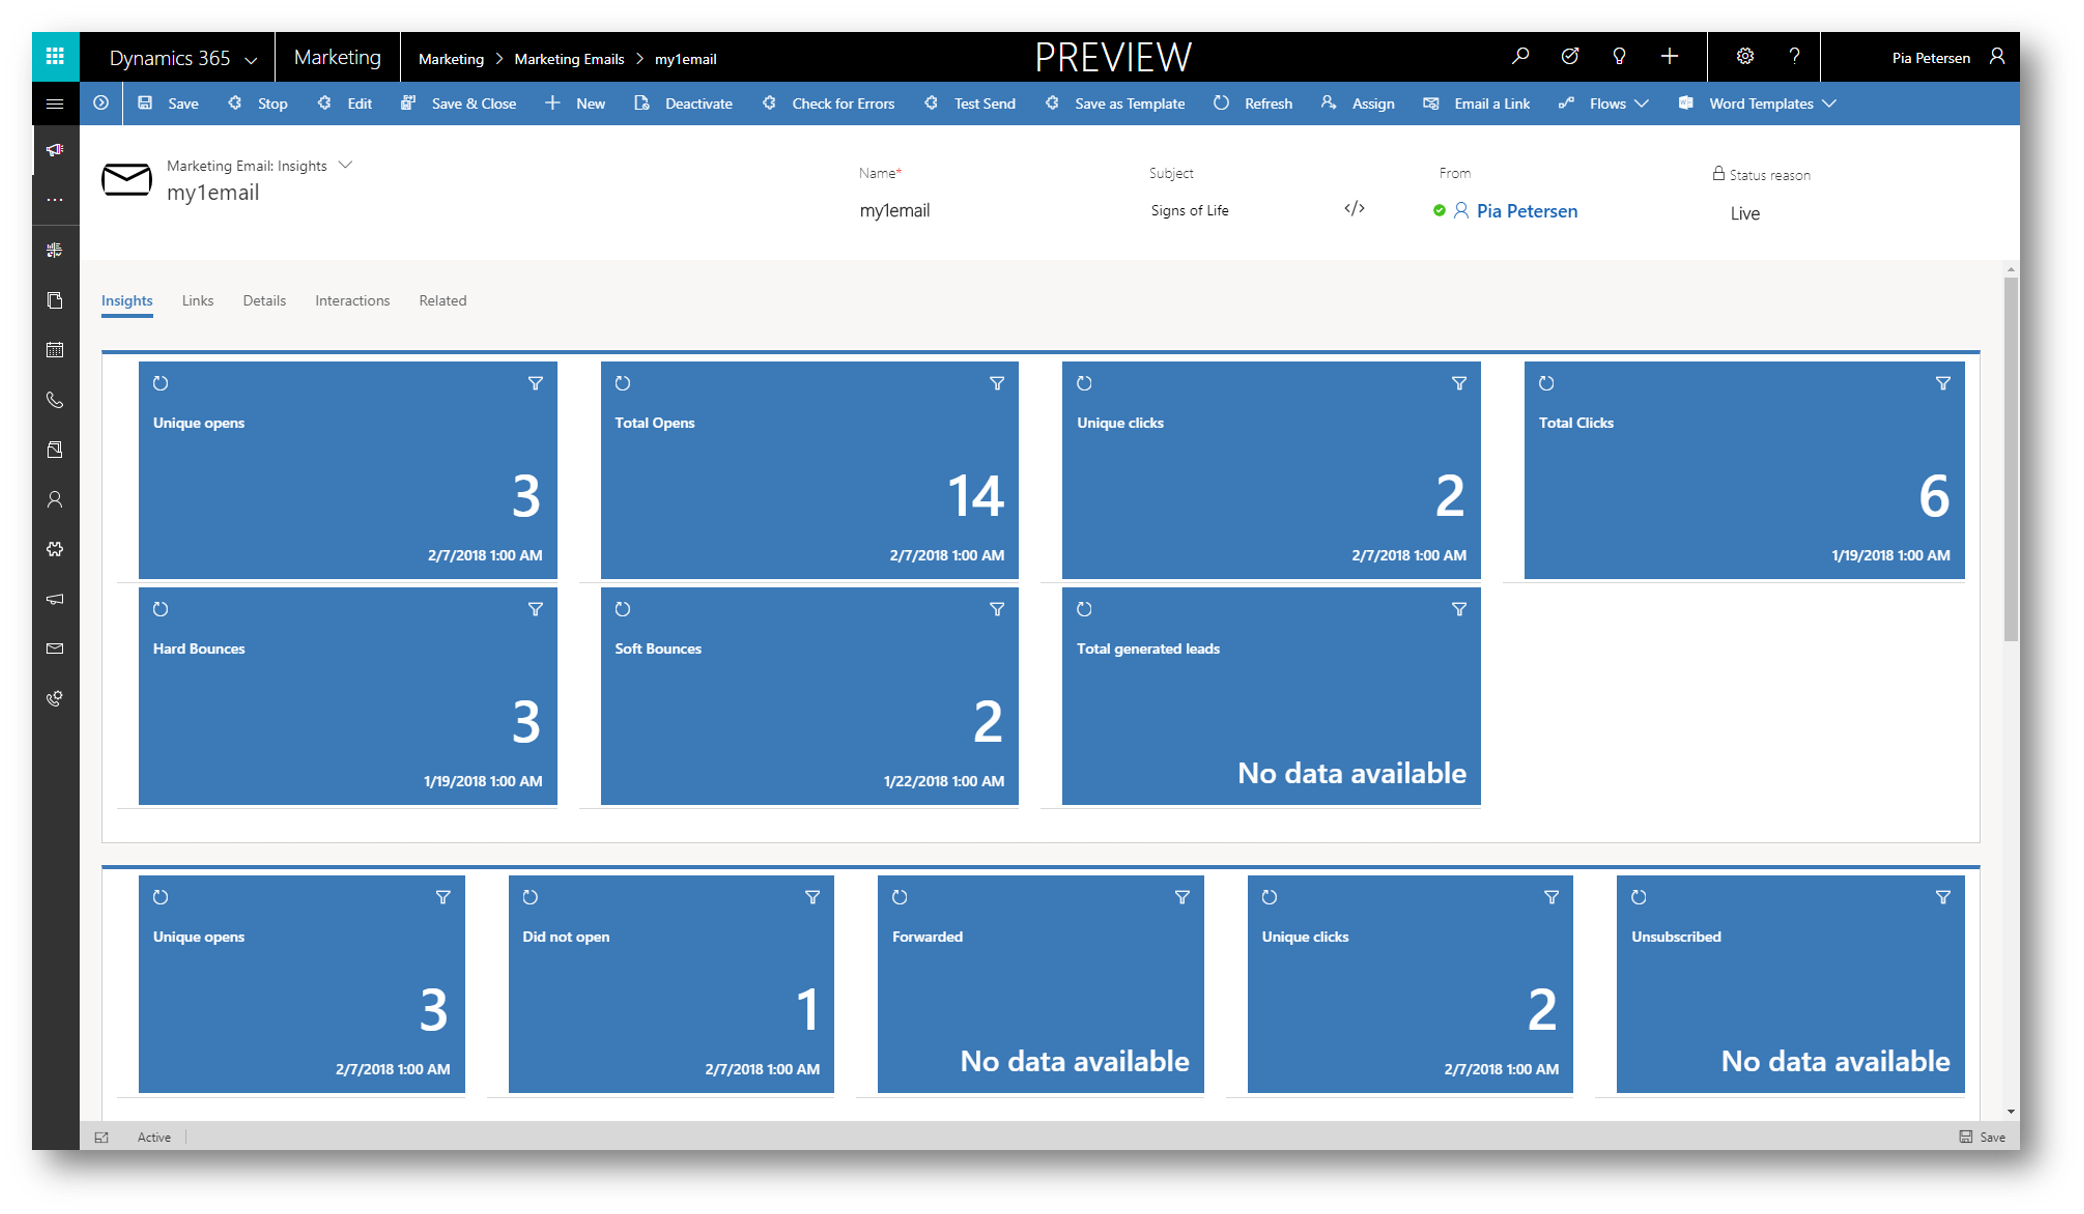
Many entities in Dynamics 365 provide an Insights view for analyzing the results of your marketing initiatives, including marketing emails.
Try opening the record for the email message you sent with this customer journey and check its Insights view for even more information
On the Insights tab you get insights into things like number of soft and hard bounces etc
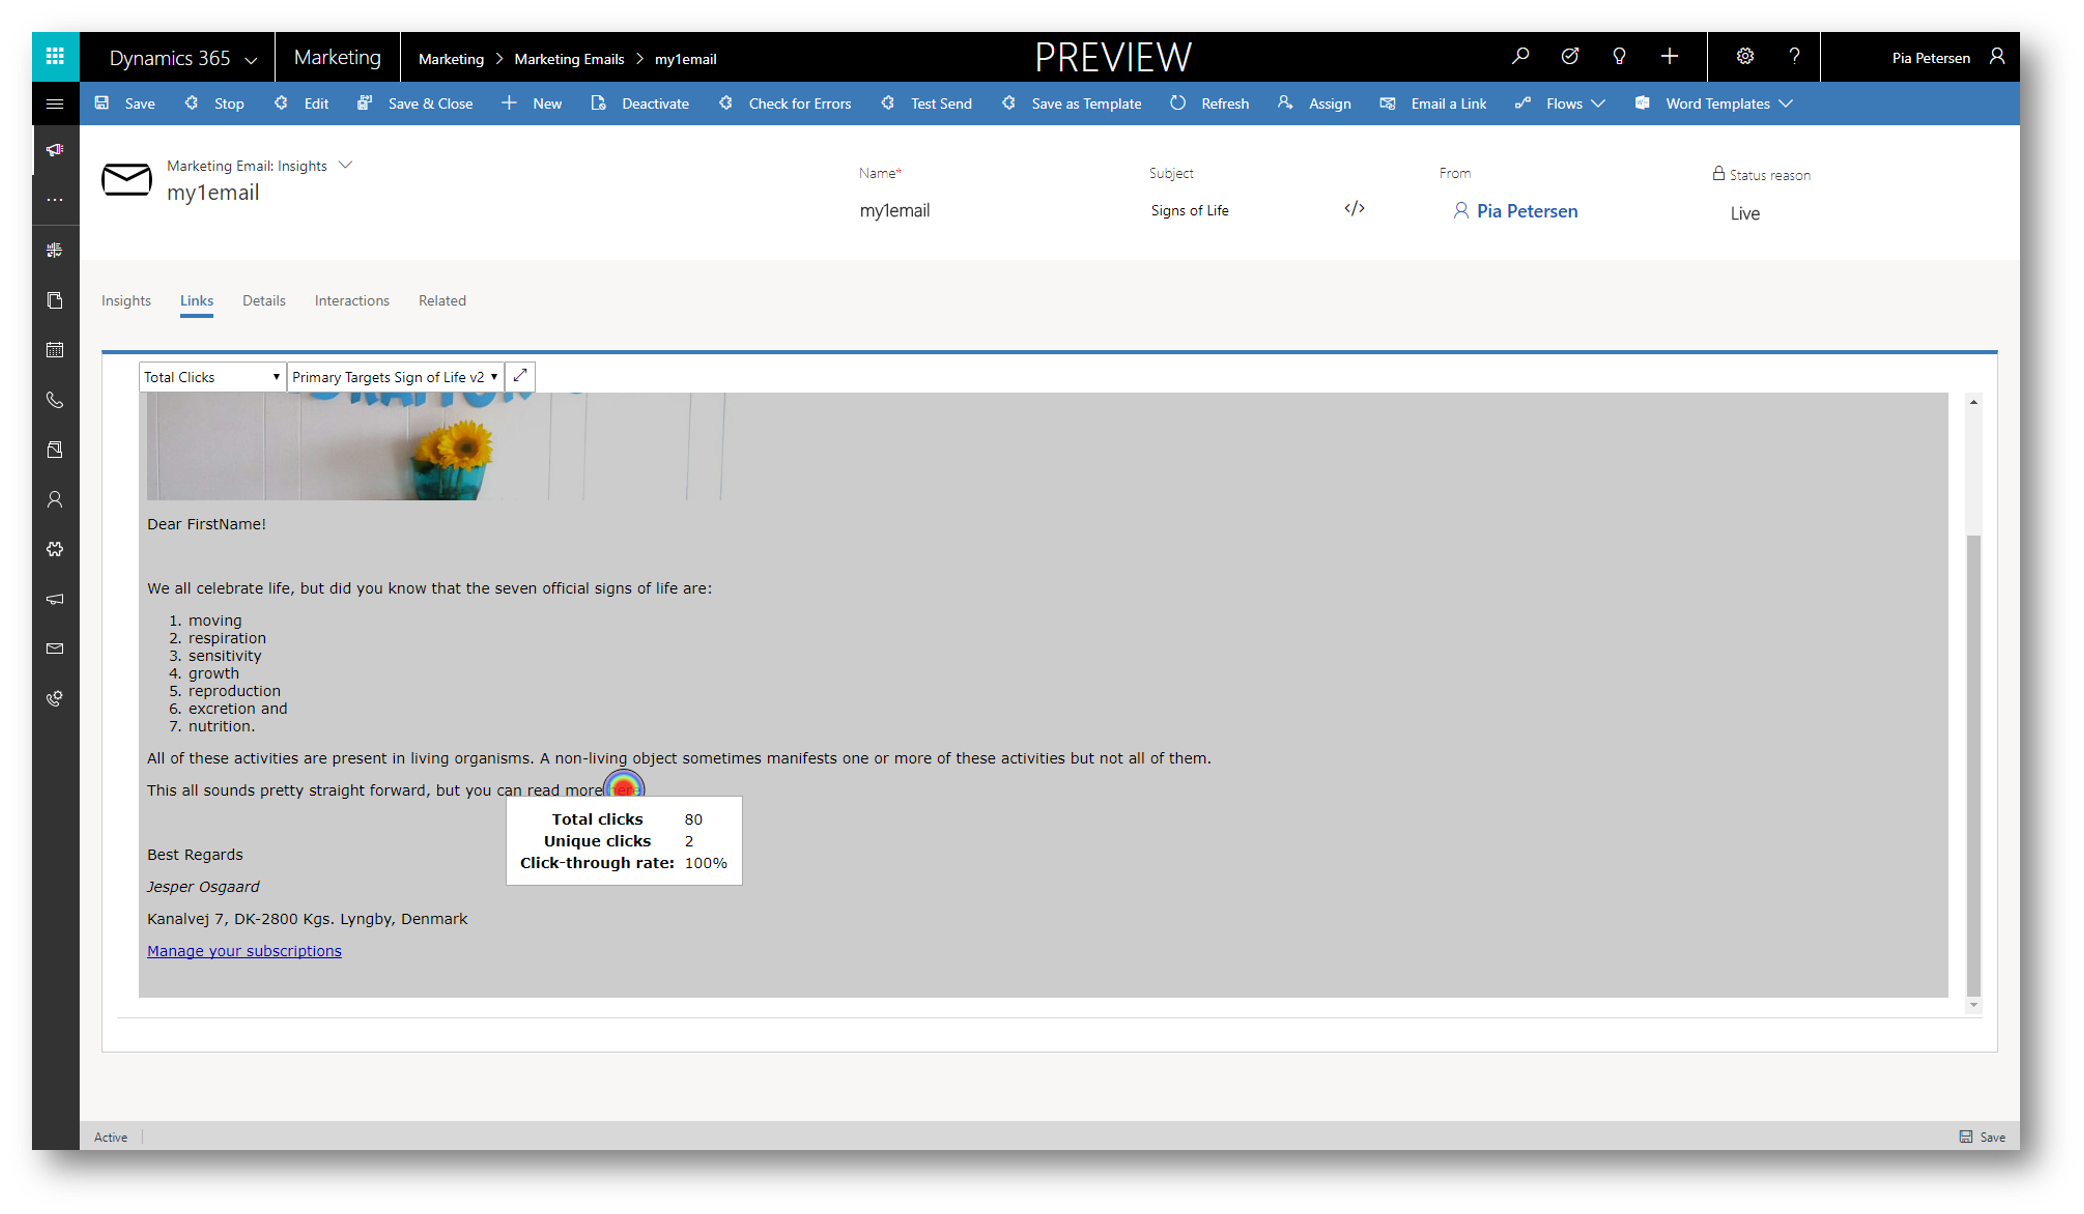
On the Links tab you get insights into how often any links in your email are clicked
Close
We are excited to bring you Dynamics 365 for Marketing and I hope you will enjoy this addition to the Dynamics 365 family
Note
This blog post is part of a five posts series to help you get started with Dynamics 365 for Marketing
- How to Create a Dynamics 365 for Marketing Trial (1/5) - link
- Try Dynamics 365 for Marketing (2/5) - link
- How to Create Landing Pages in the new Dynamics 365 for Marketing (3/5) - link
- Interactive Customer Journeys in Dynamics 365 for Marketing (4/5) - link
- Lead Scoring in Dynamics 365 for Marketing (5/5) - link
See Also
- Dynamics 365 for Marketing Help and Training - link