Putting Lead Scoring Models and Landing Pages to work in Dynamics Marketing
In Dynamics Marketing you can generate Leads from visitors to a landing page. You can score the leads using lead scoring models, allowing you to prioritize which leads to target first.
In this blog post I'll explain a bit about Lead Scoring Models and Landing Pages, and then take you through an example of using those to generate and score leads.
Lead Scoring Models
A Lead Scoring Model (LSM) contains Lead Scoring Rules that are applied to Leads generated by one, several or all of your Marketing Campaigns or Programs. The Lead Scoring Rules are displayed in the "Rules" section of the Lead Scoring Model.
Rules are separated into two sections, "Condition" and "Action".
"Condition" section
In the "Condition" section of the rule you can choose from a variety of Fields, Operators, and Values.
The Field option that you select will determine the Operator and Values that are available as well as the corresponding Actions that can be applied.
Field options are eg "Name (Lead)" so you can act upon the name of the visitor, or "Landing Page" so you can act upon which Landing Page the visitor submitted info from
Operator options are determined by Field type
- Date
- Number
- Text
- Category
and will enable additional Condition qualifier values to suit the rule.
"Action" Section
In the "Action" section you define the score value that will be applied to the Lead that meets the Conditions defined.
Certain Condition Fields have corresponding Action Devaluation Fields that will allow for score deprecation to occur based on recency of the action.
Lead Grades and Sales Ready Grade
If you prefer to show lead quality using words, phrases or symbols, Dynamics Marketing can generate Grades in addition to scores.
To add Grades to a Lead Scoring Model, enter the Grade Name (such as a letter grade, or word such as hot or cold), enter the From and To score range for the Grade and continue through to the next line until you have a set of Grades to match your Lead Scoring Model range.
You can identify certain Grades as Sales Ready by selecting the grades and clicking the "Sales Ready" icon. You can also remove the Sales Ready grade by selecting the Remove Sales Ready Grade icon.
The Sales Ready Score will be identified on Leads that the scoring model applies to and Leads that are Sales Ready will be marked accordingly in the Scoring section on the Lead. The lead header will show a score indicator and the grade associated to the score is displayed at the end of the Lead name.
Landing Pages
Landing Pages are used to collect information from visitors to a web site.
They are commonly used to collect information about leads and prospects, to register for an event, or to get a visitor to join a distribution/mailing list.
Microsoft Dynamics Marketing enables you to collect information without writing any HTML code or computer programs. The information can be gathered and added to Microsoft Dynamics Marketing’s marketing database.
Microsoft Dynamics Marketing Landing Pages work in conjunction with Lead Management to enable you to create forms that can be embedded into web pages that result in the automatic creation of Marketing Contacts, Companies and Leads in Microsoft Dynamics Marketing.
To help format the Landing Pages are organized into three sections
- Behavioral Analysis
- Lead Management
- Content
Landing Page "Behavioral Analysis" section
In the Behavioral Analysis you associate the Landing Page with the marketing entities that the Landing Page is being created to promote; an existing Program and/or Campaign, a Source Code, a Phone Number, and/or an Offer that will associated with the Landing Page.
If the Landing Page is being used to generate Leads, depending upon Lead Creation Strategy of the Client or Site Company that the Landing Page is for, a Program or Campaign selection may be required.
Landing Page "Lead Management" section
In the "Lead Management" section you can enable the Landing Page to automatically generate leads. In order to generate geads from your landing page you need to check the "Generate Leads" checkbox.
The "Lead Management" section holds several prepopulated, required, and optional fields
- The "Creation Strategy" and "Creation Scope" fields will automatically populate with the values that are defined in the Lead Management section of your Site Company
- The "Name" field will be the name that appears on the "Lead Interactions" of any leads that are generated from the Landing Page and is a required field if the "Generate Leads" box is checked.
- The "Status" field is used to populate the Status of the leads that are generated from the Landing Page. Newly generated Leads that come in from the Landing Page will be marked in bold as an ‘unread’ Lead until it is clicked on or marked as ‘Read’.
- The "Web Site" field is used for Behavior tracking. In order to see an activity on the Online Visitors page for prospects that are visiting your Landing Page, the Web Site field must populated with the Web Site you identified in Microsoft Dynamics Marketing.
- "Days Until Due" is used to populate the due date on the Leads that are generated. For example, if the Days Until Due is set to 4, the new Leads that are generated will be assigned a due date 4 business days from the create date.
- The "Priority" field is used to populate the Priority of the leads that are generated from the Landing Page, default options are High, Medium, and Low. The Type field can be used to assign a Type to the leads that are generated from the Landing Page. (This field is populated by adding items to the Lead Type category).
Landing Page "Content" section
In the "Content" section of the Landing Page you define the content and design options of your Landing Page.
To help structure your Landing Page this section is organized into three additional sections:
- "Layout" - allows you to format the Header, Body, and Footer for your Landing Page
- "Form Details" - see below
- "Confirmation" - allows you to send confirmation emails
"Form Details" sub section
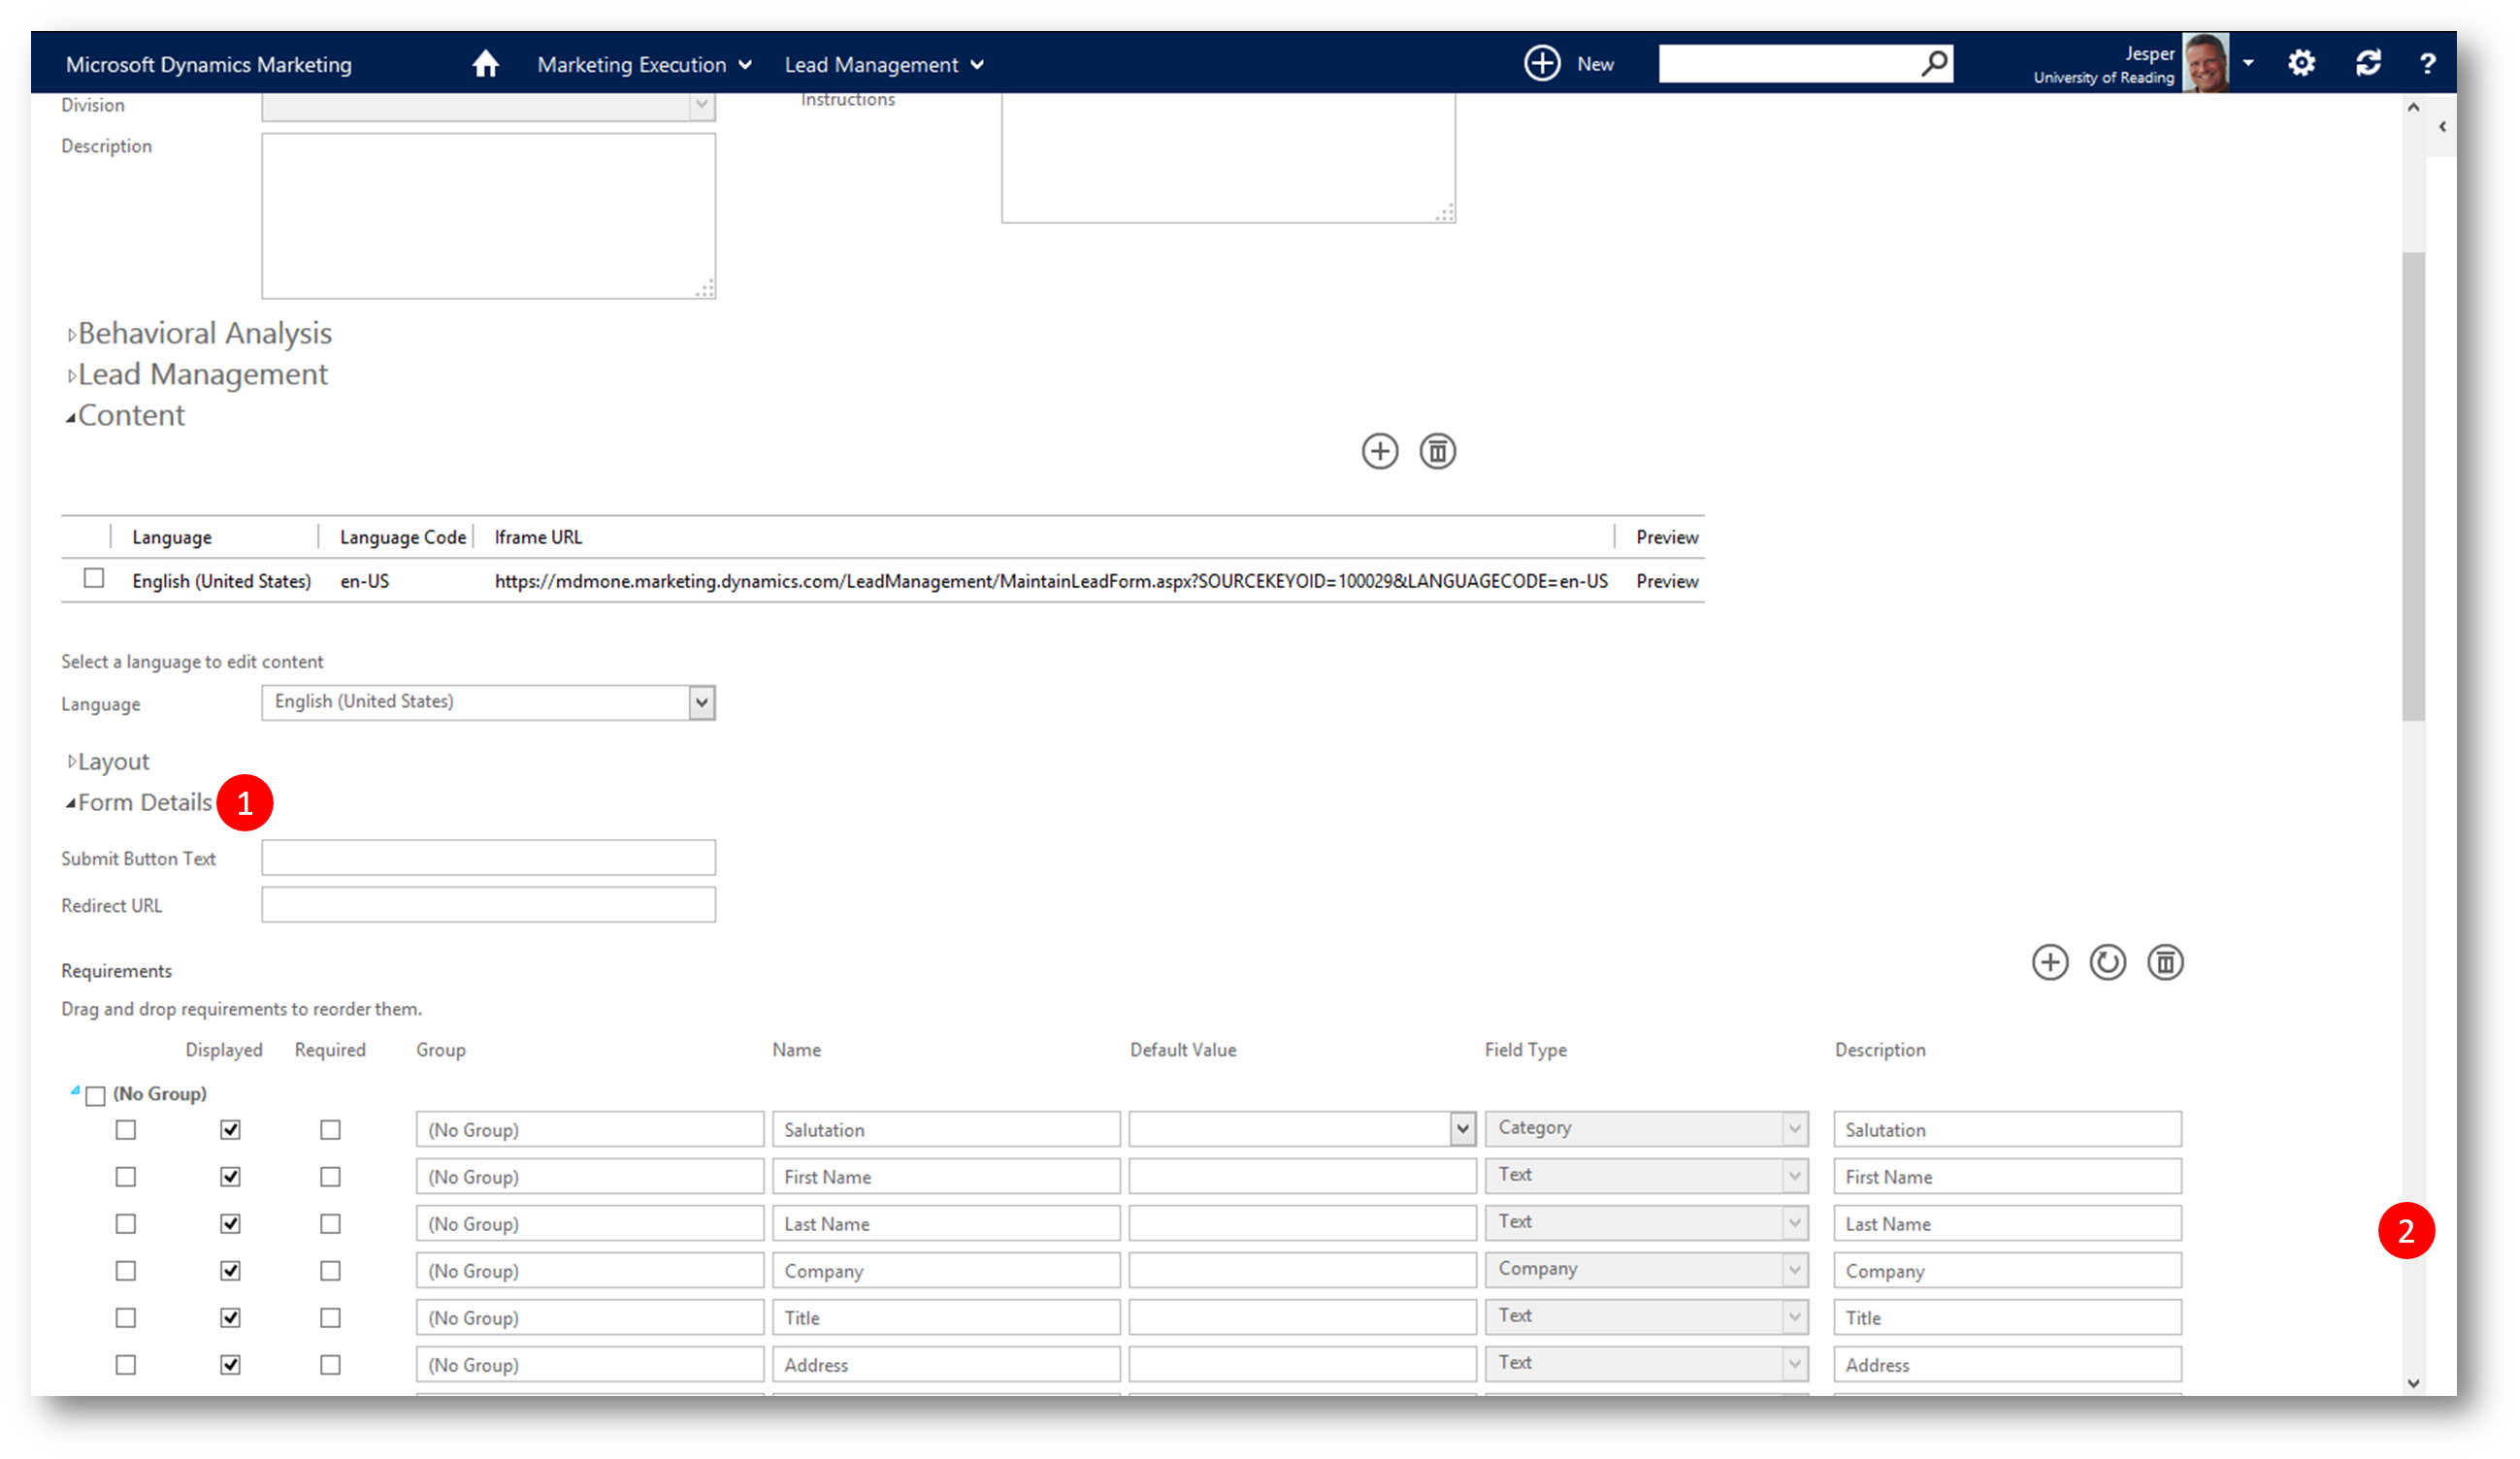
In the "Form Details" sub section you define which fields you want to have available for visitors to fill out when submitting the Landing Page form.
- The "Submit Button Text" allows you to specify the text that will be displayed in the Submit Button field.
- The "Redirect URL" can be designated as well so that you can redirect the visitor to another website after they click Submit.
"Requirements" are the fields that you select to comprise what will be displayed on the Landing Page form for the visitors to fill out, and have options for
- Displayed - There are several fields that are already marked as "Displayed", which means they will appear on the Landing Page.
- Required - fields are not required unless the "Required" checkbox is selected. You can select which fields you want displayed or not, and which you want to mark as required or not by checking or unchecking the corresponding checkboxes. If the visitor tries to submit the form and a required field is not filled out they will receive a prompt advising it needs to be populated.
- Group - you can group fields for easier readability
- Name - The existing Landing Page field Names can be changed and customized so that they display a name that is more suited to your marketing approach. If you want to set a Default Value that will be pre-filled into the form that the visitor sees you can define that as well
- Default Value - set the default value if applicable
- Field Type - checkbox, multi-line text etc
- Description - can be customized so that when visitors mouse-over the Name they can see the description you set
The "Subscribe" field is a type ahead field that displays all lists for the Landing Page company that are specified as Subscription lists. Only one list can be specified, the list name is not shown to the visitor and is not displayed by default.
The Iframe URL is the string that needs to be placed on a web page using an Iframe tag. This allows you to embed the Landing Page where ever you want to place it on the page. ve entered all of the details of your Landing Page you can click Preview to see what it will look like.
Every Landing Page form will automatically have a security code generated on each visit that must be entered in order for the form details to be submitted to help prevent automated submissions.
Example of using a landing page to generate and score leads
In this example we will
- Create a new Landing Page for visitors to register themselves (and us to score them as leads)
- Create a new Lead Scoring Modelwith two rules and grades
- Create Rule 1: If Lead from above Landing Page then 5 points
- Create Rule 2: If Lead Name contains Osgaard then 50 point
- Define Grades - Sales Ready if score greater then 50 points
- Create a new simple Campaign
- associate the Lead Scoring Model
- associate the Landing Page
- Return to the Landing Page and
- Define which fields visitors can fill out (First and Last name Fields – and Subscribe field (add contact to Marketing List))
- Make sure "Create Leads" checkbox is checked so we can create Leads from visitors
- Test the Landing Page iFrame
- Verify a Lead is created and scored from a visitors submission
- Check visitor is added to marketing list if visitor chose to subscribe
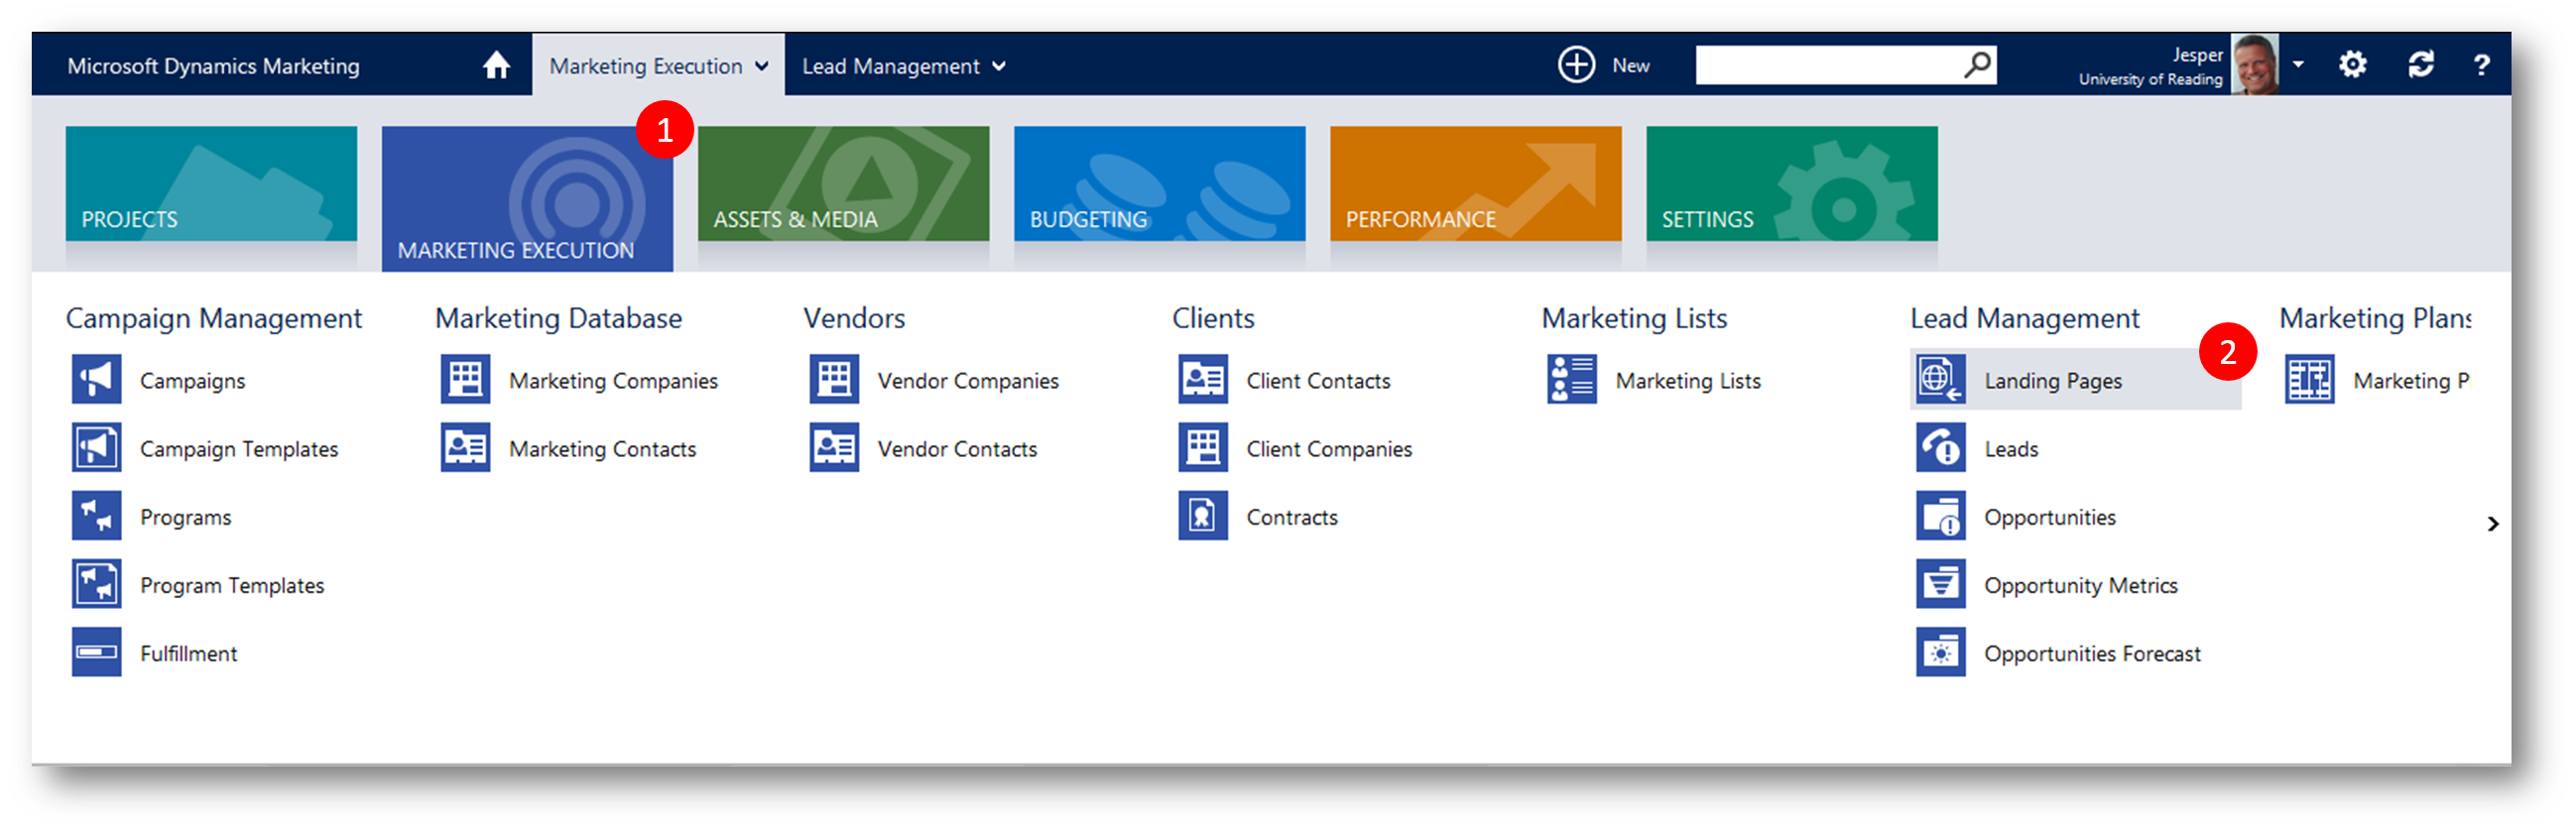
pic 1: Click Home - Marketing Execution - scroll to "Lead Management" - click Landing Pages to open Landing Page grid
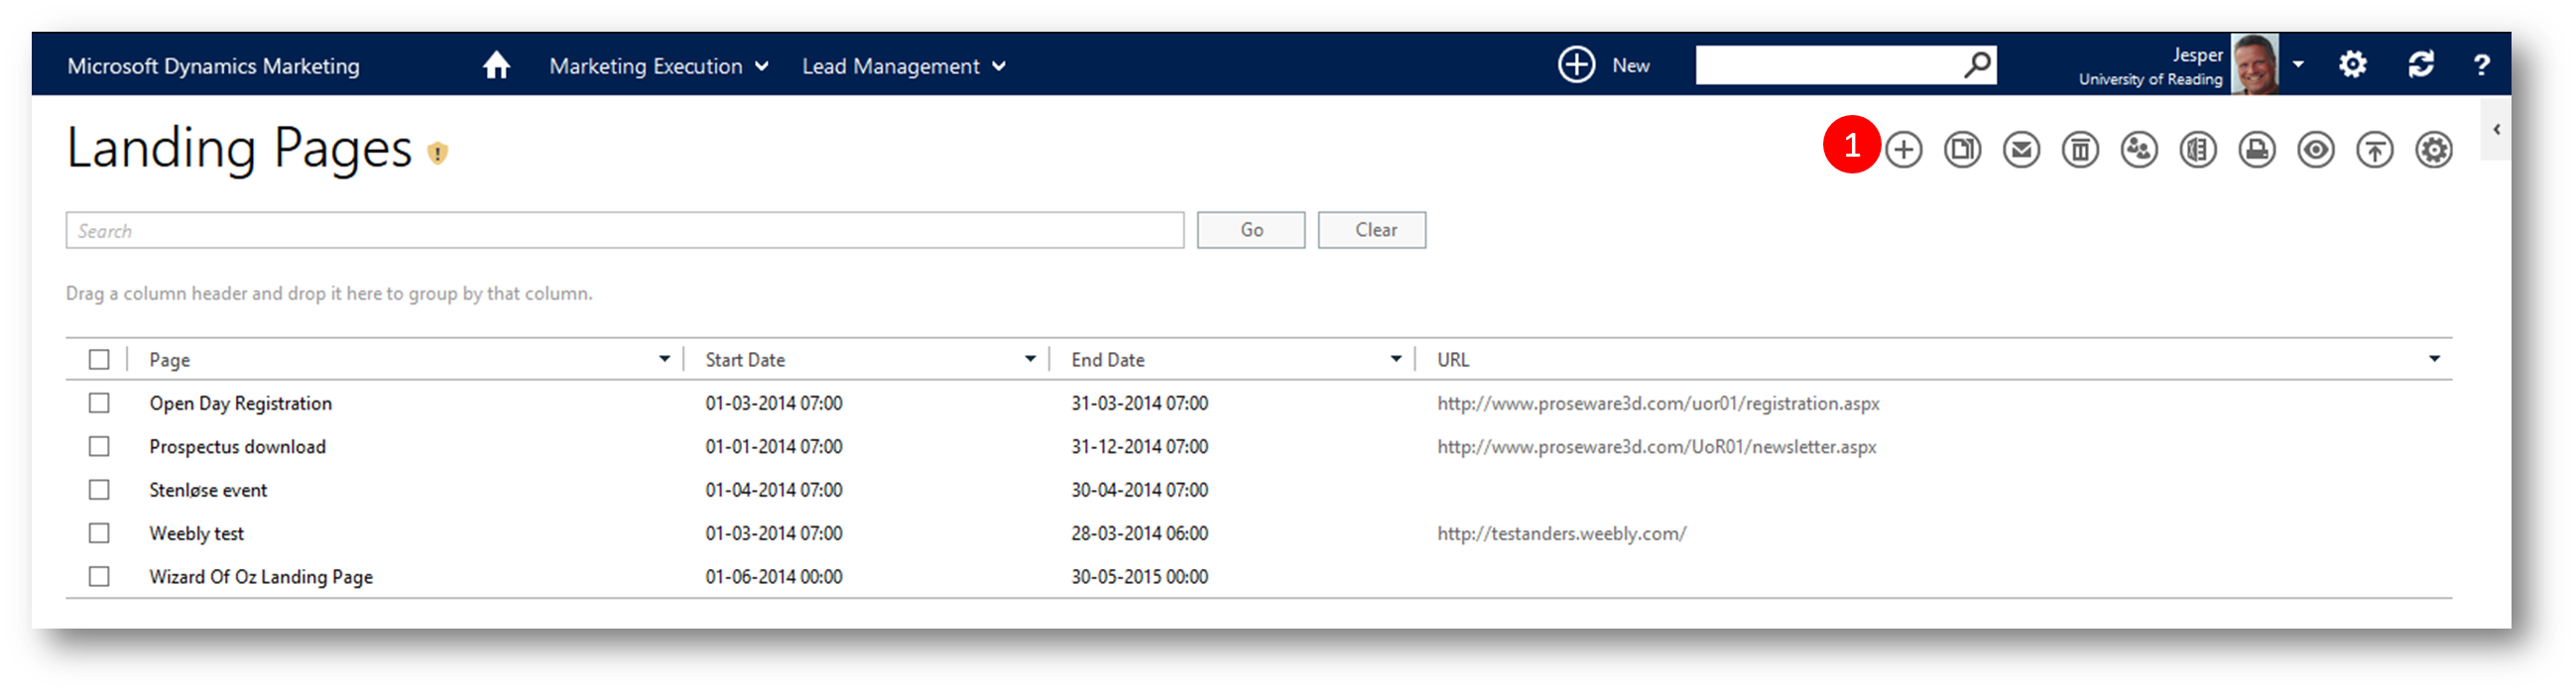
pic 2: Click "+" (New) to open the "New Landing Page" dialog
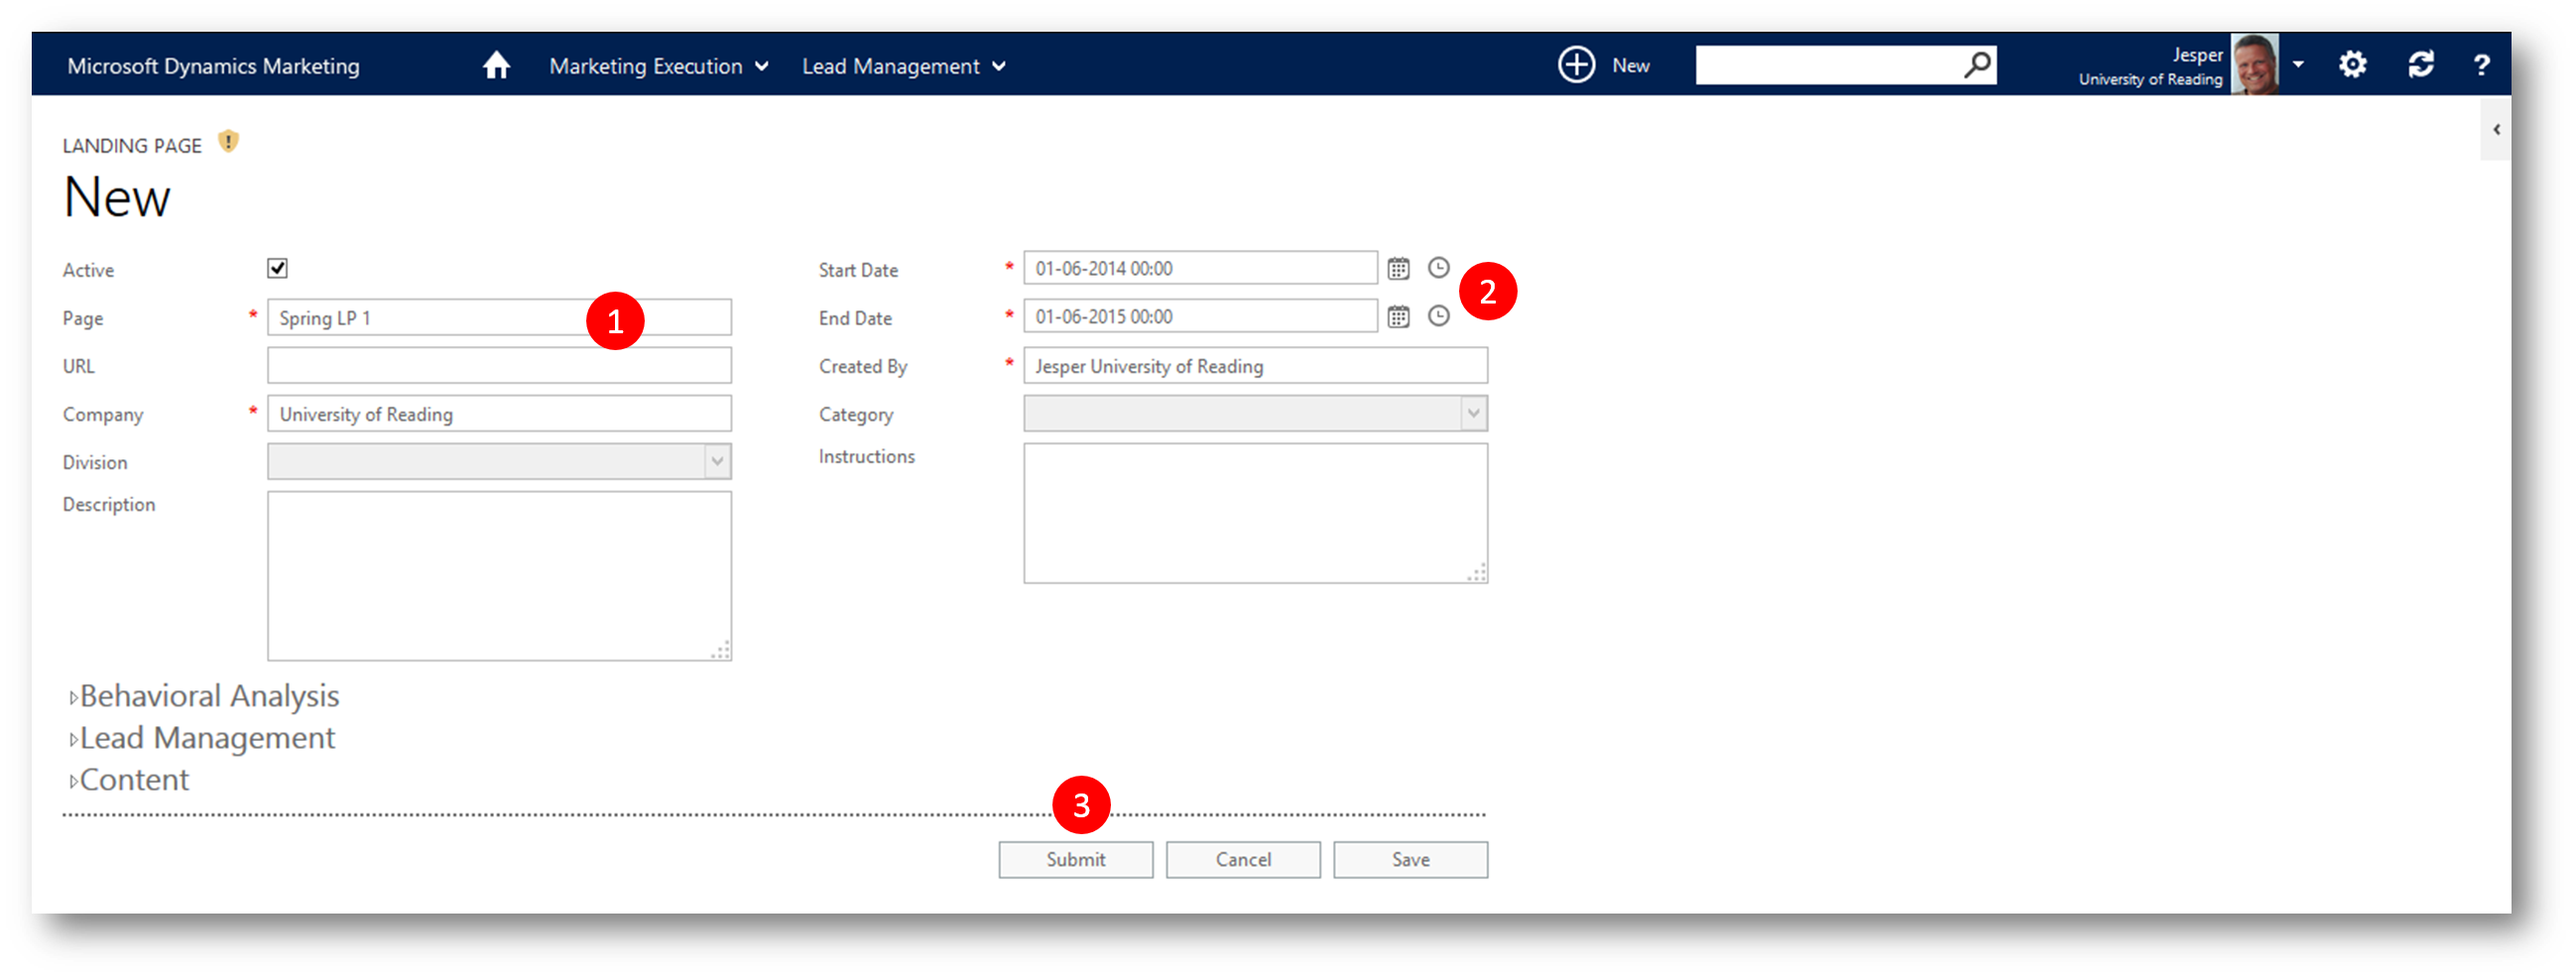
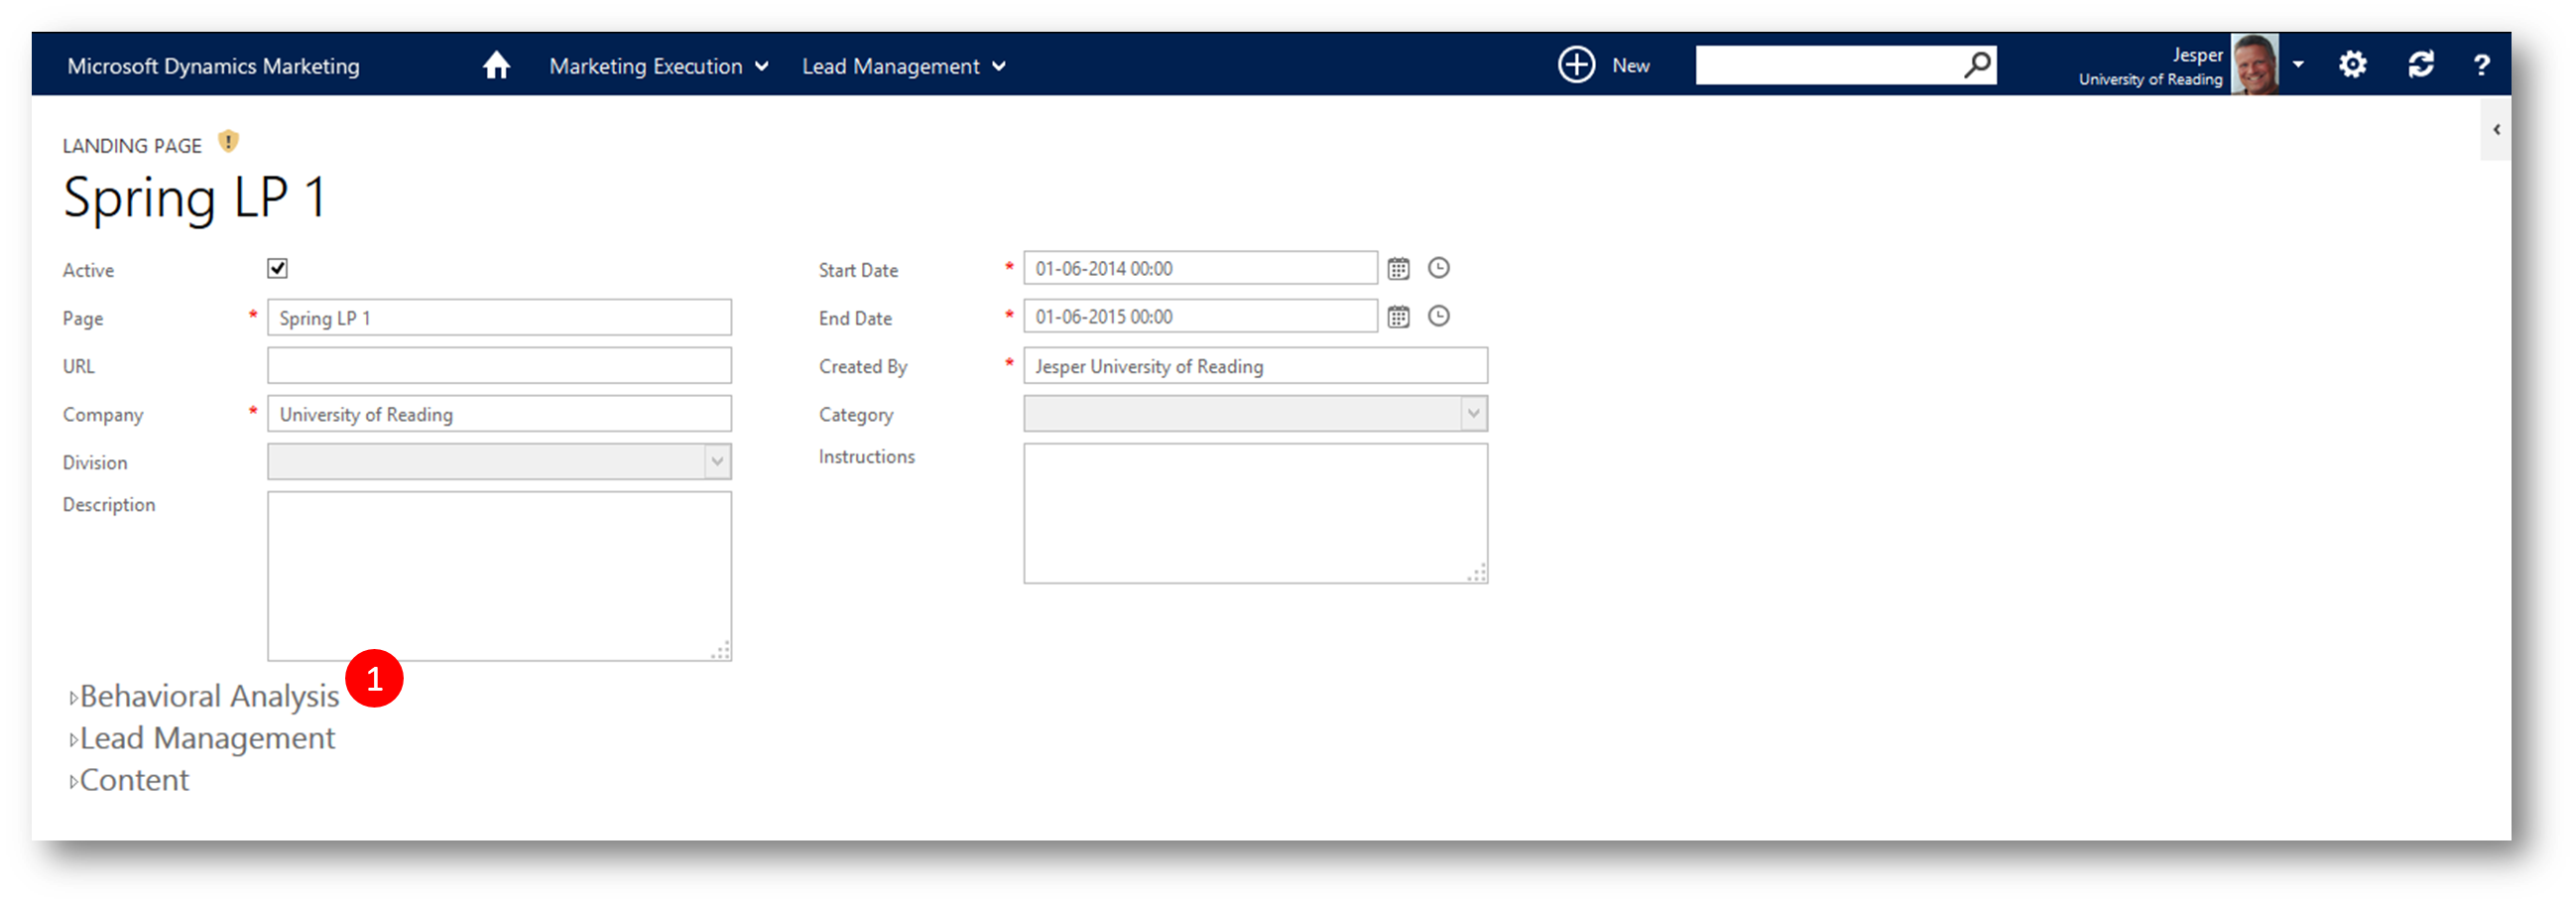
pic 3: Type a name for the landing page, set the Start/End Date and then click Submit to save and close the new landing page
We will return to the landing page later and do some further settings - but before that we'll create Lead Scoring Model for scoring future visitors to the landing page.
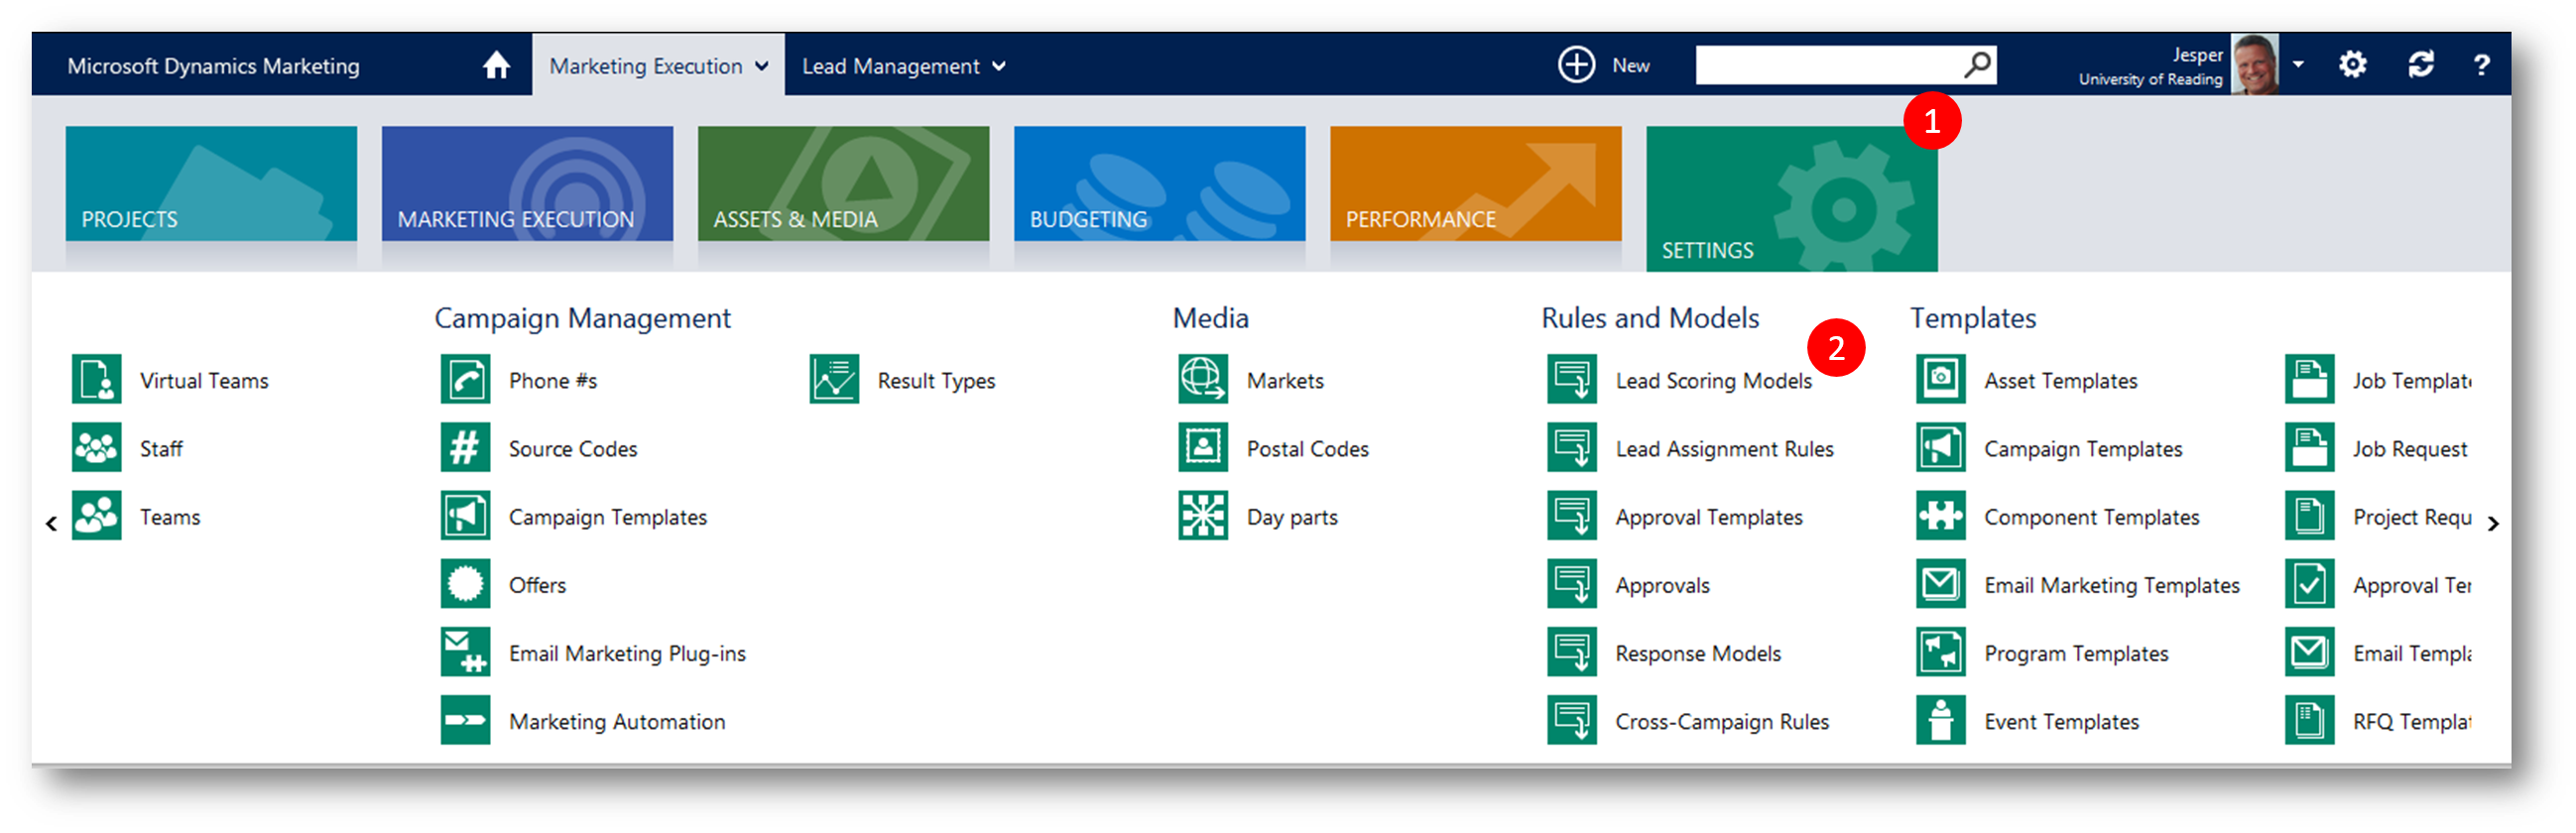
pic 4: Click Home - Settings - scroll to "Rules and Models" - click Lead Scoring Models to open the Lead Scoring Models grid
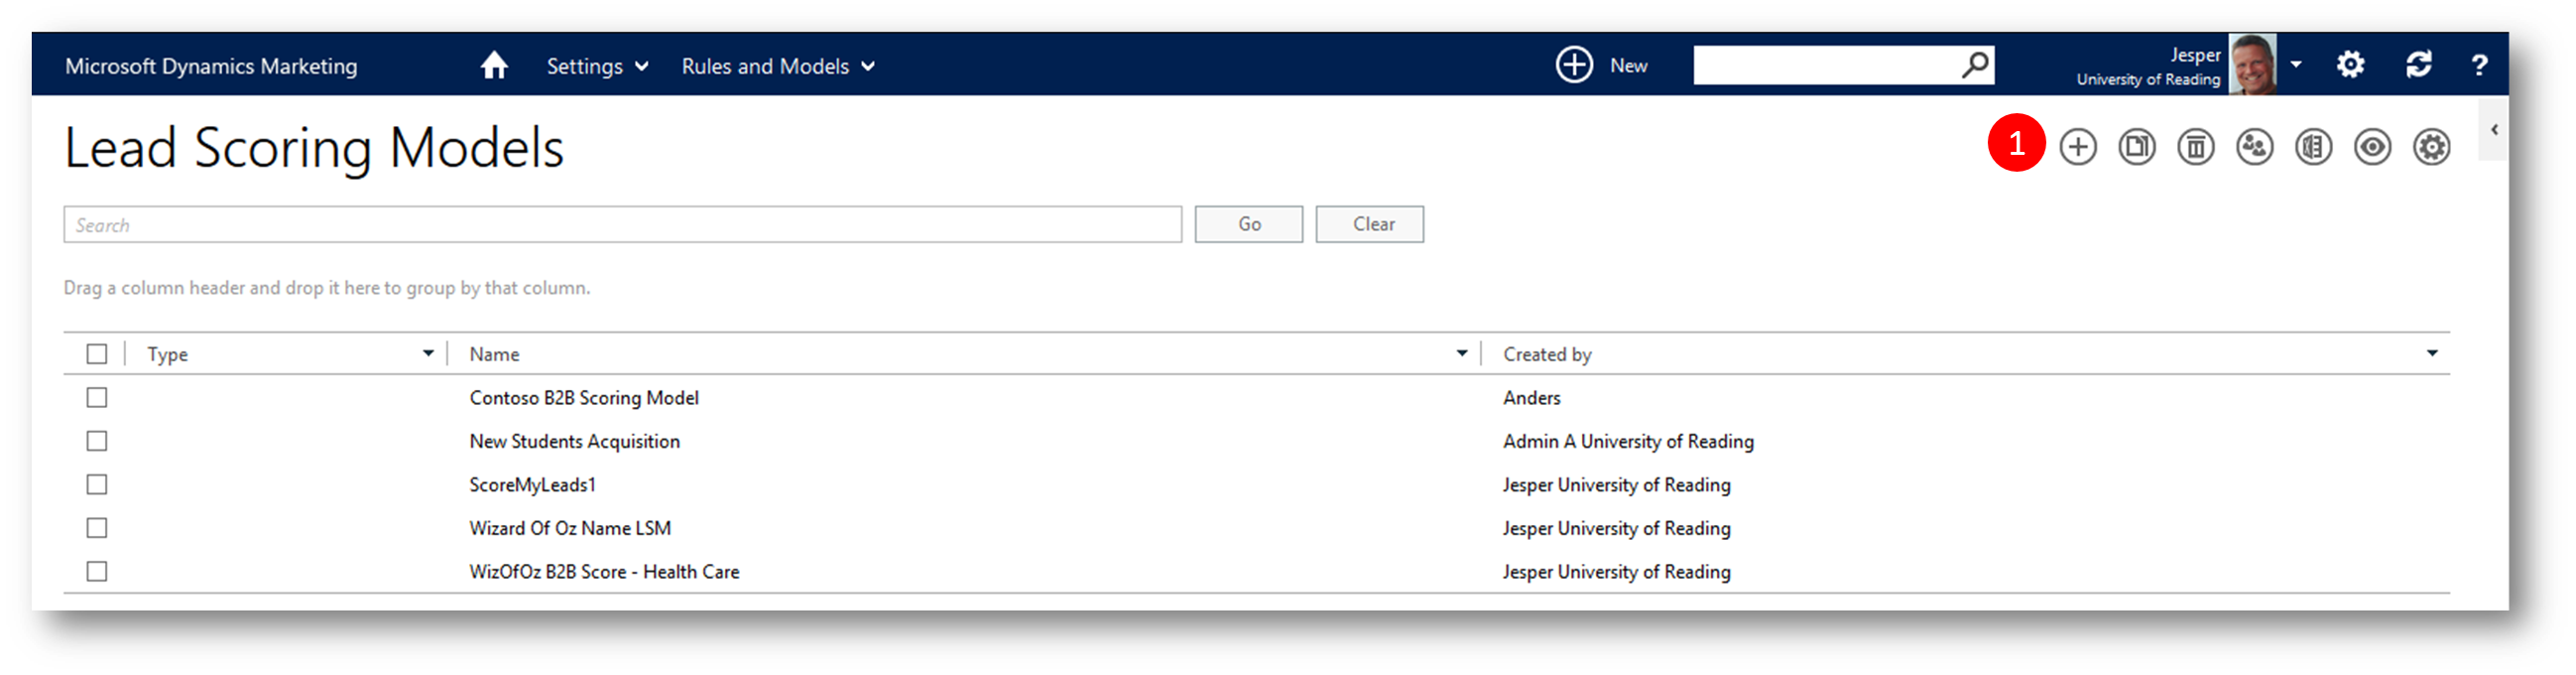
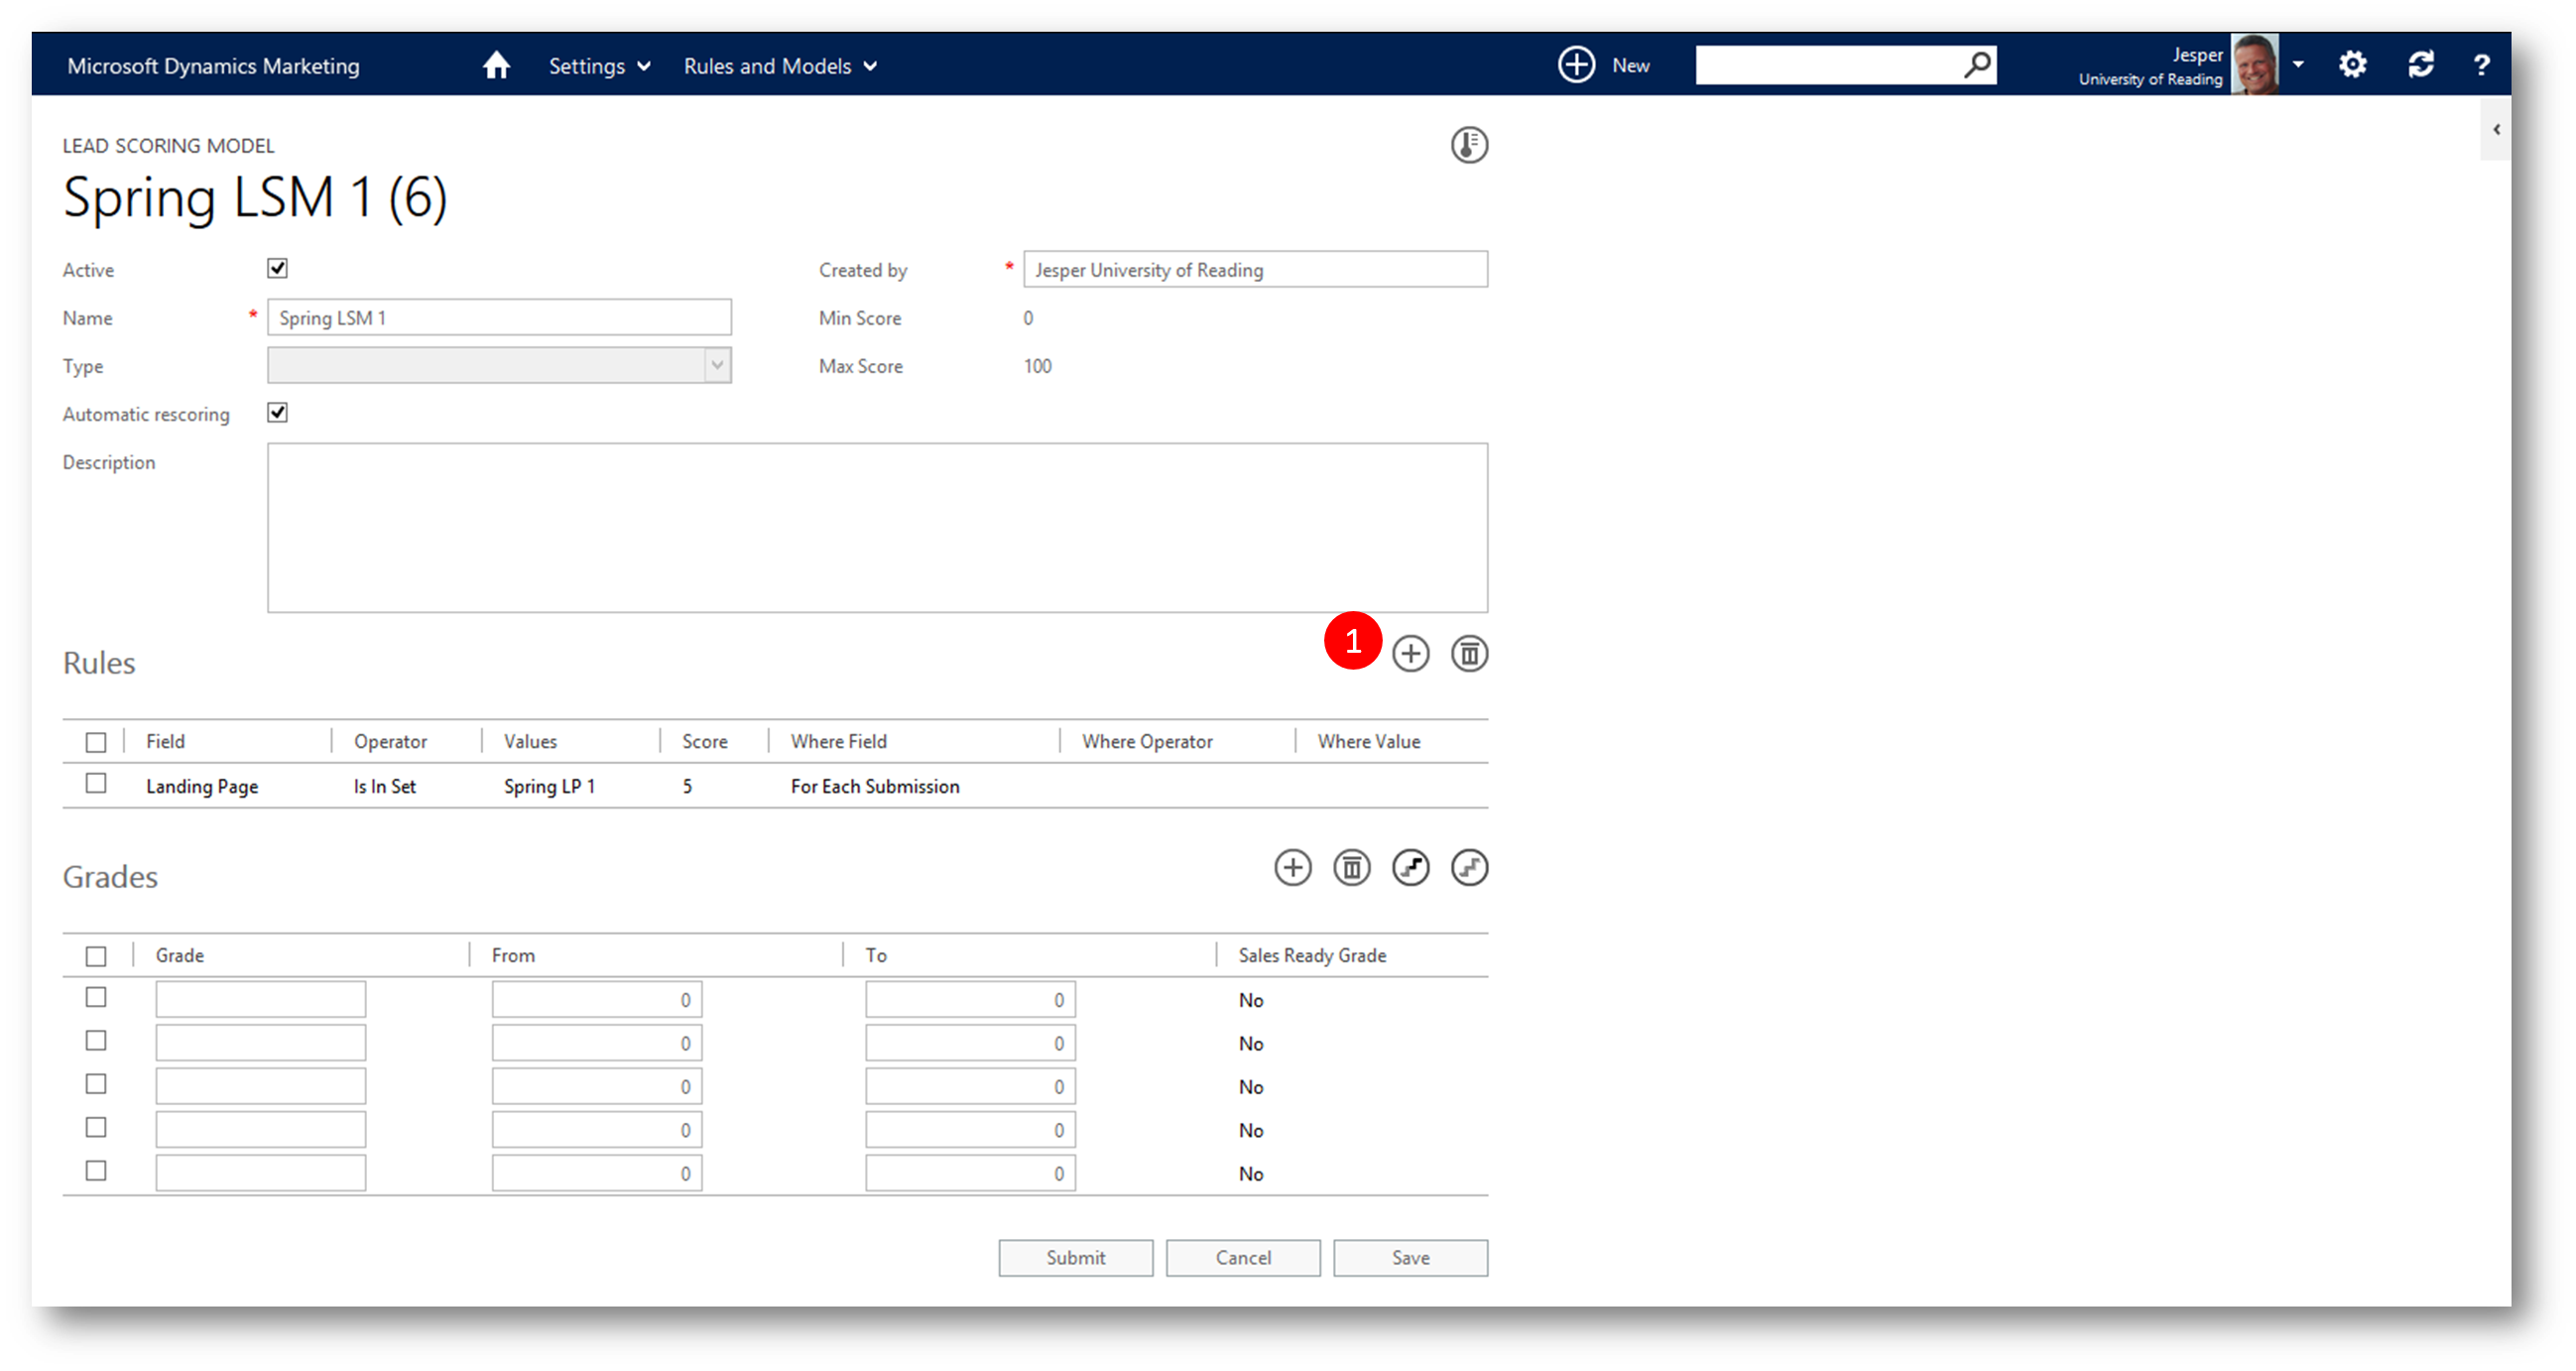
pic 5: Click "+" (New) to open the "New Lead Scoring Model" dialog
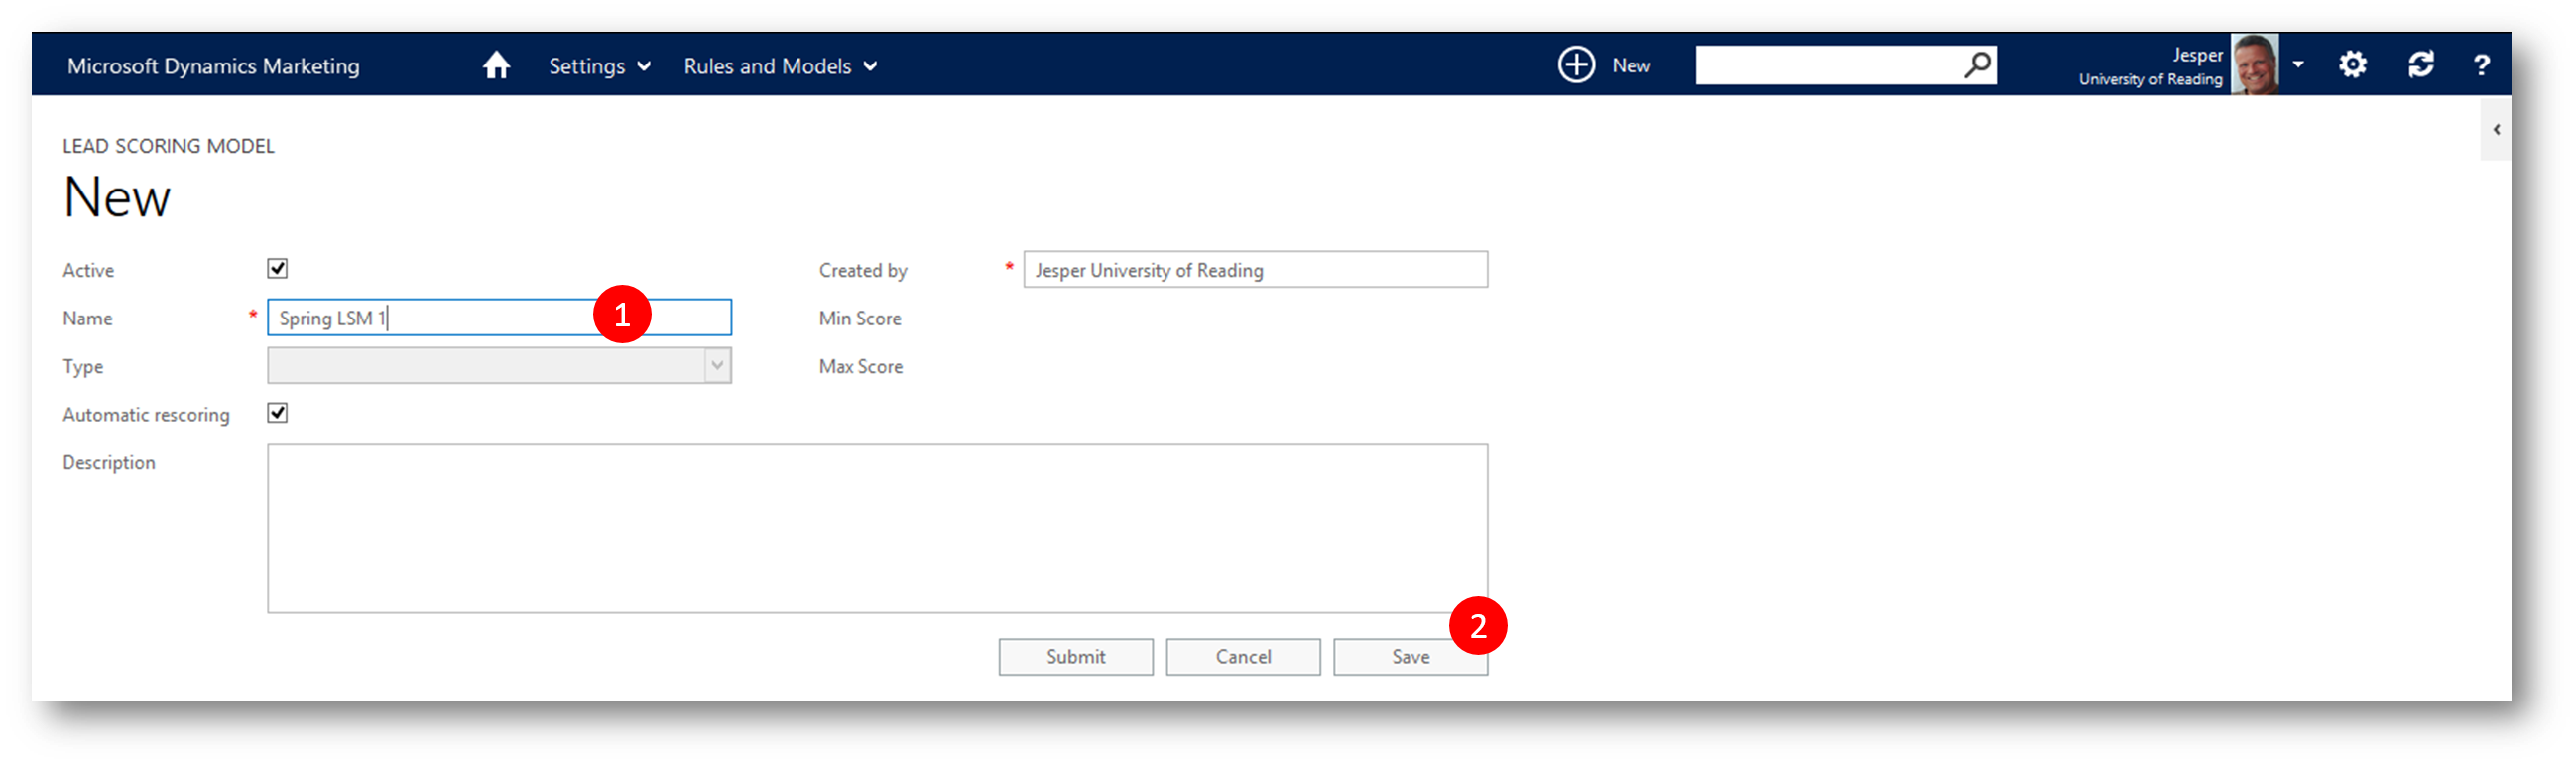
pic 6: Type a name for the model and then click Save (to display the lower dashboard)
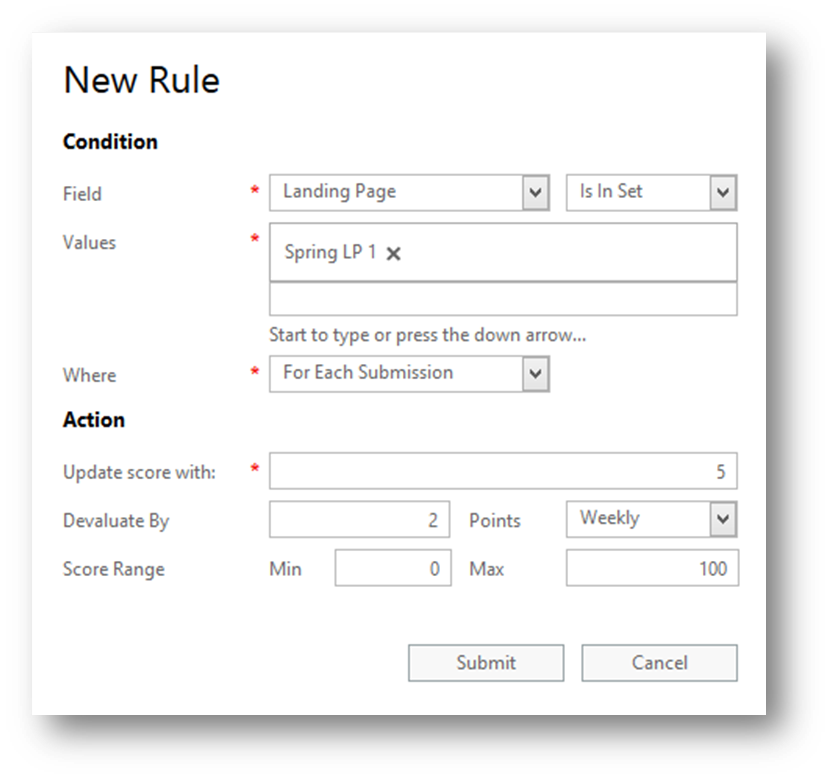
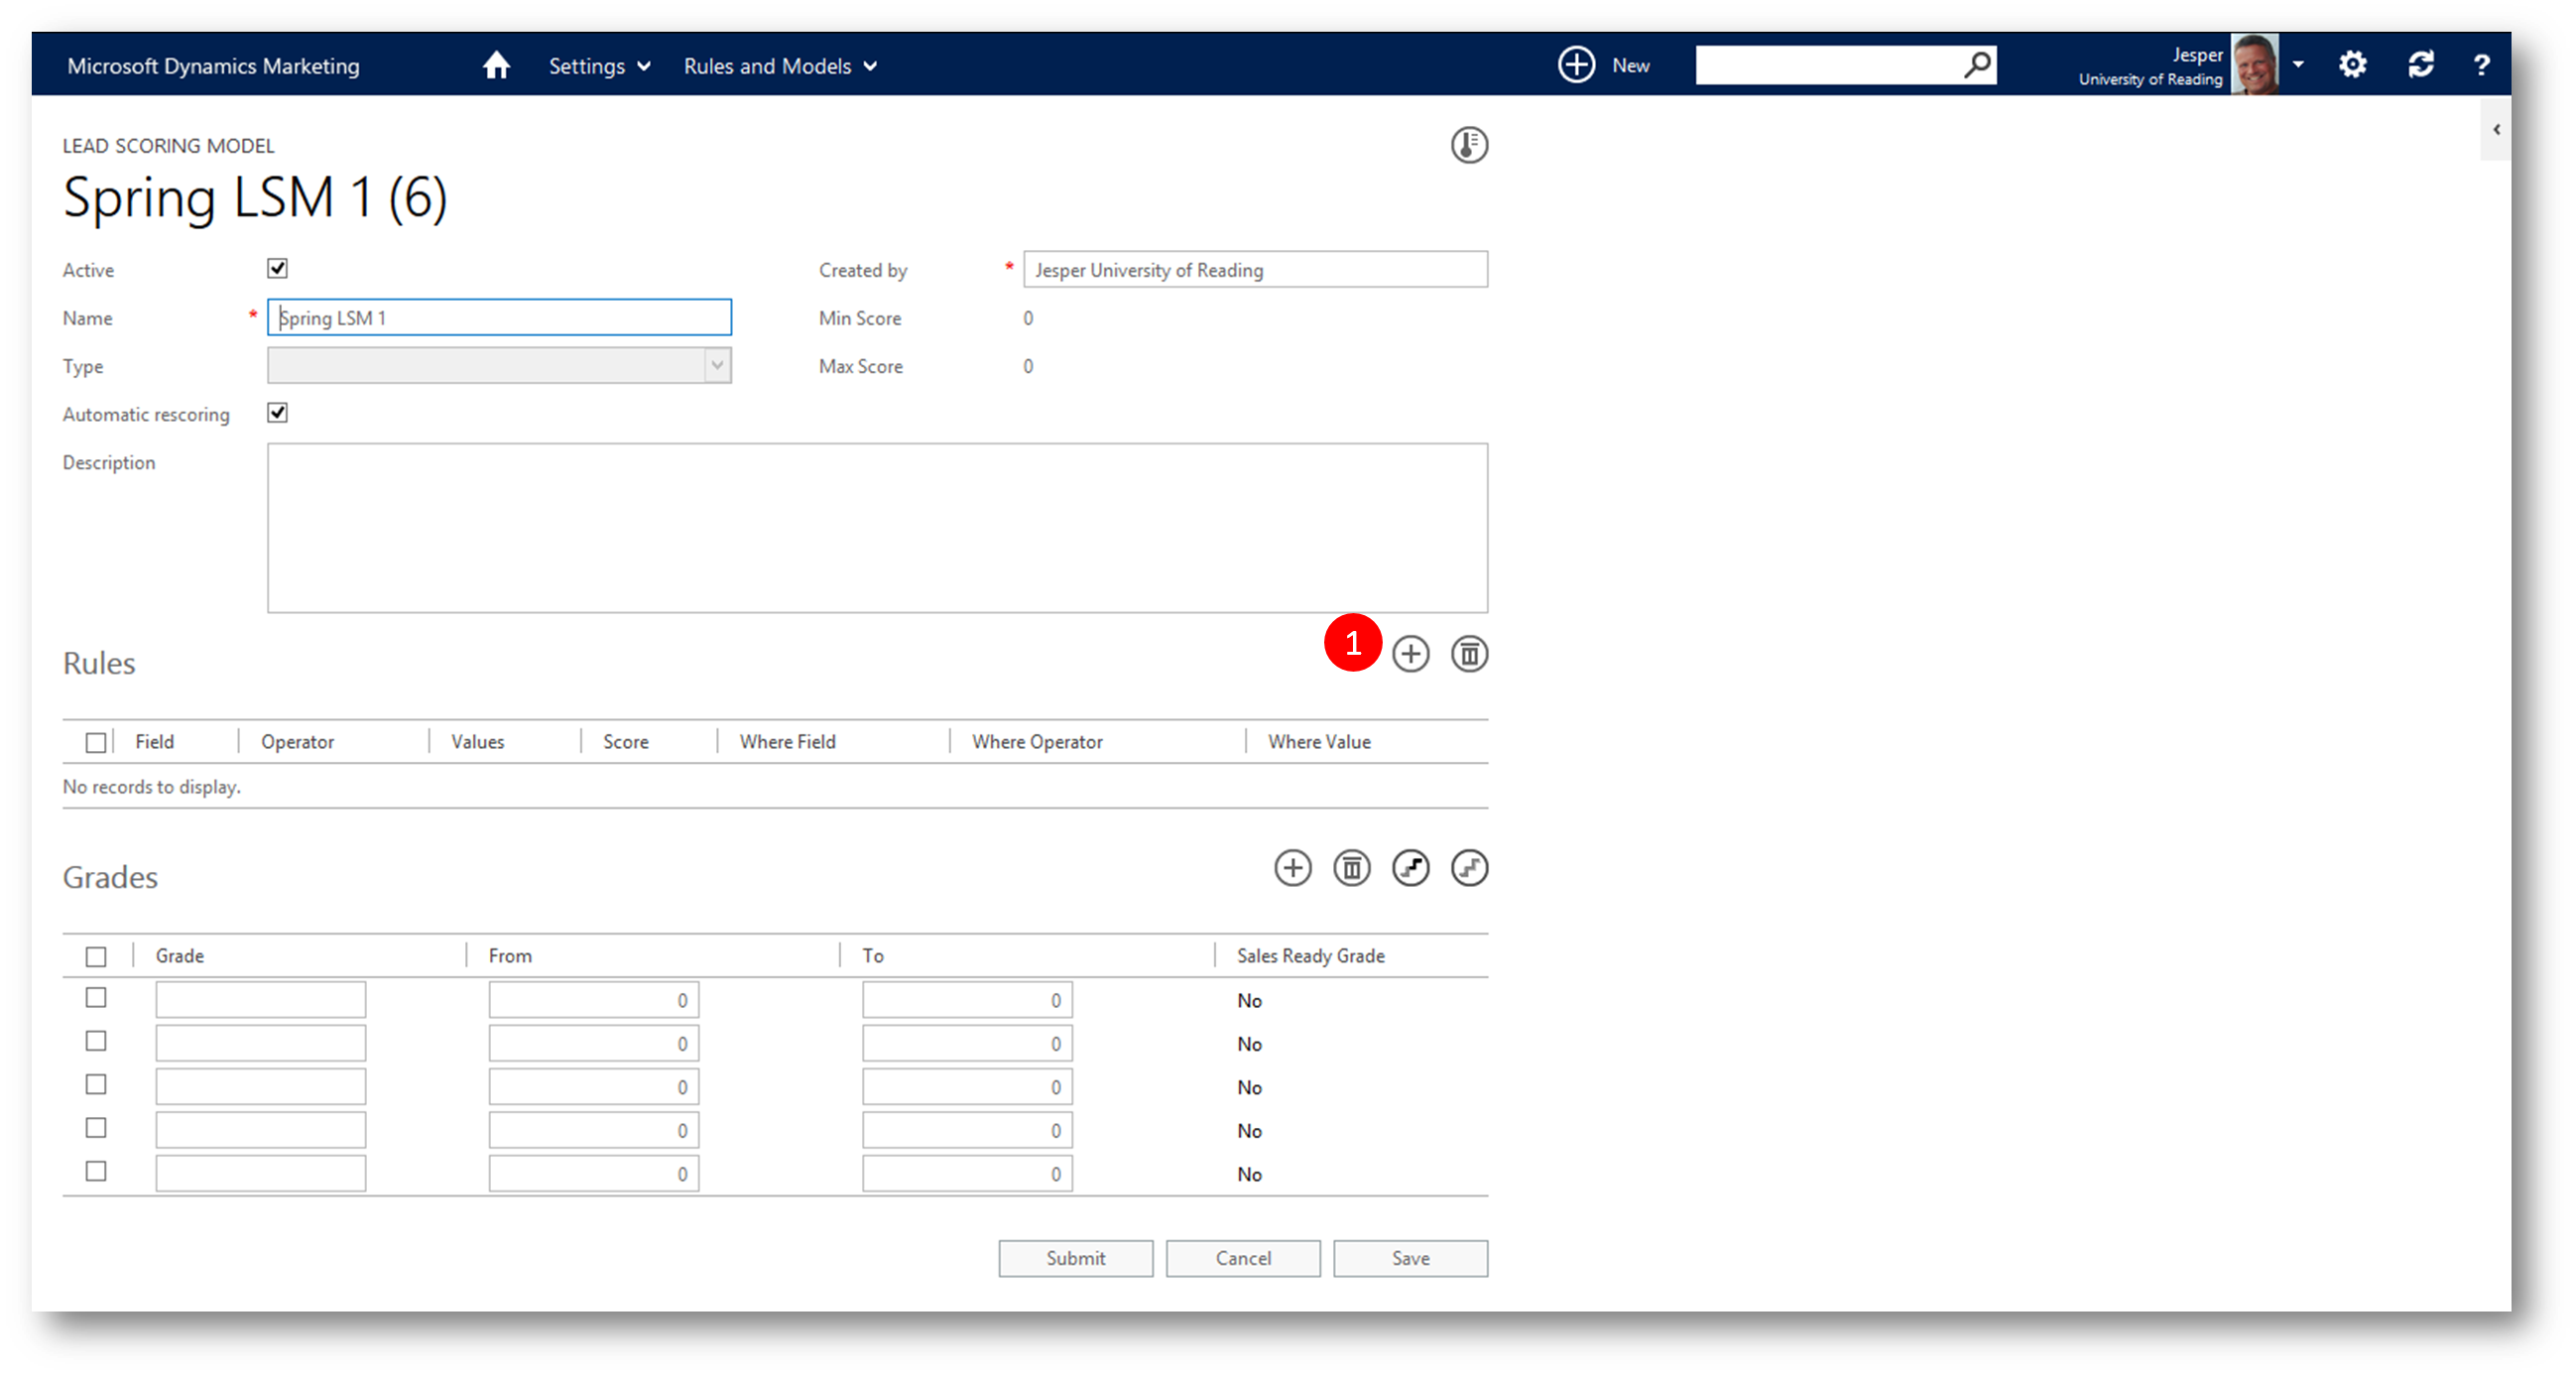
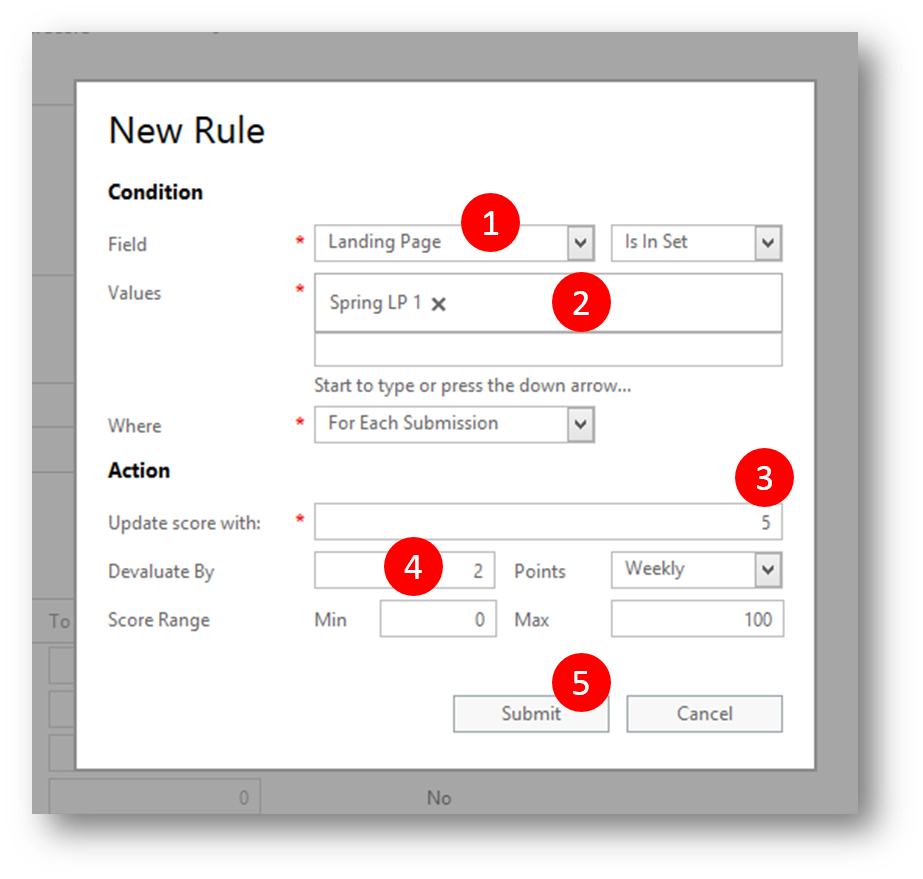
pic 7: Click "+" (New) to display the "New Rule" dialog
pic 8: In the "New Rule" dialog
- Select "Landing Page" in the "Field" drop-down and verify that the operator is "Is in Set"
- Select your new landing page in the "Values" box
- Type "5" in the "Update score with" field (we'll add 5 points to the lead score for each submission from the landing page)
- Type "2" in the "Devaluate by" field and choose "Weekly" (we'll deduct 2 points from the lead score for every week of inactivity)
- Click Submit to save and close the rule
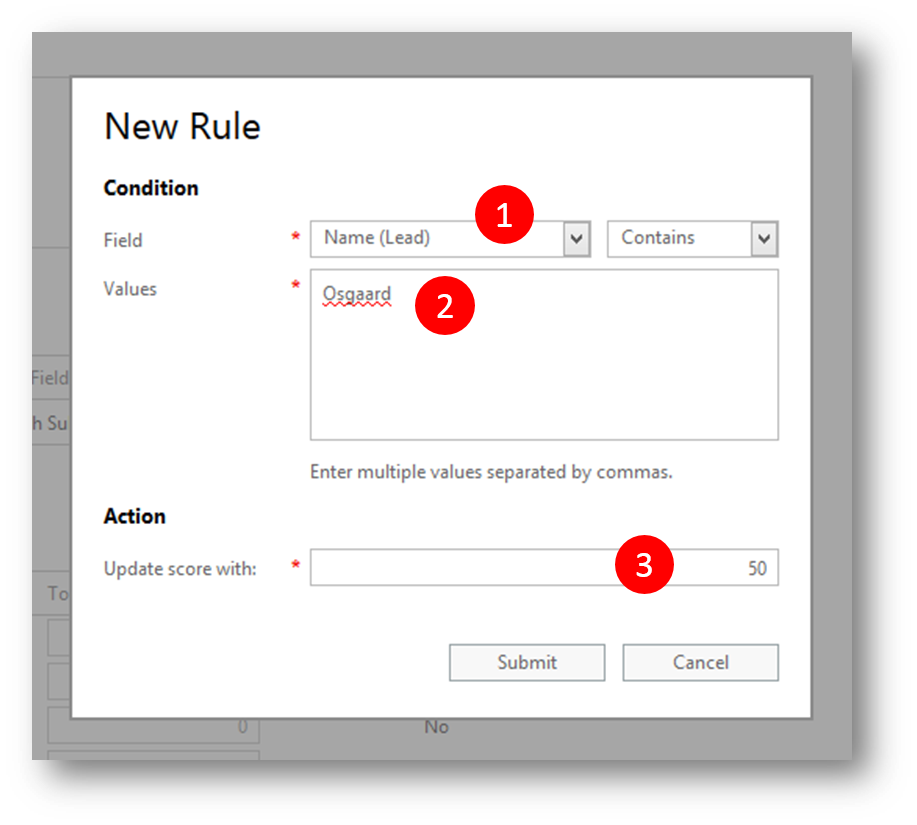
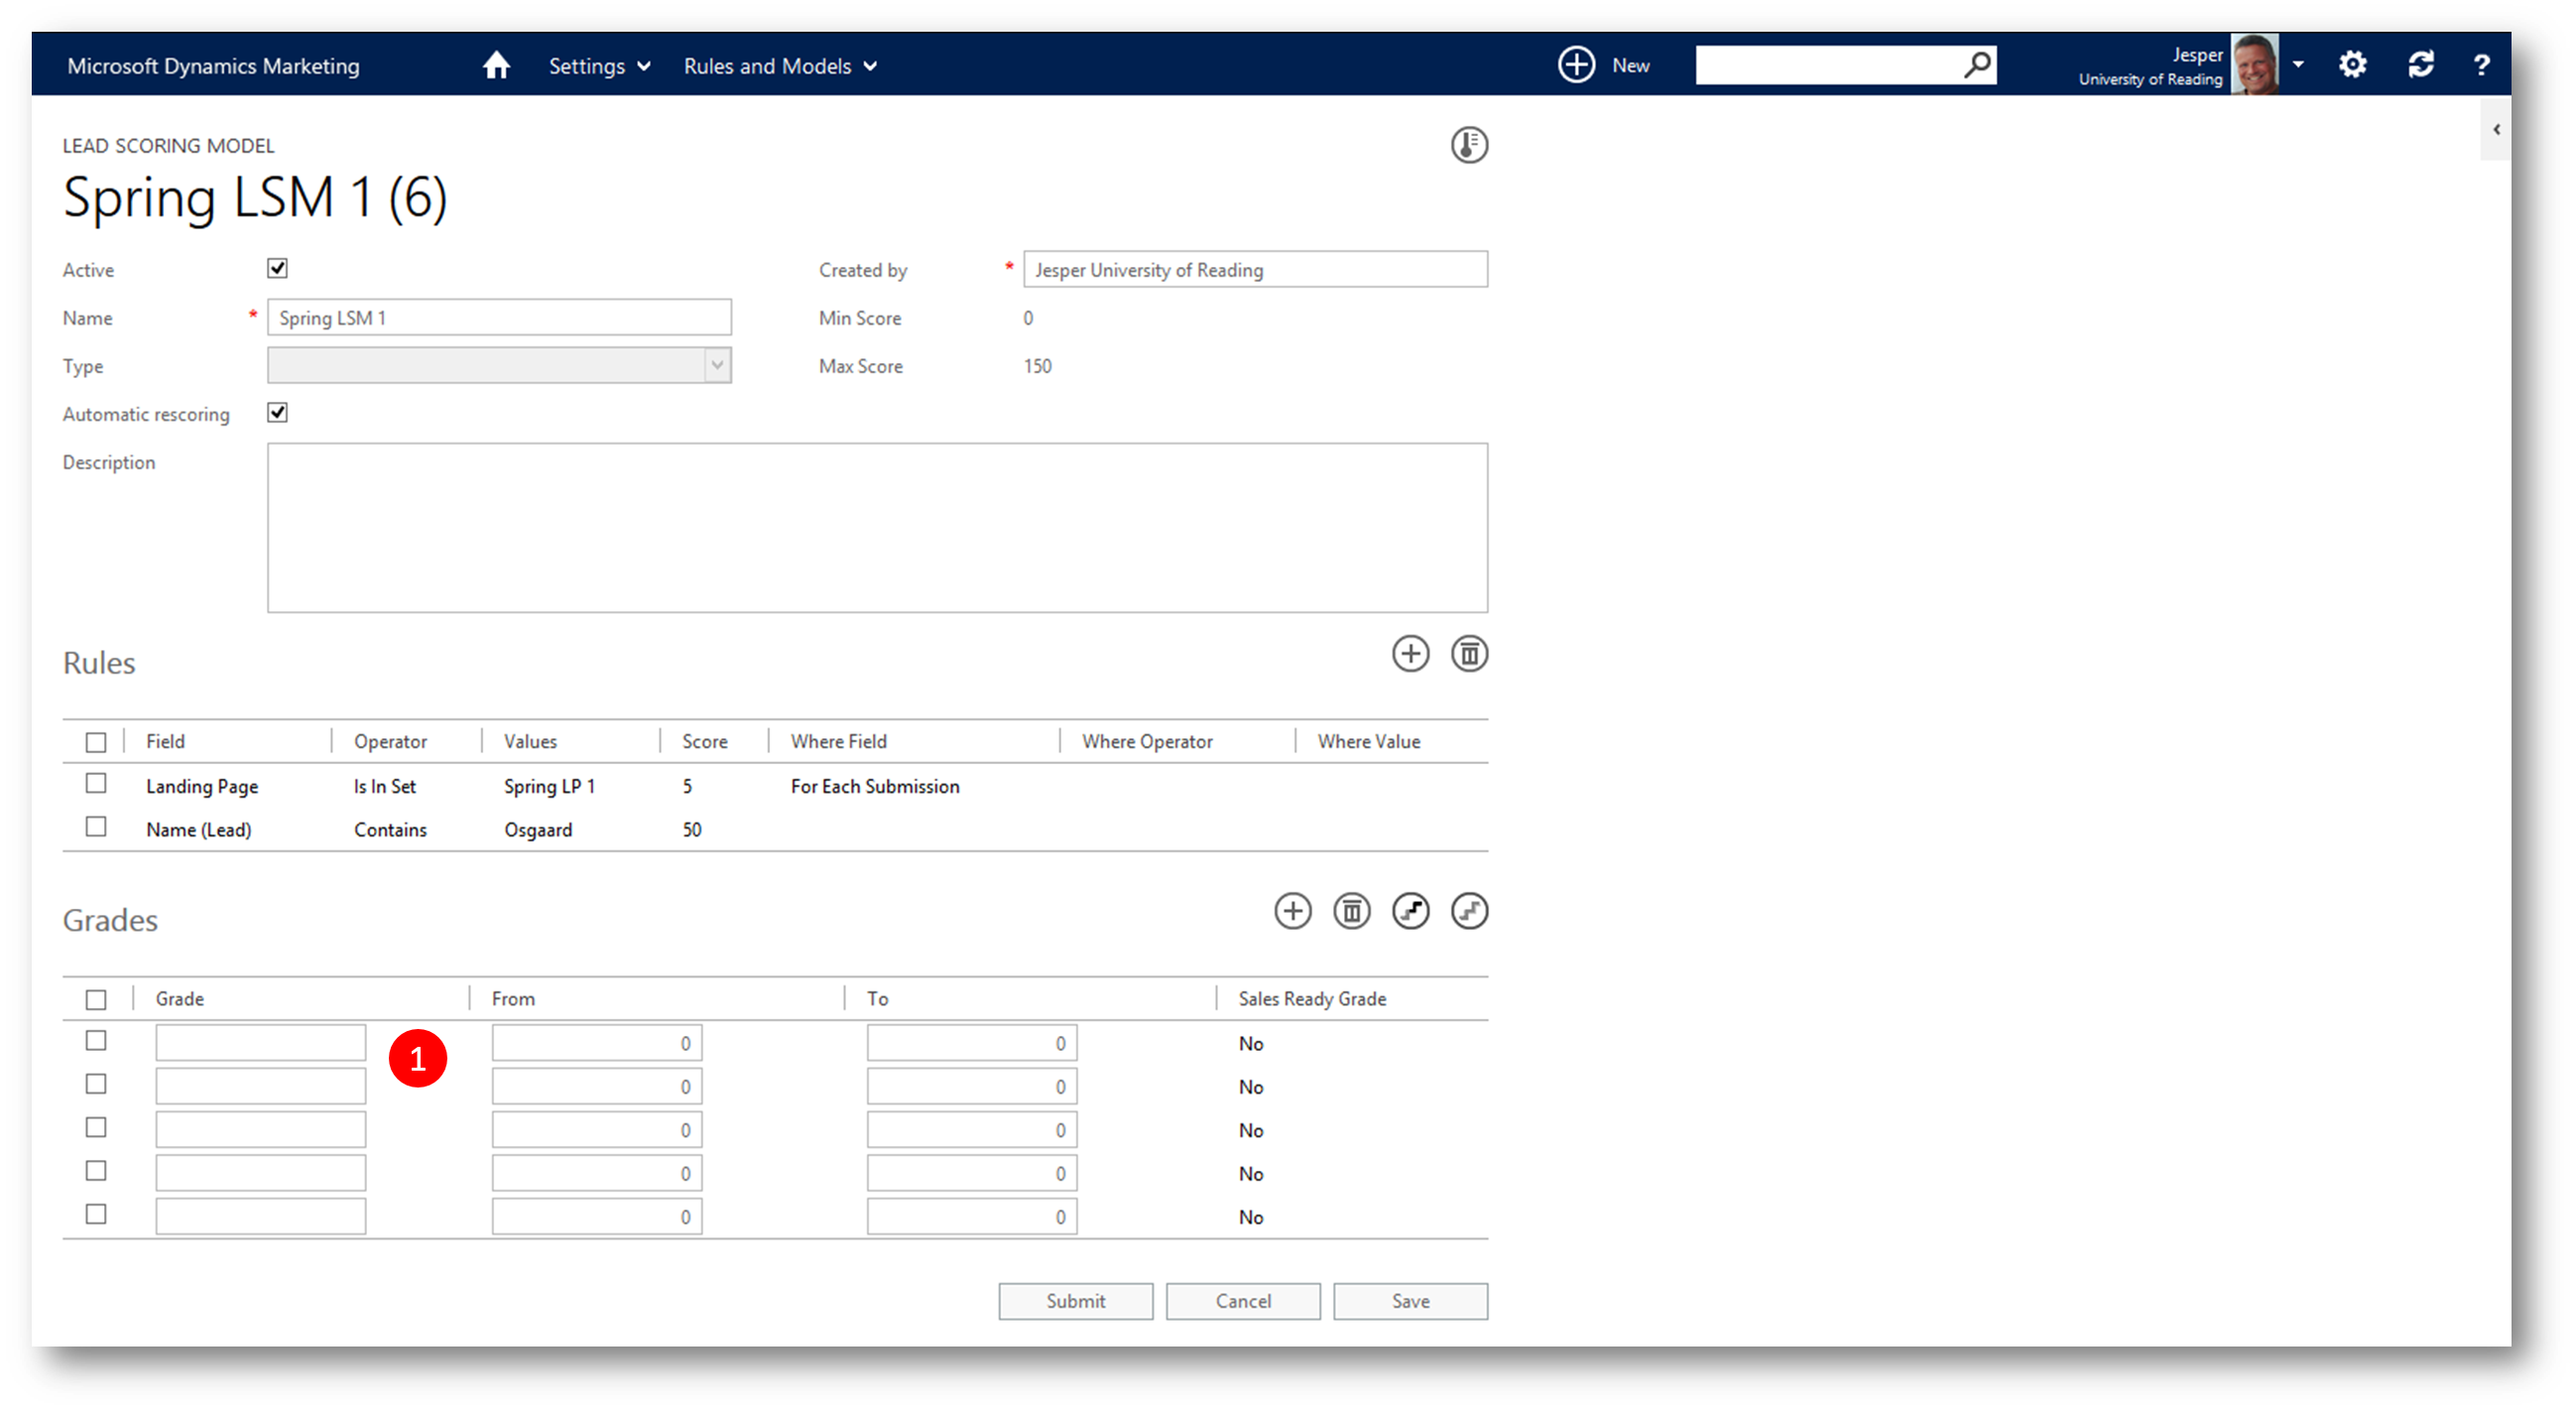
pic 9: Click "+" (New) to display the New Rule dialog
pic 10: In the "New Rule" dialog
- Select "Name (Lead)" in the "Field" drop-down and "Contains" as the operator
- Type (your last name) in the "Values" box
- Type "50" in the "Update score with" Action (we'll add 50 points to the lead score if its a certain person submitting from the landing page)
- Click Submit to save and close the rule
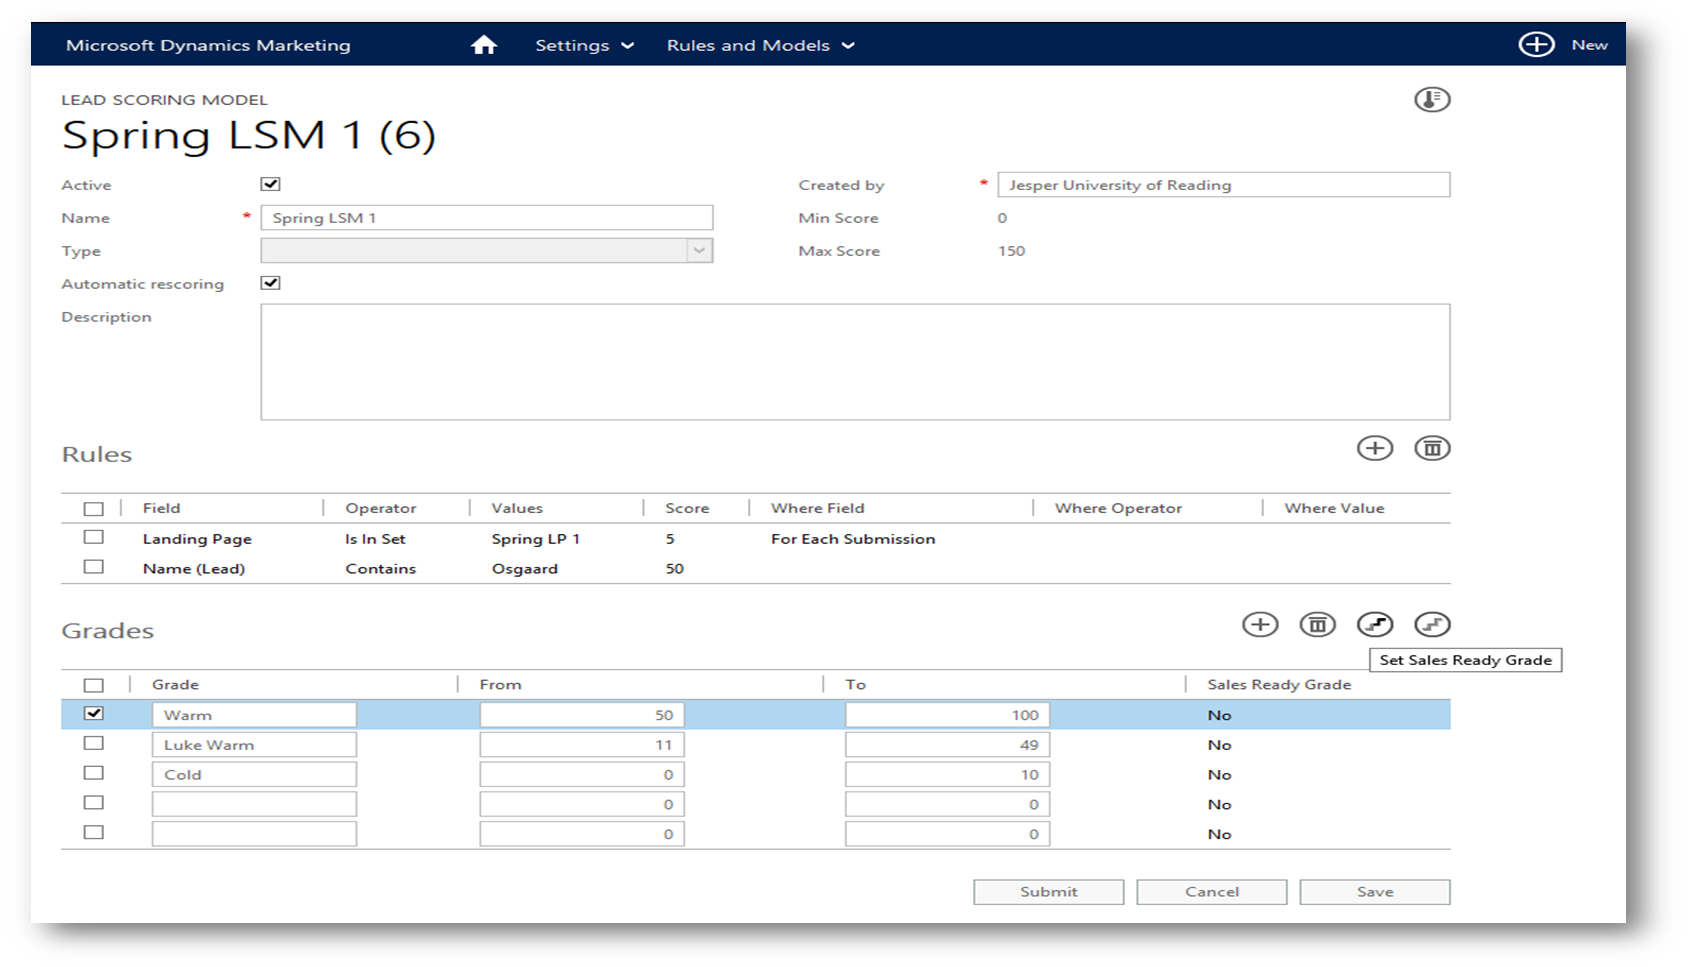
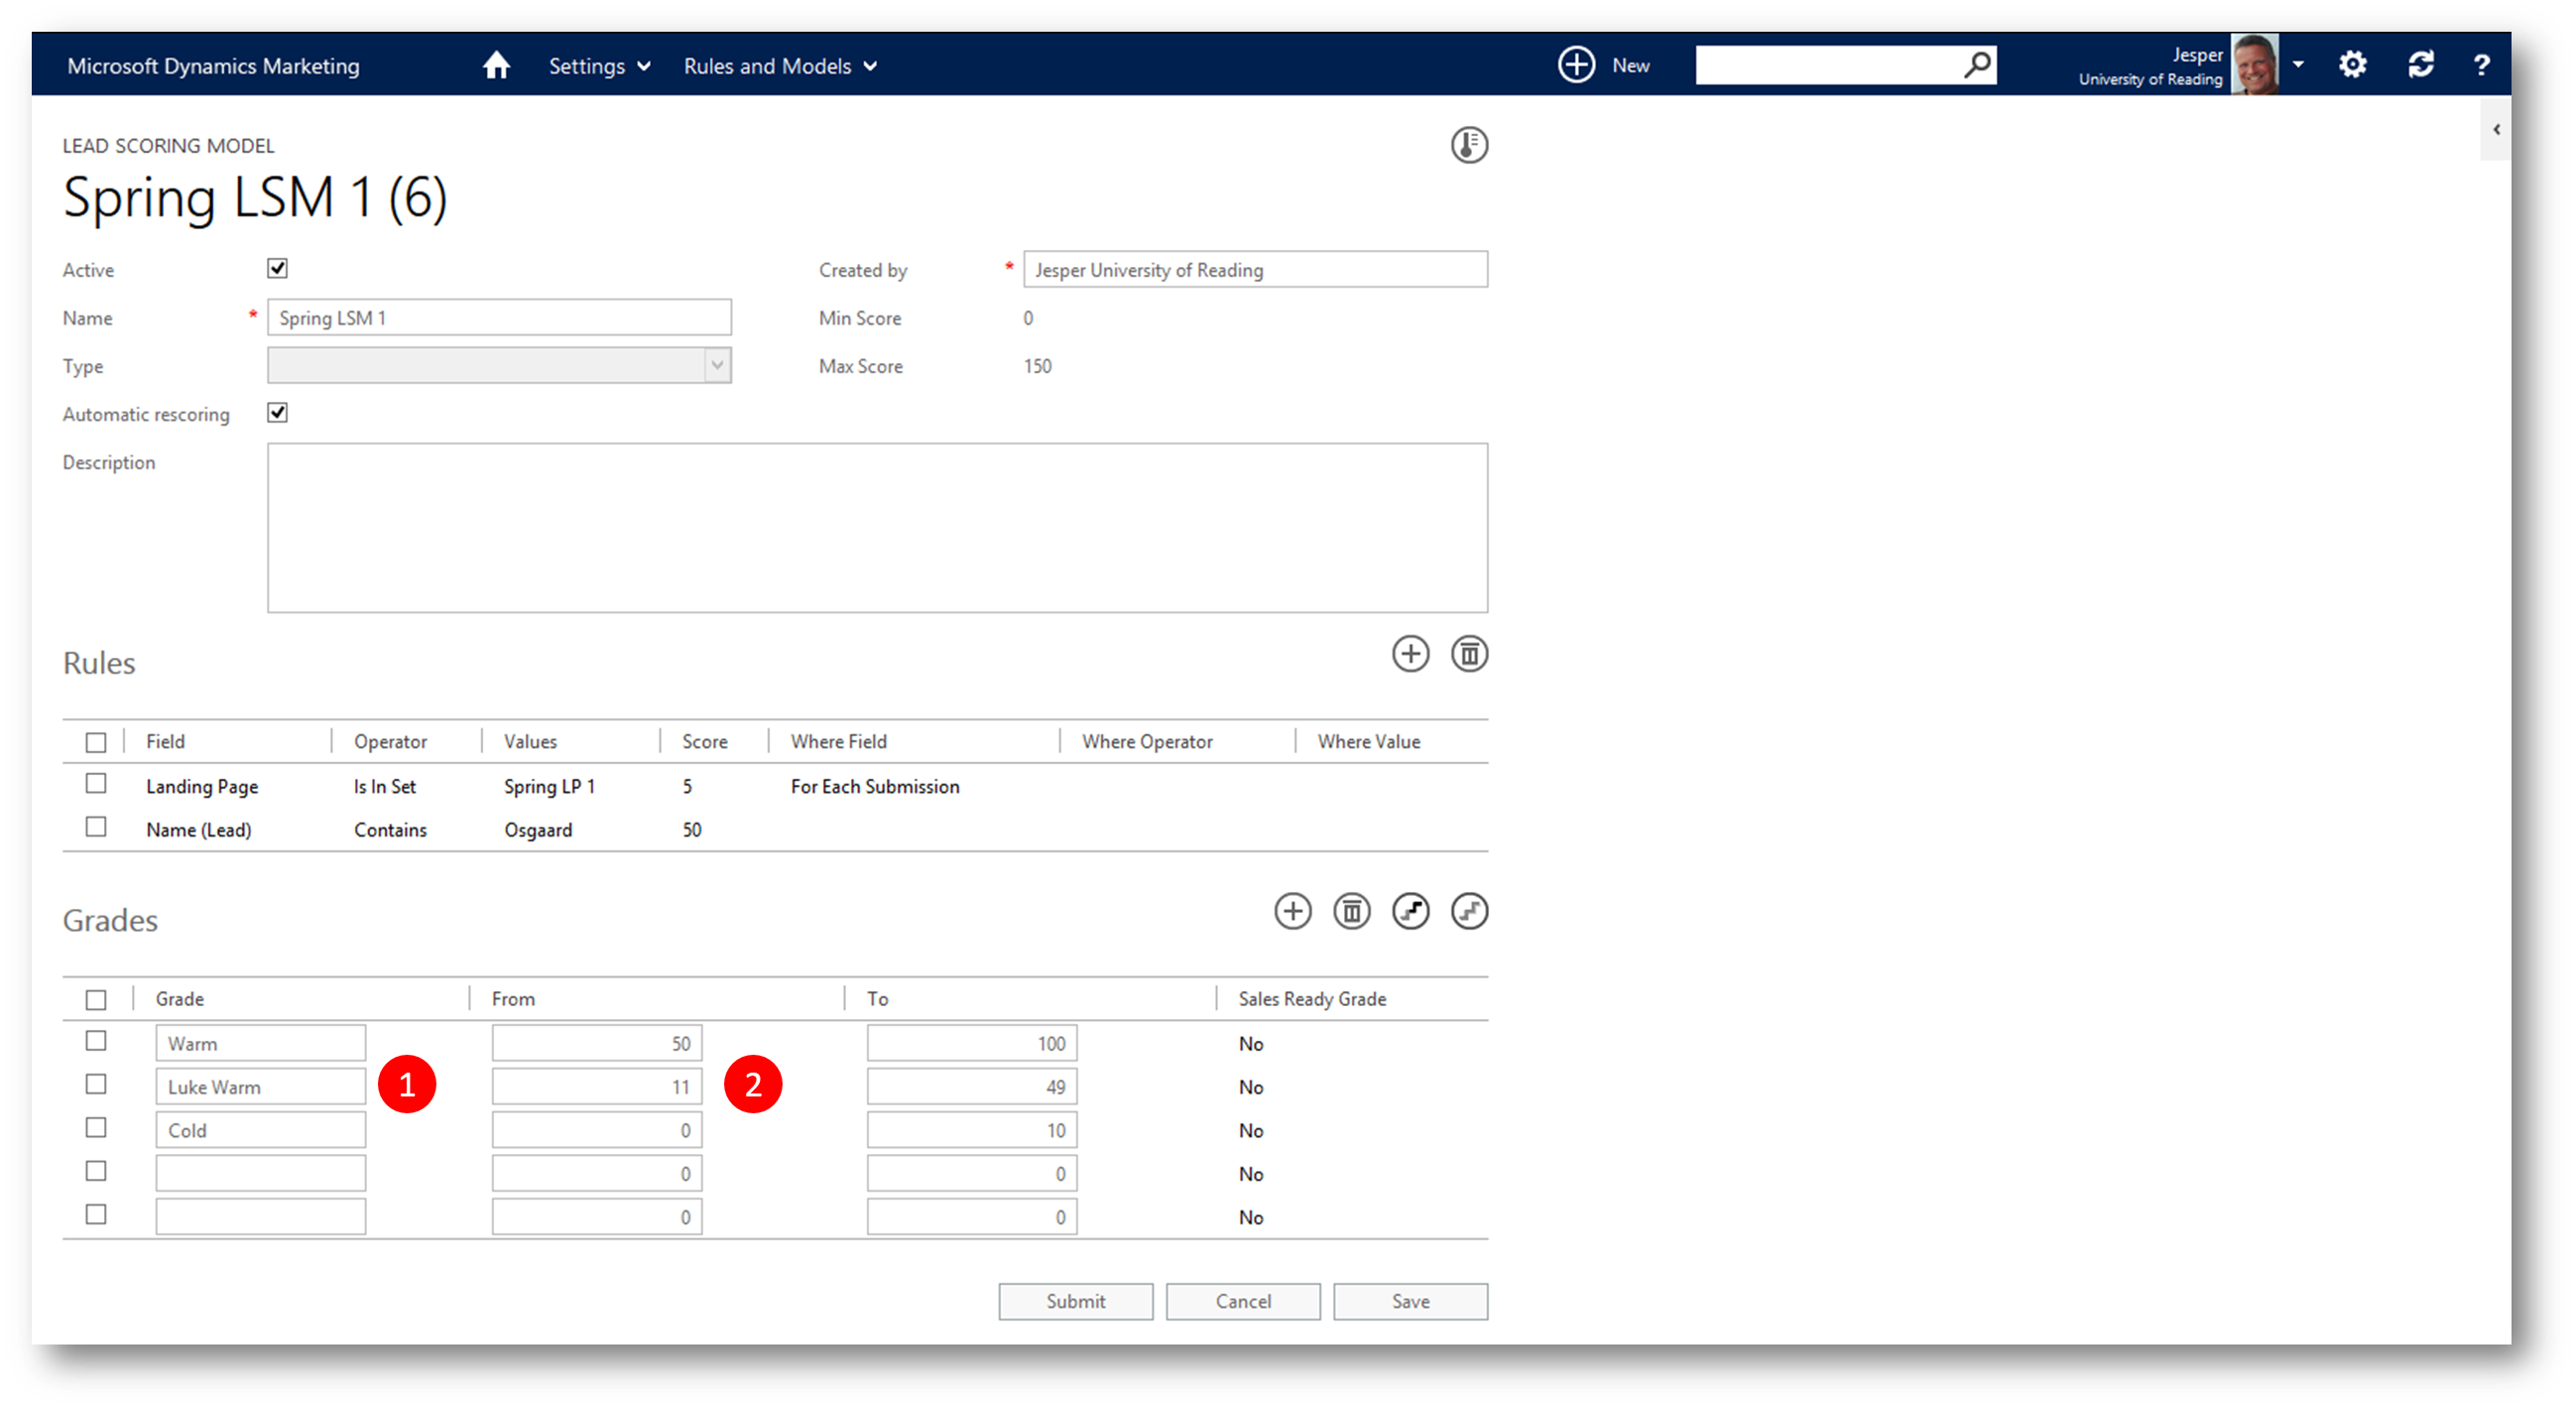
pic 11: Having defined the rules we can now create entries for the Grades (Grades is a way to show the lead quality using words, phrases or symbols)
pic 12: Create three grades, eg "Cold", "Luke Warm", and "Warm" - and set their intervals to respectively 0-10, 11-49, and 50-100
pic 13: Check the checkbox to the left of "Warm" and then click the "Set Sales Ready Grade" icon
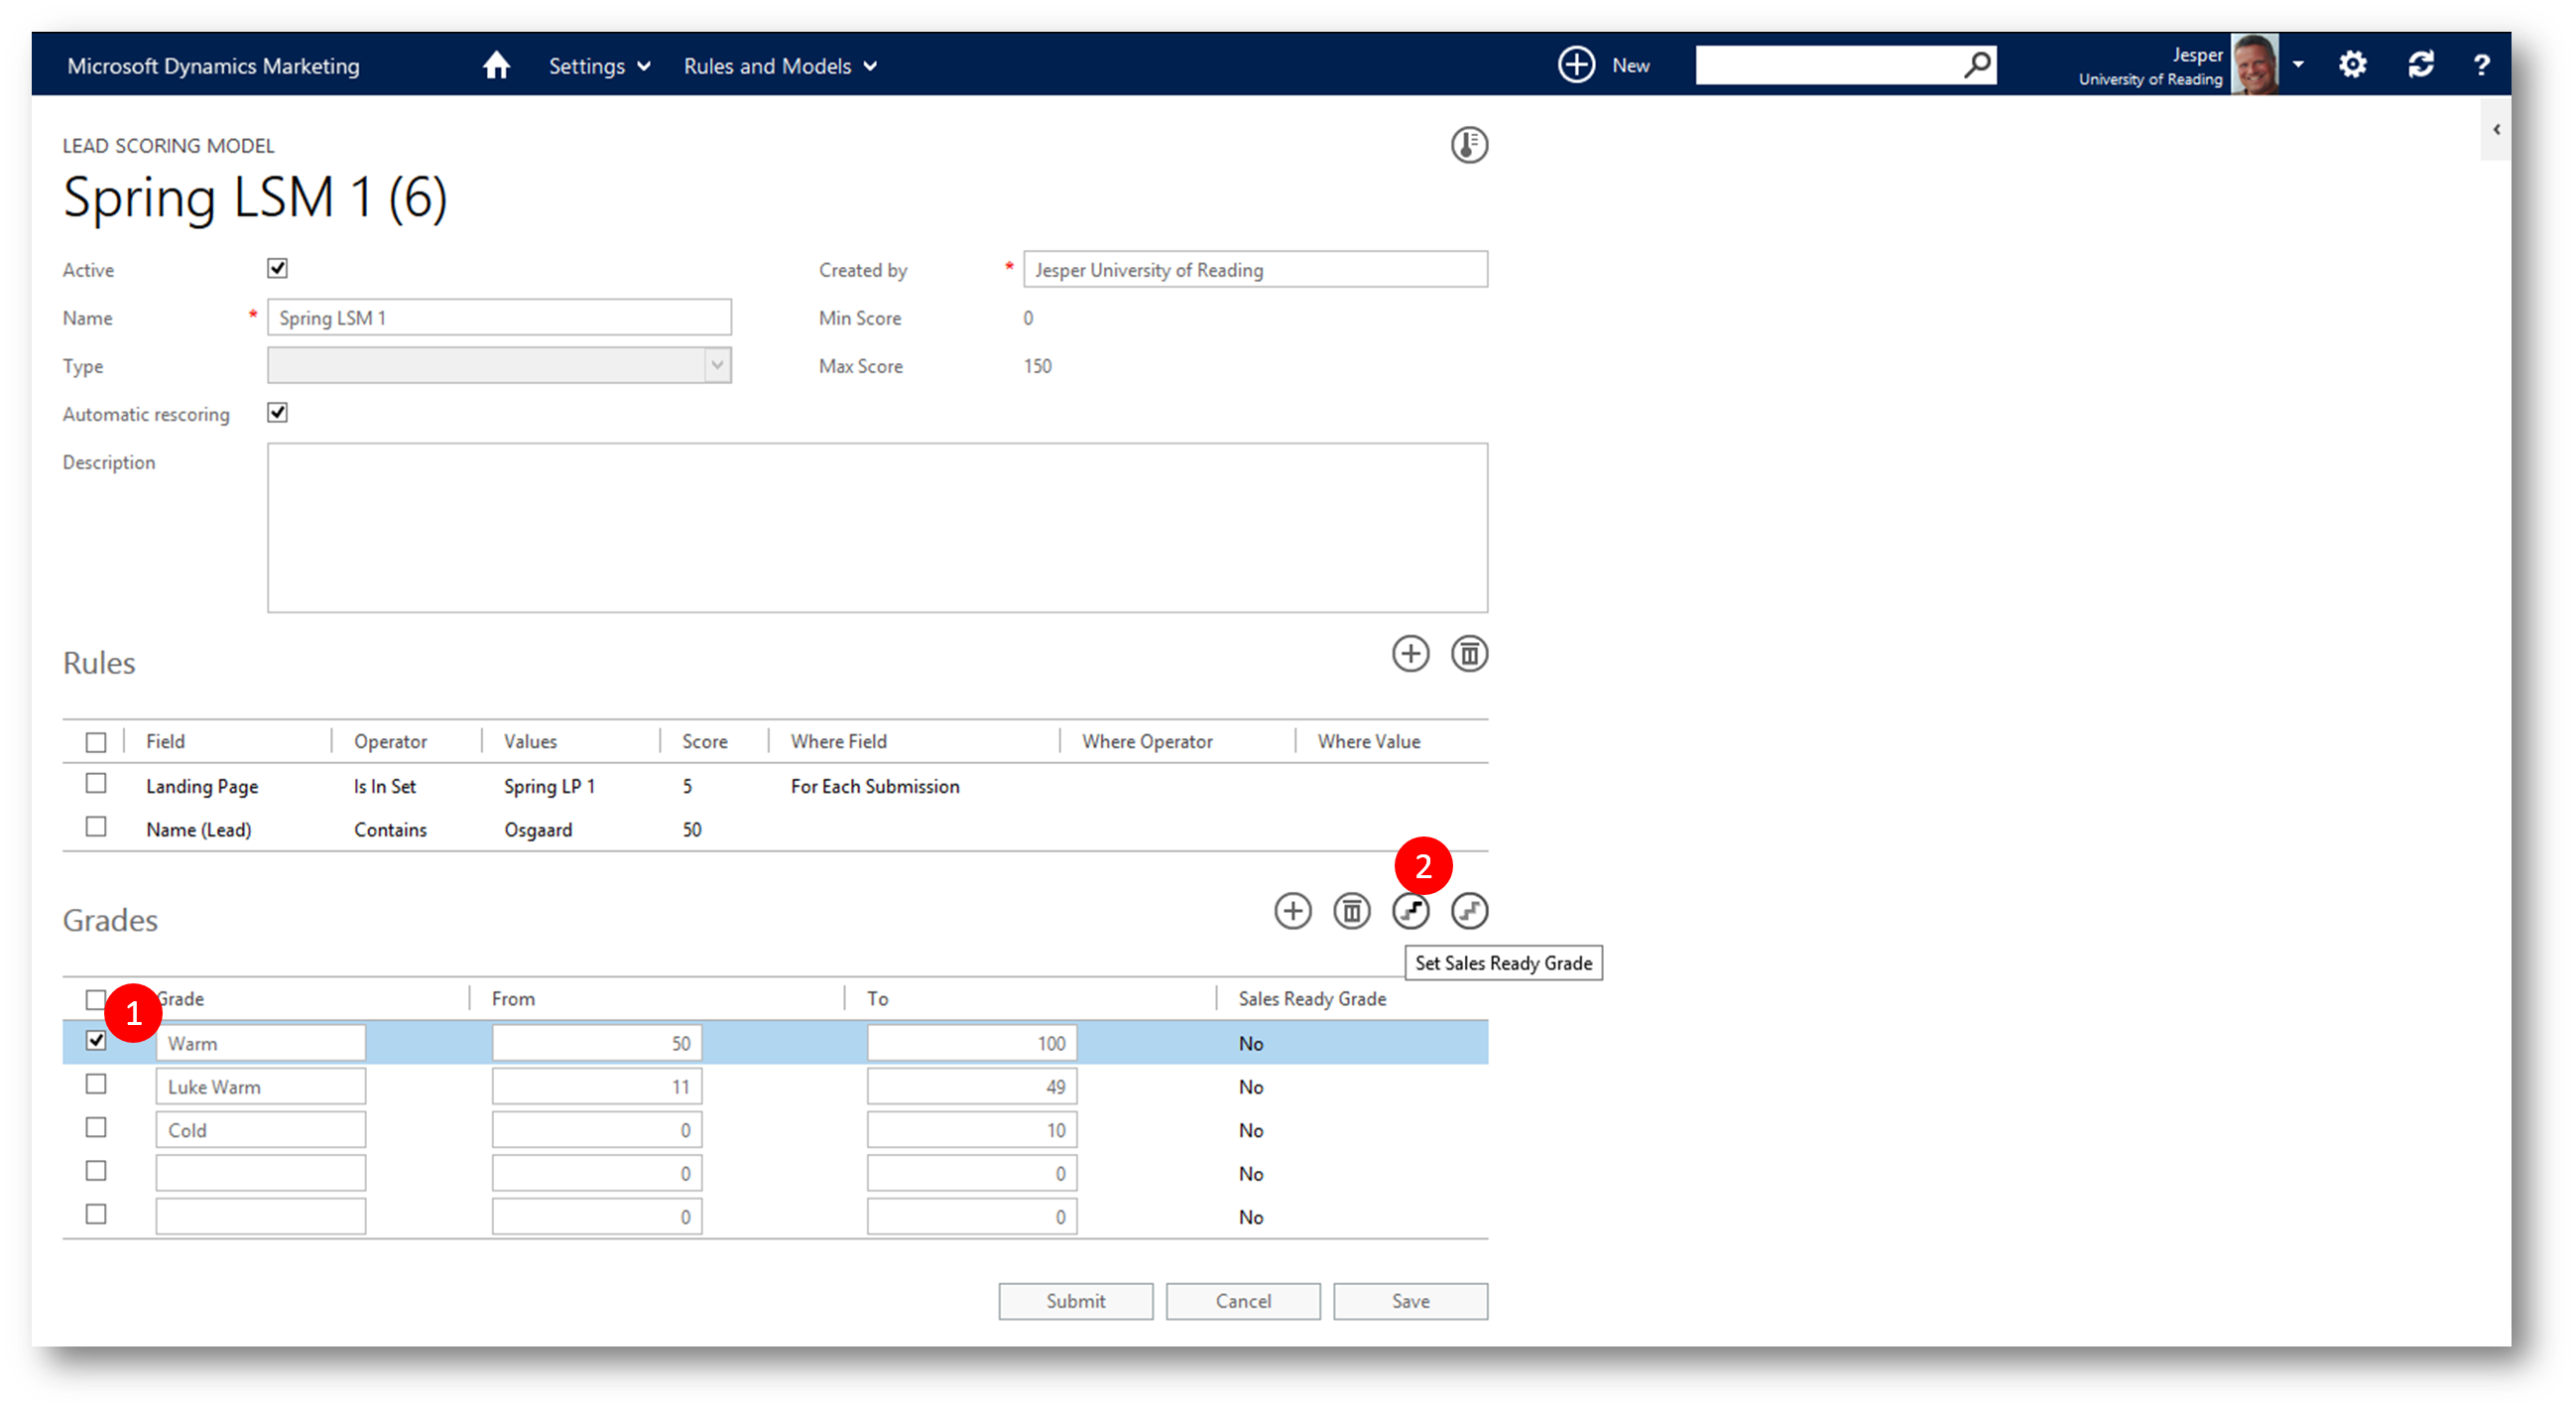
pic 14: The grade "Warm" is now displaying a "Yes" in the "Sales Ready Grade" column, indicating that leads with a score of 50 or higher is sales ready. Click Submit to save and close the Lead Scoring Model

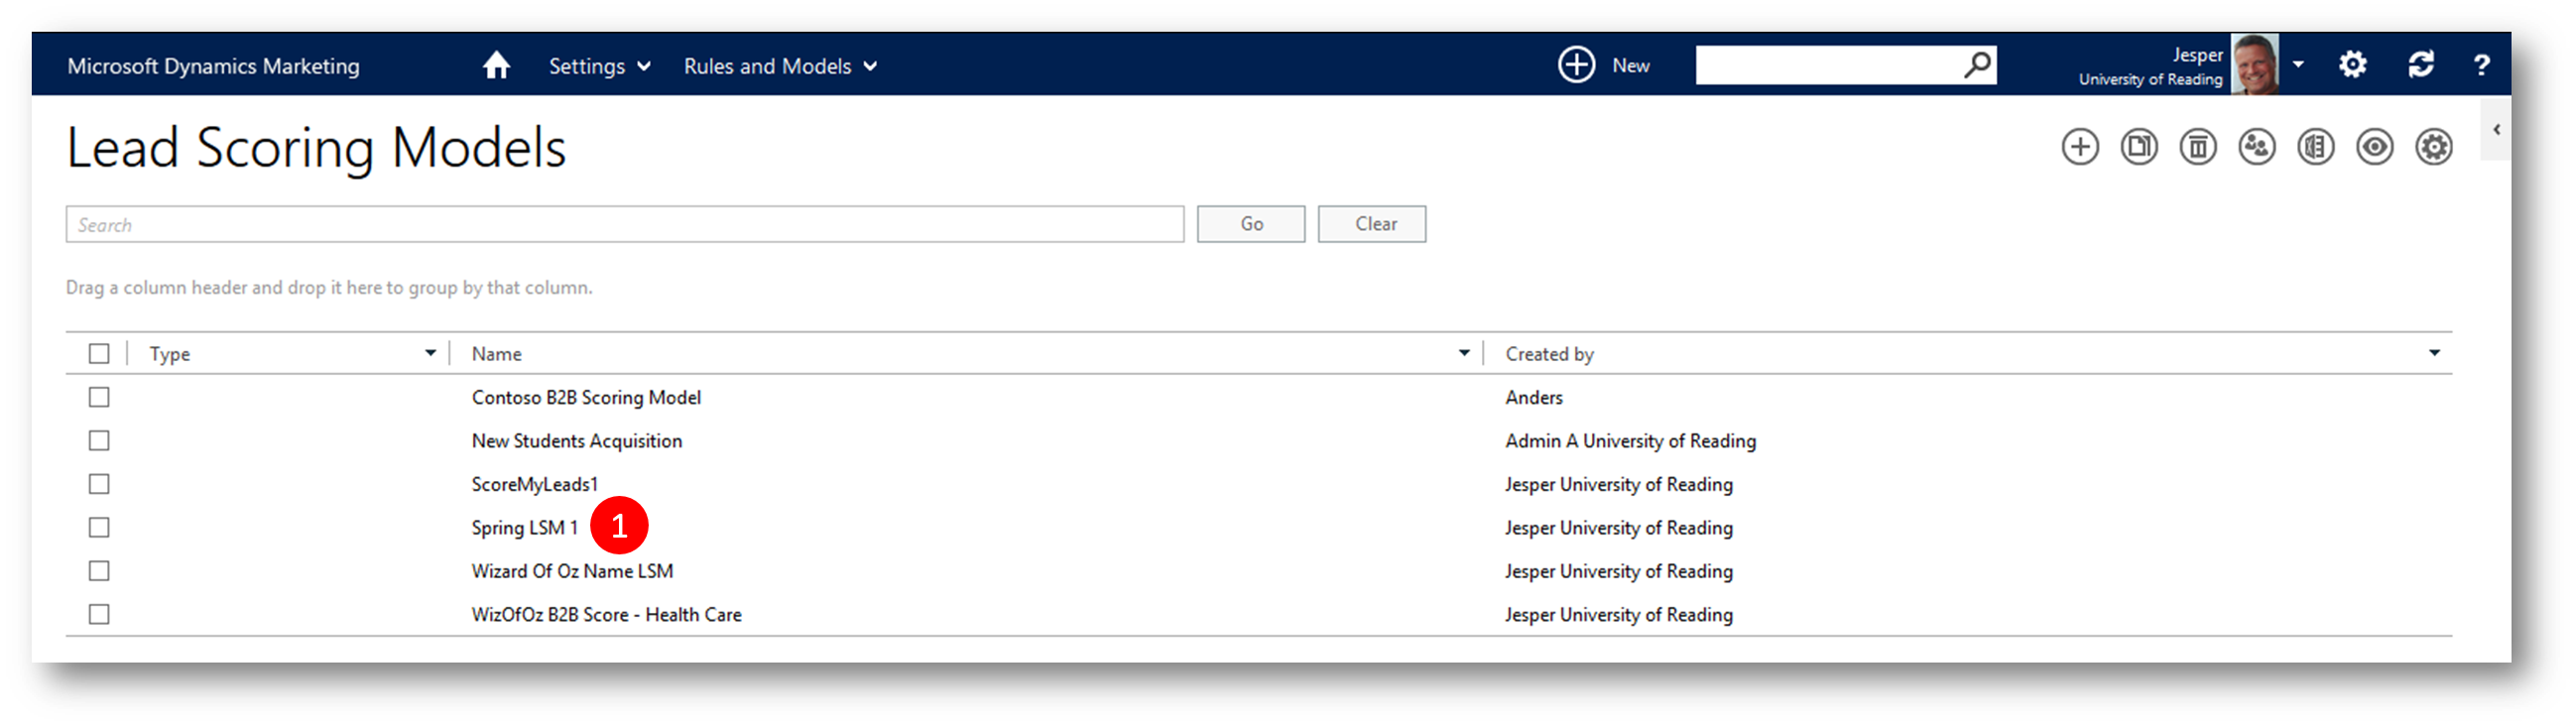
pic 15: The new model now listed in the grid of Lead Scoring Models
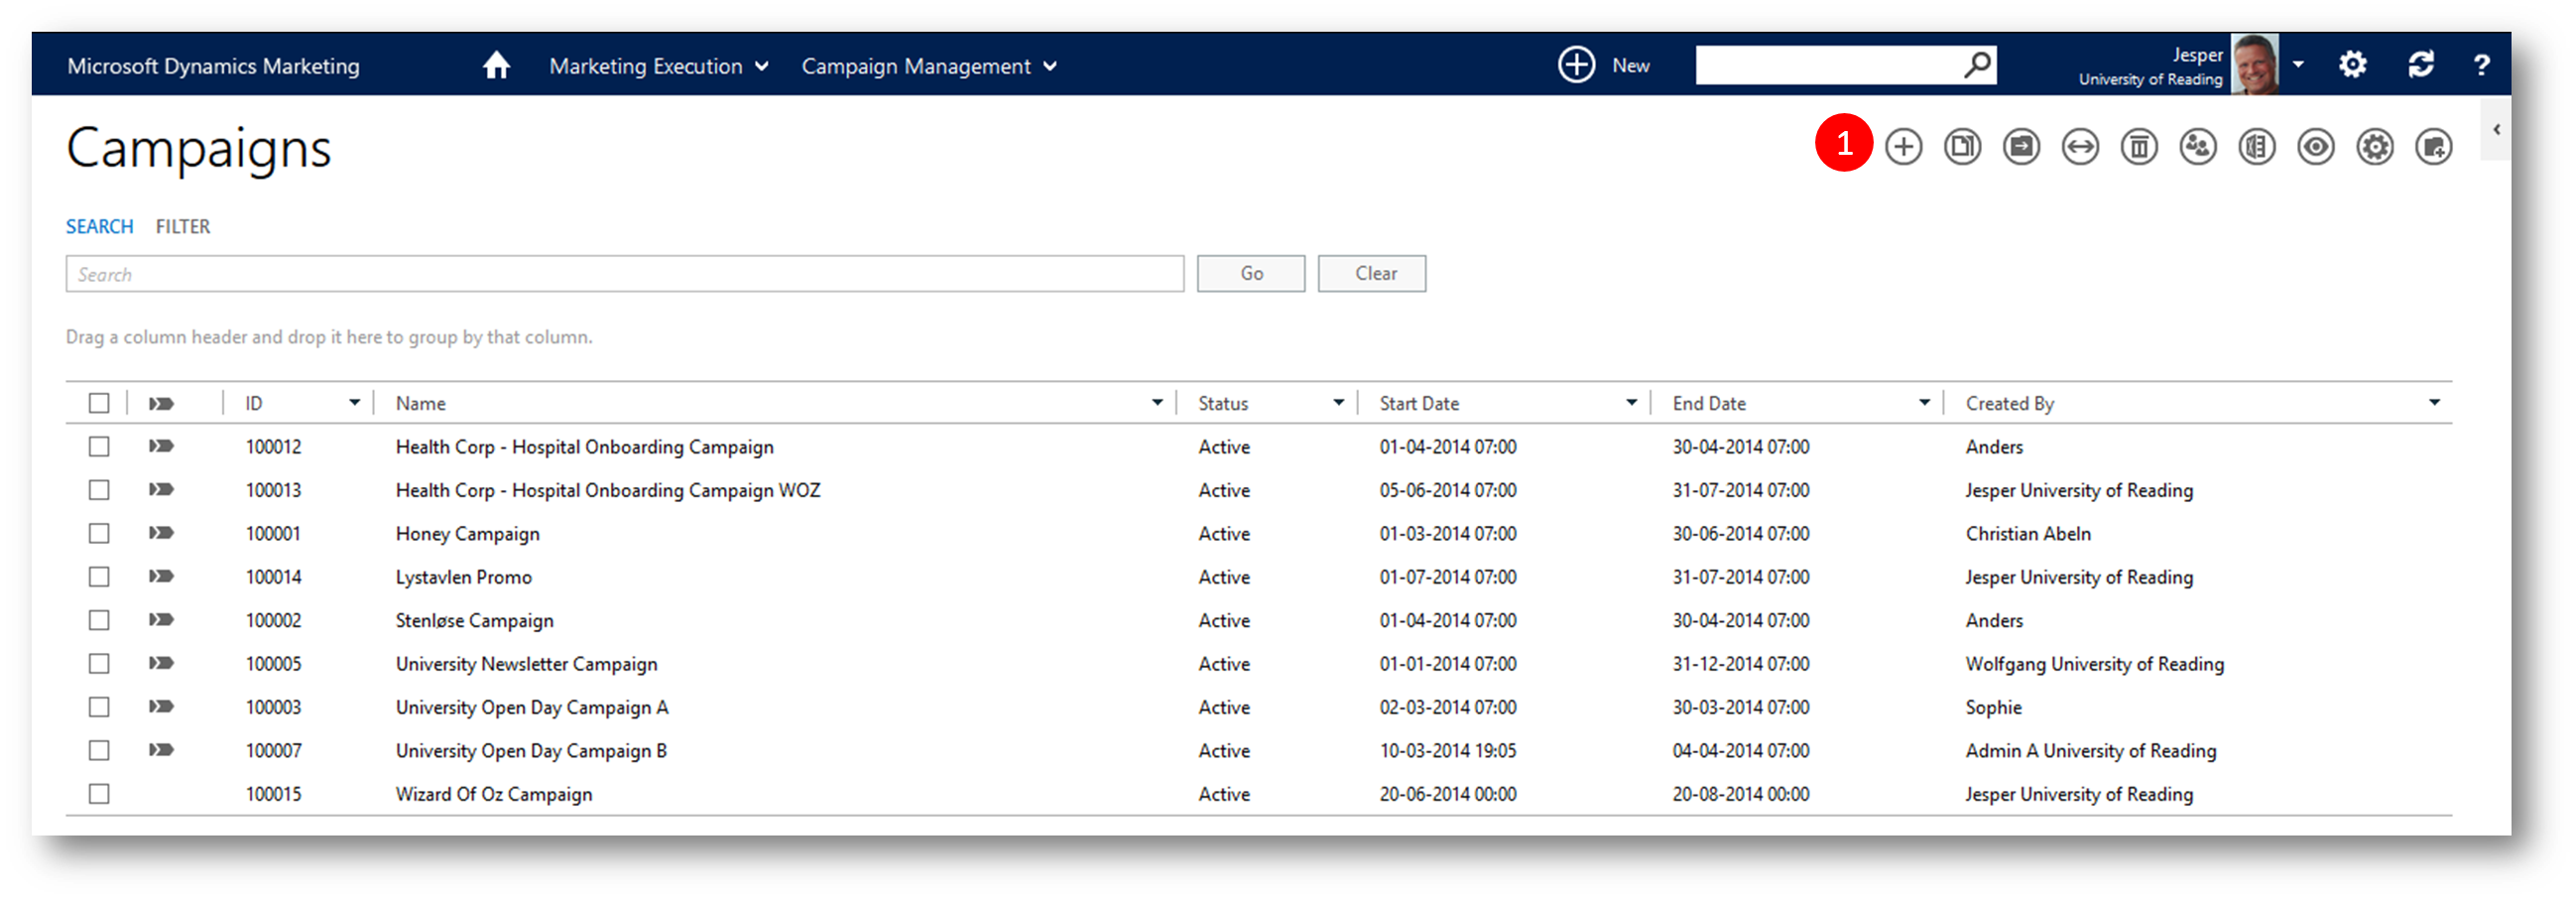
Since our lead creating strategy is tied to campaings (by default) we'll now create a new (simple) Campaign to hook the lead scoring model up to, and after that connect the landing page and the campaign
pic 16: Click Home - Marketing Execution - Campaigns to show the Campaigns grid

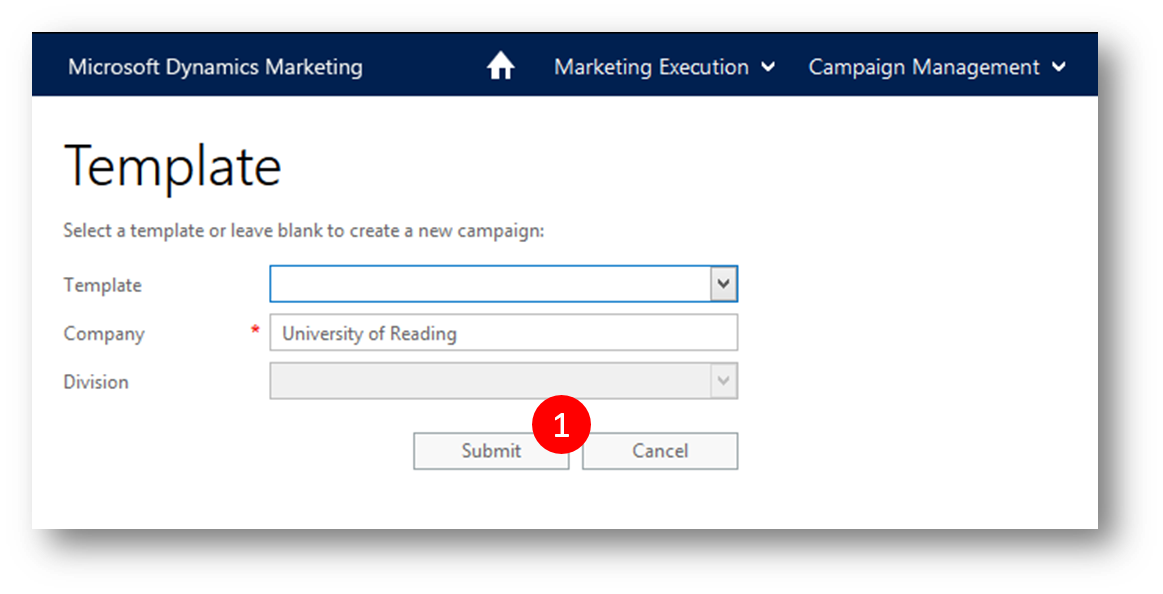
pic 17: Click "+" (New) to display the "New Campaign" dialog
pic 18: leave Template blank and click Submit
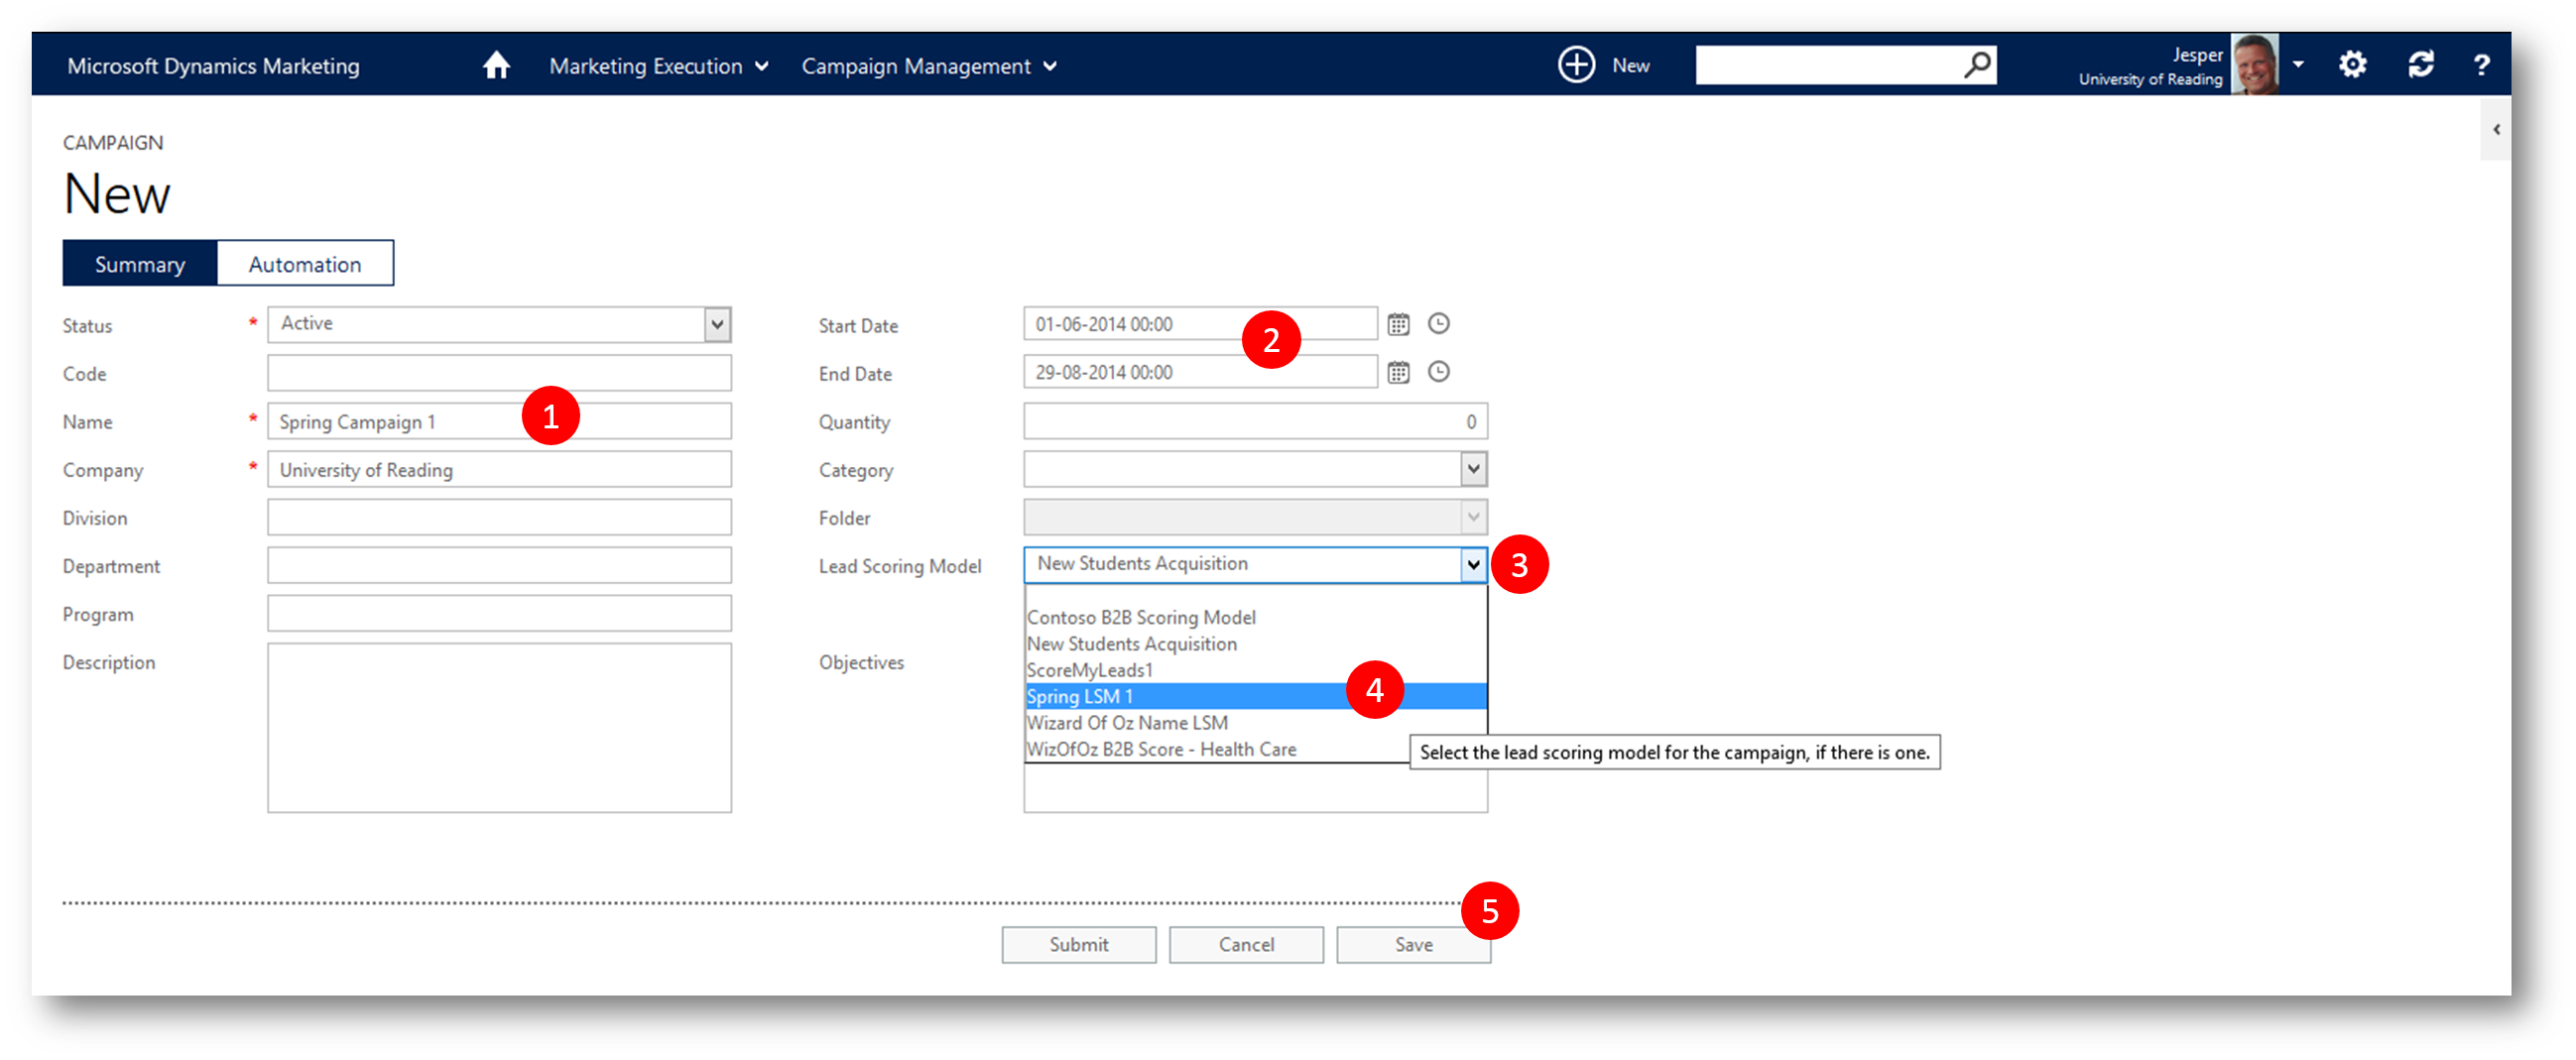
pic 19: In the "New Campaign" page
- Type a name for the campaign (eg "Spring Campaign 1")
- Set start/end date
- Click the "Lead Scoring Model" drop down
- Select your new lead scoring model (created above)
- Click Save to display the lower dashboard
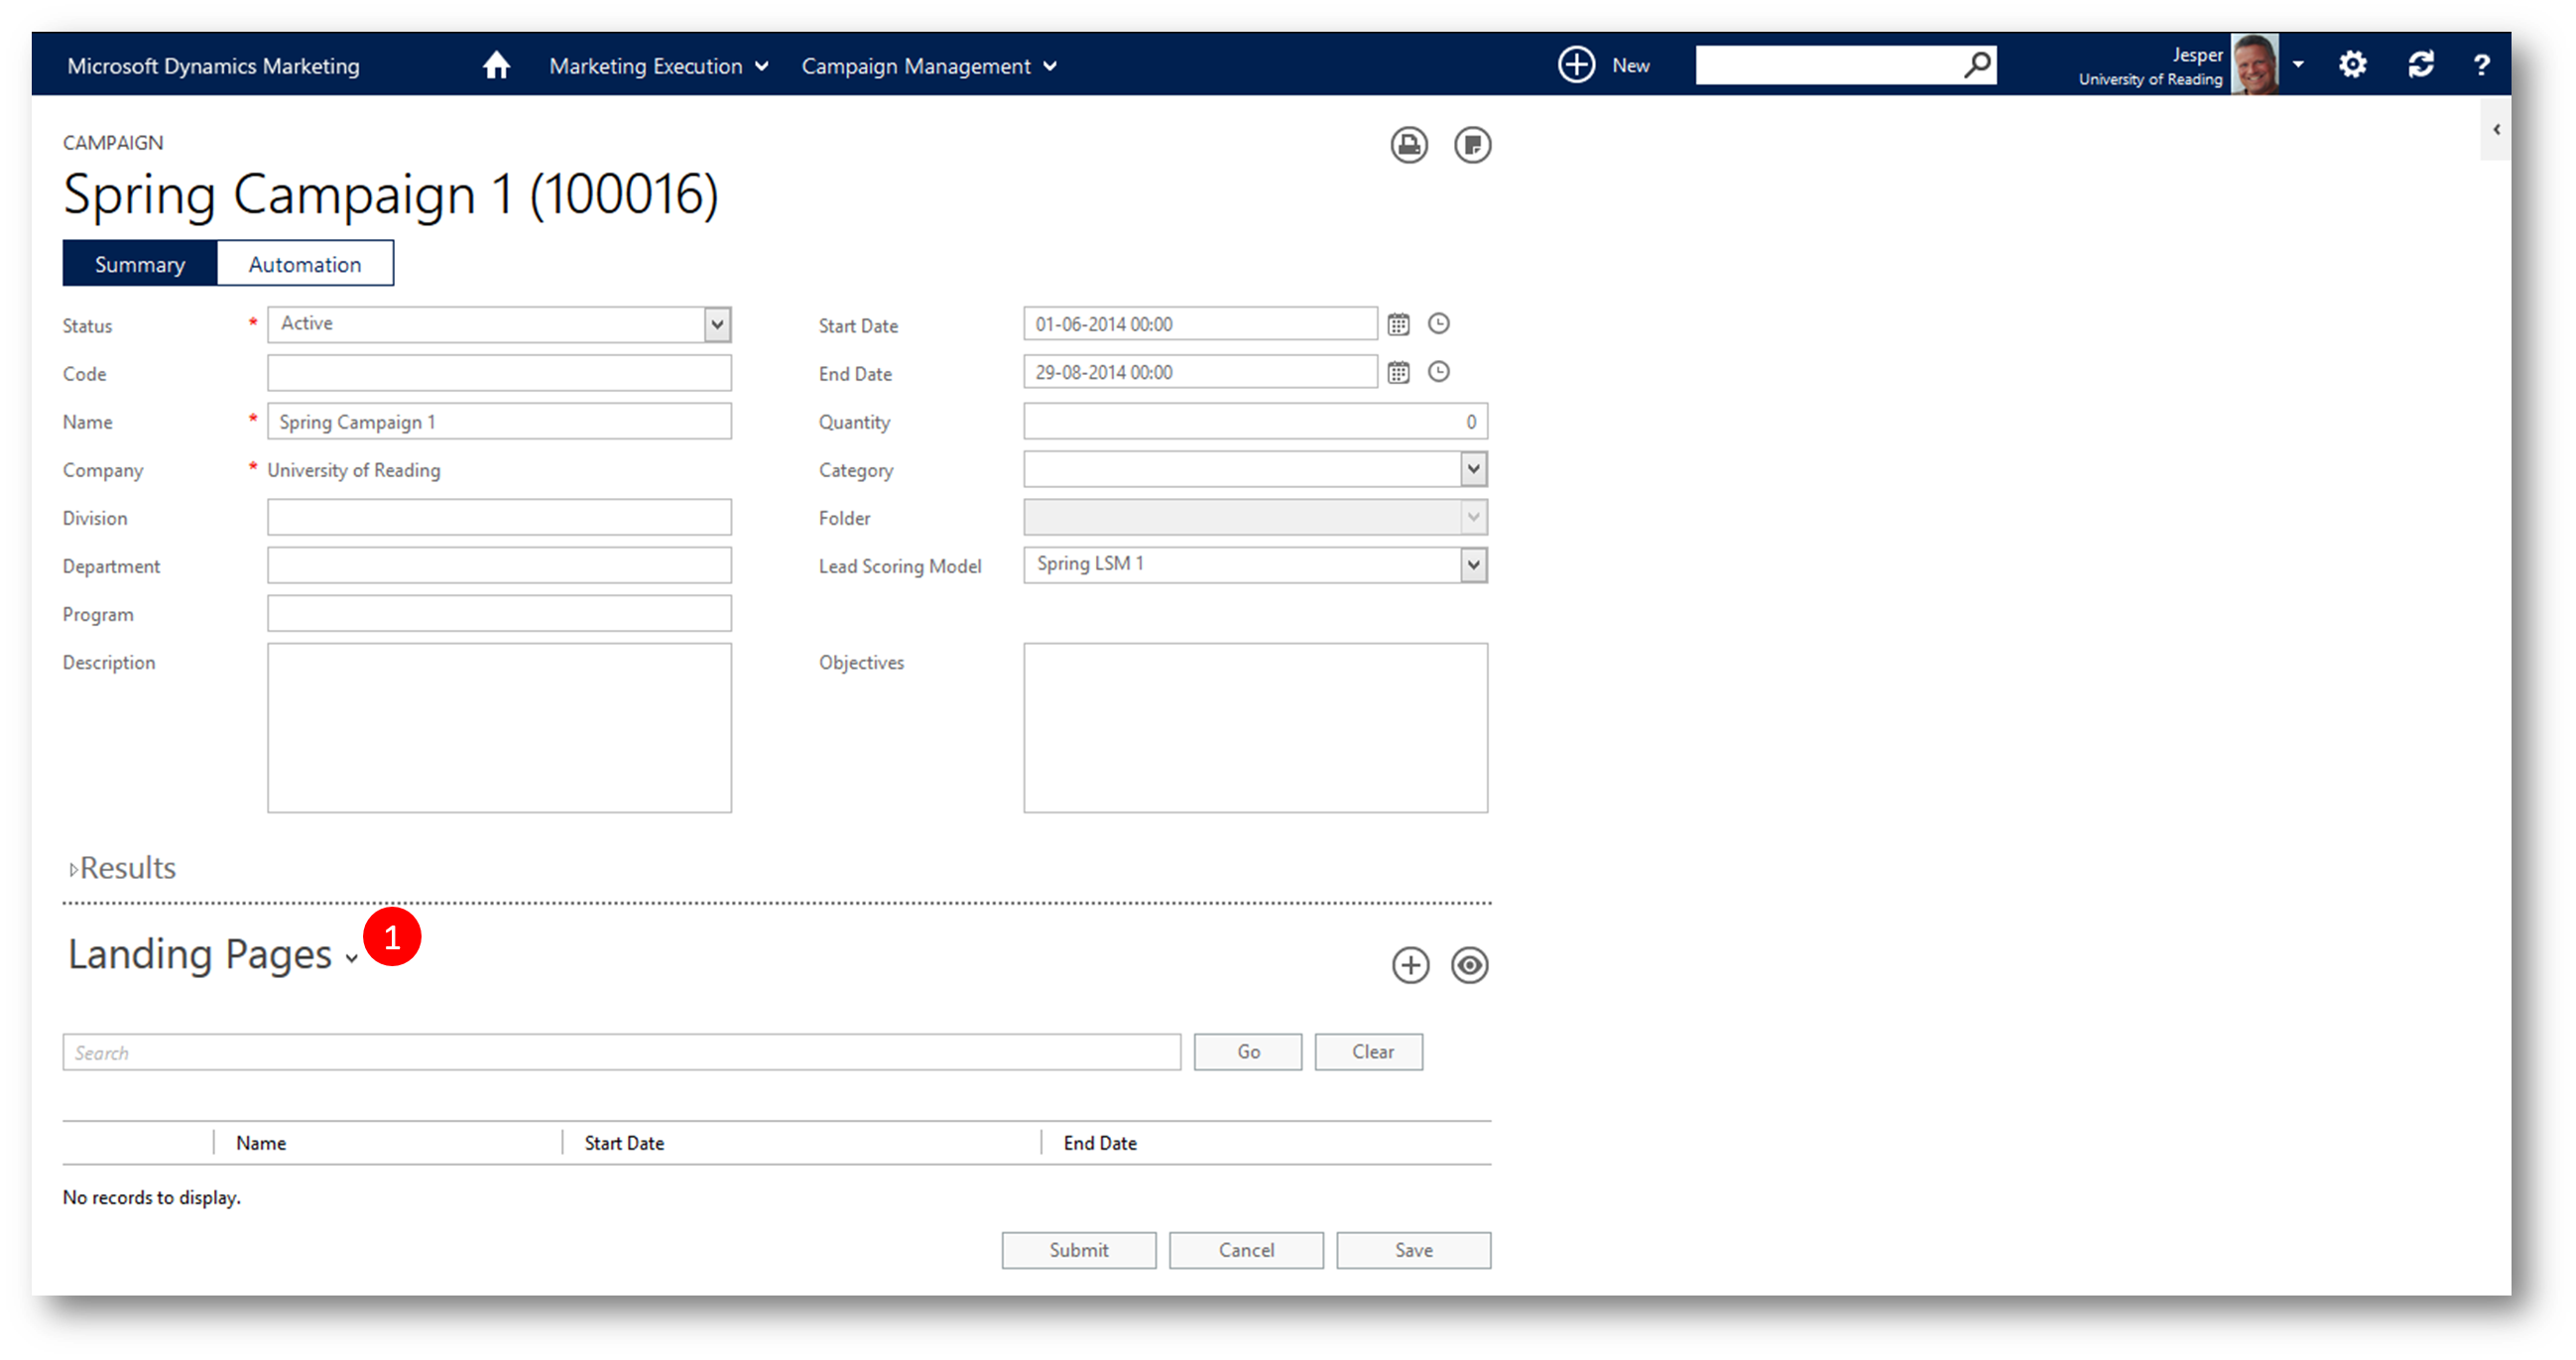
pic 20: Select Landing Pages in the dashboard drop down
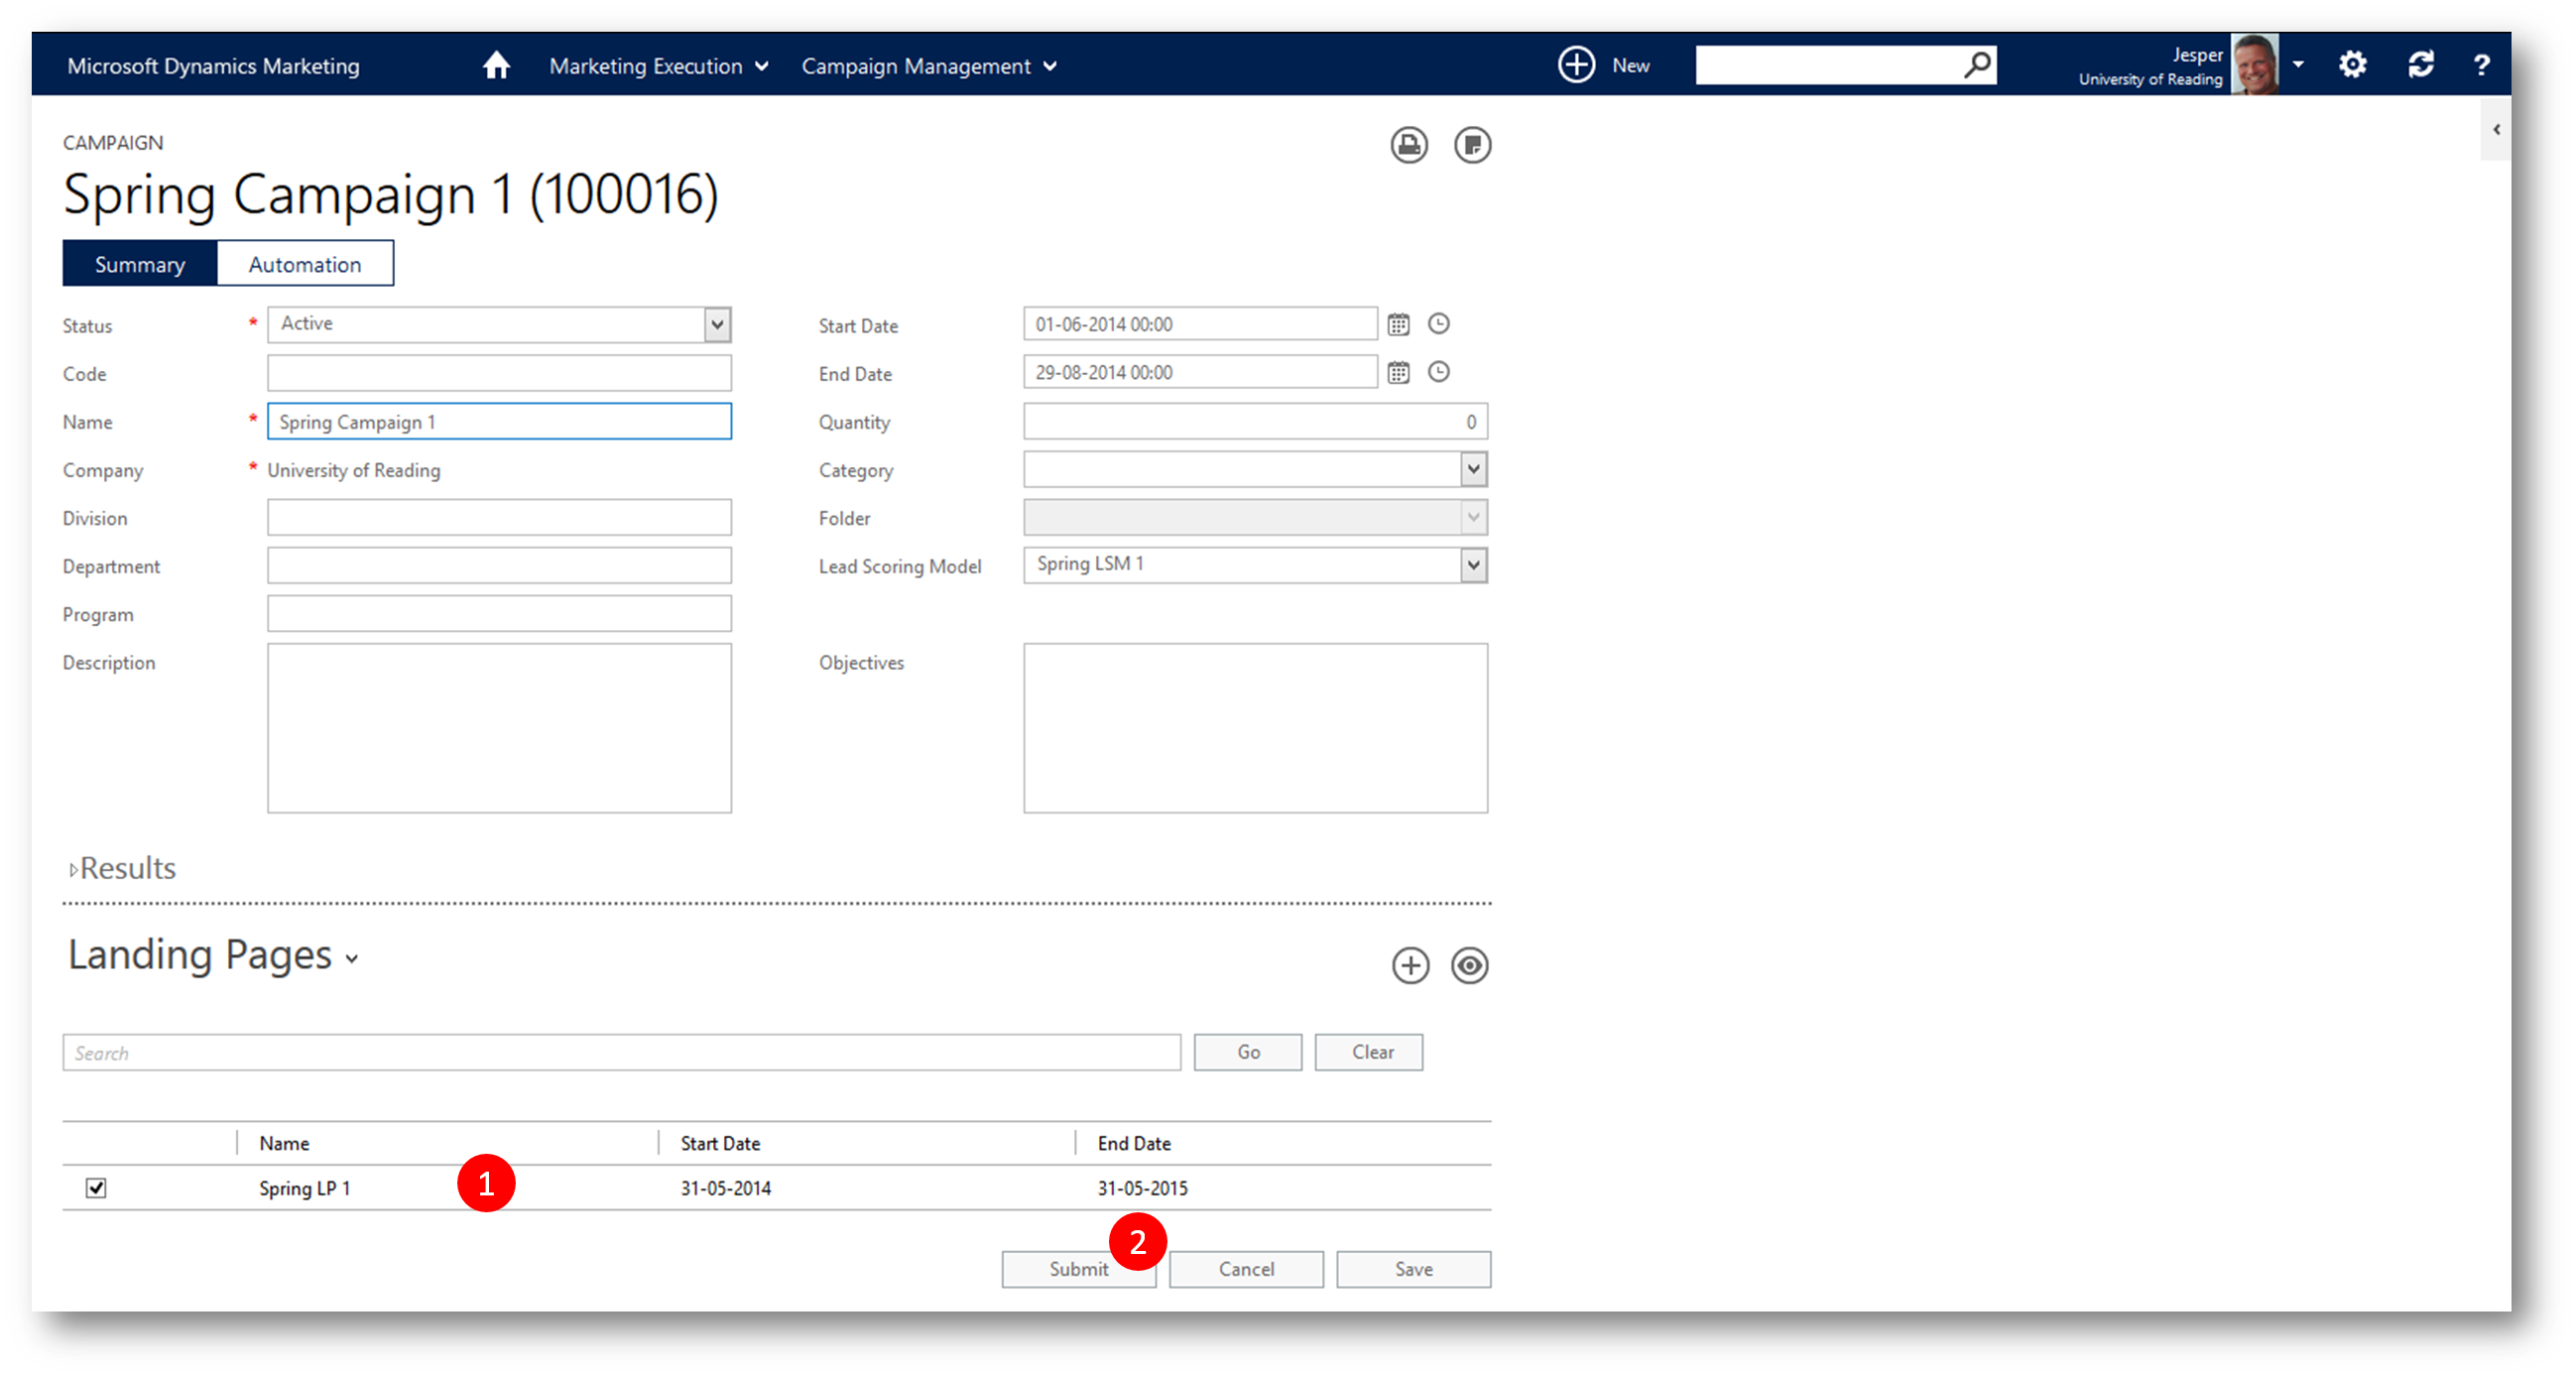
pic 21: Select your new Landing Page in the grid, and then click Submit to save and close the campaign
Now its time to return to the landing page, connect it to the campaign, and define the fields we want the landing page to display
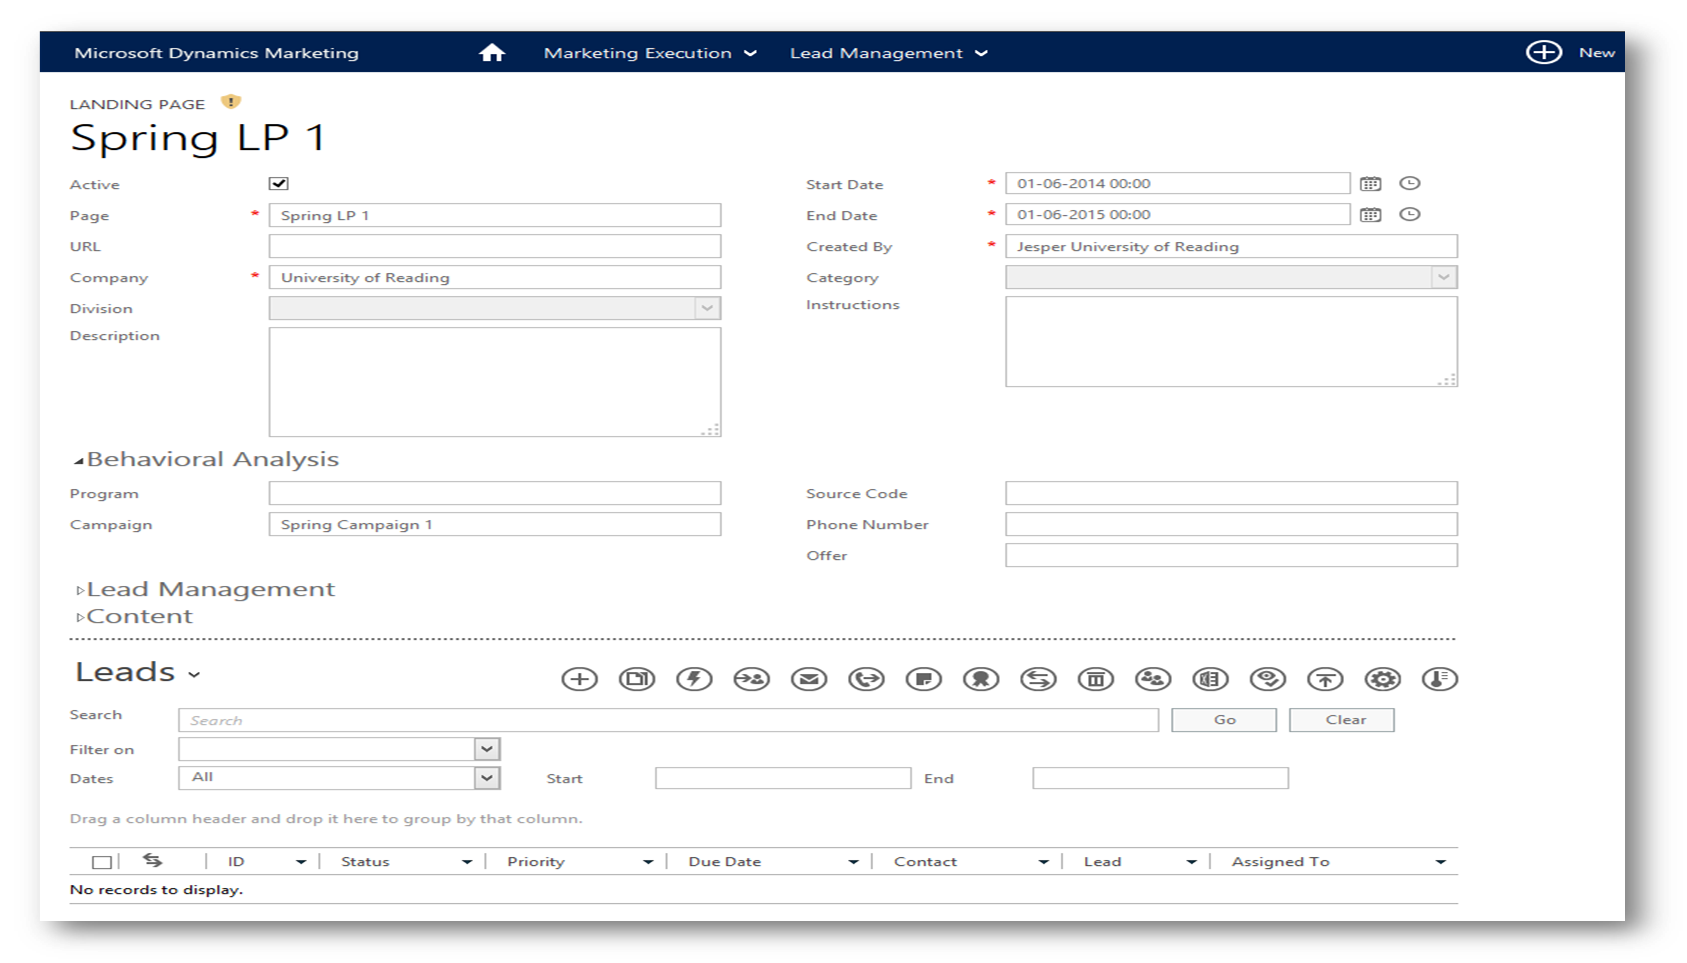
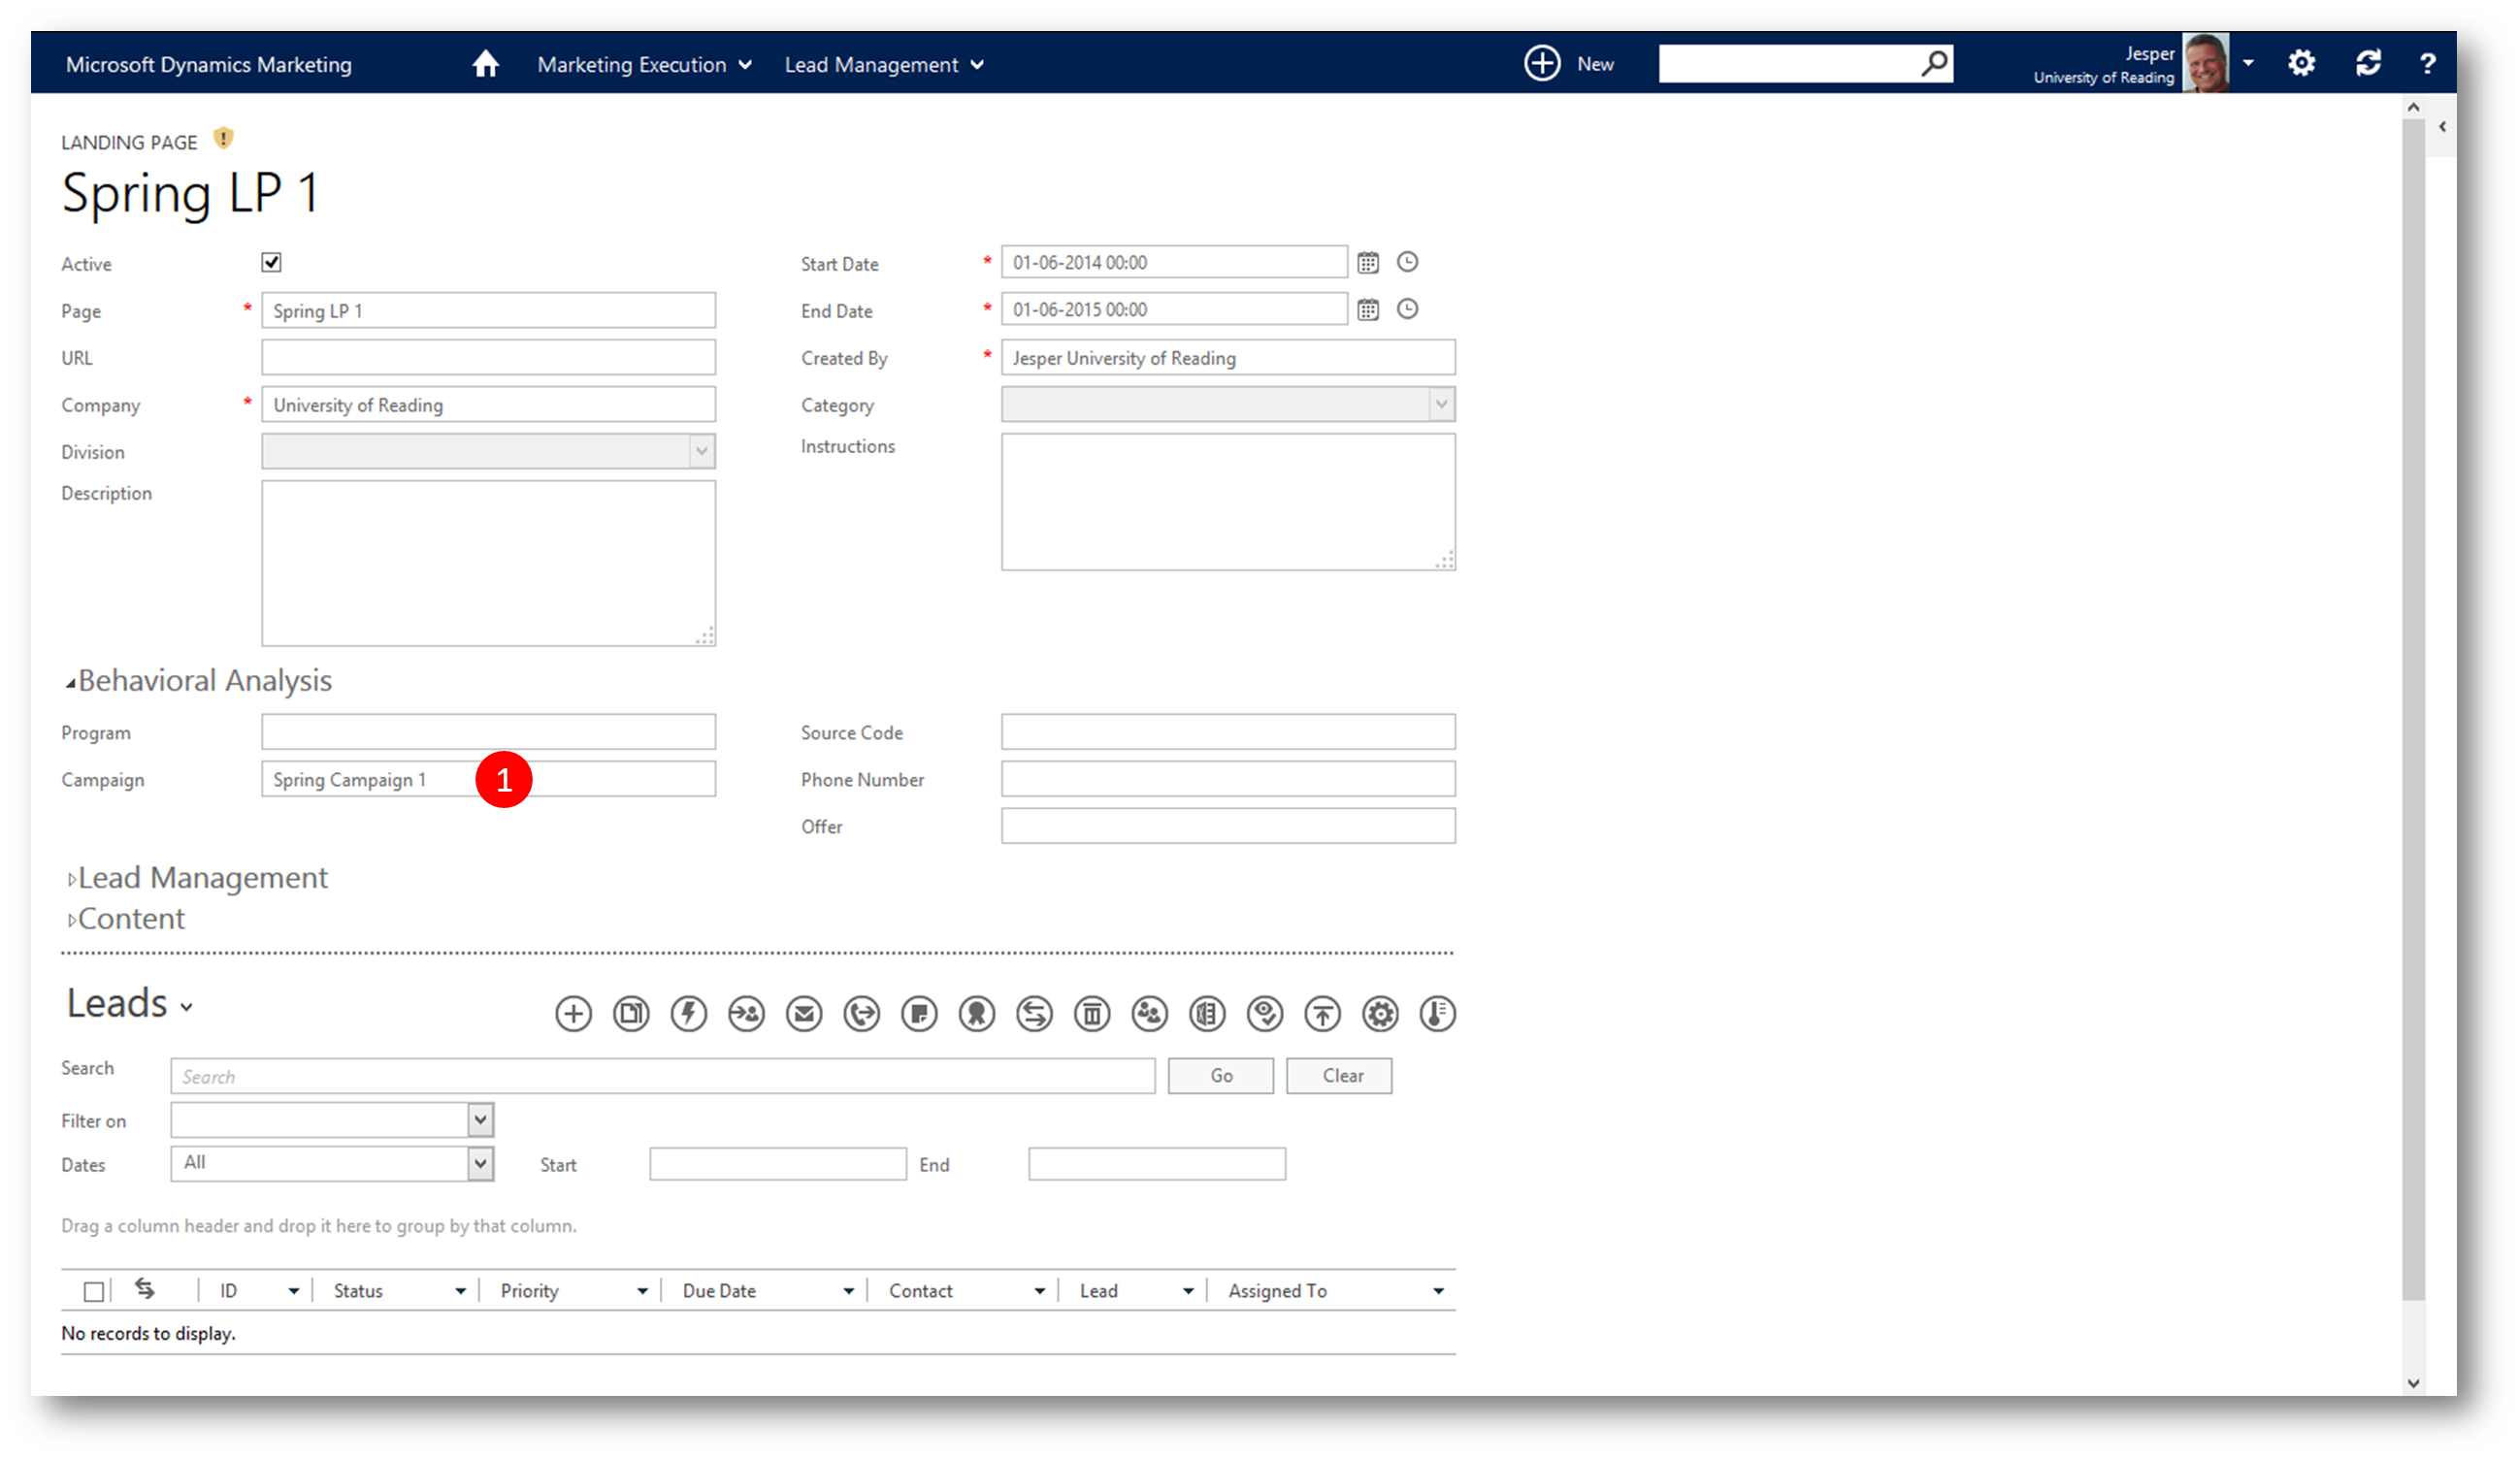
pic 22: Click Home - Marketing Execution - scroll to "Lead Management" - click Landing Pages. Then open your new Landing Page and expand the "Behavioral Analysis" section
pic 23: Verify that your new landing page is now connected to your new campaign
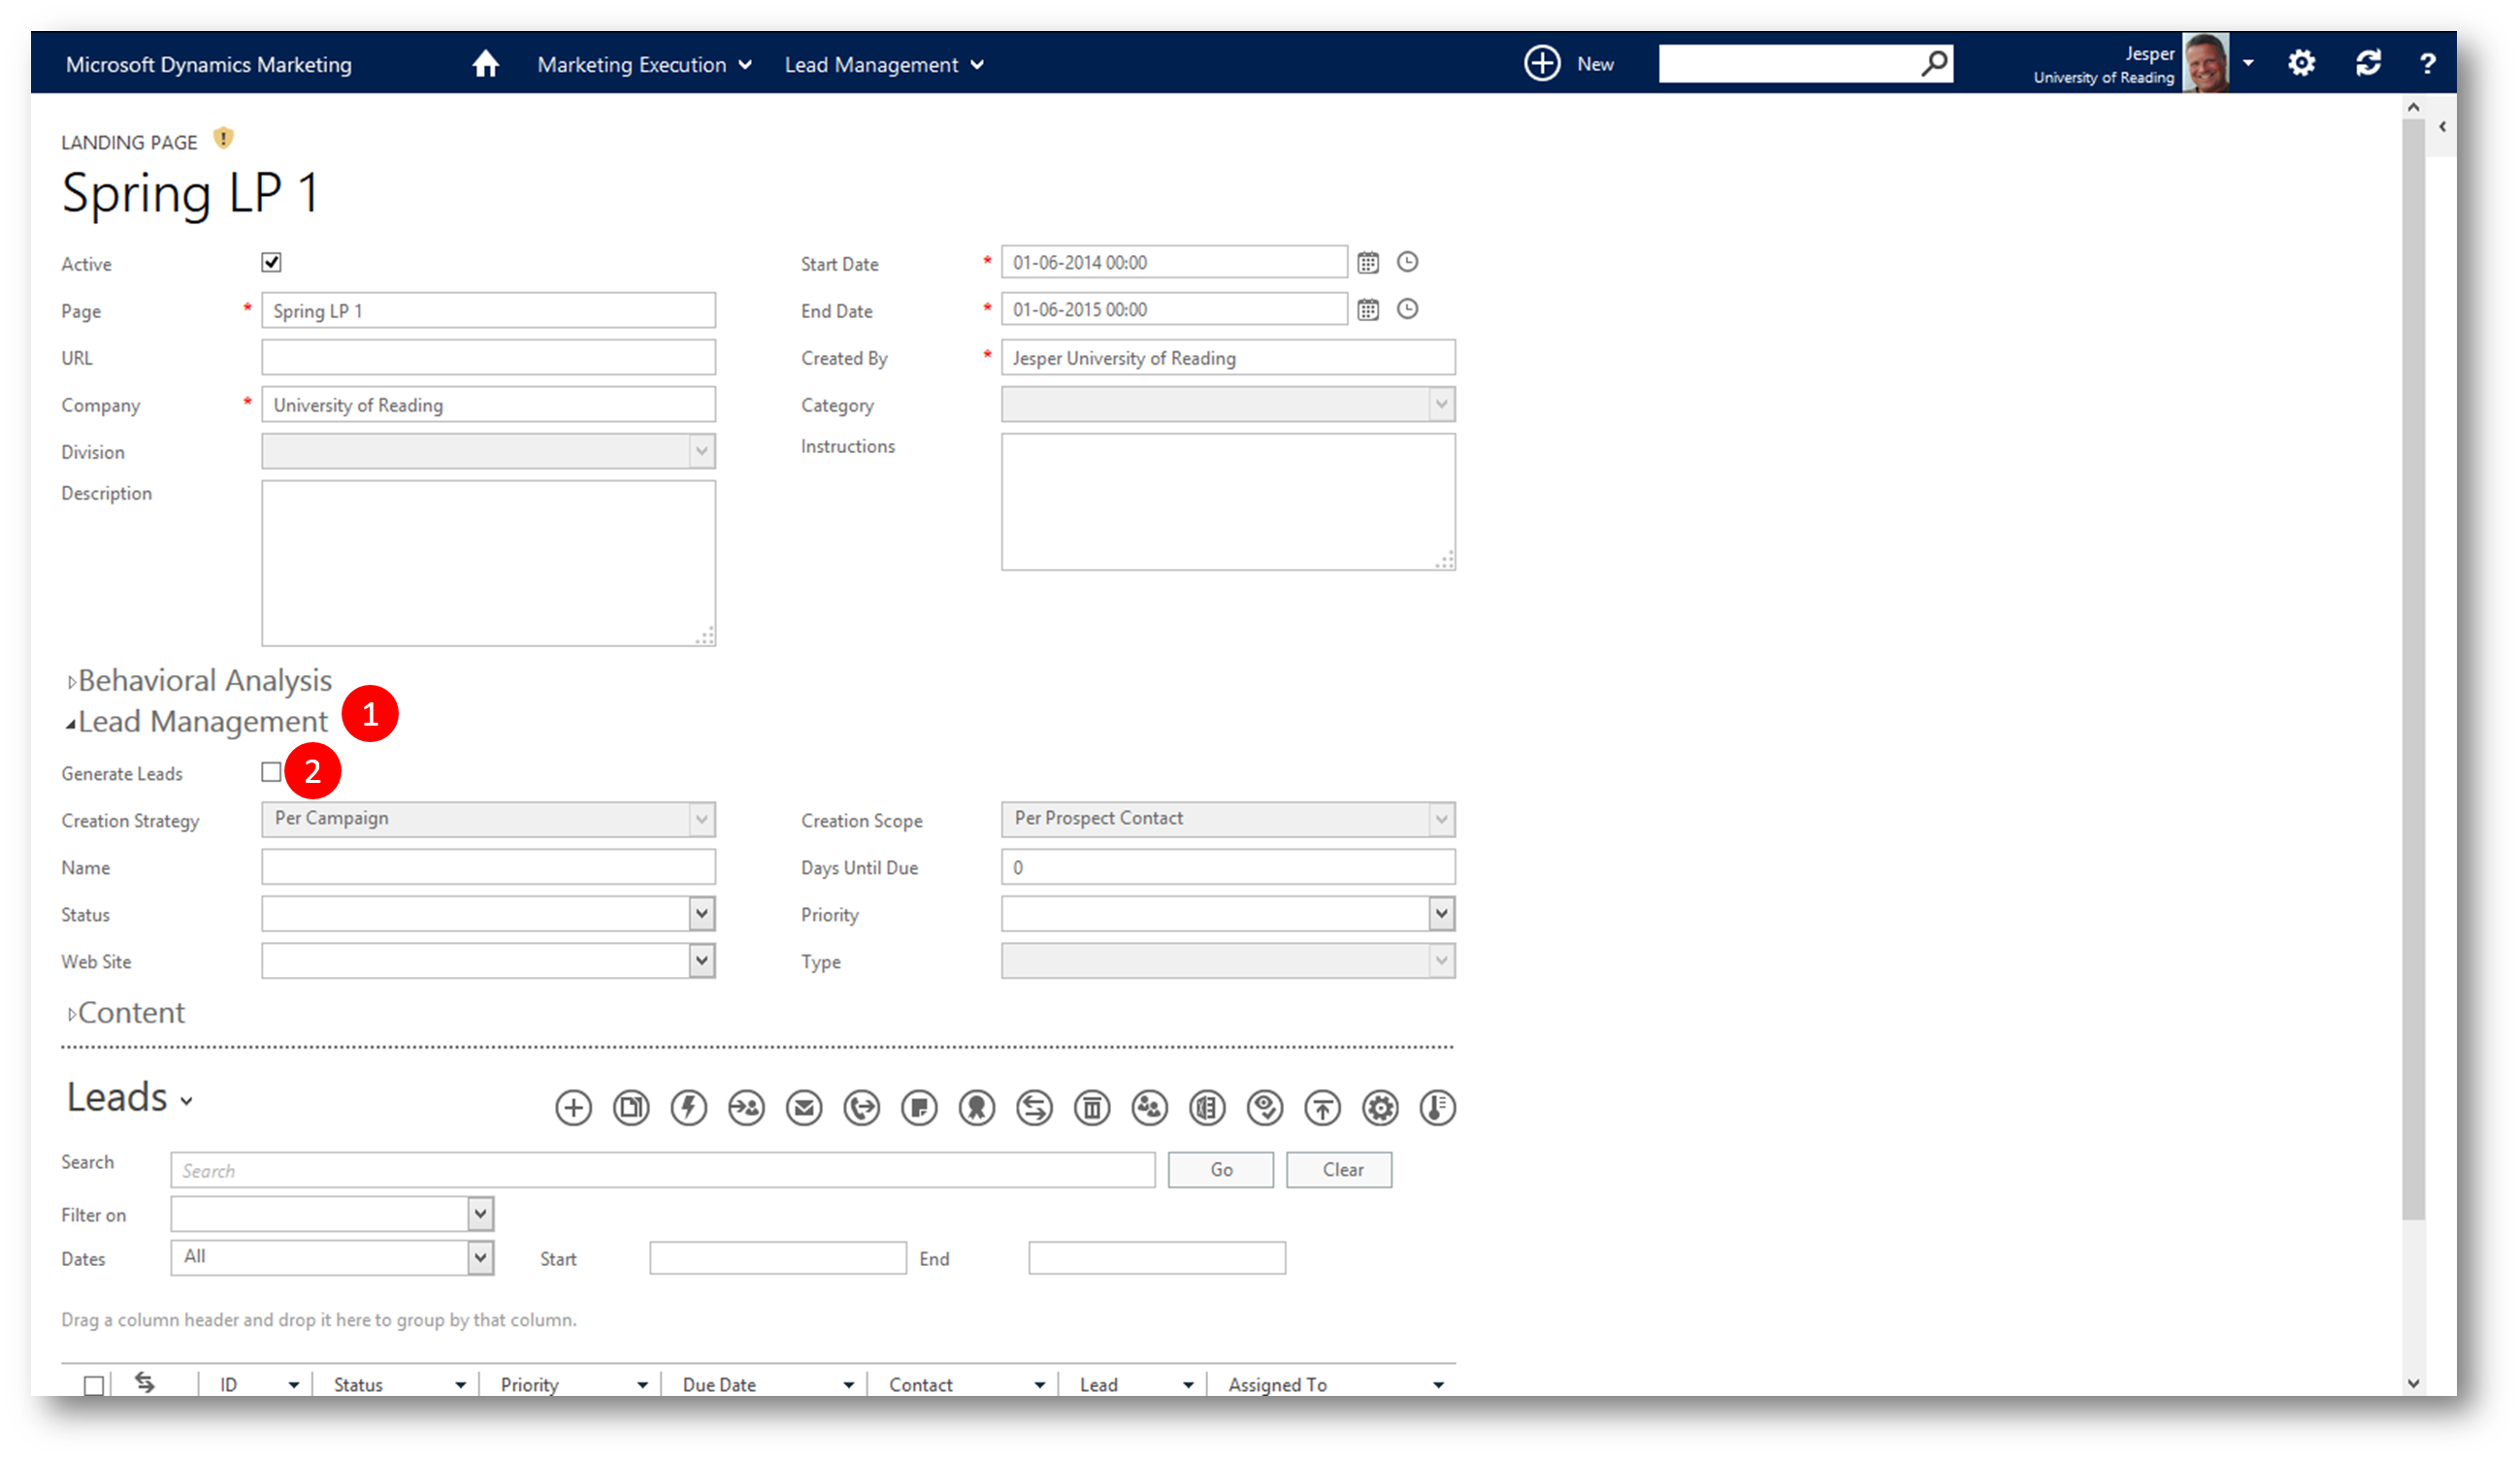
pic 24: Expand the "Lead Management" section, and check the "Generate Lead" check box
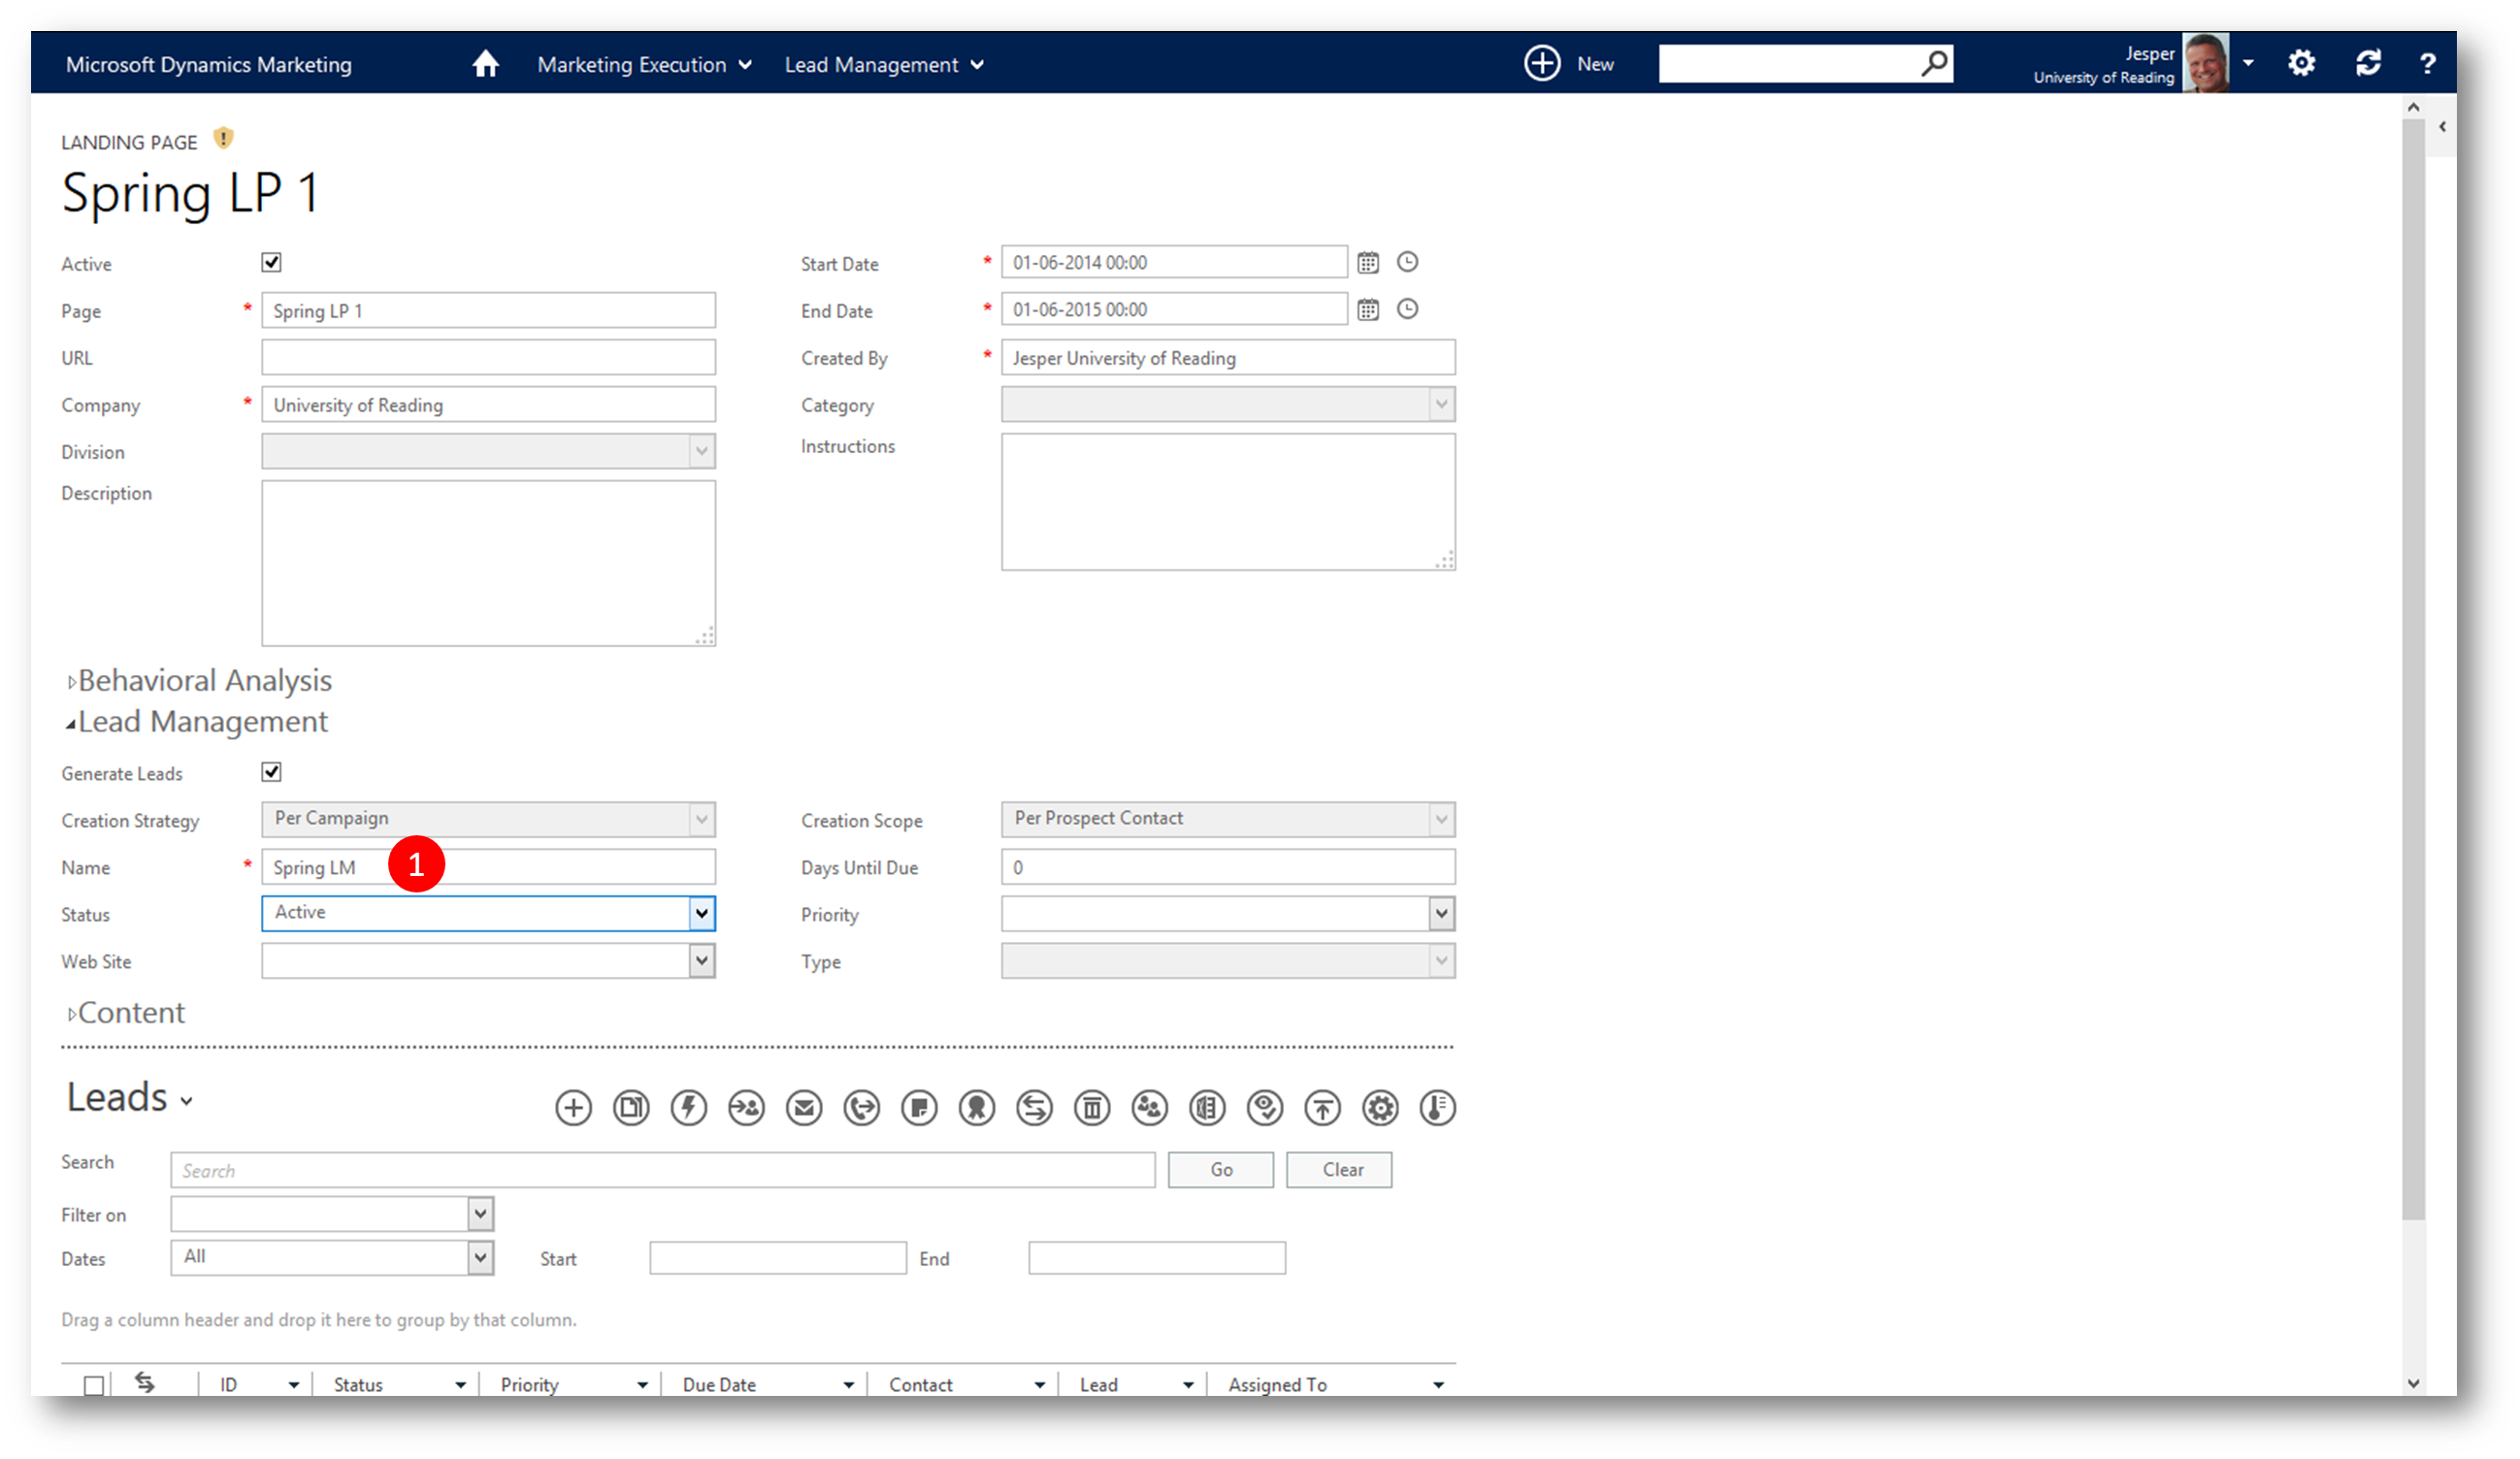
pic 25: Type a name for the Lead Management model
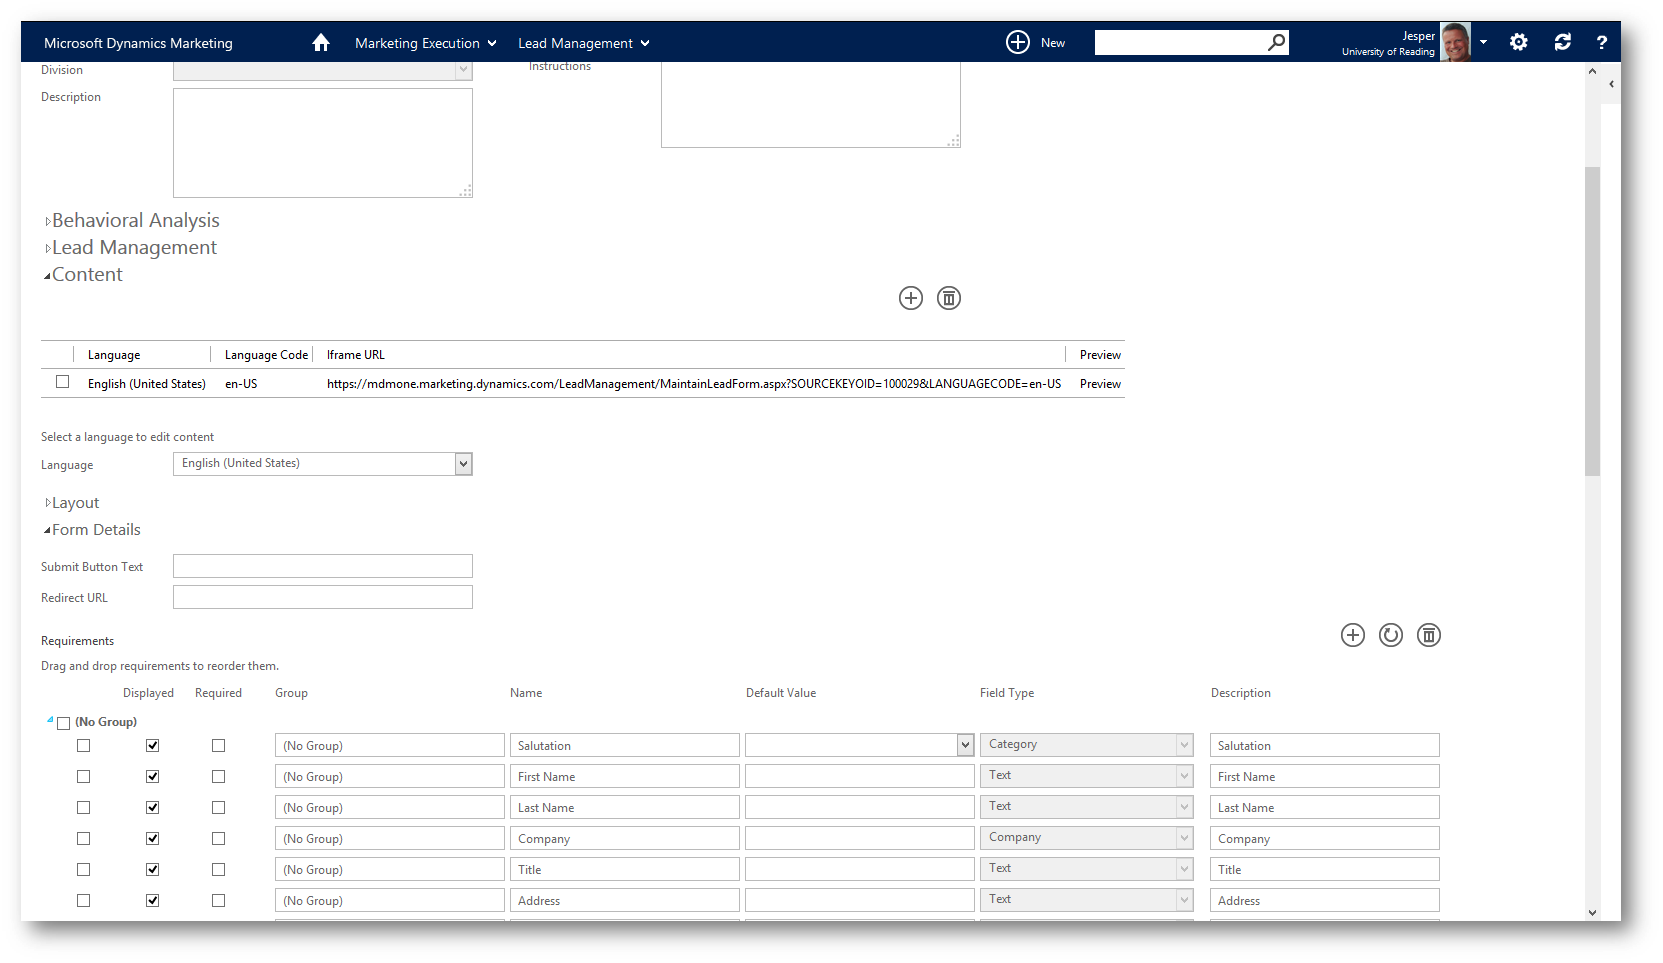
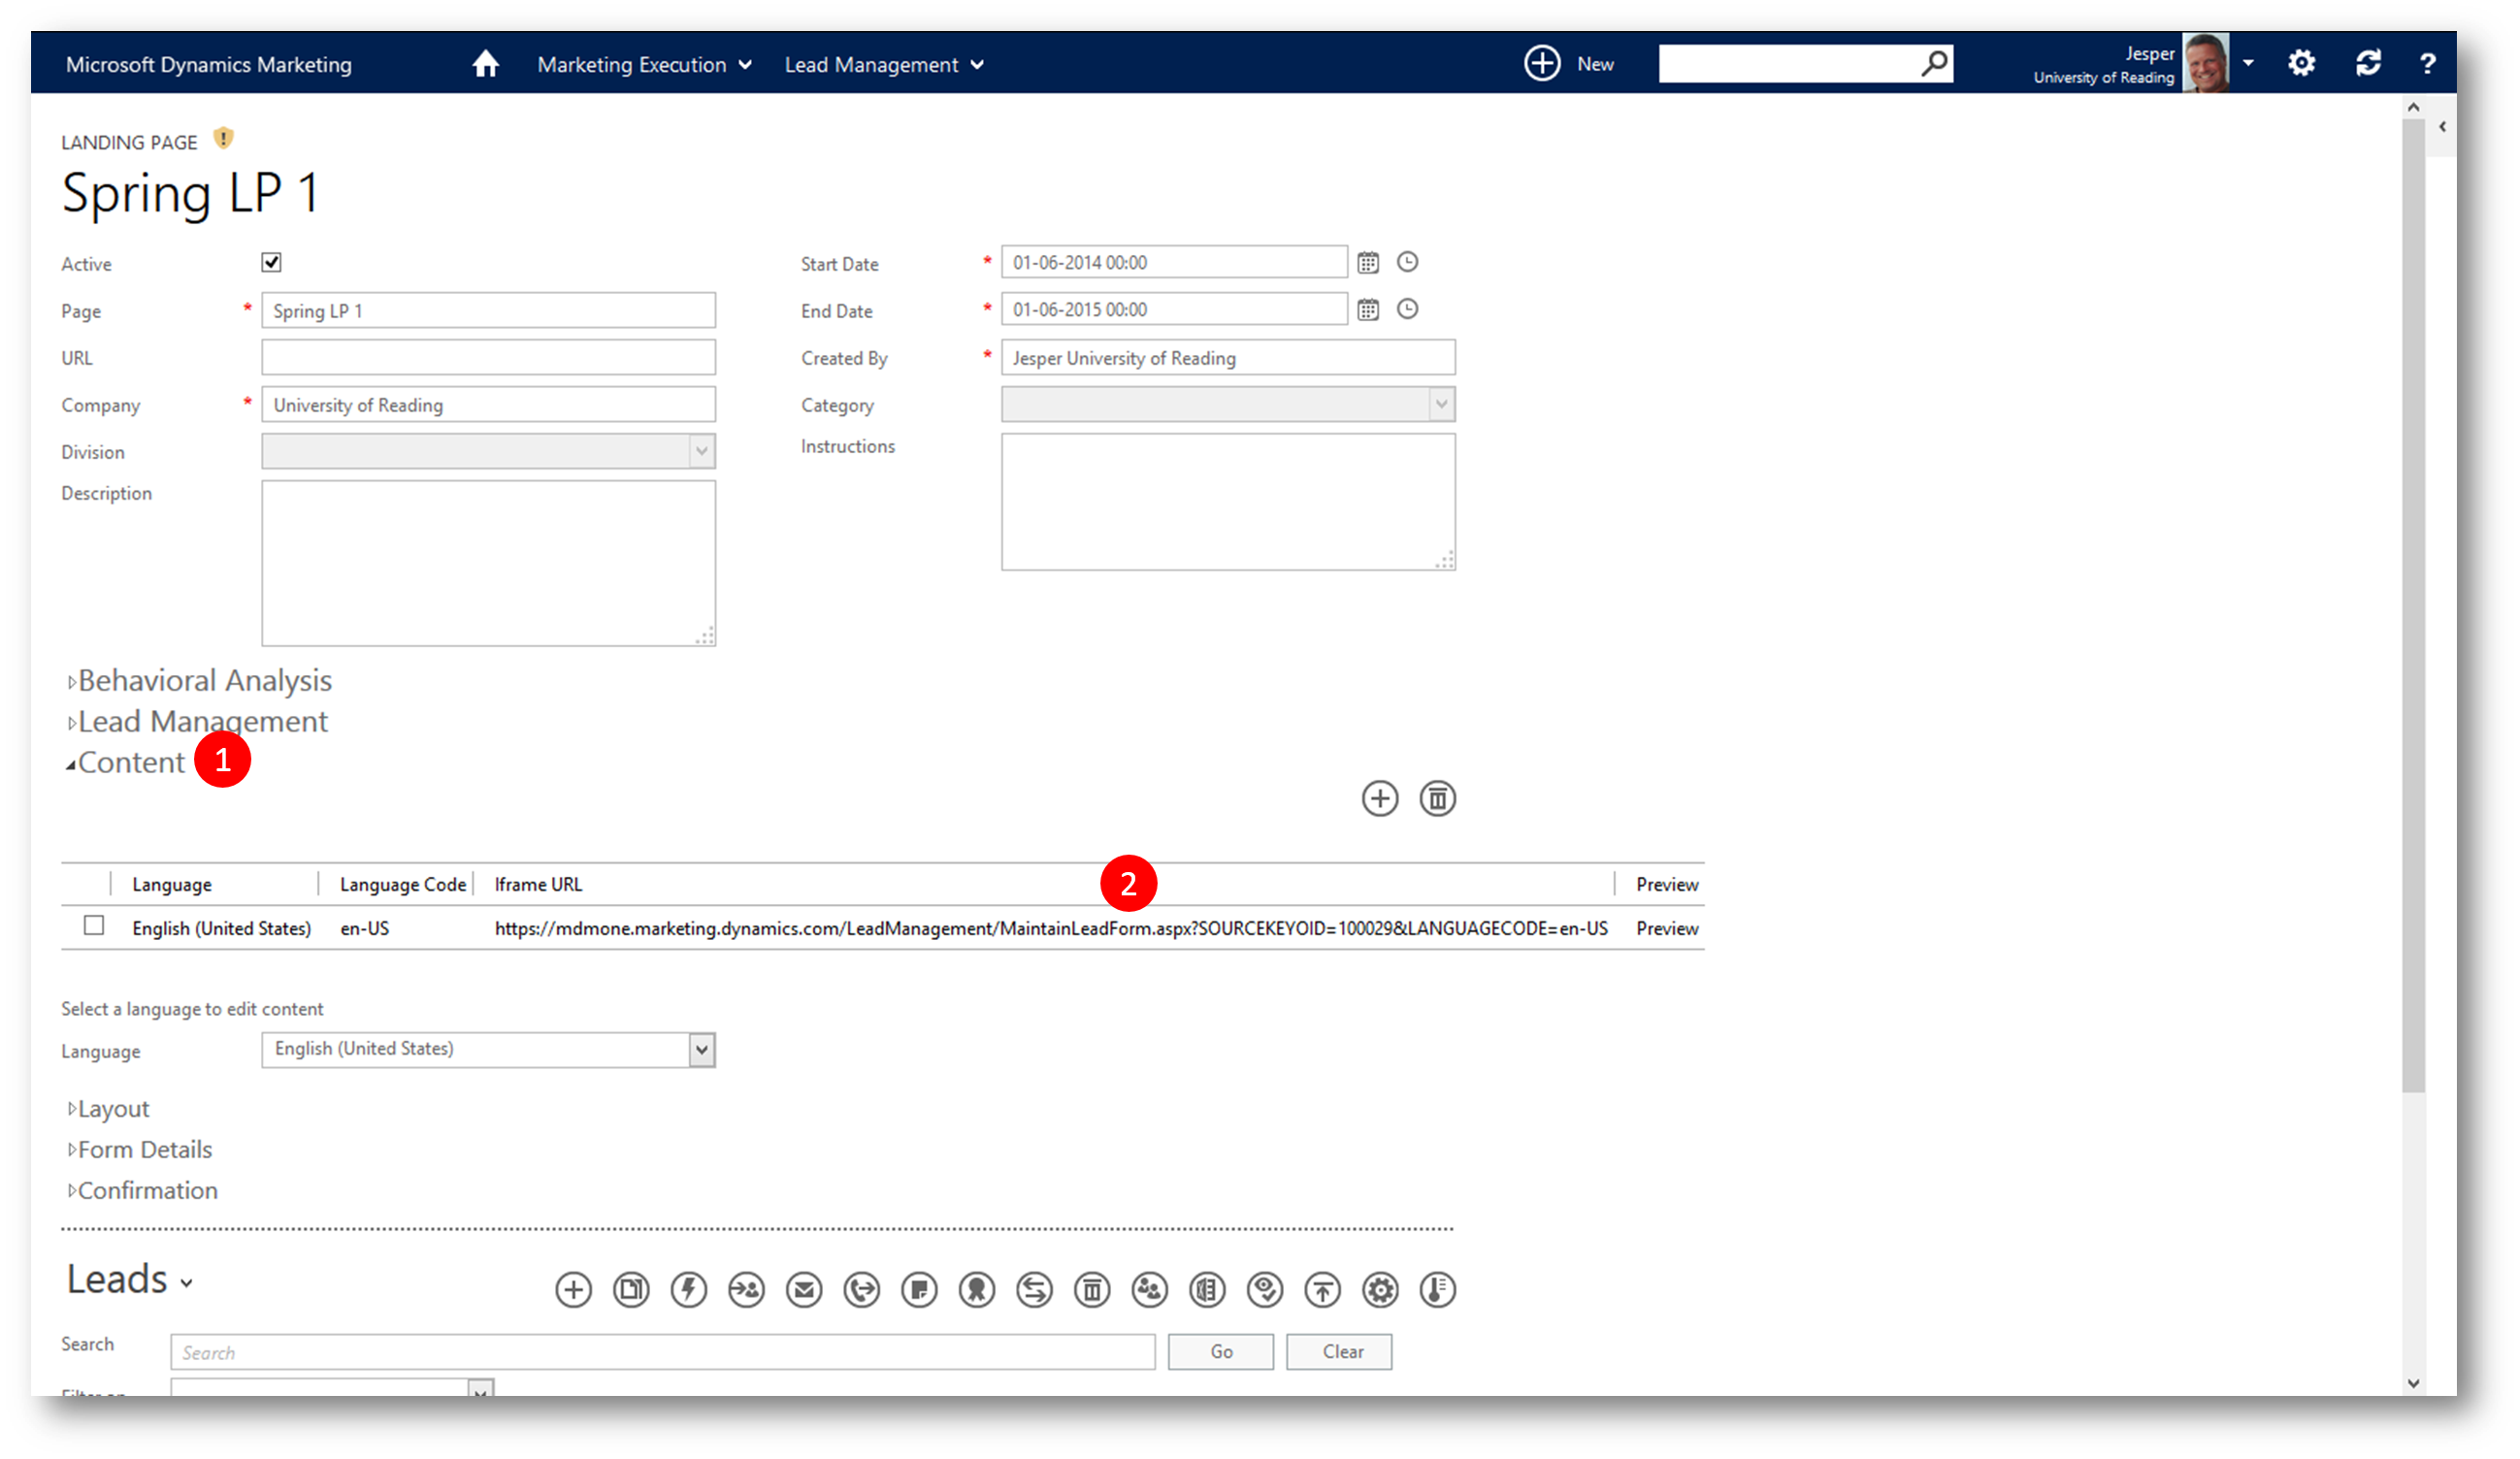
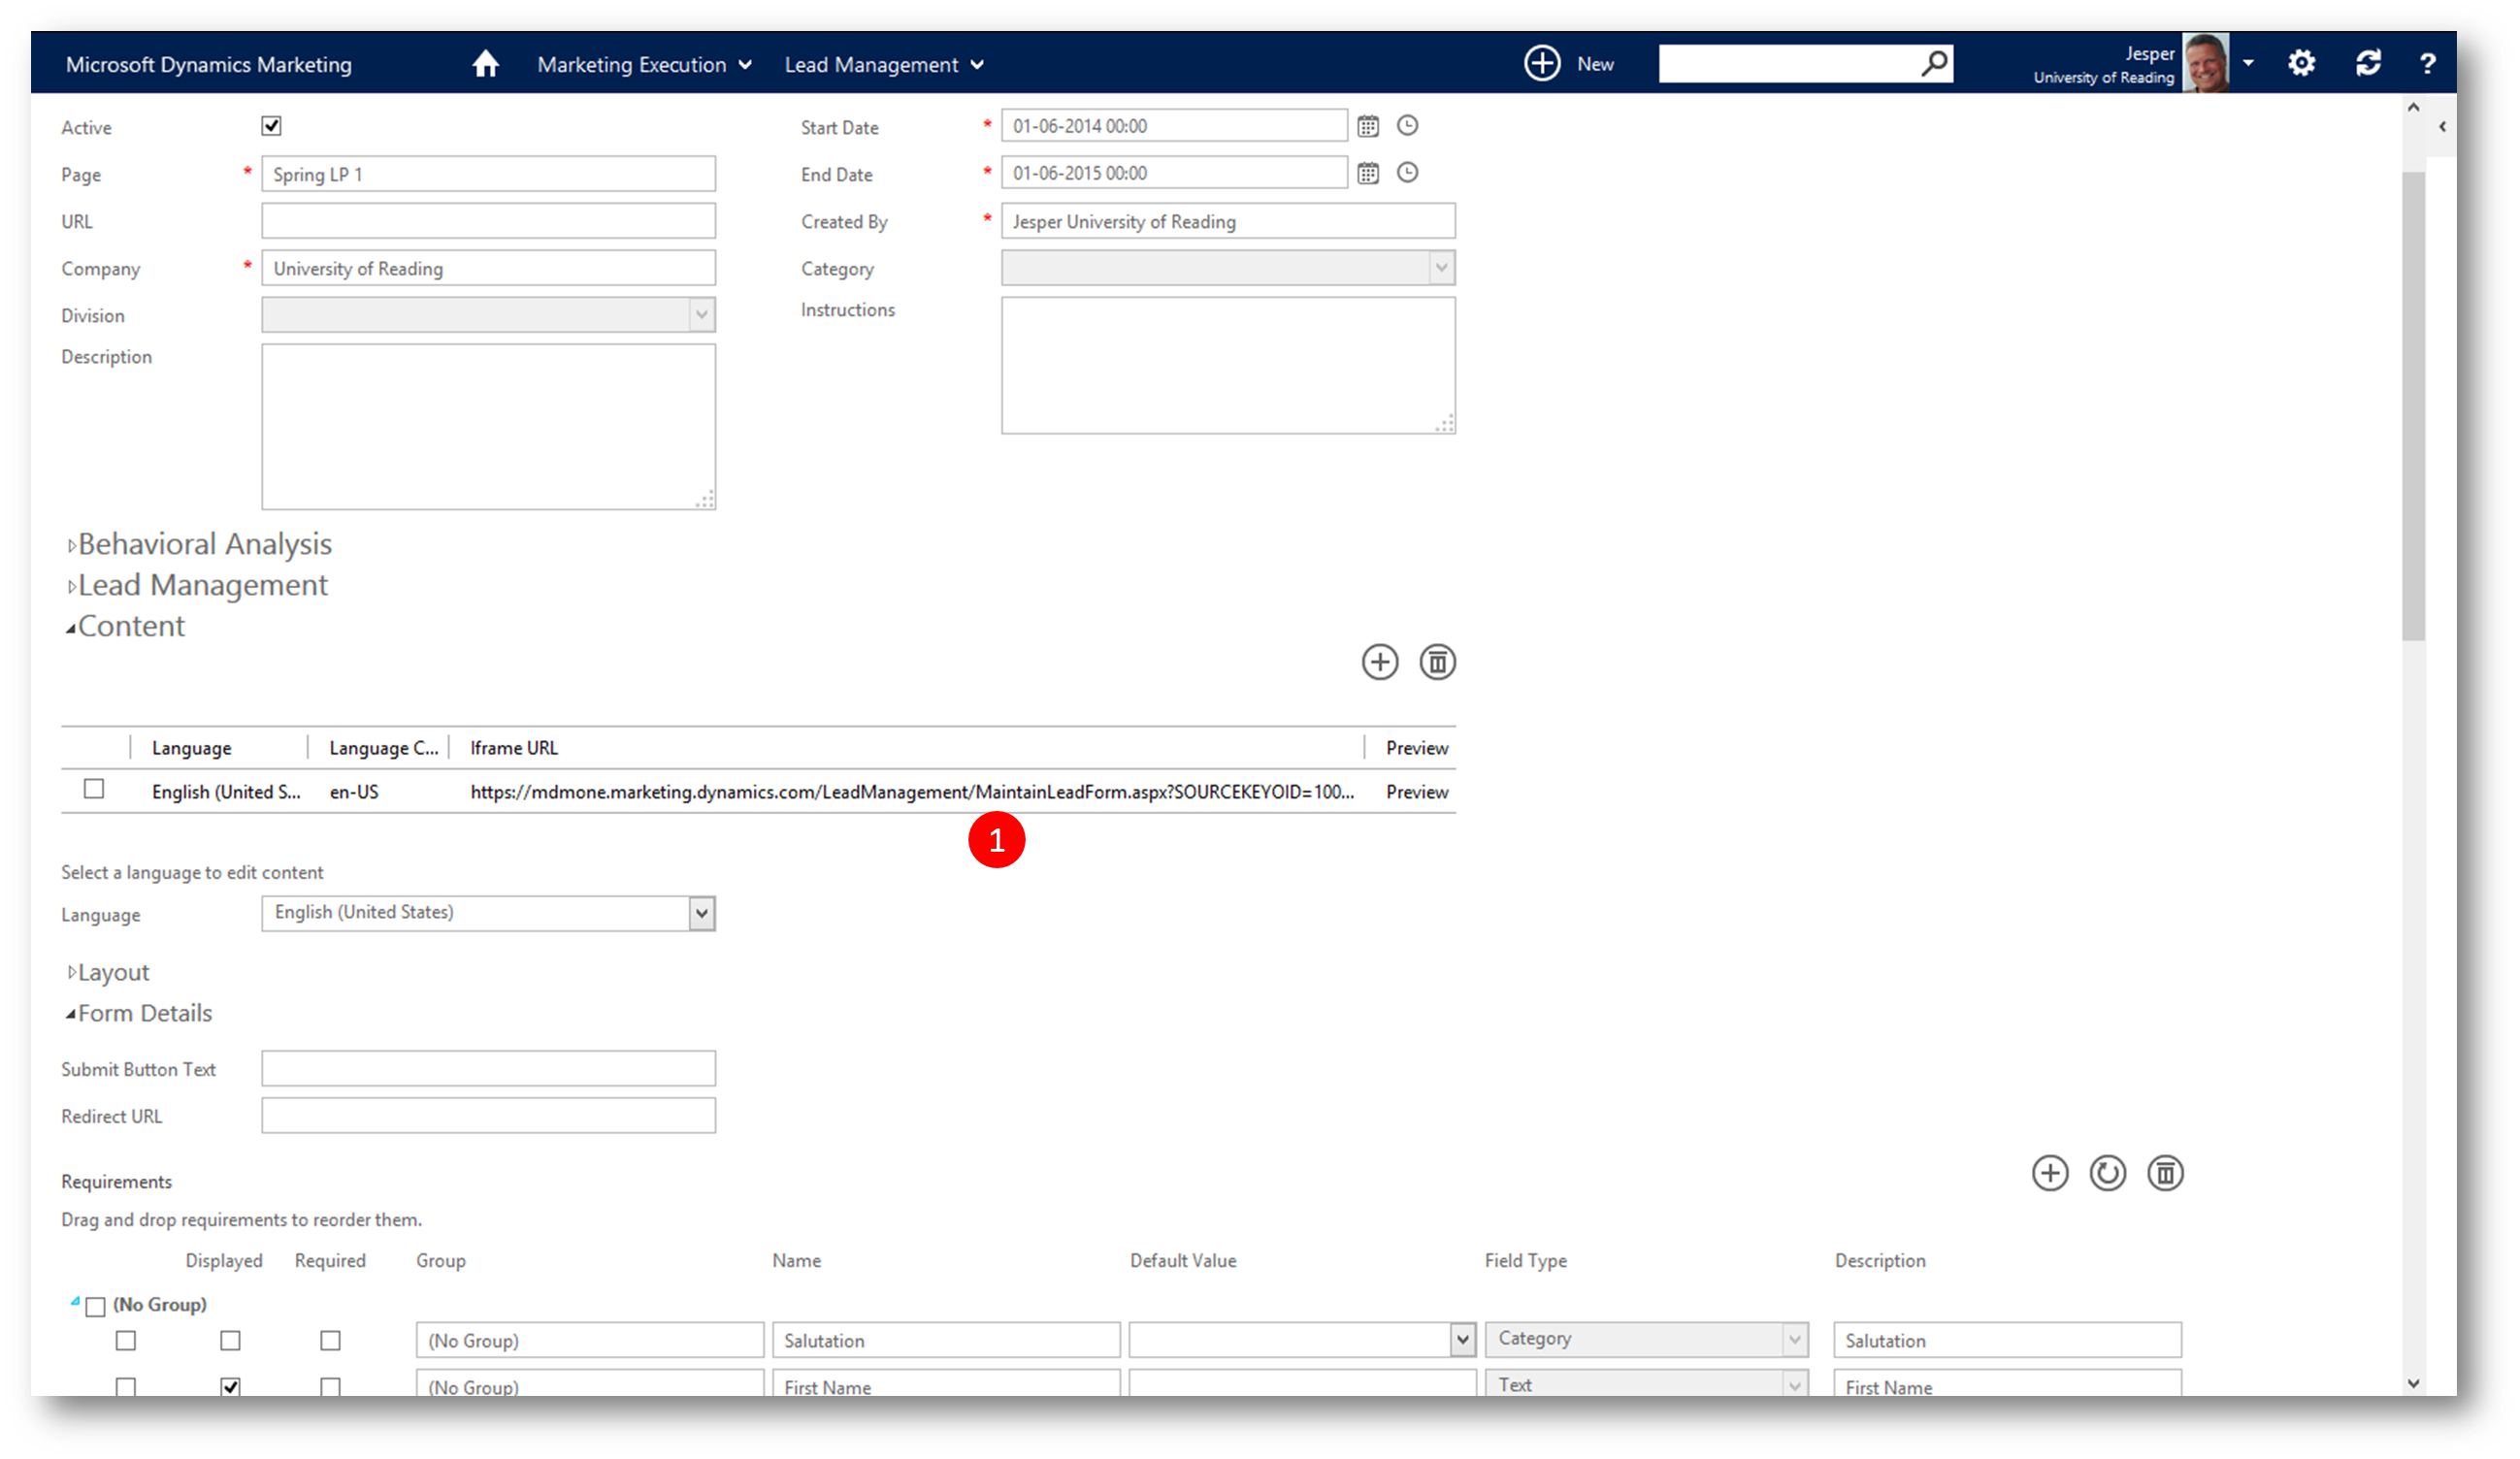
pic 26: Expand the "Content" section, and note the Landing Page iFrame URL (The Iframe URL is the string that needs to be placed on a web page using an Iframe tag. This allows you to embed the Landing Page where ever you want to place it on the page - we'll not touch on that part in this example)
pic 27: In the "Content" section expand the sub section "Form Details", and scroll down a bit to see all the fields you can define for the Form (aka the Landing Page)
pic 28: Uncheck all fields but "First Name", "Last Name", and "Subscribe" (the "Subscribe" field is a special field allowing a visitor to the landing page to add him/her self to our subscribers list)
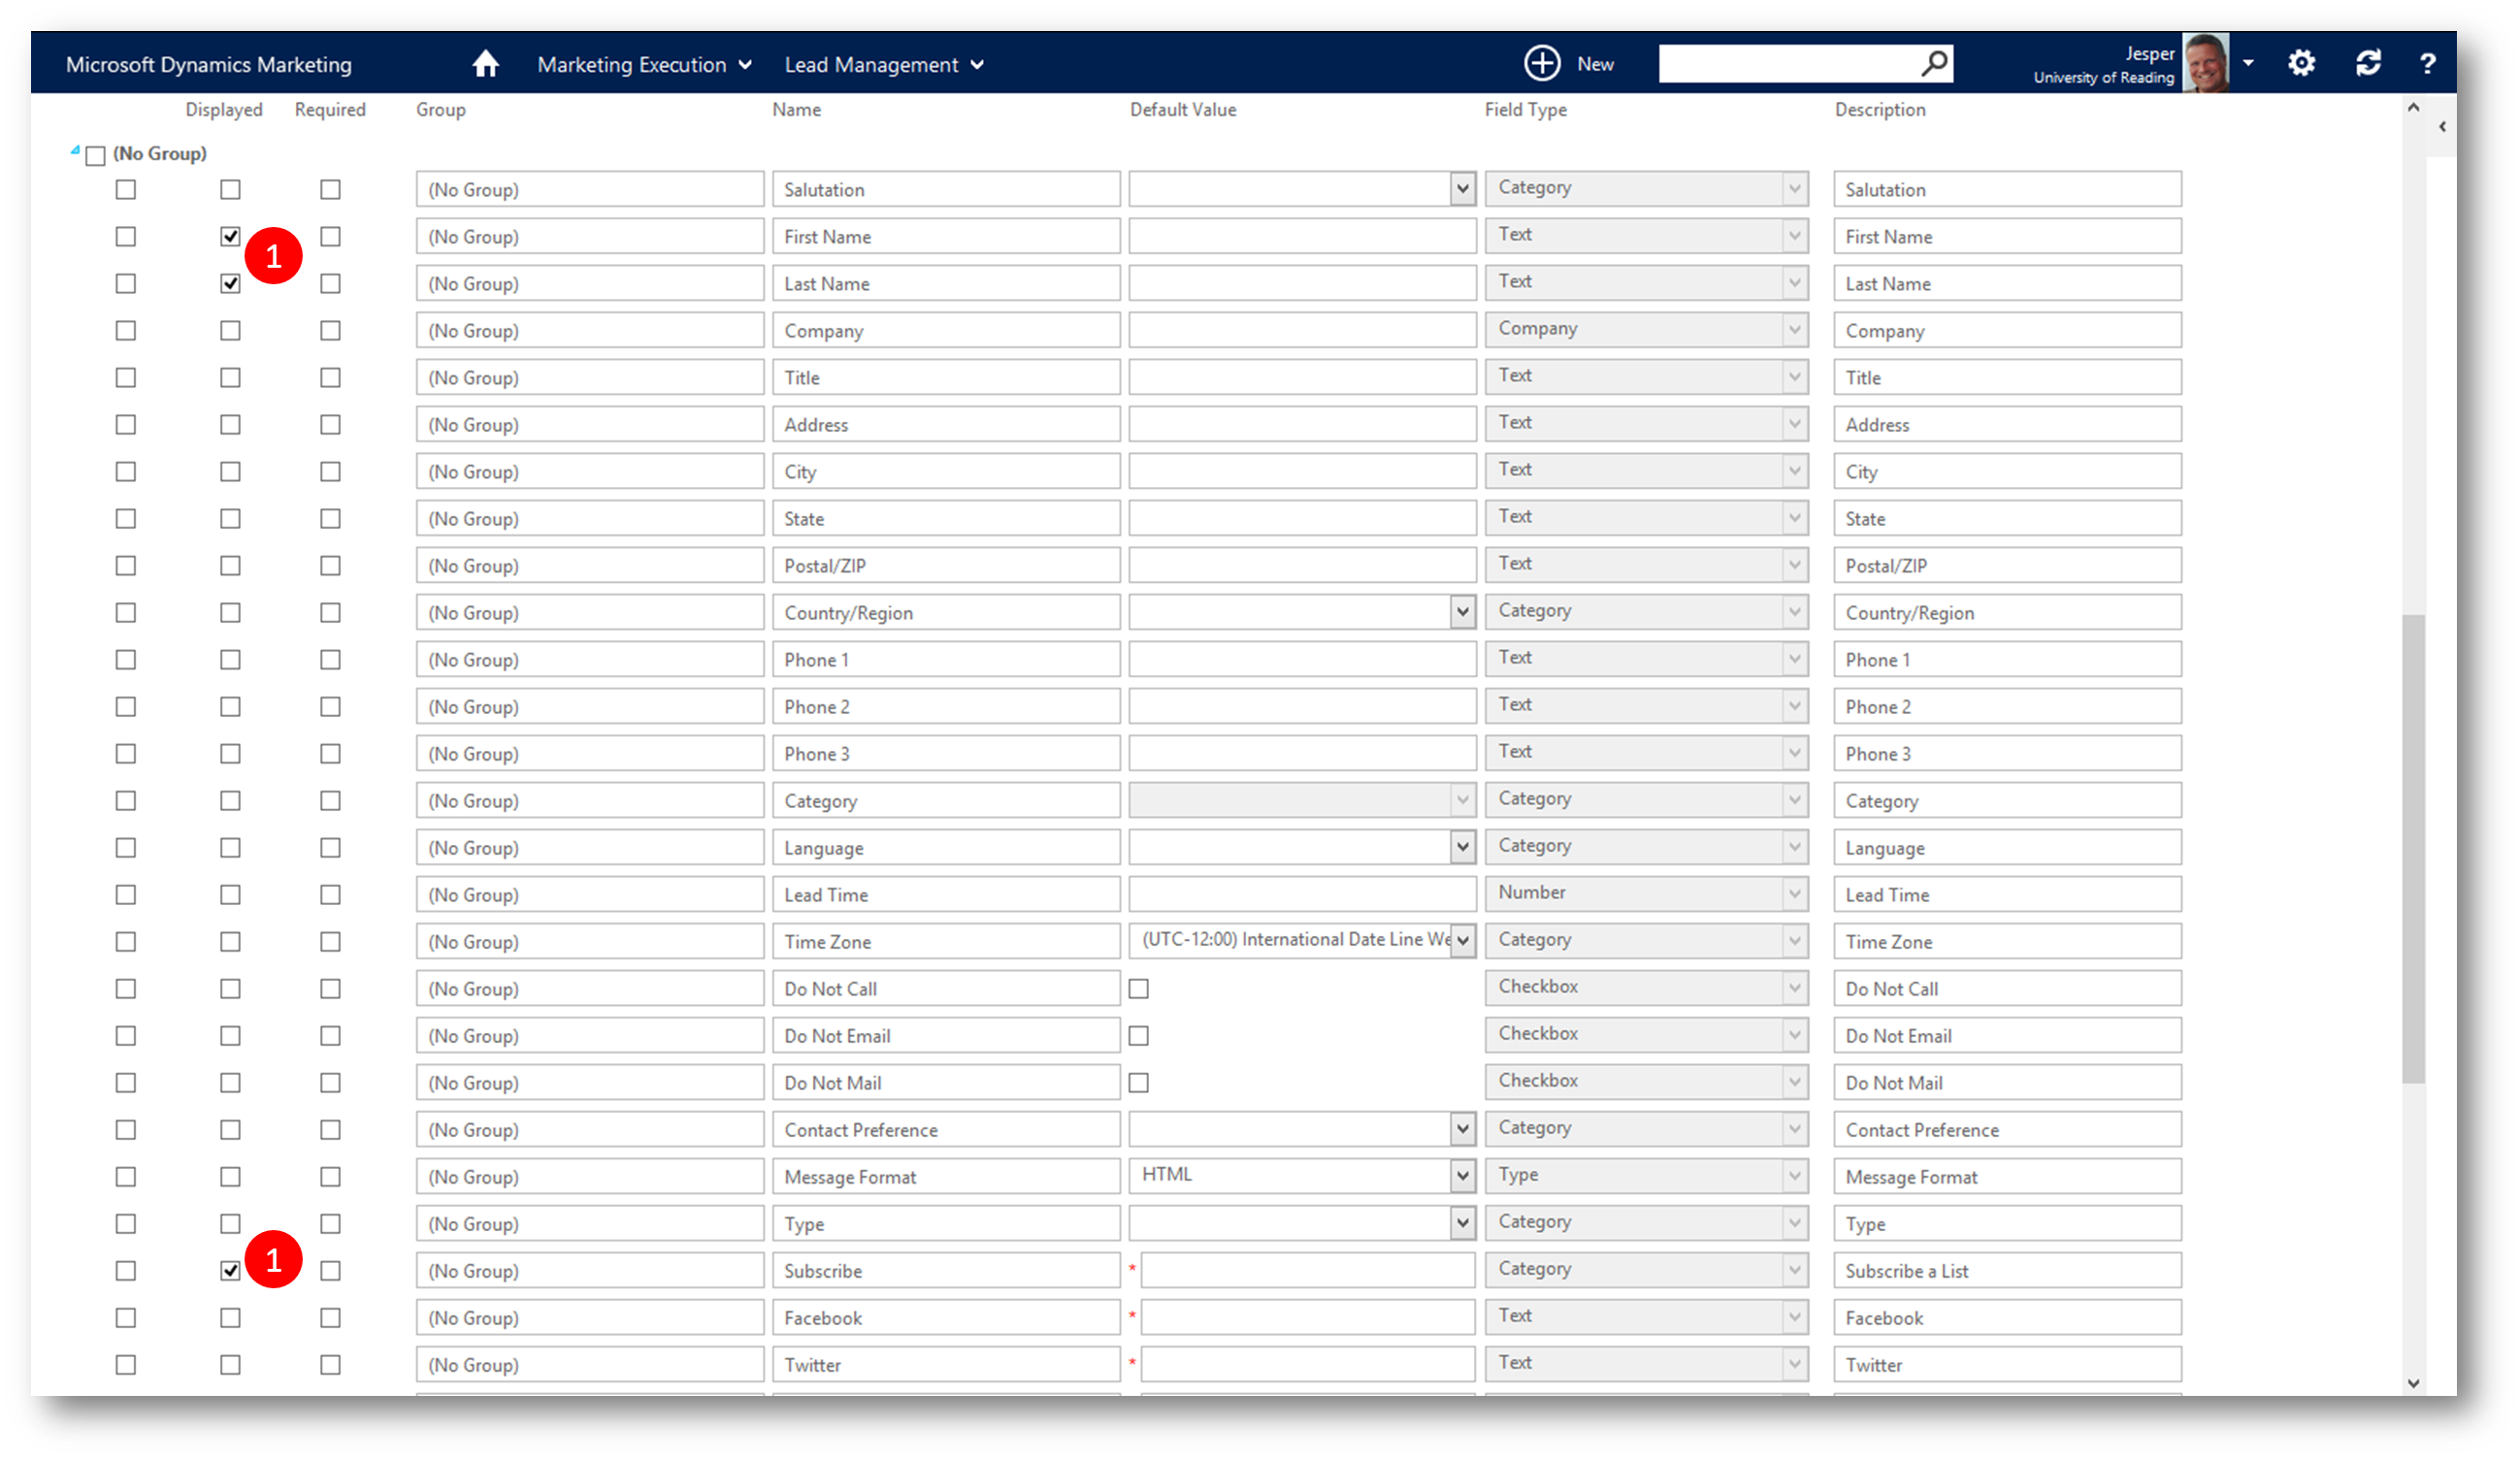
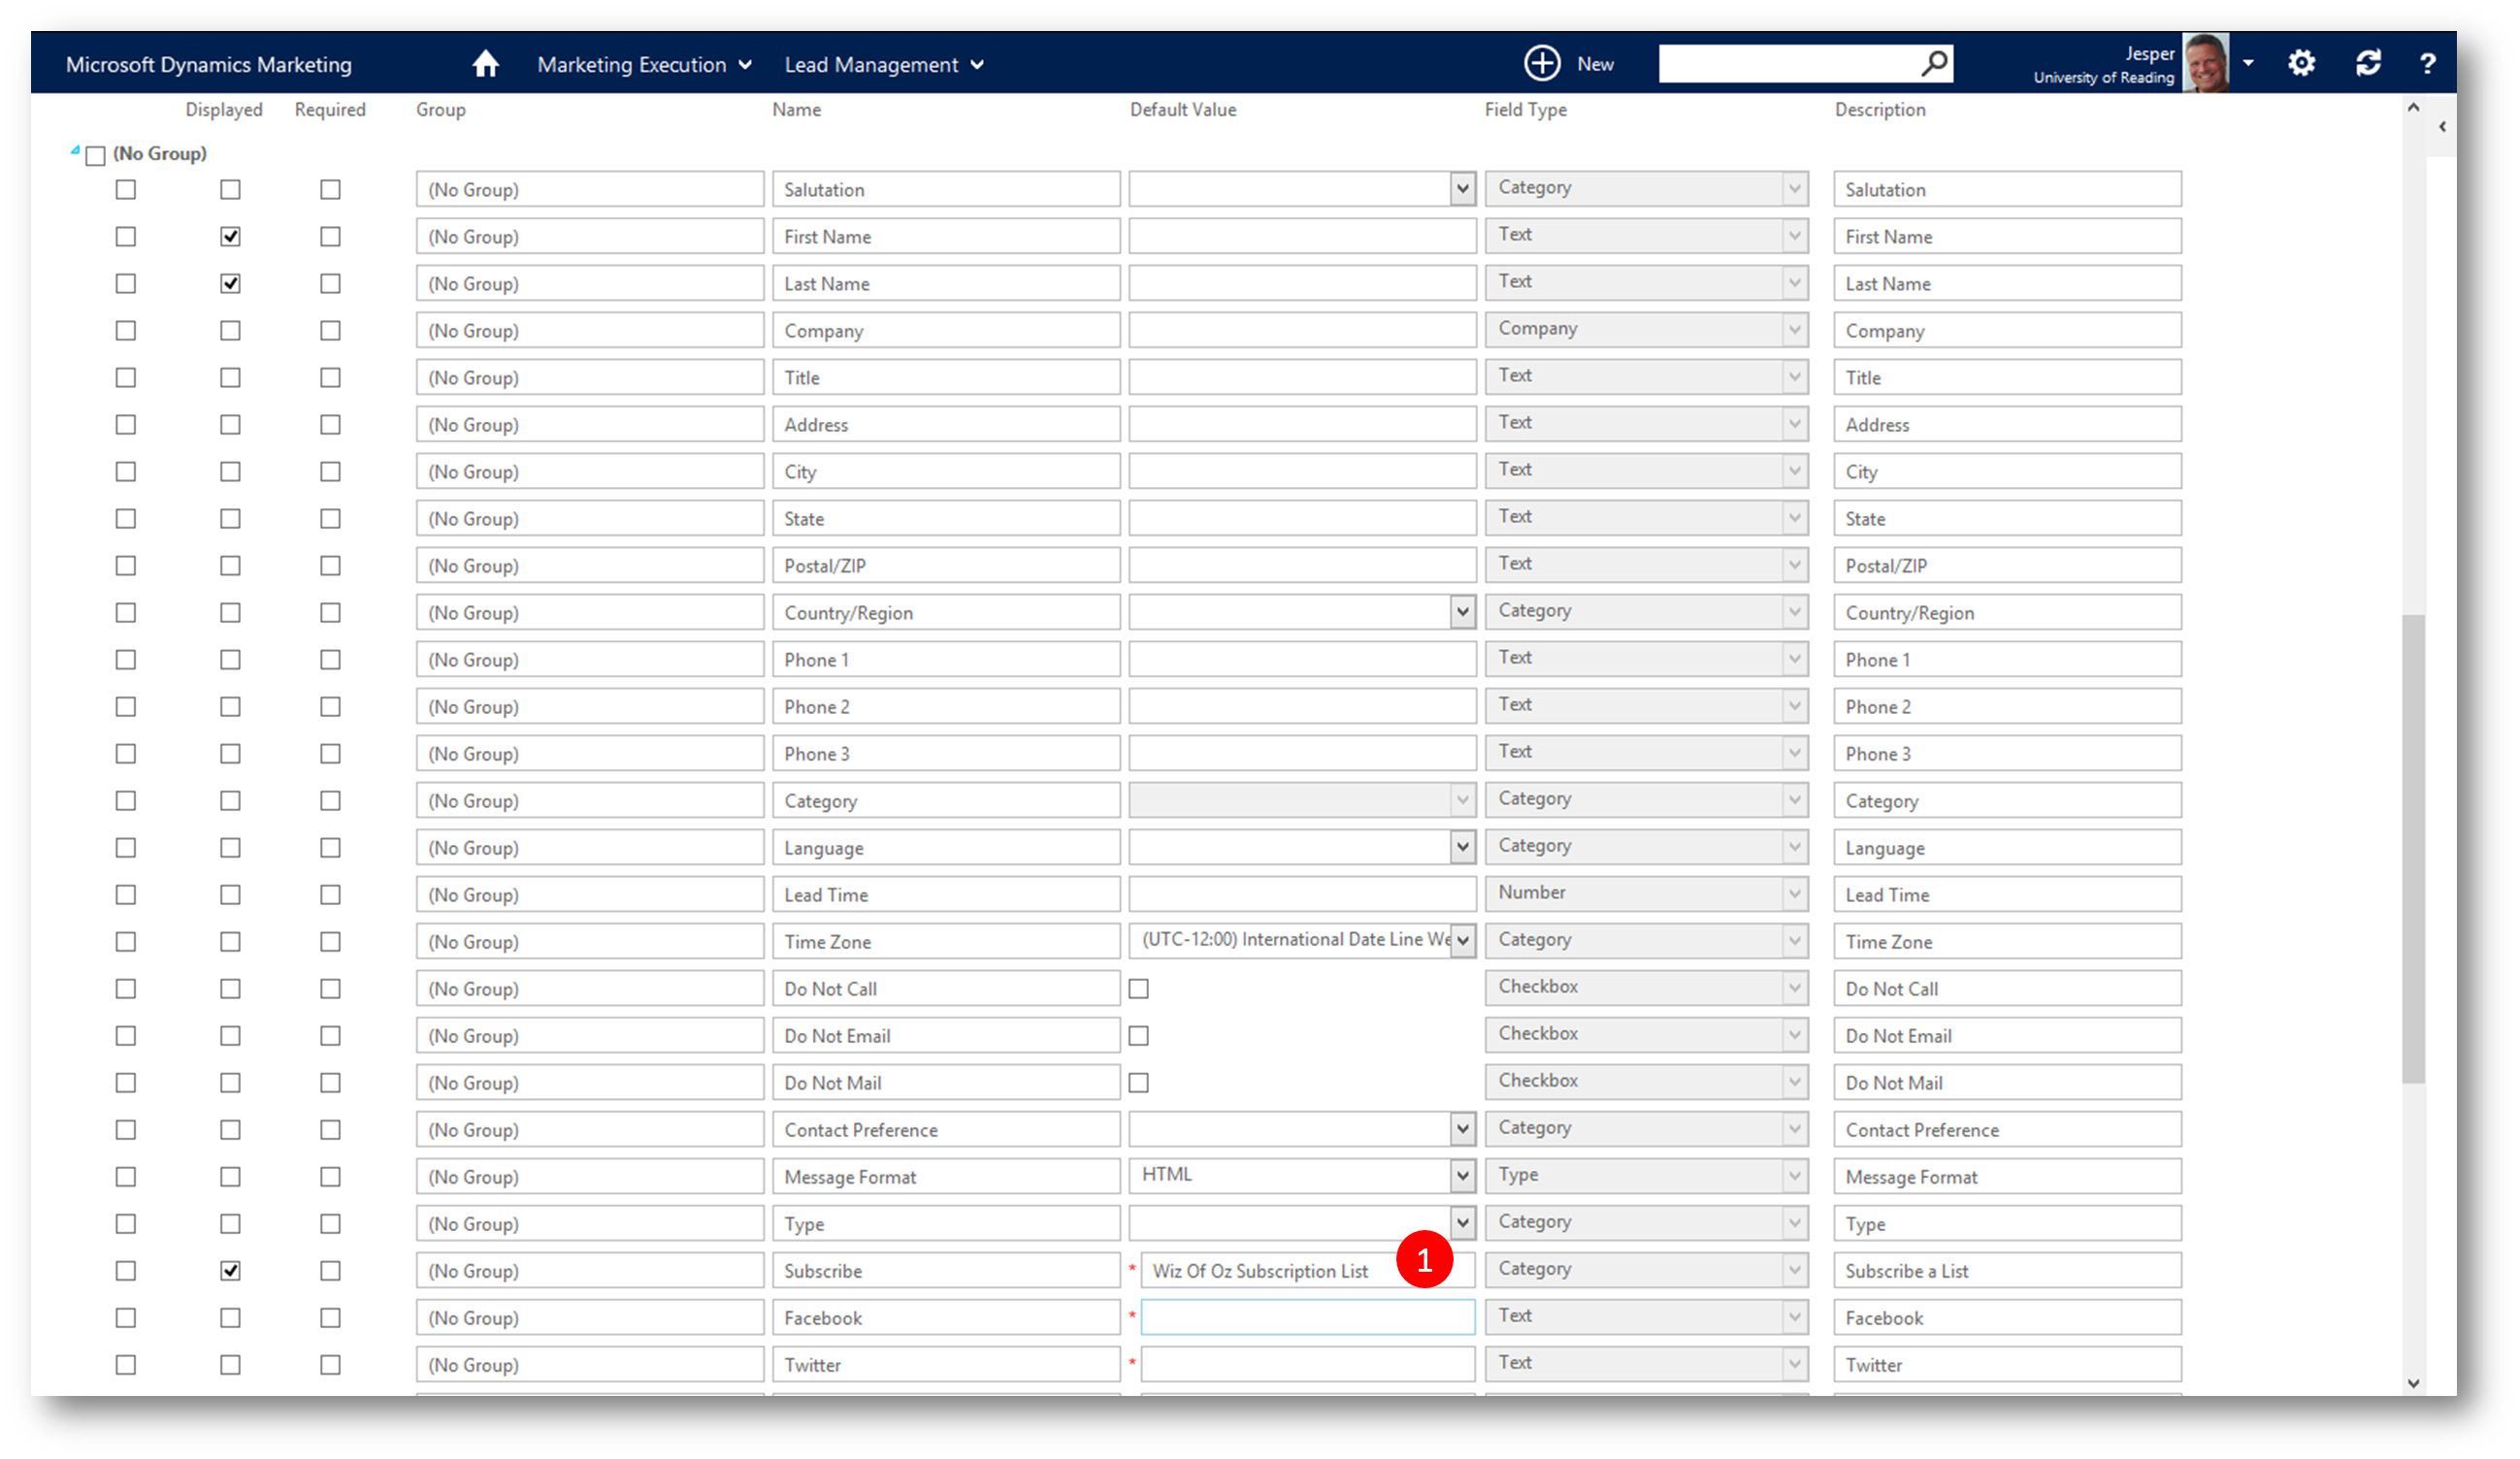
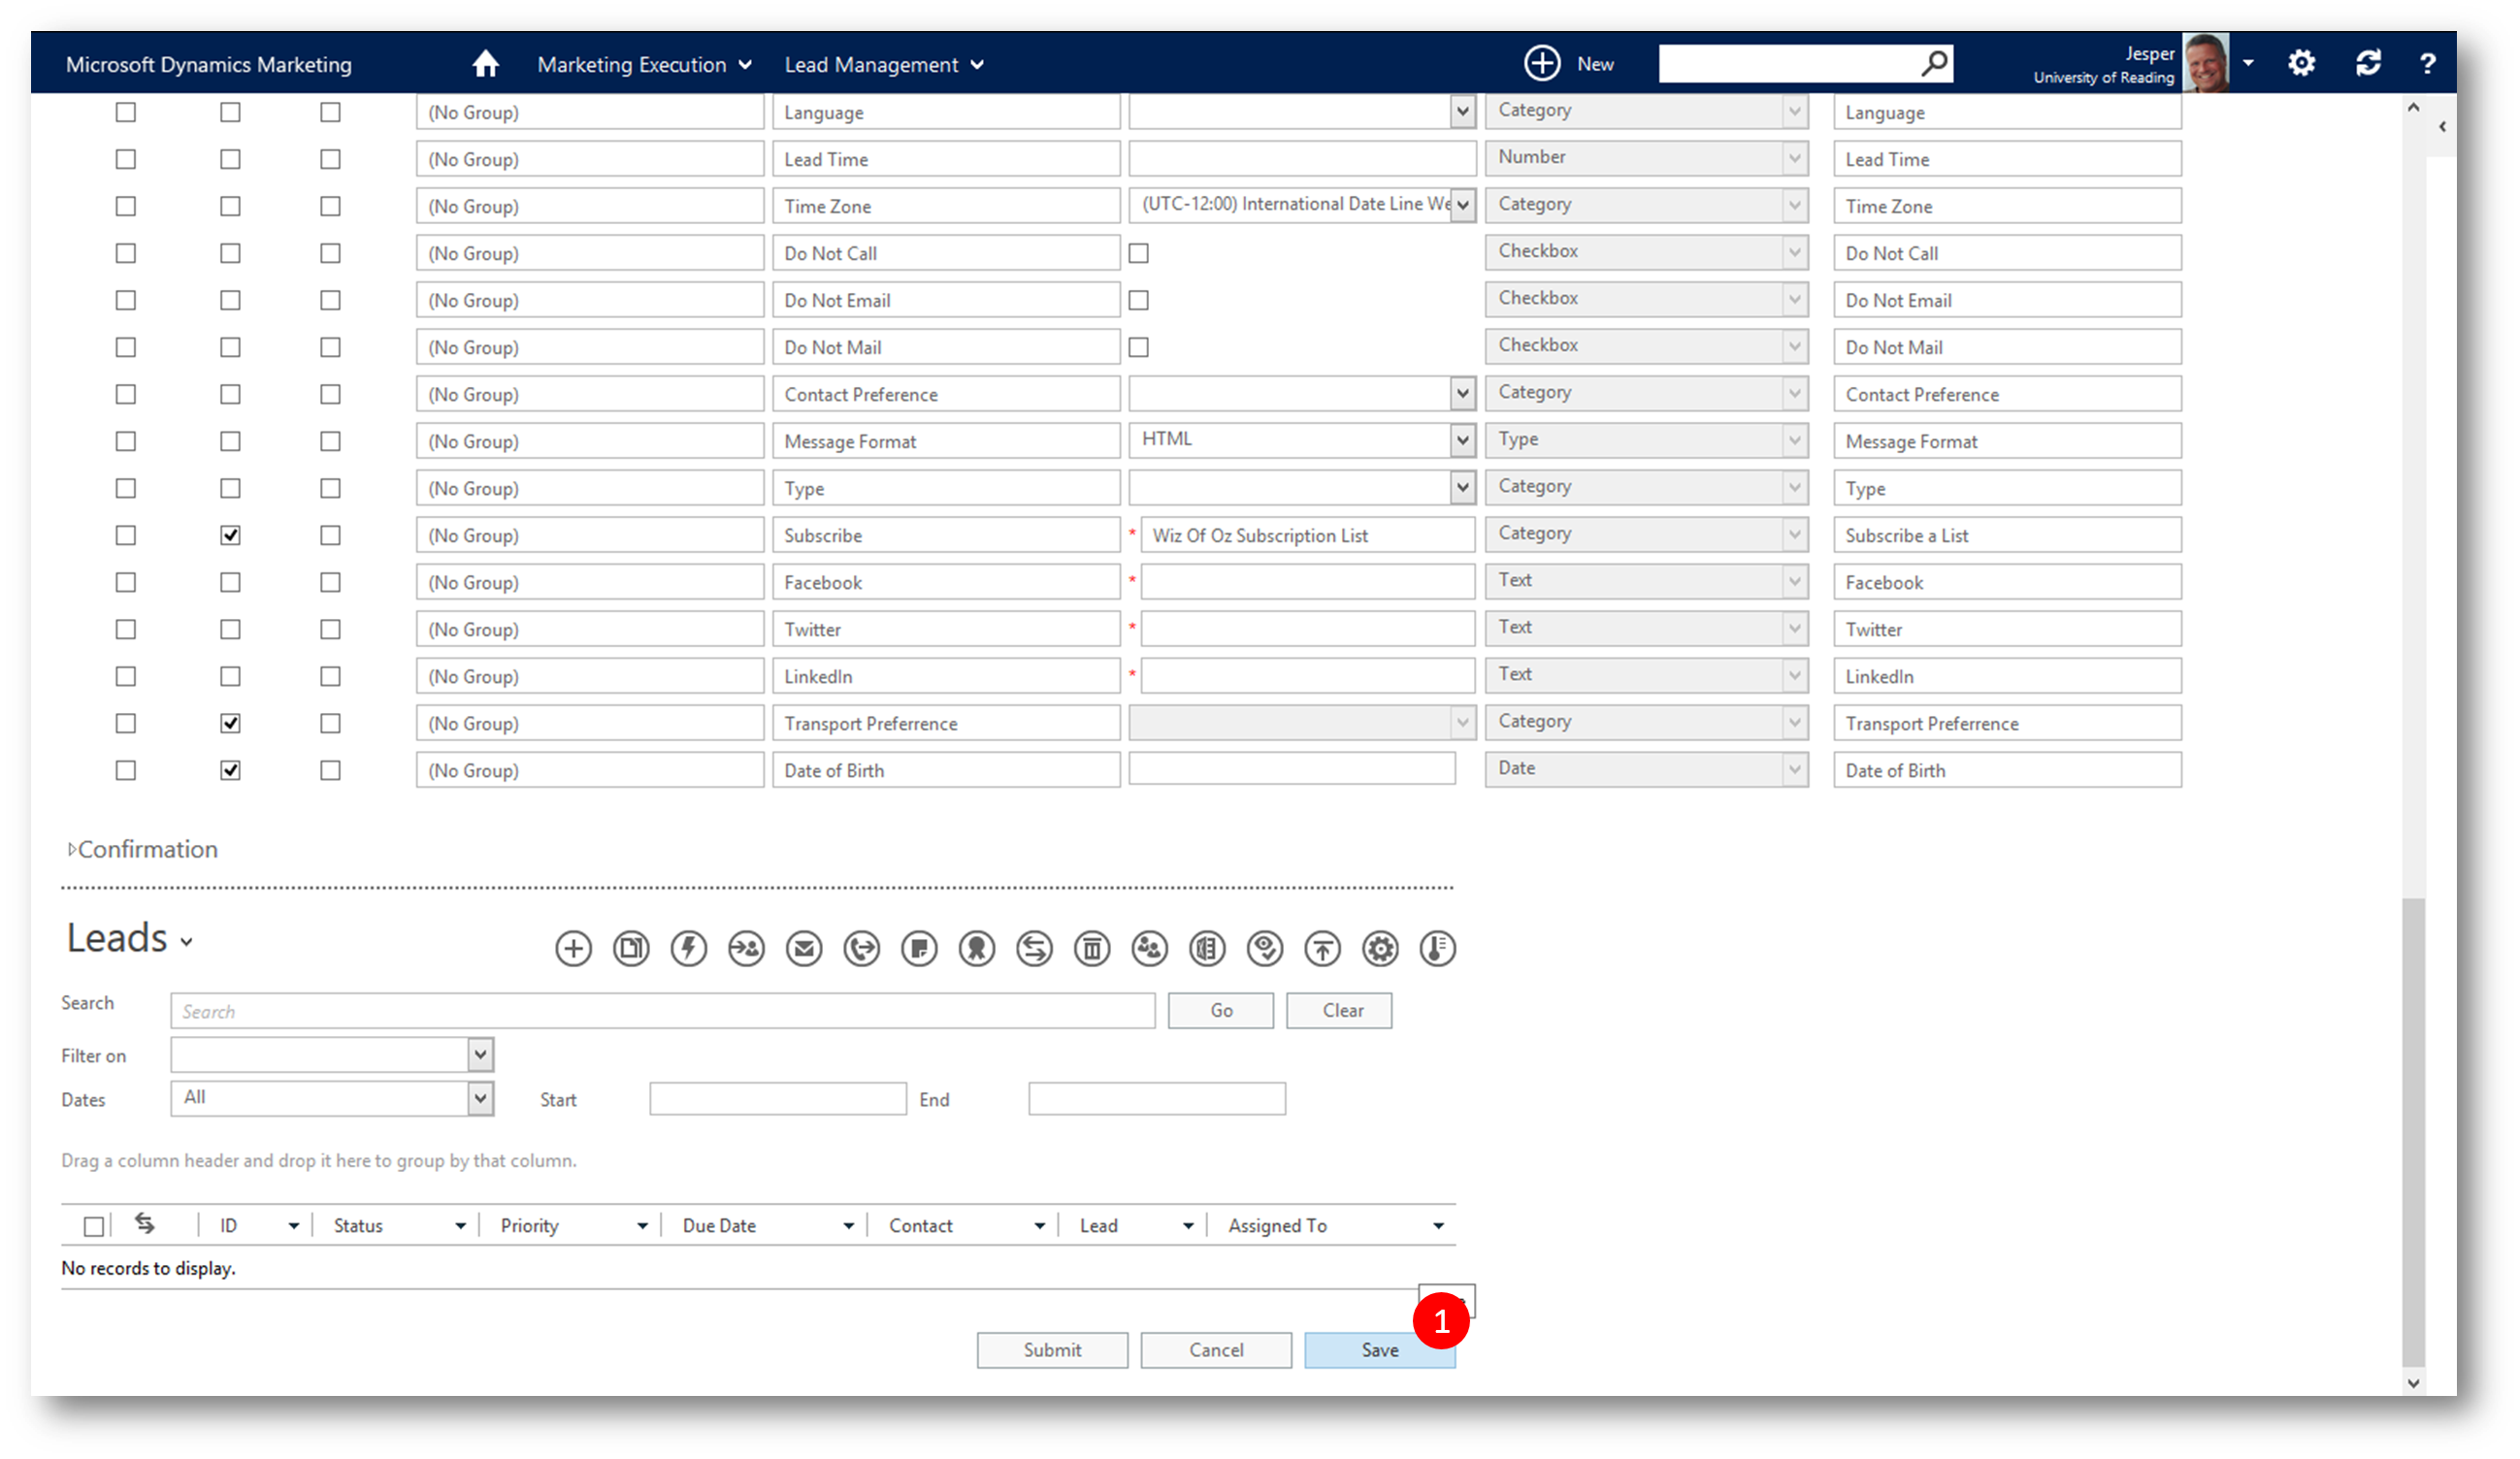
pic 29: In the "Subscribe" drop-down select a marketing list
pic 30: Scroll down to the bottom and click Save
pic 31: Now scroll up until you see the iFrame URL. Click the URL to test the Landing Page - does it show the fields you selected? does it create a Lead with the correct score? Does it add the visitor to the marketing list if the Subscribe field was checked by the visitor?
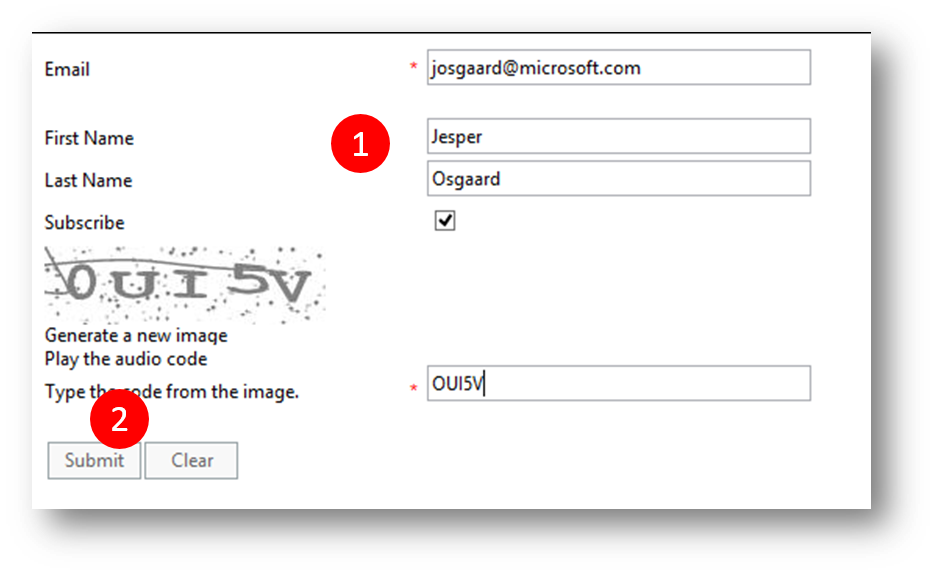
pic 32: The Landing Page iFrame is displayed. Note that all field are present, including the "Subscribe" checkbox

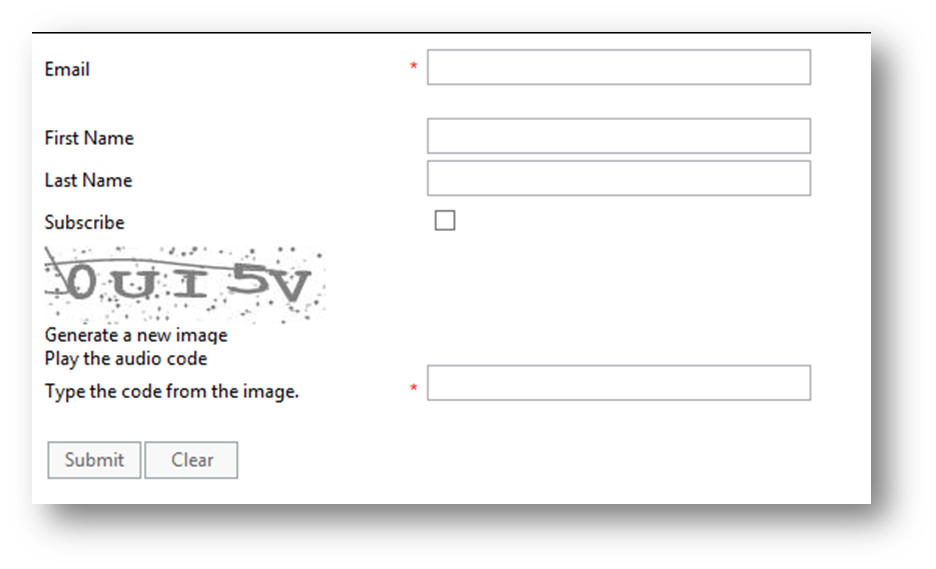
pic 33: Provide an email address, first name, last name, check the "Subscribe" check box, and then click Submit to save and close the submission
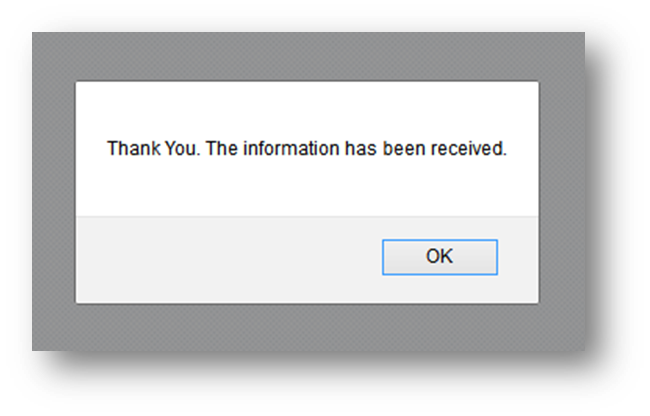
pic 34: MDM acknowledges your submission
pic 35: In the lower dashboard of your Landing Page, select Leads in the drop-down - and verify that there is now a new Lead submitted via the Landing Page. Click the Lead to open the Lead.
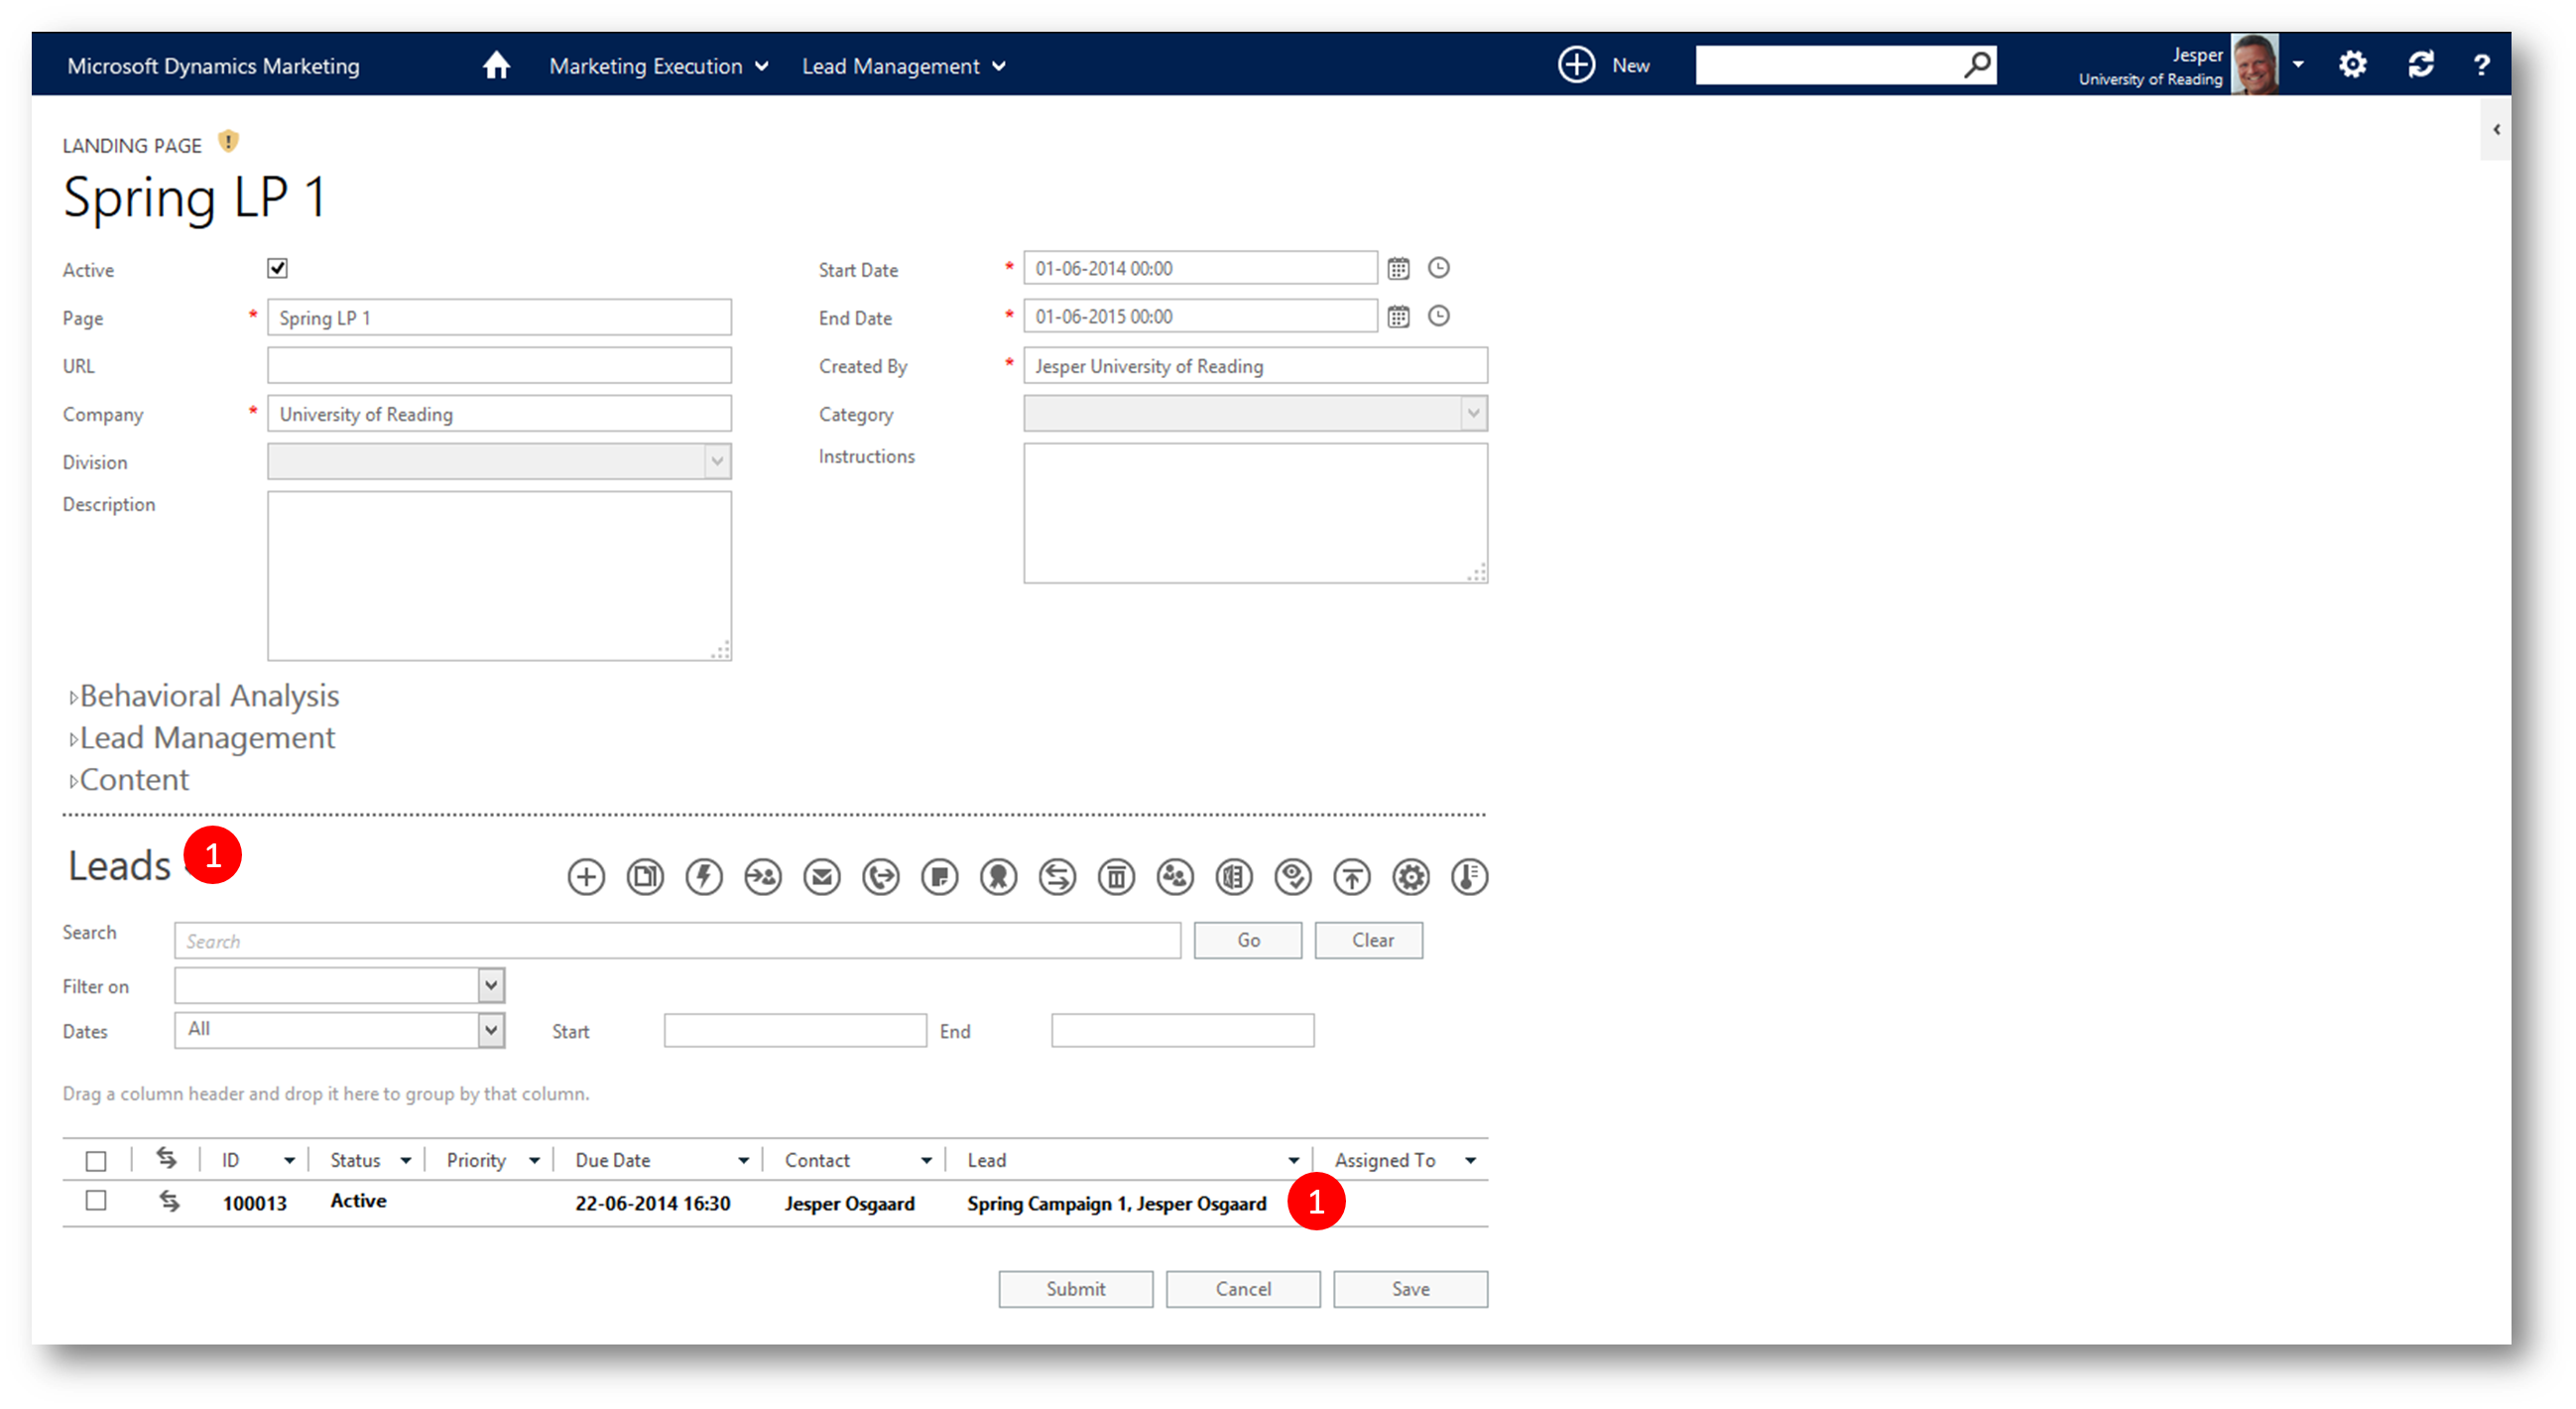
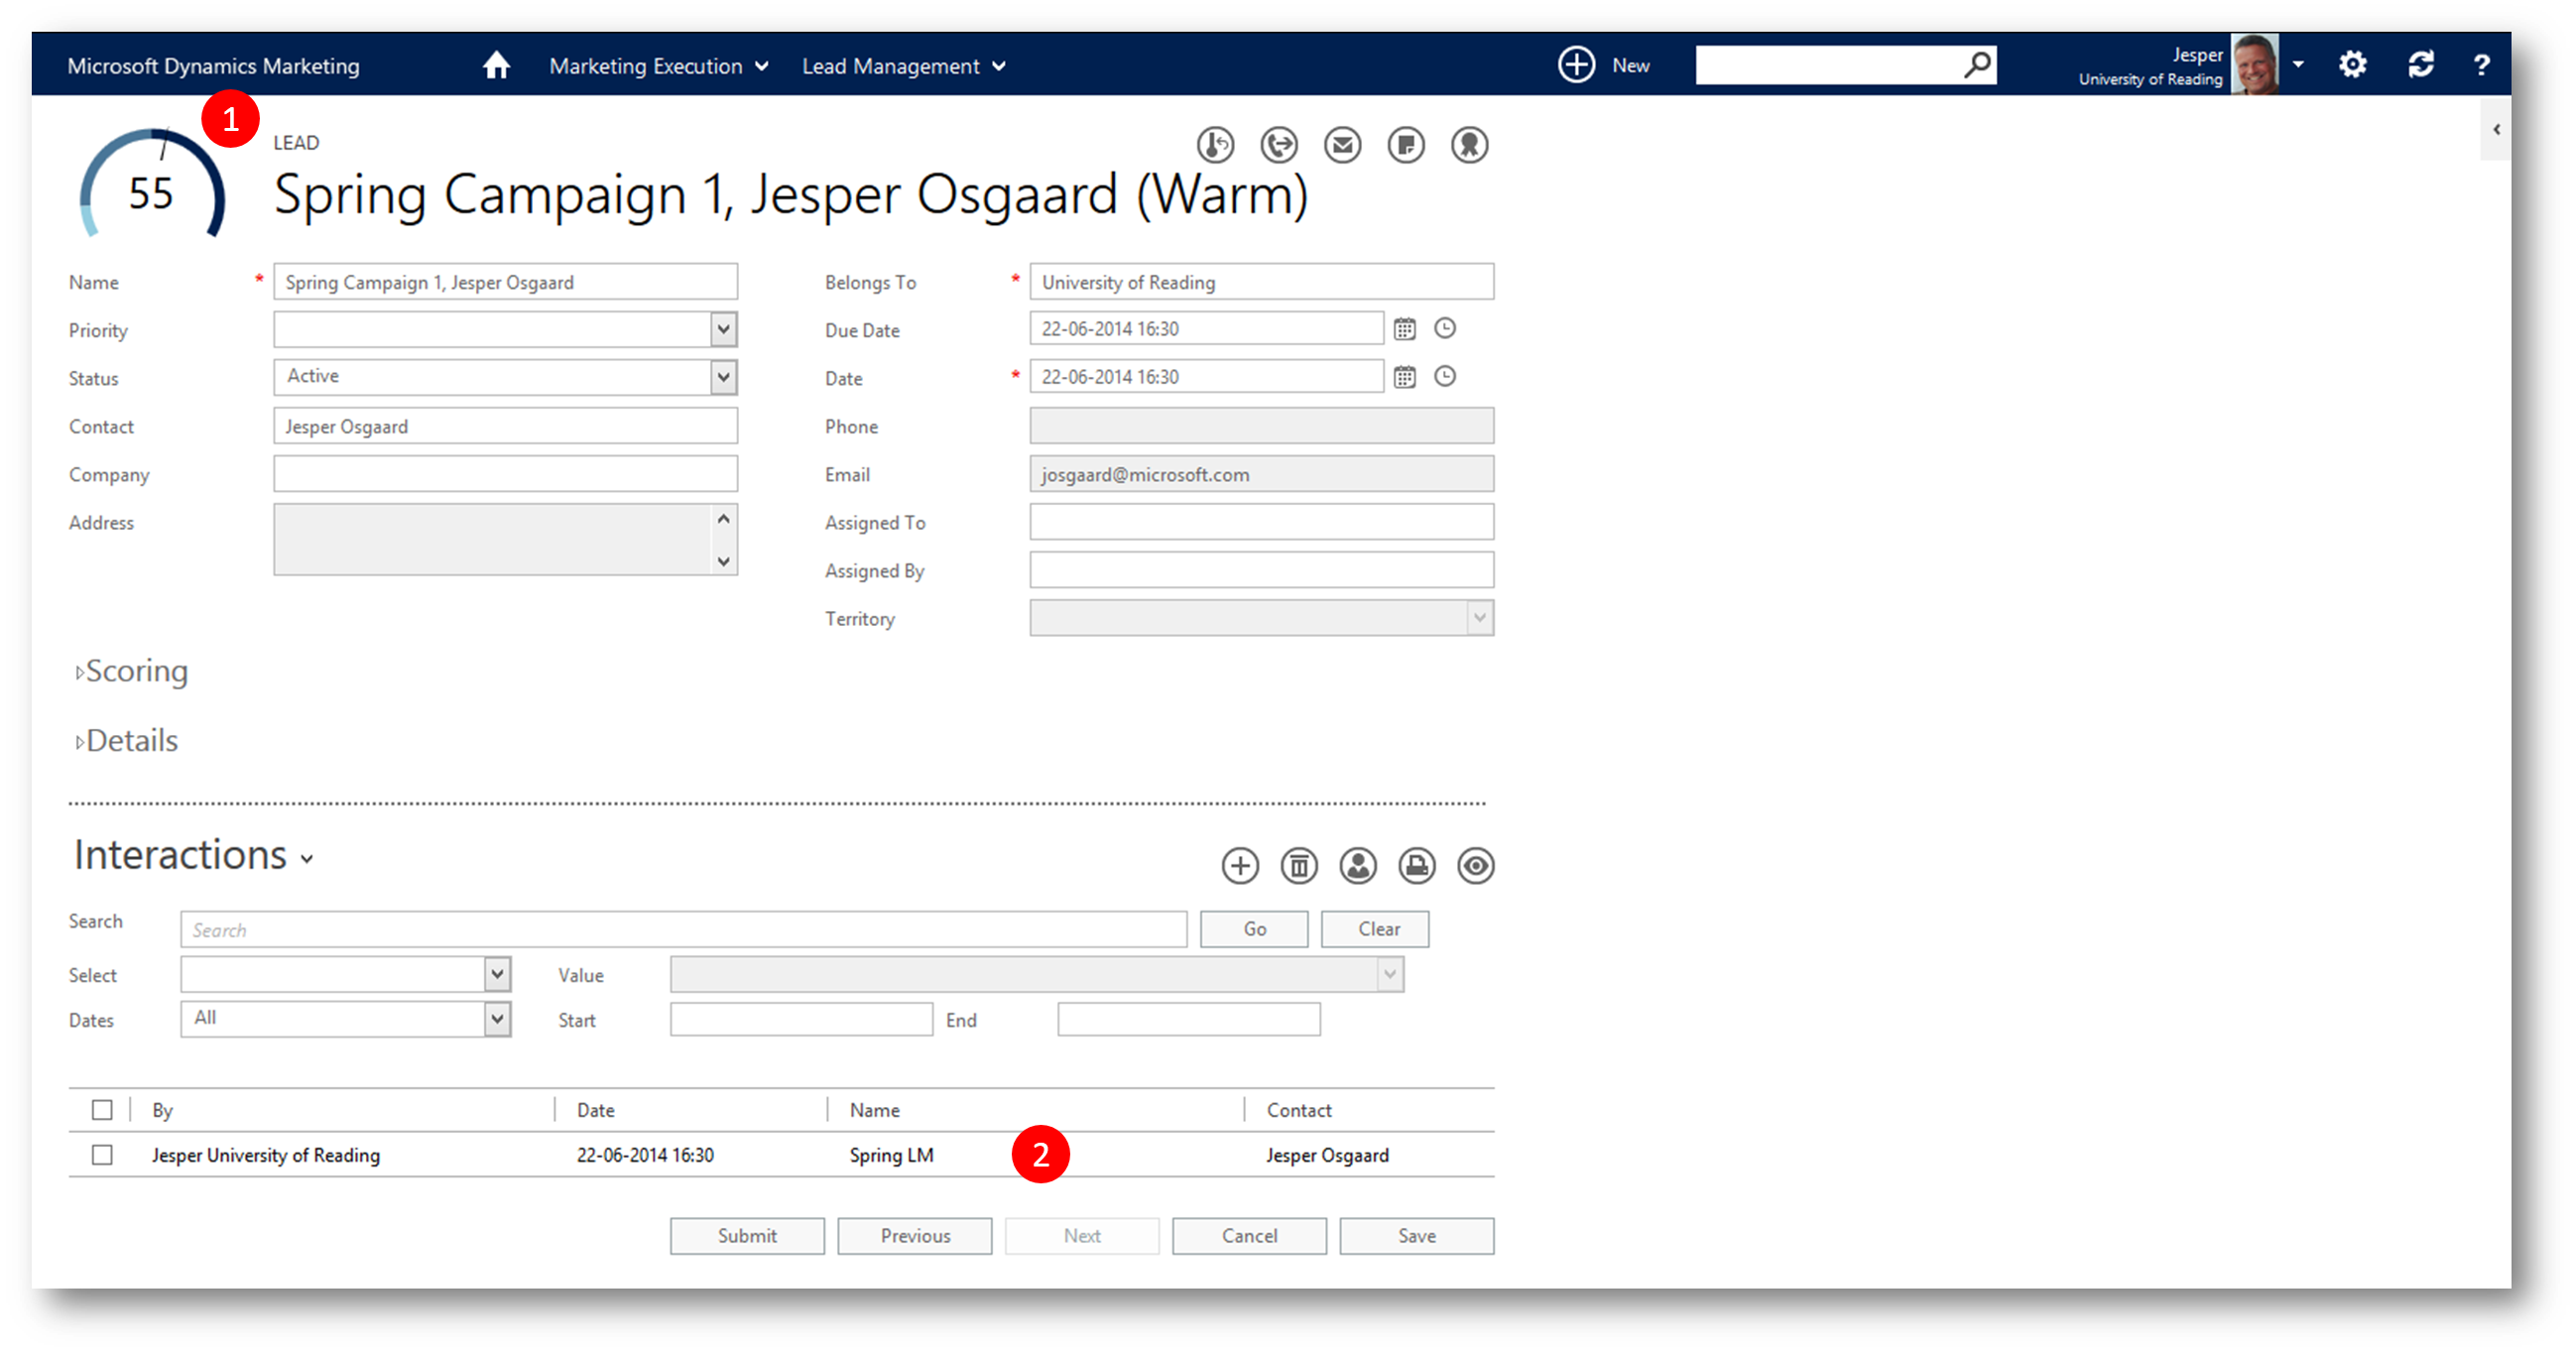
pic 36: Note the score in the upper left corner is 55 as expected (5 point from submitting via the landing page, 50 point for the last name), and note under Interactions that the Lead is related to the Lead Model
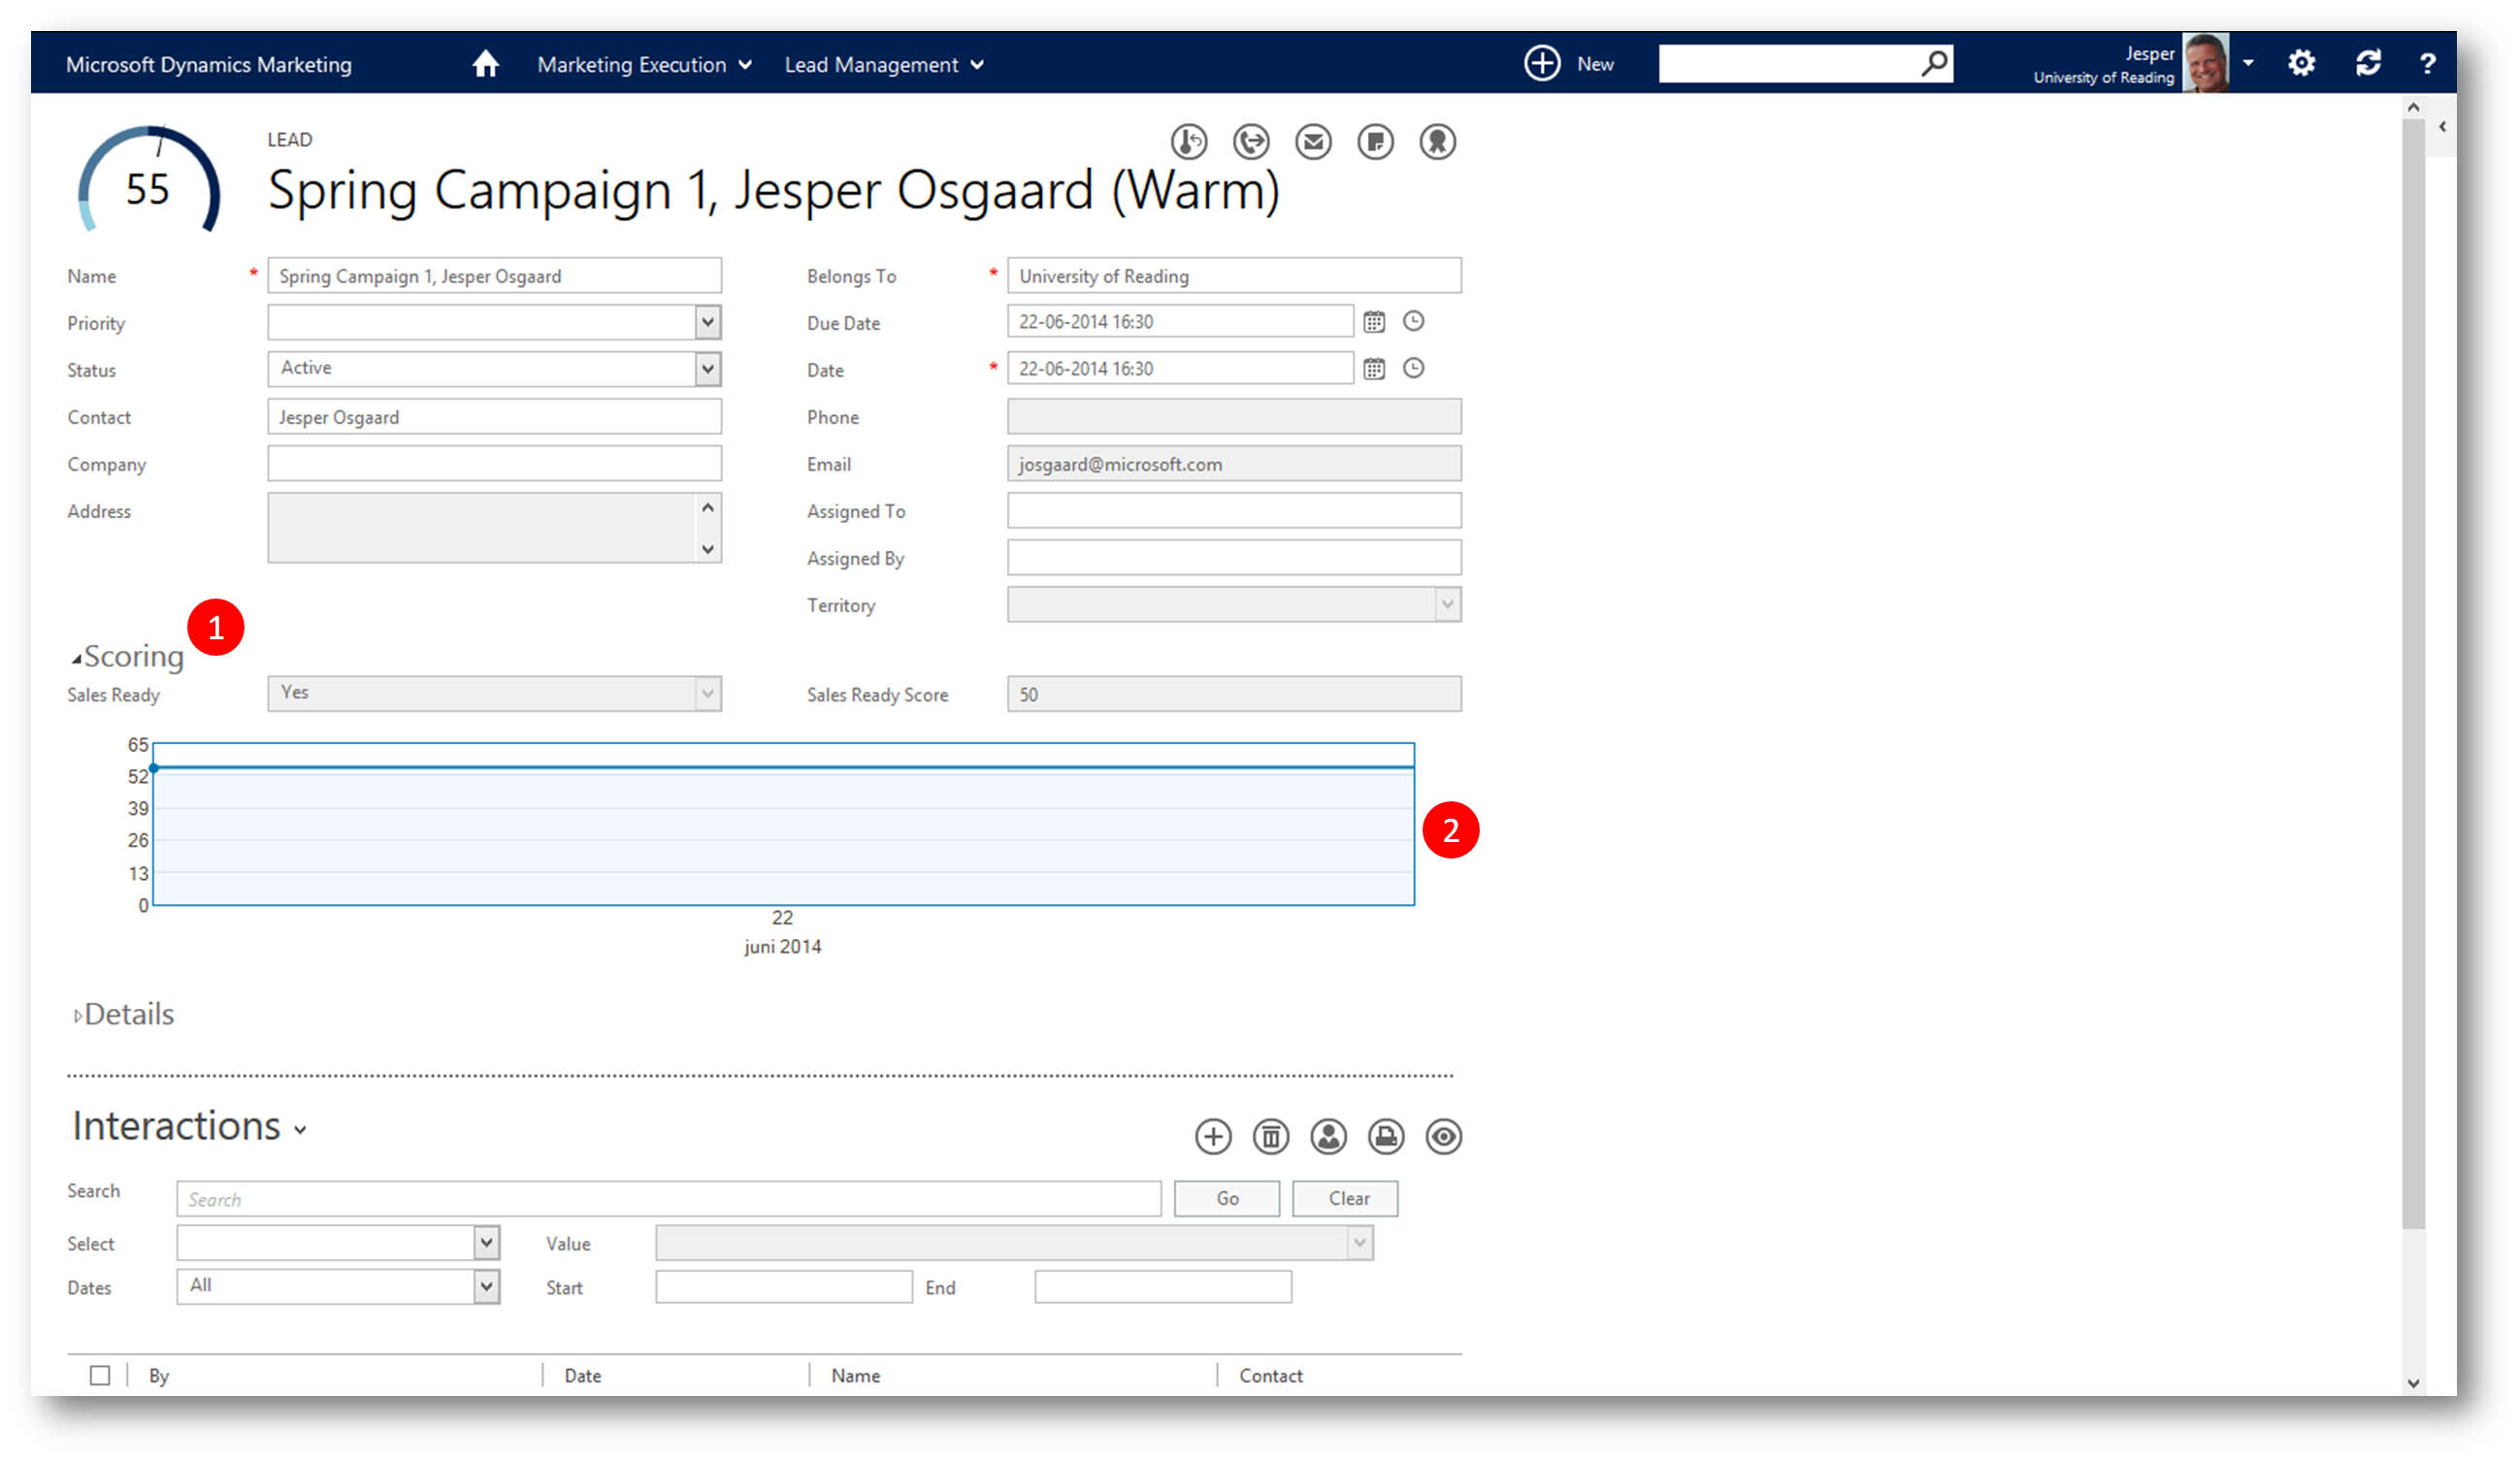
pic 37: Expand the "Scoring" section. Note the "Sales Ready" fields is set to "Yes", and note the (currently flat) timeline for the lead score (at 55 points). Since we did put a weekly devaluation rule in place, the timeline will show a lower lead score one week from creatíon (55-2=53)
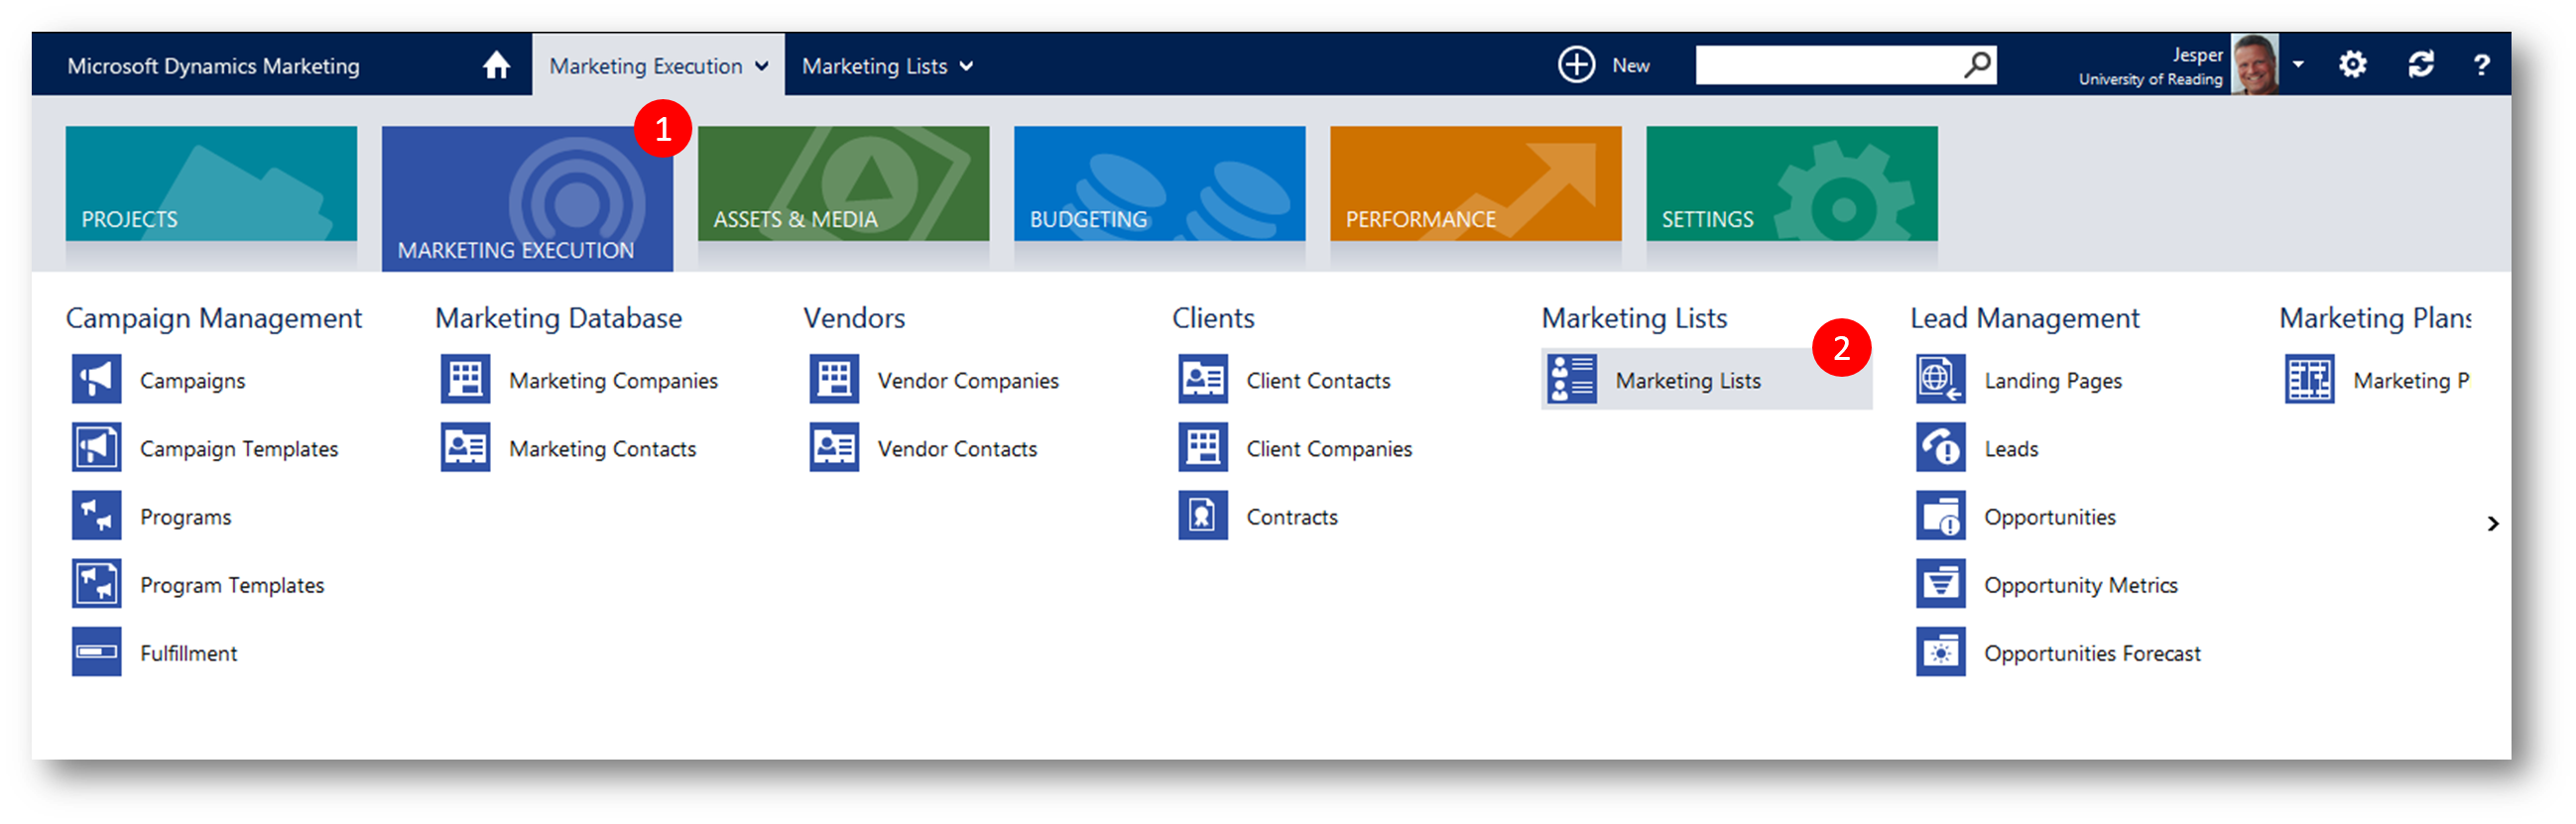
pic 38: Lastly we want to check if the "Subscribe" field did its job; that is, added the visitor to the correct Marketing List. Click Marketing Execution - scroll to "Marketing Lists" - click Marketing Lists to open the Marketing Lists grid
pic 39: Click the Marketing List you selected when setting the "Subscribe" field to open the Marketing List
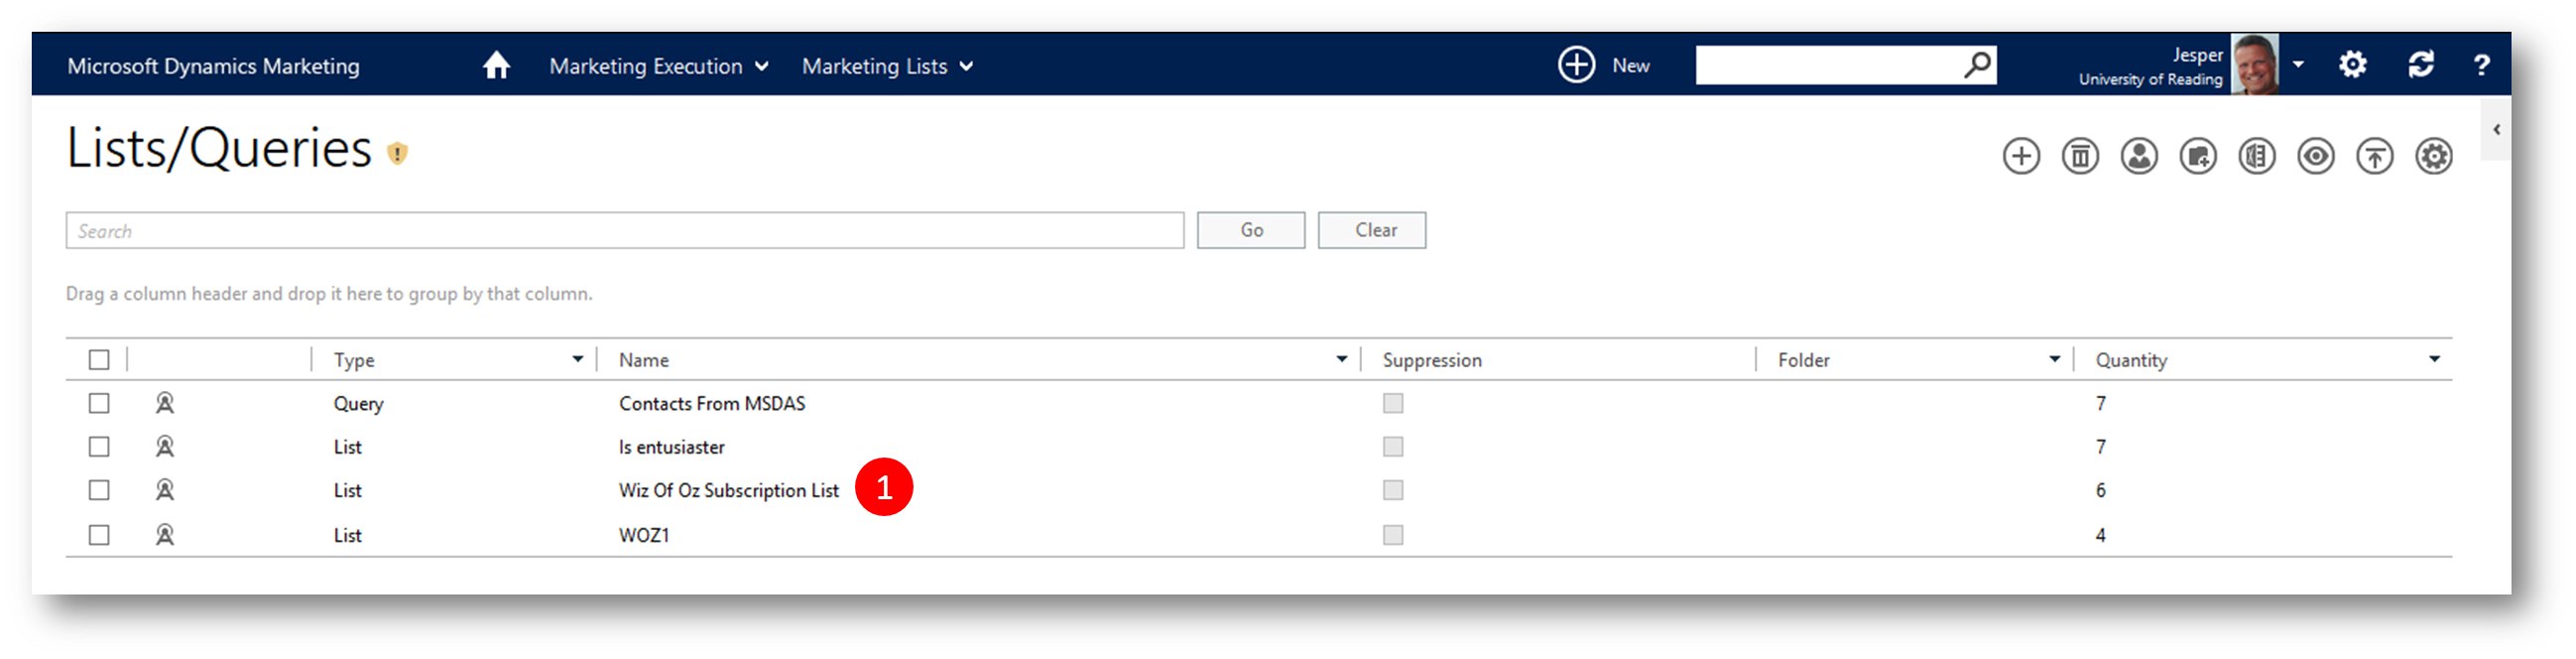
pic 40: Verify that the information the visitor submitted is added to the list of Contacts for the Marketing List

So with Landing Pages, Lead Scoring Models and Campaigns you have a perfect toolbox for generating Leads - Leads with a Lead Score, enabling you to prioritize and decide which Leads you should work with first.
Your MDM Leads can be synchronized with your Dynamics CRM (free connector) for your to work them through the Leads-to-Opportunity process there and (when done) return the Opportunity to MDM
See also
- Engage your customers - link
- Dynamics Marketing Help Center – link
- Test Drive Dynamics Marketing – link
- Introduction to Dynamics Marketing – link
- Microsoft Dynamics Marketing Spring '14 Overview - link
- Designing Email Marketing Messages in Dynamics Marketing – link
- Campaign Automation in Dynamics Marketing - link