Using PowerShell DSC to Manage Your Azure RemoteApp Hybrid Image
Now that Azure RemoteApp (https://www.remoteapp.windowsazure.com/) has been made Generally Available (see announcement here: https://blogs.technet.com/b/enterprisemobility/archive/2014/12/04/microsoft-azure-remoteapp-general-availability.aspx), there is a lot of interest not only in how to leverage it, but how to manage it. Azure RemoteApp is offered in two pricing tiers, Basic and Standard. Both tiers still support both of the deployment methods, namely Cloud and Hybrid. Since the Cloud image is managed by Microsoft (at the OS level, the patch level, and the Office software level), I want to focus on managing the Hybrid image.
Currently, the guidance for updating an Azure RemoteApp Hybrid image is to create a new template image, upload it, and link it to your RemoteApp Collection. Doing this can be an effort, especially if you haven’t upgraded your operations and aren’t using automation at some level to perform these regular and repeatable tasks for you. While a Hybrid image can be managed by standard systems (WSUS, System Center, etc) since it is joined to your domain, I wanted to see if I could combine it with one of my favorite technologies, PowerShell DSC, in a simple and effective way.
Here are the high level steps that will be covered:
- Setting up the Environment (pre-requirements for this post's content)
- Enable Azure RemoteApp on your Azure Subscription
- Create a custom template image (read entire article first)
- Link Azure RemoteApp VNET to either your on-prem network (S2S or P2S gateway) or another Azure VNET
- Connect Active Directory to Azure Active Directory (DirSync) so you can enable domain users to use the Azure RemoteApp Collection
- Configure the Pull Server
- Option 1 - A Unique .MOF for Every Server
- Generating .MOFs for the Pull Server
- The DSC Configuration
- Scheduling Execution
- Option 2 - A Shared ConfigurationID per OU / RemoteApp Collection
- Change to the Configuration
- Change to the LCM Setup
- Conclusion
- Publishing the new Application(s)
- Next Steps
Setting up the Environment
There are a few steps you’ll need to have done before being ready to try out the things in this post, namely having a working Azure RemoteApp Hybrid collection. There are a number of great instructions for getting started with Azure RemoteApp, and I’m just going to link to them instead of repeating each:
- How to create a hybrid collection for RemoteApp (https://blogs.technet.com/b/enterprisemobility/archive/2014/12/04/microsoft-azure-remoteapp-general-availability.aspx)
- How to create a custom template image for RemoteApp (https://azure.microsoft.com/en-us/documentation/articles/remoteapp-create-custom-image/)
- How to link Azure RemoteApp to an existing VNET (https://blogs.msdn.com/b/rds/archive/2014/07/21/how-to-link-azure-remoteapp-to-an-existing-vnet.aspx)
For the purpose of simple testing, I wanted my template image to have none of the applications I actually wanted to deliver through RemoteApp. As such, when I followed the guide above, I did not install or do any configuration for steps 5-7. There are a few exceptions to this and I will call them out with each of the options we discuss below for making this happen. I’d suggest reading this post all the way through before building your image so that you know which choice you are going to go with and only build your template image once.
Also, since I wanted to do all the testing within Azure itself (making my Lab portable for me while I’m on the road) I used the third article to connect my Azure RemoteApp VNET to an existing VNET in my Azure Subscription, where I already had a Domain Controller and Hybrid Identity configured. While doing Azure RemoteApp VNET to Azure VNET isn't a requirement, the Domain Controller and Hybrid Identity are and need to be configured within whatever you connect your RemoteApp VNET to.
Configure the Pull Server
The next step to configuring the environment is getting a PowerShell DSC Pull Server up and running. There are more than a few ways to do this, but the simplest is to use the xPSDesiredStateConfiguration Resource to do the heavy lifting for you. The original article announcing it can be found here (https://blogs.msdn.com/b/powershell/archive/2013/11/21/powershell-dsc-resource-for-configuring-pull-server-environment.aspx). The latest version is available standalone here (https://gallery.technet.microsoft.com/xPSDesiredStateConfiguratio-417dc71d) or as part of the latest version of the DSC Resource kit here (https://gallery.technet.microsoft.com/scriptcenter/DSC-Resource-Kit-All-c449312d).
Status Check
If all has gone well, at this point you've verified that your Pull Server is operational and you've noticed that some machines have started showing up in the Organizational Unit that you specified when you created the Azure RemoteApp Collection. Looking in the OU, you should see something similar to this:
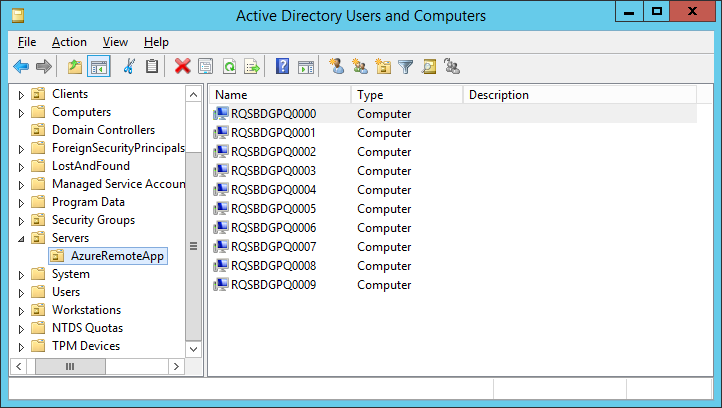
You likely won’t see as many Azure RemoteApp Virtual Machines just yet, though. I was doing some load testing and that is why I have so many. If you are just starting, you’ll likely see three VMs: 1 active (accessible), 1 standby (accessible), and maybe 1 secondary standby (non-accessible / paused).
Option 1 - A Unique .MOF for Every Server
For this first option, we will treat each machine in the OU as a unique object and generate a different .MOF for each as well as configure the LCM on each server to use a different GUID as the ConfigurationID. The only catch with this method (as a result of remotely configuring the LCM) is that during the template image creation we will have needed to run “winrm quickconfig” to ensure that remoting is possible as well as the firewall rules in place when using the Set-DscLocalConfigurationManager cmdlet.
Generating .MOFs for the Pull Server
If you’ve worked with a Pull Server already, you know there are a few more steps that need to be taken:
- Generate a .MOF file from a DSC Configuration
- Rename the .MOF to the target computers GUID and put in the Configuration folder
- Generate a Checksum for the new .MOF
And of course, we also need to configure the LocalConfigurationManager (LCM) on the target computer with the GUID it will use to get configurations as well as to point it to the Pull Server and switch it out of Push mode. To make things simple, I’m going to use the GUID from the objectGUID attribute on the computer object in Active Directory since these are all domain joined machines. If they weren’t, I’d still need a central place to store and manage them all. While a database would work for this, I’d suggest considering a CMDB as the right place. But that’s a topic for a different time.
The DSC Configuration
This PowerShell script has the DSC configuration for the Azure RemoteApp servers, the configuration to update their LCM, as well as some code to do the work for us. Here’s the entire thing and then we’ll walk through it piece by piece:
configuration AzureRemoteApp
{
param(
[string]$ComputerName
)
Node $ComputerName
{
Package 7zip
{
Name = "7-Zip 9.20 (x64 edition)"
Path = "\\dc0.dcthegeek.com\SharedData\7z920-x64.msi"
Arguments = "/qn"
LogPath = ""
ProductID = "23170F69-40C1-2702-0920-000001000000"
Ensure = "Present"
}
}
}
configuration SetPullMode
{
param(
[string]
$GUID,
[string]
$ComputerName
)
Node $ComputerName
{
LocalConfigurationManager
{
ConfigurationMode = ‘ApplyAndAutoCorrect’
ConfigurationID = $GUID
RefreshMode = ‘Pull’
DownloadManagerName = ‘WebDownloadManager’
DownloadManagerCustomData = @{
ServerUrl = ‘https://dc0.DCtheGeek.com:8080/PSDSCPullServer.svc';
AllowUnsecureConnection = ‘true’
}
}
}
}
ForEach ($computer in (Get-ADComputer -SearchBase 'OU=AzureRemoteApp,OU=Servers,DC=DCtheGeek,DC=com' -Filter '*' -Properties ObjectGUID)) {
# Create and brand MOF for use on Pull Server
AzureRemoteApp -ComputerName $computer.DNSHostName
$source = "AzureRemoteApp\" + $computer.DNSHostName + ".mof"
$target = "C:\Program Files\WindowsPowerShell\DscService\Configuration\" + $computer.ObjectGUID + ".mof"
Move-Item $source $target -Force
New-DSCChecksum $target -Force
# Validate each server is configured to use Pull Server
SetPullMode –GUID $computer.ObjectGUID -ComputerName $computer.DNSHostName
Set-DSCLocalConfigurationManager –Computer $computer.DNSHostName -Path ./SetPullMode –Verbose
}
The ‘AzureRemoteApp’ configuration is pretty straightforward. It takes advantage of the built-in Package resource, points to a share available on the Domain Controller, and installs an application. This is the heart of the configuration for the Azure RemoteApp servers. What we define here is what gets updated on each of them. Once executed, this would allow us to go into Azure and publish 7-zip as an application to our users, even though we never included this in our template image. We could use this configuration to update 7-zip to the next version once it’s published, allowing us to incrementally keep the template images updated and maintained, without needing to create new ones to do so.
The ‘SetPullMode’ configuration is also very simple. It simply configures the LCM to point to the Pull Server and tells it what ConfigurationID to use when looking for the appropriate .MOF files. As a reminder, we tied this to the objectGUID attribute of the server in Active Directory.
The ForEach loop is where the work happens. We get a list of all the computers in the OU we specified for our Azure RemoteApp Collection (as a result of doing this, I’d recommend a unique OU for each Azure RemoteApp Collection to keep things straight). We also specify that we want the objectGUID attribute returned as part of the hash table, since it isn't included by default.
The loop then calls the configuration for each machine in the OU, takes the generated .MOF and moves and renames it to match the objectGUID, and finally generates a new checksum using –Force to ensure any existing checksum will be overwritten. This is necessary in case this script is updated with new configuration, but an old checksum already exists. Remember that a Pull Client uses the checksum’s data/time stamp to determine if the configuration has changed and if it needs to be re-downloaded.
The last step in the loop is to generate the meta .MOF for the LCM, utilizing the objectGUID to provide uniqueness. Then, using Set-DscLocalConfigurationManager, it attempts to connect to each endpoint server and update the LCM. This is the reason we performed the “winrm quickconfig” when we built the template image, as it allows this to connect and to update the LCM on the target server centrally.
Scheduling Execution
The easiest thing to do would be to schedule this script to run every 30 minutes or so. This would ensure that any new Azure RemoteApp VMs coming up would get a .MOF generated for them as well as have their LCM configured with the objectGUID and the Pull server information. Of course, if a CMDB was in play, this could be streamlined a bit so that we could track if the new Azure RemoteApp server LCM had been configured, and skip that step if already done. I’m sure there are other (and probably better!) ways to do this, and I look forward to hearing such suggestions in the comments.
Option 2 - A Shared ConfigurationID per OU / RemoteApp Collection
With this option, we step away from treating each of the Azure RemoteApp servers as a unique item, simply because they aren't. We want every machine in that OU / RemoteApp Collection to have the exact same configuration, so there isn't really a technical need to treat them as more. However, there may be a non-technical (organizational rule, management, CMDB, whatever) need to treat them as unique, which is why I presented that option first with simple example code of how to glue it together.
Change to the Configuration
For this example, we’ll update our Configuration a little to make it simpler. Start by generating a GUID ( [guid]::NewGuid() ) to have a shared ConfigurationID across all of the devices in the OU / RemoteApp Collection.
configuration AzureRemoteApp
{
Node (“localhost”)
{
Package 7zip
{
Name = "7-Zip 9.20 (x64 edition)"
Path = "\\dc0.dcthegeek.com\SharedData\7z920-x64.msi"
Arguments = "/qn"
LogPath = ""
ProductID = "23170F69-40C1-2702-0920-000001000000"
Ensure = "Present"
}
}
}
AzureRemoteApp
That’s the shorter configuration for the servers. Note that all we changed is the Node name and so when we generate the .MOF (last line) we don’t need to pass any parameters this time. We DO still need to rename it to the GUID that we just generated and move it into the ‘C:\Program Files\WindowsPowerShell\DscService\Configuration’ folder (so that it will be available from the Pull Server) as well as run the New-DscCheckSum cmdlet.
Change to the LCM Setup
We’ll need to make same changes to the LCM configuration as well.
configuration SetPullMode
{
Node "localhost"
{
LocalConfigurationManager
{
ConfigurationMode = ‘ApplyAndAutoCorrect’
ConfigurationID = <YOURGUID>
RefreshMode = ‘Pull’
DownloadManagerName = ‘WebDownloadManager’
DownloadManagerCustomData = @{
ServerUrl = ‘https://dc0.DCtheGeek.com:8080/PSDSCPullServer.svc';
AllowUnsecureConnection = ‘true’
}
}
}
}
SetPullMode
Just like the Configuration, we have removed the parameters and changed this node to use localhost. Note that you’ll also inject your generated GUID into this file manually since we are now configuring them to all be the same. When SetPullMode runs, it will generate a localhost.meta.mof. You might need to manually remove any OMI_ConfigurationDocument entries if they exist, as it should only have MSFT_DSCMetaConfiguration and MSFT_KeyValuePair entries.
If the intent is to have only ONE Azure RemoteApp Collection ever, than this file could simply be placed in %SystemDrive%\Windows\System32\Configuration when you create your template image and as soon as the machine is generated in Azure, it is ready to start getting configurations from the Pull Server. However, since I expect many organizations to have different Collections with different applications, we’d need another way to deliver this. The simplest method would be to create a Group Policy for the OU and to use Group Policy Preferences and a File Item (mode Replace). This would allow us to use a single generic template image for multiple Azure RemoteApp Collections, and yet still have each group of machines pull a different configuration from the Pull Server.
Another nice thing about this option is it means I only run the core configuration and regenerate a Checksum when I actually make changes. It does a better job of separating the configuration of the machine versus the configuration of the machines LCM, and that makes it both simpler and cleaner in my book.
Conclusion
The method chosen will, of course, depend on the requirements a business has for using Azure RemoteApp and their internal rules for dealing with machines. Both have advantages as well as drawbacks. If your plan is to use a Compliance Server, I don’t believe the implications of using a shared ConfigurationID and name bodes well for reporting, but I haven’t worked much with the Compliance Server (yet).
Publishing the new Application(s)
Once you have validated that the servers are connecting to the Pull Server, getting their unique .MOF, and the DSC configuration is running correctly and installing your applications (regardless of which option you used), don’t forget to go back to the Azure website for Azure RemoteApp and publish that new application for your users!
Next Steps
The configuration for the Azure RemoveApp servers can obviously include other required configuration details beyond just packages, like specific settings for an application, files, whatever you can dream of that PowerShell DSC can do. With PowerShell 5 and the ability to use OneGet to pull packages (including from Chocolatey), there are many options and easily installed packages at our fingertips. Since OneGet can also create its own internal repository, I see this as a way for organizations to “publish” their internal applications to Azure RemoteApp, and let PowerShell DSC do the heavy lifting (updating existing machines with new configuration and bringing newly scaled machines into consistent configuration).
Personally, I’d recommend adding three things to your template image (I told you it’d be worth reading to the end before starting!) to make things simpler down the road. The first is PowerShell 5 (part of WMF). As of this posting, it is still in Preview, so consider that when working with Production images. The second is the DSC Resource Kit (https://gallery.technet.microsoft.com/scriptcenter/DSC-Resource-Kit-All-c449312d) which just released Wave 9. Having all of the DSC Resources already present, even if you aren’t going to use them yet, will make it easier when you want to. Additionally, if you do use PowerShell 5, consider adding the xOneGet Resource (https://www.powershellgallery.com/packages/xOneGet/1.0.0), too. This will allow adding or updating many packages a triviality. Here’s a quick example:
configuration AzureRemoteApp
{
Import-DSCResource -ModuleName xOneGet
Node ("localhost")
{
xOneGet InstallNotepadPlusPlus
{
PackageName = "notepadplusplus"
Ensure = "Present"
}
}
}
AzureRemoteApp
Azure RemoteApp is a great tool and has many uses cases. Using a Hybrid image extends that power to work with on-prem and LOB applications, but from the Cloud. Currently, those images need to be built and uploaded with each change to those LOB applications. But using PowerShell DSC, we can manage them without the need to customize an image each cycle, saving time, labor, and frustration. Enjoy!
Happy Holiday to everyone!
David Coulter, Sr. Consultant