Azure Stack WAP Connector - Part 1
Azure Stack WAP connector is preview now. With WAP Connector, you can enable access from the Azure Stack user portal to tenant virtual machines running on Windows Azure Pack. Tenants can use the Azure Stack portal to manage their existing IaaS virtual machines and virtual networks. These resources are made available on Windows Azure Pack through the underlying Service Provider Foundation (SPF) and Virtual Machine Manager (VMM) components. For more information about WAP connector, please refer to the link below.
https://docs.microsoft.com/en-us/azure/azure-stack/azure-stack-manage-windows-azure-pack
When we deployed WAP connector, the most challenging part is integrate the identity management systems between WAP and Azure Stack. Right now we support the following ID management scenarios.
|
Azure Stack Id Manager |
CPS/WAP Id Manager |
Notes |
|
AAD |
AD-ADFS | AD is synchronized with AAD |
| AAD through ACS | CPS using AAD instead of local | |
| 3rd Party Id Manager | Both sharing AAD | |
|
ADFS |
AD-ADFS | Both sharing same customer AD |
| AAD through ACS | Both sharing same AAD | |
| 3rd Party Id Manager | Both sharing 3rd Party solution |
If you're using ASDK, you probably would find it's more challenging coz in ASDK (one-node deployment) the whole Azure Stack is behind NAT.
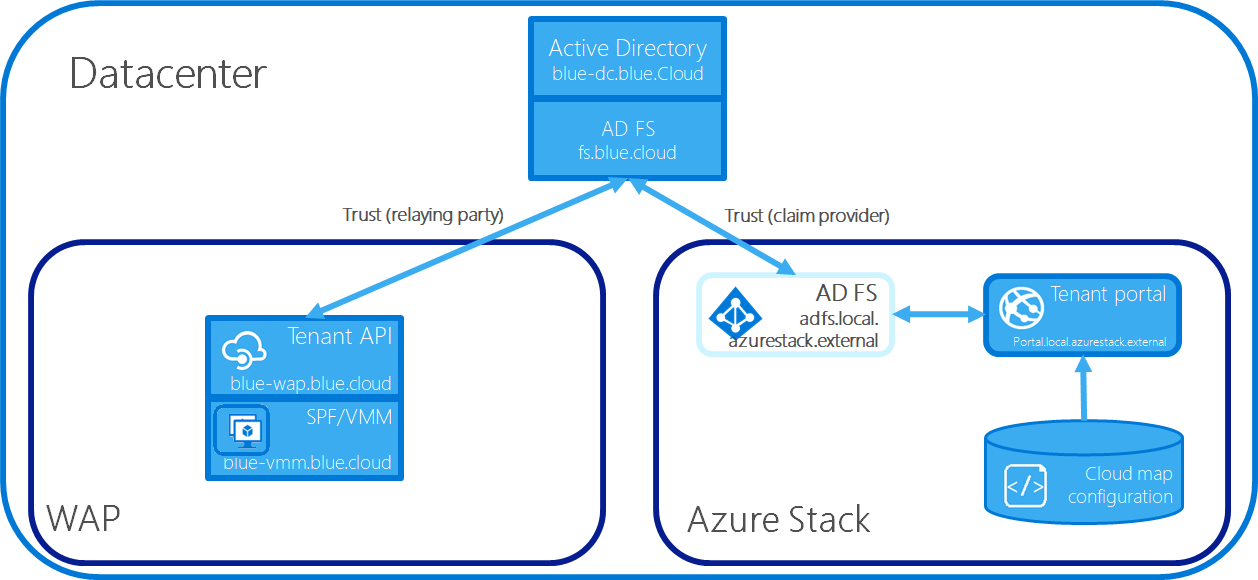
In this blog, I will demonstrate how to integrate ASDK and WAP's identity management systems. In my setup, Azure Stack uses built-in ADFS (adfs.local.azurestack.external) and WAP uses a separate ADFS (fs.blue.cloud).
Pre-requisites
- Deploy Azure Stack Development Kit (ASDK) and use ADFS type. https://docs.microsoft.com/en-us/azure/azure-stack/azure-stack-run-powershell-script#deploy-the-development-kit
- Prepare a Separate AD forest (BLUE.CLOUD in my setup).
- Deploy a WAP environment. In my setup, I put all the WAP roles on single VM (BLUE-WAP.BLUE.CLOUD). I hosted VMM and SPF are on another VM (BLUE-VMM.BLUE.CLOUD)
Prepare Certificates for *.BLUE.CLOUD
1. On BLUE-WAP.BLUE.CLOUD, run the following cmdlets to install CA.
Install-WindowsFeature -Name ADCS-Cert-Authority -IncludeAllSubFeature -IncludeManagementTools
2. Open Server Manager and following the wizard to configure the CA as standalone CA.
3. Create certificate request configuration file called "Bluecloud-Cert.inf".
 [Version]
Signature="$Windows NT$"

[NewRequest]
Subject = "CN=*.blue.cloud"   ; For a wildcard use "CN=*.CONTOSO.COM" for example
; For an empty subject use the following line instead or remove the Subject line entierely
; Subject =
Exportable = TRUE                  ; Private key is not exportable
KeyLength = 2048                    ; Common key sizes: 512, 1024, 2048, 4096, 8192, 16384
KeySpec = 1                         ; AT_KEYEXCHANGE
KeyUsage = 0xA0                     ; Digital Signature, Key Encipherment
MachineKeySet = True                ; The key belongs to the cph01 computer account
ProviderName = "Microsoft RSA SChannel Cryptographic Provider"
ProviderType = 12
SMIME = FALSE
RequestType = CMC

; At least certreq.exe shipping with Windows Vista/Server 2008 is required to interpret the [Strings] and [Extensions] sections below

[Strings]
szOID_SUBJECT_ALT_NAME2 = "2.5.29.17"
szOID_ENHANCED_KEY_USAGE = "2.5.29.37"
szOID_PKIX_KP_SERVER_AUTH = "1.3.6.1.5.5.7.3.1"
szOID_PKIX_KP_CLIENT_AUTH = "1.3.6.1.5.5.7.3.2"

[Extensions]
%szOID_SUBJECT_ALT_NAME2% = "{text}"
_continue_ = "dns=*.blue.cloud&"
_continue_ = "dns=enterpriseregistration.blue.cloud&"
_continue_ = "dns=fs.blue.cloud&"
_continue_ = "dns=certauth.fs.blue.cloud&"
%szOID_ENHANCED_KEY_USAGE% = "{text}%szOID_PKIX_KP_SERVER_AUTH%,%szOID_PKIX_KP_CLIENT_AUTH%"

[RequestAttributes]
4. Run the following cmdlets and submit a certificate request.
 cmd.exe /c "certreq -new Bluecloud-Cert.inf Bluecloud-Cert.req"
cmd.exe /c "certreq -submit Bluecloud-Cert.req"
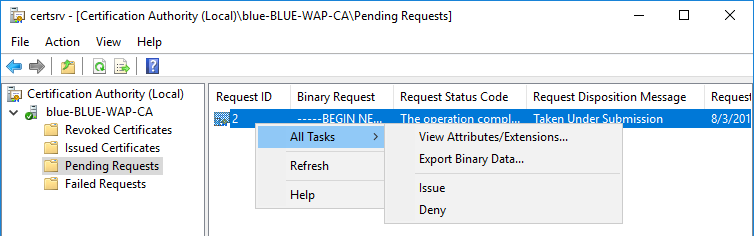
5. Open CA management console and issue the certificate and then copy it to the file "C:\Bluecloud-Cert.cer"
6. Run the following cmdlets and import the certificate to the local machine.
cmd.exe /c "certreq -accept Bluecloud-Cert.cer"
7. Export certificates.
 $cert = get-Childitem cert:\localmachine\my | where-object {$_.Subject -eq "CN=*.blue.cloud"}
$PfxPass = ConvertTo-SecureString "123" -AsPlainText -Force
Export-pfxCertificate -Cert $cert -FilePath c:\Bluecloud-Cert.pfx -Password $PfxPass
$CAcert = Get-Childitem cert:\localmachine\root | where-object {$_.Subject -eq "CN=blue-BLUE-WAP-CA"}
Export-Certificate -Cert $CAcert -FilePath c:\Bluecloud-CACert.cer
8. Configure all the Web Sites on BLUE-WAP to use the new certificate.
 Import-Module WebAdministration
$sslBindings = Get-childItem IIS:\SslBindings\
$sslBindings | foreach-Object{$path = "IIS:\SslBindings\" + $_.IPAddress.IPAddressToString + "!" + $_.port; Remove-Item $path; $cert | new-item $path}
Install ADFS in Domain "BLUE.CLOUD"
1. On the domain controller "BLUE-DC.BLUE.CLOUD", copy the above "bluecloud-cert.pfx" and "bluecloud-CAcert.cer" to the folder "C:\". Then run the following cmdlets to install and configure ADFS.
 Install-WindowsFeature -Name ADFS-Federation -IncludeAllSubFeature -IncludeManagementTools

# Set these values:
$domainName = 'blue.cloud'
$adfsPrefix = 'fs'
$username = 'administrator'
$password = 'User@123'
$dnsName = ($adfsPrefix + "." + $domainName)
$PfxPass = ConvertTo-SecureString "123" -AsPlainText -Force
$securePassword = ConvertTo-SecureString -String $password -Force -AsPlainText
$adfsServiceCredential = New-Object -TypeName System.Management.Automation.PSCredential -ArgumentList ($domainname + '\' + $username), $securePassword

Import-Certificate -FilePath C:\Bluecloud-CACert.cer -CertStoreLocation cert:\localmachine\root
$cert = Import-pfxCertificate -FilePath C:\Bluecloud-Cert.pfx -CertStoreLocation cert:\localmachine\my -Exportable -Password $PfxPass

# Configure AD FS
Install-AdfsFarm `
    -CertificateThumbprint $cert.Thumbprint `
    -FederationServiceName $dnsName `
    -ServiceAccountCredential $adfsServiceCredential `
    -OverwriteConfiguration

Set-ADFSProperties -IgnoreTokenBinding $True
Set-ADFSWebConfig –HRDCookieEnabled $false
cmd.exe /c "setspn -U -S http/fs.blue.cloud administrator"
cmd.exe /c "setspn -U -S http/blue-dc.blue.cloud administrator"
Configure the Name Resolution between Azure Stack and WAP
- On ASDK Host Machine, open DNS management console and connect to AzS-DC01.AZURESTACK.LOCAL.
- Add a conditional forwarding and forward the query for domain "BLUE.LCOUD" to IP address of the DNS server "BLUE-DC.BLUE.CLOUD".
- On BLUE-DC.BLUE.CLOUD, open DNS management console and add a new DNS zone called "LOCAL.AZURESTACK.EXTERNAL".
- Add an HOST record (A record) under that new created DNS zone "ADFS.LOCAL.AZURESTACK.EXTERNAL" and point to the external IP of AzS-BGPNAT01.
Configure the Trust between WAP Tenant Portal, Azure Stack's ADFS and BLUE.CLOUD's ADFS
1. On ASDK Host machine, create a text file "C:\Rules.txt". Copy and paste the following content to that file.
 @RuleTemplate = "LdapClaims"
@RuleName = "LDAP UPN"
c:[Type == "https://schemas.microsoft.com/ws/2008/06/identity/claims/windowsaccountname", Issuer == "AD AUTHORITY"]
 => issue(store = "Active Directory", types = ("https://schemas.xmlsoap.org/ws/2005/05/identity/claims/upn"), query = ";userPrincipalName;{0}", param = c.Value);

@RuleTemplate = "LdapClaims"
@RuleName = "LDAP Groups"
c:[Type == "https://schemas.microsoft.com/ws/2008/06/identity/claims/windowsaccountname", Issuer == "AD AUTHORITY"]
 => issue(store = "Active Directory", types = ("https://schemas.xmlsoap.org/claims/Group"), query = ";tokenGroups(domainQualifiedName);{0}", param = c.Value);

@RuleTemplate = "PassThroughClaims"
@RuleName = "Passthru UPN"
c:[Type == "https://schemas.xmlsoap.org/ws/2005/05/identity/claims/upn"]
 => issue(claim = c);

@RuleTemplate = "PassThroughClaims"
@RuleName = "Passthru Groups"
c:[Type == "https://schemas.xmlsoap.org/claims/Group"]
 => issue(claim = c);
3. Copy Bluecloud-CACert.cer to the ASDK Host machine's C drive.
4. Open GPMC.MSC and edit default domain policy. Import Bluecloud-CACert.cer to the Root CA store in that GPO.
5. On ASDK Host machine, run the following cmdlets.
 #Save Azure Stack's ADFS Metadata
invoke-webrequest https://adfs.local.azurestack.external/FederationMetadata/2007-06/FederationMetadata.xml -OutFile "C:\FederationMetadata-AzureStack.xml"
#Save Azure Stack's CA Certificate
Copy-Item \\su1fileserver\SU1_Infrastructure_1\AzureStackCertStore\Internal\Current\RootCert\AzureStackCertificationAuthority.cer C:\

#Publish ADFS's HTTPS port
Enter-PSSession AzS-BGPNAT01.azurestack.local
$externalNic = Get-NetIPConfiguration | ? { [string]$_.IPv4Address -ne "192.168.200.1" }
$externalNicName = $externalNic.InterfaceAlias
$externalIP = $externalNic.IPv4Address.IPAddress + "/" + $externalNic.IPv4Address.PrefixLength
Add-NetNatExternalAddress -NatName BGPNAT -IPAddress $externalNic.IPv4Address.IPAddress -PortStart 443 -PortEnd 443
Add-NetNatStaticMapping -ExternalIPAddress $externalIP -ExternalPort 443 -InternalIPAddress "192.168.102.5" -InternalPort 443 -NatName BGPNAT -Protocol TCP

#Copy Rules.txt to AzS-ADFS01
Copy-Item C:\Rules.txt \\AzS-ADFS01.azurestack.local\C$
#Create trust between BLUE.CLOUD ADFS and Azure Stack ADFS
Enter-PSSession AzS-ADFS01.azurestack.local
Set-ADFSWebConfig –HRDCookieEnabled $false
Set-ADFSProperties -IgnoreTokenBinding $True
$policy = Get-AdfsAccessControlPolicy -Name "Permit everyone"
Add-ADFSRelyingPartyTrust -Name "Blue Cloud" `
    -MetadataUrl https://fs.blue.cloud/federationmetadata/2007-06/federationmetadata.xml `
    -AutoUpdateEnabled:$true  `
    -MonitoringEnabled:$true `
    -IssuanceTransformRulesFile "C:\rules.txt" `
    -AccessControlPolicyName $policy.name `
    -ClaimsProviderName @("Active Directory") `
    -EnableJWT $true
6. On BLUE-DC.BLUE.CLOUD, copy "AzureStackCertificationAuthority.cer" and "Rules.txt" to C drive.
7. Run the cmdlets below to configure the ADFS.
 $policy = Get-AdfsAccessControlPolicy -Name "Permit everyone"
Add-AdfsRelyingPartyTrust -Name "WAP Tenant Portal" `
    -MetadataUrl "https://blue-wap.blue.cloud:30081/FederationMetadata/2007-06/FederationMetadata.xml" `
    -EnableJWT:$true `
    -AutoUpdateEnabled:$true `
    -IssuanceTransformRulesFile "C:\rules.txt" `
    -ClaimsProviderName @() `
    -AccessControlPolicyName $policy.name
Add-AdfsClaimsProviderTrust -Name "Azure Stack" `
    -MetadataFile "C:\FederationMetadata-AzureStack.xml" `
    -AutoUpdateEnabled:$false `
    -AcceptanceTransformRulesFile "C:\rules.txt"
Set-AdfsRelyingPartyTrust -TargetName "WAP Tenant Portal" -ClaimsProviderName @()
8. On BLUE-WAP.BLUE.CLOUD, copy "AzureStackCertificationAuthority.cer" to C drive. Then run the following cmdlets.
 Import-Certificate -FilePath C:\AzureStackCertificationAuthority.cer -CertStoreLocation cert:\localmachine\root

$fqdn = 'fs.blue.cloud'
$dbServer = 'blue-wap.blue.cloud'
$dbpassword= 'User@123'
$portalConfigStoreConnectionString = [string]::Format('Data Source={0};Initial Catalog=Microsoft.MgmtSvc.PortalConfigStore;User ID=sa;Password={1}', $dbServer, $dbPassword)

# Configure Tenant to use ADFS
Set-MgmtSvcRelyingPartySettings -Target Tenant `
    -MetadataEndpoint https://$fqdn/FederationMetadata/2007-06/FederationMetadata.xml `
    -DisableCertificateValidation `
    -ConnectionString $portalConfigStoreConnectionString
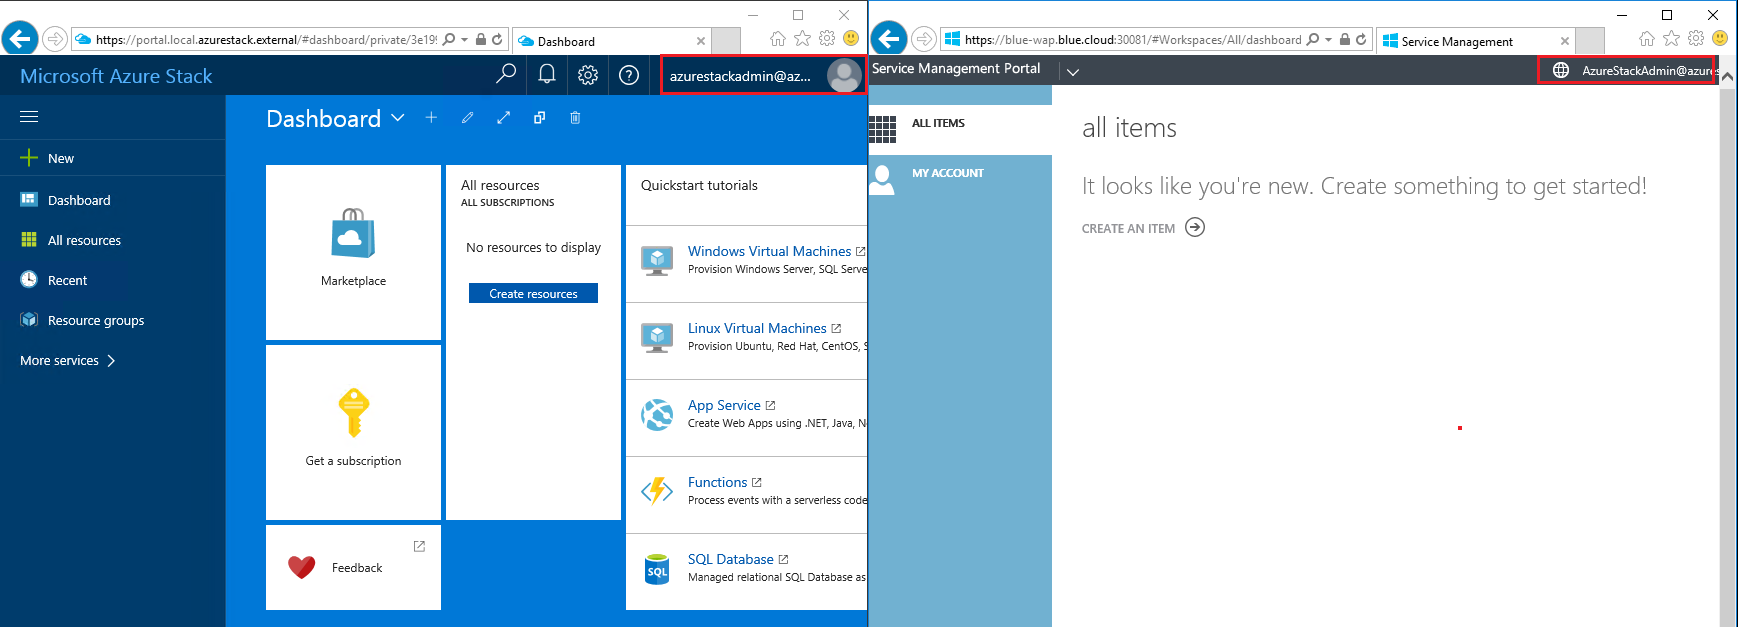
Verify the user AzureStackAdmin@AzureStack.local can login both Azure Stack and WAP
On ASDK Host machine, user the account "AzureStackAdmin@AzureStack.local" to login Azure Stack Tenant portal "https://portal.local.azurestack.external" and WAP tenant portal "https://blue-wap.blue.cloud:30081".
In the next blog, we will deploy WAP connector.